 View PDF


Migrate Citrix Application Streaming to App-V 5.0
Aug 14, 2017
Citrix XenApp and XenDesktop now use Microsoft App-V 5.0 as the preferred technology to stream applications to user devices. An application profiled using Citrix Application Streaming will most likely be a good candidate for App-V 5.0. Although applications must be re-sequenced using App-V 5.0, it can be done through AppDNA automation.
This topic guides you through the process to ensure you are using AppDNA to its fullest potential. It provides the steps required to build the AppDNA software environment and links to additional documentation that helps you to prepare your environment and ensure a successful migration of your applications.
When your migration is completed, you can continue to use AppDNA in your everyday business-as-usual processes to determine the best fit platform for new applications coming into your environment. This includes determining if an application is a good candidate for streaming and hosting, compatibility against the XenDesktop or XenApp supported operating systems, legacy operating systems, interoperability between applications, and utilizing Forward Path to model your business decisions and automate processes.
Get started
To start making decisions about which applications to import into the AppDNA software and migrate to App-V 5.0, perform each of the following steps.
| Step 1
Discover your applications |
To prevent unexpected delays in the migration plan, you must discover which applications are being used in your environment. Use the integration features within AppDNA to discover applications being used in your environment (Lakeside Software SysTrack) and to import your managed applications using the installation media that has been used to deploy them through Active Directory (AD) or Microsoft System Center Configuration Manager (Configuration Manager) integration. |
| Step 2
Perform inventory and rationalization |
To perform an inventory and rationalization of the Windows applications used in your enterprise, use tools such as Lakeside SysTrack. It’s important to monitor the environment over a 6 week to 2 month period at quarter and/or year end. This will not only identify any unmanaged applications which could be critical to business, but also tells you what applications are still being used, and whether you have duplicate applications with overlapping functions. |
| Step 3
Prepare your AppDNA environment |
Setup and configure the AppDNA environment as outlined in the next section of this topic. This includes setting up the AppDNA and configuring it for use with the AppDNA Forward Path feature and AppDNA Execution Profile scripts used for the suggested solution. The AppDNA Forward Path feature is a powerful business decision engine that is built into AppDNA and makes it possible to model different deployment scenarios and compare their impacts. |
| Step 4
Locate source media |
You can directly import MSI and App-V (SFT, APPV) files. Non-MSI files require the AppDNA Install Capture feature, which uses a virtual machine to capture the application into an MSI. The AppDNA Self-Provisioning tool can also be used to capture non-MSI files. Self-Provisioning allows the capture process to be driven by an application expert who does not have access to AppDNA. The AppDNA administrator prepares and publishes control information that enables the application expert to perform the installation. The capture takes place on a separate machine (virtual, physical, or VDI) from AppDNA. |
| Step 5
Import AD and/or Configuration Manager data |
To import your managed applications using the installation media that has been used to deploy them through Active Directory (AD) and System Center Configuration Manager (Configuration Manager), first load your AD and Configuration Manager data into AppDNA using the Load AD and ConfigMgr Data wizard. Decide whether to load the data directly or indirectly. You have the option to load AD and Configuration Manager data indirectly which enables the data to be extracted on the AD domain controller or Configuration Manager server separately from AppDNA. As a result, AppDNA users do not need to request administrator access to the AD and Configuration Manager data, plus the AD domain and Configuration Manager administrators do not need to install AppDNA. Note: For best results, import both AD and Configuration Manager data. Typically AD provides rich data about organizational structure and Configuration Manager provides data about applications that are managed centrally. |
| Step 6
Use the AppDNA reports |
Reports for migration of Application Streaming to App-V 5.0, later in this topic, guides you through the reports that you’ll need to help you make decisions. It also covers the Forward Path scripts, which simplify decision making by modeling your business needs, providing solutions, and enabling you to automate the desired output for compatible applications, such as App-V 5.0 sequences and MSIs. |
| Step 7
Manage ongoing application evolution |
As new applications enter the environment and as new service packs, patches and upgrades impact the environment, use AppDNA to manage and model the changes that affect applications and end users. |
AppDNA setup and configuration
Follow these steps to set up and configure AppDNA for the migration of application streaming to App-V 5.0.
| Step 1
Create groups to organize applications by priority |
Create AppDNA groups to organize the applications accordingly. This can be by priority or business unit. Once your group is created and applications are imported and analyzed, you can use the group to determine priority within the group based on the complexity of the problems encountered. |
| Step 2
Request access to AppDNA scripts |
Citrix has a library of non-supported Forward Path and Execution Profile scripts that are available for download. The scripts are customized to model business decisions around applications and to automate processes (such as Microsoft App-V 5.0 application sequences and MSIs). This solution uses an execution profile script that ships with AppDNA as well as the following scripts which are available for download:
To access the scripts, set up a Podio account and send an email to appdnafeedback@citrix.com requesting access to the AppDNA Extensions Podio site. |
| Step 3
Create a VM for Install Capture (non-MSIs) and Forward Path automation |
Create a Virtual Machine on supported technology to use with Install Capture and Forward Path. The VM should use the same operating system that the applications run on. Install Capture is used as part of the import process to install and capture non-MSI applications before importing the application DNA into the AppDNA database. Forward Path is used to determine outcomes for applications and automate processes, such as to convert Microsoft App-V 4.6 sequences to Microsoft App-V 5.0 or create Microsoft App-V 5.0 sequences using MSI/EXE source media. The virtual machine should use the operating system that you are moving to. |
| Step 4
Configure a VM for capturing non-MSIs and Forward Path Automation |
Review the general overview of the AppDNA Install Capture setup requirements. At the end of that overview are links to each of the following virtualization technologies. The details for configuring your VM vary depending on the underlying virtualization technology:
The virtualization technology topics include instructions for creating a shared output folder. Additional folder configuration is required when using the Microsoft App-V 4.6 to Microsoft App-V 5.0 Execution Profile:
|
| Step 5
Install Required Software on Virtual Machine |
Install the software on the virtual machine that will be used to automate converting Microsoft App-V 4.6 sequences to Microsoft App-V 5.0 and to create Microsoft App-V 5.0 sequences.
|
| Step 6
Import Microsoft App-V 5.0 Sequencer Execution Profile into AppDNA |
To import the App-V 5.0 Sequencer execution profile script into AppDNA: Note: App-V 5.0 Sequencer.xml is installed by default to C:\Program Files\Citrix\AppDNA\Client\Execution Profiles or C:\Program Files (x86)\Citrix\AppDNA\Client\Execution Profiles.
|
| Step 7
Download Forward Path Scripts and Execution Profiles |
From the AppDNA Extensions Podio site:
|
| Step 8
Import Forward Path Script into AppDNA |
To import the downloaded Microsoft App-V 5.0 Decision forward path script into AppDNA:
|
| Step 9
Configure the Microsoft App-V 5.0 Decision Forward Path Script |
This forward path script checks the compatibility of applications against Microsoft App-V and Windows 7 x64. There are 8 task scripts assigned to the Forward Path script taking into account options to automate the creation/conversion of App-V sequences on both Windows 7 x64 and x32. To configure the scripts to match your AppDNA environment:
|
| Step 10
Configure Task Scripts |
The forward path script you downloaded and imported has eight task scripts assigned to it to enable you to automate the creation of Microsoft App-V 5.0 sequences. The task scripts need to be configured to reference your AppDNA virtual machine name and the execution profile that should be used to automate the process. To configure a Forward Path Task Script:
|
Reports for migration of Application Streaming to App-V 5.0
The following table lists the reports required for the migration of Application Streaming to App-V 5.0. These reports will provide the data you need to help with decision making.
To access the reports, click Reports: Applications in the side bar.
| Reports | Description |
|---|---|
Forward Path |
Reflects scenarios based on organizational decisions and used to run automation task scripts based on the results. Potential outcomes for the Forward Path script include deploy on Windows 7 x64 as App-V Package and retire/replace or find alternative platform. The Forward Path report is used to reflect organizational decisions and run task scripts based on the results. The Forward Path report configured for this solution:
To access the Forward Path report click Reports: Applications > Forward Path. Click the Change Scenario button and then click the drop-down list to select the Microsoft App-V 5.0 Decision report. Note: You can further customize the Forward Path script to tailor it to your environment and business decisions. |
Overview Summary |
Provides a high-level dashboard view of the state of your application portfolio across all active reports. For each of the selected applications, it shows the overall RAG (red, amber, green) status for each of the active reports. On the rows that relate to an application, you can click the RAG icons to access the Remediation report views for that application. These provide the remediation details required for the application to work using the selected platform. |
Microsoft App-V 5.0 |
Tests desktop applications for suitability with Microsoft Application Virtualization (App-V) 4.5, 4.6 SP1, or 5.0. |
Microsoft Windows 8/7 |
Determines compatibility of the application on the target OS by going directly to the specific OS report. Drill down to the specific issues, download automated fixes, and get more information on how the application can be remediated. |
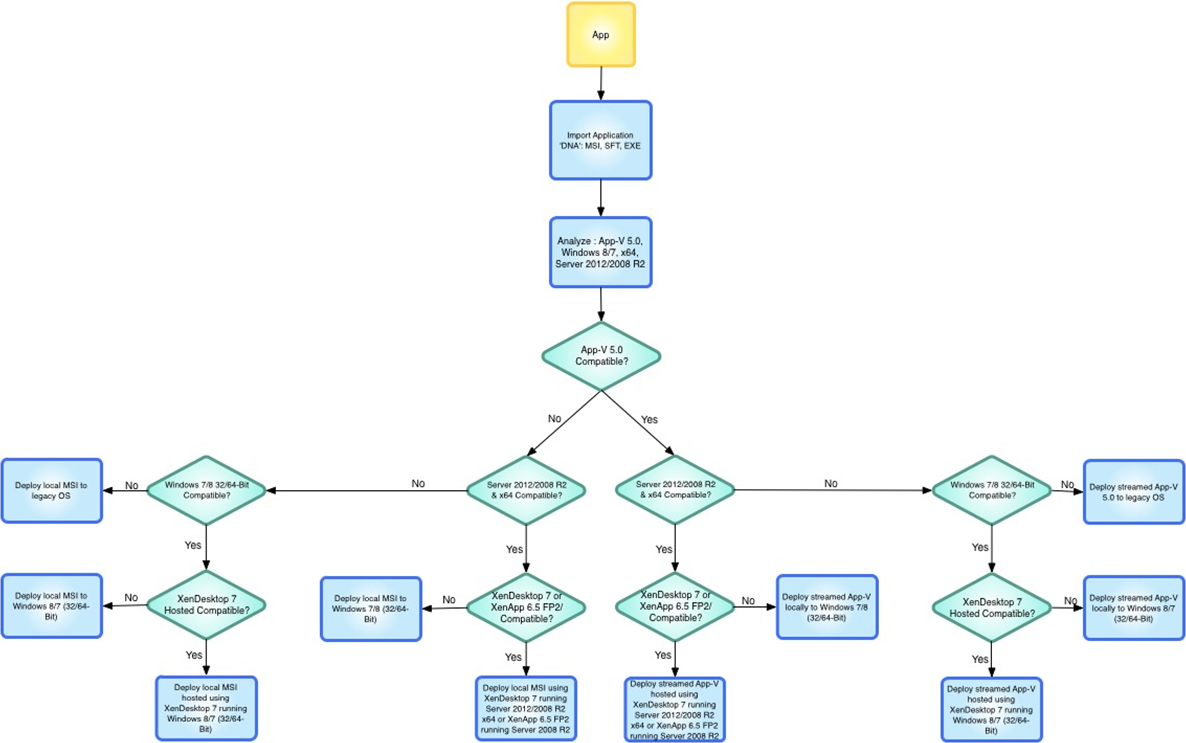
Application Streaming to App-V 5.0 migration steps
This section details the recommended process for migrating Application Streaming applications to Microsoft App-V 5.0, including the stages involved in assessing the application for compatibility against App-V 5.0 and Windows 8/7, 64-bit. It also covers how to automate the creation of App-V 5.0 sequences using AppDNA forward path scripts.
The flowchart shows you the decisions that AppDNA makes in the background and guides your decision-making process.
| Step 1
Import application DNA |
For applications in an MSI format, select Import & Analyze > Applications > Direct Import. For application in a Non-MSI format, select Import & Analyze > Applications > Install Capture. |
| Step 2
Analyze the application |
Analyze the application against Microsoft Windows 8/7 and App-V. Include Server 2012/2008 R2 if the application will be hosted on a Microsoft server platform. |
| Step 3
Run Forward Path script |
Run the forward path script Microsoft App-V 5.0 to check the compatibility of applications against Microsoft Windows 8/7 and App-V 5.0 and to get a review of the applications that are good or potential candidates for App-V 5.0.
|
| Step 4
Remediate |
Review the Forward Path report data and prioritize applications based on RAG status:
|
| Step 5
Run Task Script |
Run the task script for applications that are suitable for App-V 5.0 sequencing. These will be indicated by a Yes in the Automated Task Script column. Click the Start button to run automated task scripts and create Microsoft App-V 5.0 sequences. |
| Step 6
Test output for applications compatible for App-V 5.0 |
Locate the output files created and perform functionality testing. |
| Step 7
Submit to User Acceptance Testing |
Submit the applications to UAT, ensuring that the expert users are involved in the process. Tap into the extendable features of AppDNA by using the Forward Path script to send an email to the group performing UAT when an App-V 5.0 sequence is ready to be deployed and tested. |
| Step 8
Find alternatives for applications not compatible with a given solution |
For applications that are not compatible (cannot be remediated or remediation is deemed too costly) use AppDNA to determine if a legacy deployment option is more cost effective. Otherwise, consider retiring and replacing the application. Use the Overview Summary report to get a quick look at the best possible platform for your application. |