 View PDF


Migrate applications without install routines
Aug 14, 2017
You may have applications that can be executed by simply copying files into a folder stored on a computer, perhaps adding some registry keys or performing other manual changes to get the application working. AppDNA deals with those types of applications, enabling you to reduce the time, cost and risk for OS migration and virtualization technology adoptions by automating application compatibility and overall application migration.
AppDNA not only helps you determine if an application without an installation routine is compatible with an OS or virtualization technology, it also captures the application source and optionally produces a usable installation routine that can be added to your managed application library.
Even though you can easily create your own installer outside of AppDNA, using AppDNA enables you to reduce the overhead of managing your applications (cost, effort, and staff). Since you are already going through a capturing process with AppDNA to get the application source into the required format to run compatibility checks, it makes sense to use your third-party application packaging and virtualization software to create usable output so you can focus your expertise where it is really needed on the more difficult tasks.
AppDNA provides three ways to accomplish capturing your application source to import the application DNA for compatibility analysis and automating processes. The option used depends on the output desired and who will perform the installation/configuration (expert user, developer, or packager/sequencer). The following table outlines the options, how they can be used, and the potential use cases.
| AppDNA capturing feature | Description | Use cases |
|---|---|---|
| Install Capture |
|
|
| Self-Provisioning |
|
|
| MSI Converter |
|
|
Install Capture feature
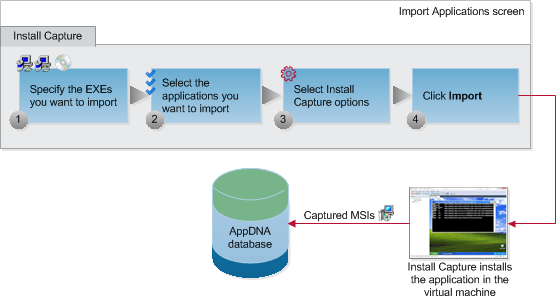
This section shows an example of how you can use Install Capture to capture an application that does not have an installation routine and requires manual configuration. The following diagram shows the process that AppDNA follows.
Note: These steps assume you configured a virtual machine that can integrate with your AppDNA environment.
To import applications using Install Capture:
-
From the AppDNA side bar, choose Import & Analyze > Applications.
-
Click the Install Capture tab.
-
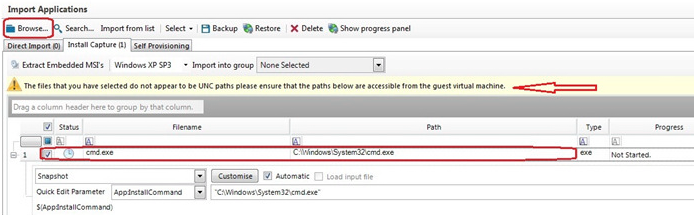
On the Install Capture tab, select the .exe or other installation files that you want to import.
-
Click Browse to select a placeholder executable.
You can use anything, provided it exists on the virtual machine in the path specified. This example uses cmd.exe.
Note: When selecting applications that have an install routine, use a UNC path such as \\MyServer\MyApplications\MyApplication.exe. The path you specify must be accessible from the virtual machine, otherwise the import will fail.
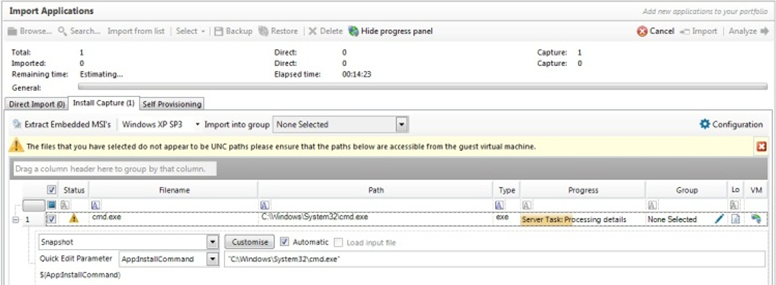
After you select the files, AppDNA lists them on the screen. As shown in the screen shot, the AppDNA software displays a warning about the hard-coded path. This is acceptable since cmd.exe is in the same location on the virtual machine.
This example uses the default AppDNA software execution profile called Snapshot. For information about the more advanced AppDNA software execution profiles which you can use to automate other processes, see Execution Profiles.
Note: Citrix also has a library of non-supported execution profiles that are available for download from the Citrix AppDNA Extensions Podio site. These extensions are customized to automate the processes of interest to our customers. To access the extensions, create a Podio account and send an email to appdnafeedback@citrix.com requesting access to the site.
The Snapshot execution profile has three main steps:
- Before snapshot – Performs an analysis of the virtual machine’s state, including its complete file system and registry entries.
- Launch command – Runs the application’s non-MSI installer. In this example, there is no installation routine, so you launch cmd.exe. While cmd.exe is open, you then add files and anything else that needs to be captured for the application.
- After snapshot – Performs a second analysis of the virtual machine’s state when the installation routine has finished (in this case, when you close the cmd.exe window), including its complete file system and registry entries.
The difference between the state of the virtual machine in the before and after snapshots represents the changes made by installing the application. The capture process uses this information to generate an .msi file for importing into the AppDNA database and then resets the state of the virtual machine back to how it was before the installation. Click Import on the right side of the toolbar to start capturing the application DNA for loading into the AppDNA database.
After you click Import for applications on the Install Capture tab, the AppDNA Virtual Machine Remote Controls window opens.
The processing that takes place is controlled by the execution profile. When the Snapshot execution profile is in use, the Execution profiles “before snapshot” is the first action that is run on the virtual machine.
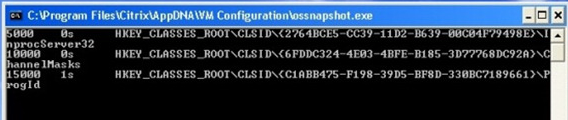
After the “before snapshot” has completed, the installation runs, which in this case is cmd.exe.
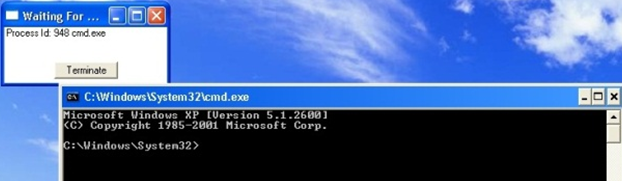
Leave cmd.exe open until after you make all configuration changes required for the application. Keep in mind that cmd.exe acts as setup.exe. The AppDNA execution profile script goes to the next step after the installation finishes and you close the cmd window.
The following screen shot shows the result of copying from a network share the folder, Icon Extractor 1.07, into c:\program files. That folder contains the required application files.
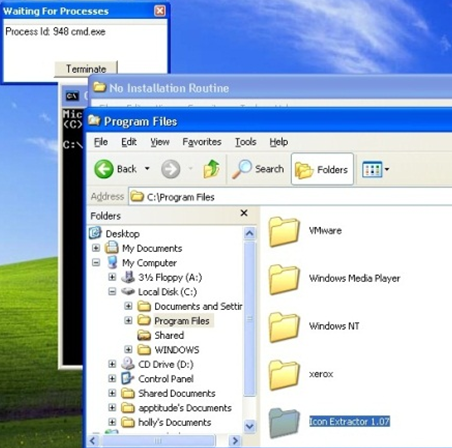
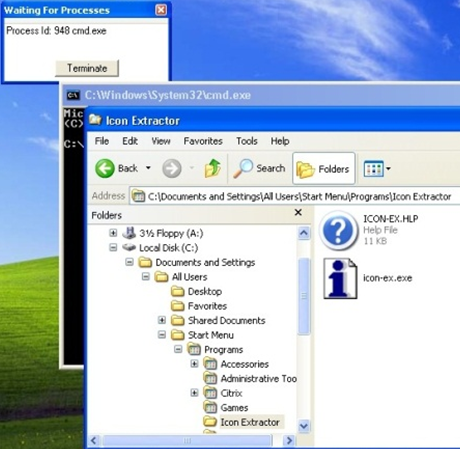
You also add the necessary shortcuts to the Start Menu. No other files are needed for this application without an installation routine. Of course, you may have an application that requires the creation of a service, environment variable, ODBC entry, and so on.
After you finish configuring the application, you can close the cmd.exe window. The “after snapshot” begins (assuming the Snapshot execution profile is in use).

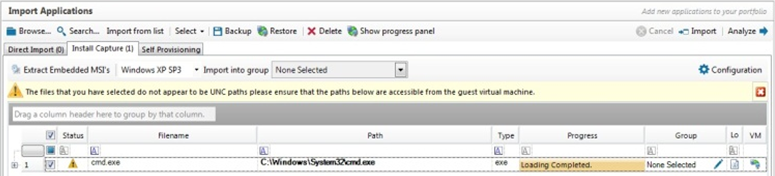
When the after snapshot completes, the AppDNA Snapshot execution profile copies the output to the designated network share and begins loading the newly created MSI into the database. When the import finishes, the AppDNA Virtual Machine Remote Controls window closes and the Install Capture tab displays the progress of the MSI import process.
Typically, the progress bar will be green indicating the installer returned a successful exit code. In this case, because no installer was used, AppDNA receives a non-zero exit code resulting in an amber progress bar. You can ignore that warning and proceed with analyzing the application against the desired modules to check compatibility. To do that, click the Analyze button now or after you have several applications to analyze.
The analysis creates a folder with the name of cmd.exe in the designated output location as defined in the AppDNA configuration settings. The folder contains the MSI created and the extracted source files.

If you wait to analyze the application, click Select > All Applications in the side bar. You can filter the Application List screen to view only what was just imported.
In this screen, you can change the name to reflect the real name of the product by clicking the pencil icon to the left of the Name column.

When ready to analyze, make sure the application is selected and click the Analyze button.
Self-Provisioning feature
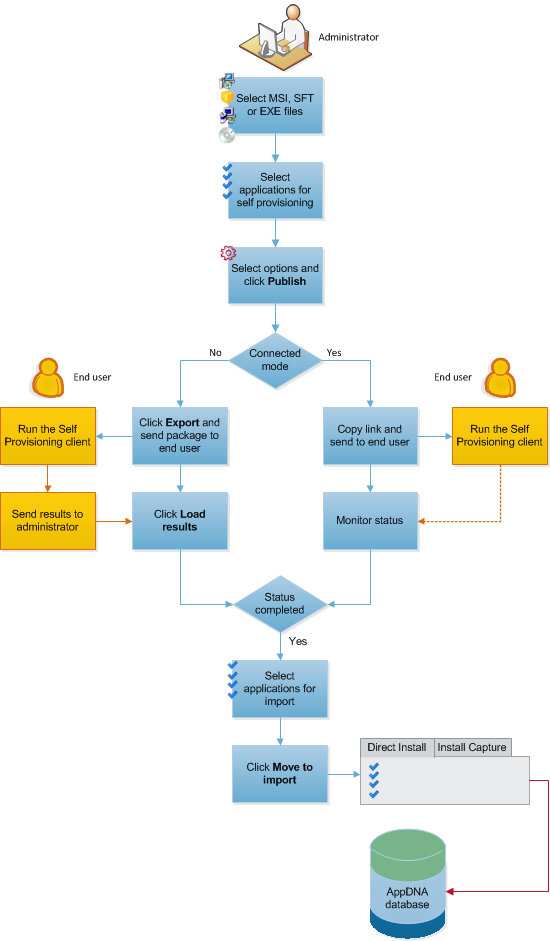
This section shows an example of how you can use the stand-alone Self-Provisioning feature to capture an application that does not have an installation routine and requires manual configuration. The following diagram shows the process that AppDNA follows.
This example uses the disconnected mode. In that mode, the Self-Provisioning client and the AppDNA client are on different networks and do not both have access to the same network file share. AppDNA wraps the client instruction files and execution profile into a package that the administrator sends to the end user. The end user in turn sends the output of the Self-Provisioning client to the administrator.
Note: These steps assume you have a configured an AppDNA Self-Provisioning client.
To prepare the application for Self-Provisioning:
-
From the AppDNA side bar, choose Import & Analyze > Applications.
-
Click the Self-Provisioning tab.
-
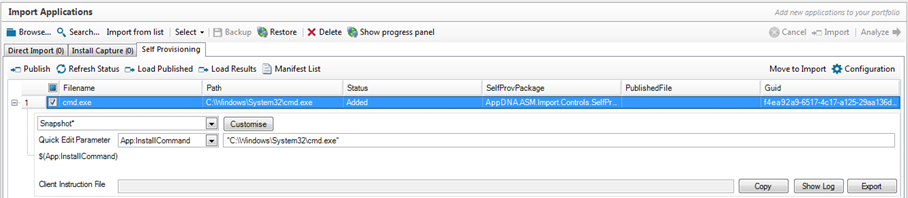
Select the installation file that you want to capture. Just like the Install Capture feature, this would typically be a setup executable that is referenced using a UNC path.
This example of capturing an application that does not have an installation routine and needs to be manually configured uses cmd.exe C:\Windows\System32\cmd.exe.
After you have selected the files, AppDNA lists them on the screen.
This example uses the default AppDNA software execution profile called Snapshot. For information about the more advanced AppDNA software execution profiles which you can use to automate other processes, see Execution Profiles.
Note: Citrix also has a library of non-supported execution profiles that are available for download from the Citrix AppDNA Extensions Podio site. These extensions are customized to automate the processes of interest to our customers. To access the extensions, create a Podio account and send an email to appdnafeedback@citrix.com requesting access to the site.
Note: Before you start using Self-Provisioning, you must configure the output path in the Self-Provisioning settings. Click Configuration on the Self-Provisioning tab toolbar to open the Self-Provisioning Settings.
-
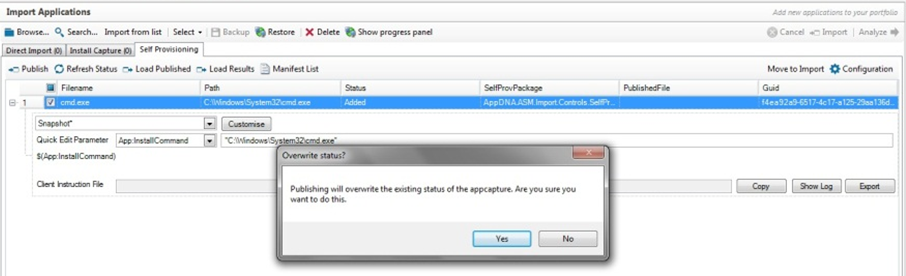
Select the application(s) you want to include and then click Publish.
AppDNA presents a warning that this will overwrite the existing status of the selected applications.
-
Click Yes to confirm.
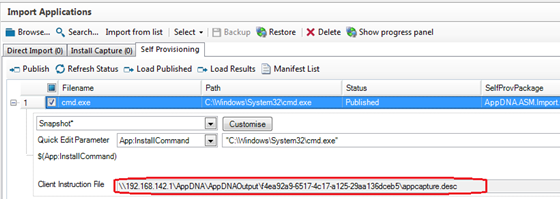
AppDNA then updates the screen with the details of the client instruction file for each selected application.
-
Click Export (to the right of the client instruction file) to create a package to send to the end user (expert user or developer) who will run the Self-Provisioning client. This opens the Export Self-Provisioning Package dialog box:
- Input file from client perspective – Specify the name and location of the application’s installation package, relative to the Self-Provisioning client machine.
- Folder where the capture results are to be stored – Specify the default location where the Self-Provisioning client will write the output of the application capture. The end user can specify a different location during the application capture. Make sure you specify this relative to the Self-Provisioning client machine.
- Exported package path – Specify the name and location of the package that is to be sent to the end user who will run the Self-Provisioning client.
Next send the exported package to the user who will perform the Self-Provisioning in the stand-alone Self-Provisioning client.
The end user will go through a capture process similar to the AppDNA Install Capture feature process.
End-users performing the configuration must install the AppDNA Self-Provisioning client. The installers, in a Tools subfolder of the AppDNA installation folder, are:
Citrix AppDNA Self-Provisioning Client.msi
Citrix AppDNA VM Configuration.msi
The MSIs created can be imported into AppDNA using the Direct Import tab in the Import Applications Screen. See Direct import for more information.
MSI Converter
The AppDNA MSI Converter is a stand-alone tool that is installed as part of AppDNA and provides an alternative to generating an MSI file from a set of application source files in a folder. The original intent of the MSI Converter was to convert web application source files into an MSI so that the web application could be checked for compatibility; however, you can use this option on any files.
Note: To install the AppDNA stand-alone web capture tools, you need the installer (called Citrix AppDNA Web Application Capture.msi). This comes with AppDNA. It is copied into a Tools subfolder of the AppDNA installation folder when you install AppDNA.
This procedure provides instructions for using the Stand-Alone Web Application Source to MSI Converter to generate an MSI from one or more folders containing application source files.
-
From the Windows Start menu, choose Citrix AppDNA > Web Application Source to MSI Converter.
-
If necessary, click Configure on the toolbar to change options.
For information about these options and those in the next step, see Stand-alone Web Application Source to MSI Converter.
-
Click Select, Search for Folders or Import List to select the folders that contain the web application source files that you want to convert.
The selected folder(s) appear in the window.
-
Select the folder(s) for which you want to create an MSI.
-
Click Start.
The MSI Generator shows whether the processing is successful in the Status column. Completed means that the processing finished successfully. If the processing is not successful, click the Refresh button to view the log. This provides information that you can use to troubleshoot the problem.
Output
The output from the Stand-Alone Web Application Source to MSI Converter is located in the folder that is specified in the Configuration dialog box. The output for each application is stored in a separate folder, whose name is derived from the folder name and the date and time stamp.
You can then import the MSIs into AppDNA using the Direct Import tab in the Import Applications Screen. See Direct import for more information.