 View PDF


Features
Aug 14, 2017
Note: The Estate View link, available for evaluation and trial installations only, provides a summary for all relevant applications in the portfolio, regardless of which applications are selected.
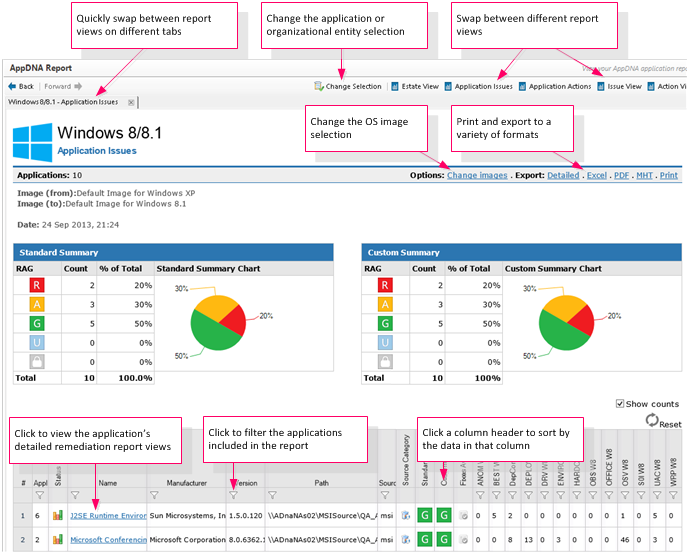
Use the options on the main toolbar to swap between different report views.
Open the Remediation report views by drilling down through the application name in one of the other report views, such as the Application Issues view.
Use the Change images link on the Export toolbar to change the OS images that are selected. The link does not appear for reports for which OS images are not relevant. To define the default OS images for reports, use the OS image settings.
Use the Export links to print the report or export it to a variety of formats. The formats that are available depend on the report view type. The options include MHT (a single-file Web page, which you can view in a browser and is easy to send to colleagues), HTML (a single Web page with a separate folder that contains the associated images and other files), Word, Excel, and PDF (Application Issues view only). Use the Report Export Wizard to perform bulk exports.
Click a column header to sort by the data in that column. Click the header again to swap between ascending and descending order. Drag the vertical bars between the column headings to resize the columns. Click Reset to revert to the default sort order and column sizes.
Use the Show counts check box on the Application Issues and Application Actions report views to show and hide additional columns that show the number of times the application has triggered an algorithm in each algorithm group and the number of applications that require each type of remediation action, respectively.
Click a filter ( ) icon (immediately below a column header) to filter by the data in that column. For example, suppose you want to see only Adobe applications in the Application Actions report view. To do this, click the filter icon under the Manufacturer column header, select Contains from the drop-down list, and enter Adobe in the text box. Similarly if you want to restrict the results to applications that need redevelopment, you could create a “greater than zero” filter on the REDEV column. (To see this column, you need to select the Show counts check box.)
You can view application report views in a browser window. To do this: on the side bar, right-click the report view you want to view and from the shortcut menu, choose Open in New Window.
Which applications are included?
The applications included in the application report views are based on the applications you selected previously - for example, in the Application List or Import Applications screens, or the groups you selected in the Manage Groups screen. You can change the selected applications in the Application List screen or by clicking Change Selection on the Report Viewer toolbar.
The top of relevant report views show the number of applications selected. If any groups were selected, their names are also shown. An asterisk (*) next to a group name means that the group has changed since the selection was made (for example, some more applications have been added to it).
Note: The above does not apply to the Organization reports, which show the status of applications that are managed through Active Directory or System Center Configuration Manager.