Private key protection
Introduction
Certificates are stored in an embedded database on the FAS server. The associated private keys are stored by means of the Network Service account of the FAS server and marked as non-exportable by default.
There are two types of private keys:
- The private key associated with the registration authority certificate, from the Citrix_RegistrationAuthority certificate template.
- The private keys associated with the user certificates, from the Citrix_SmartcardLogon certificate template.
There are actually two registration authority certificates: Citrix_RegistrationAuthority_ManualAuthorization (valid for 24 hours by default) and Citrix_RegistrationAuthority (valid for two years by default).
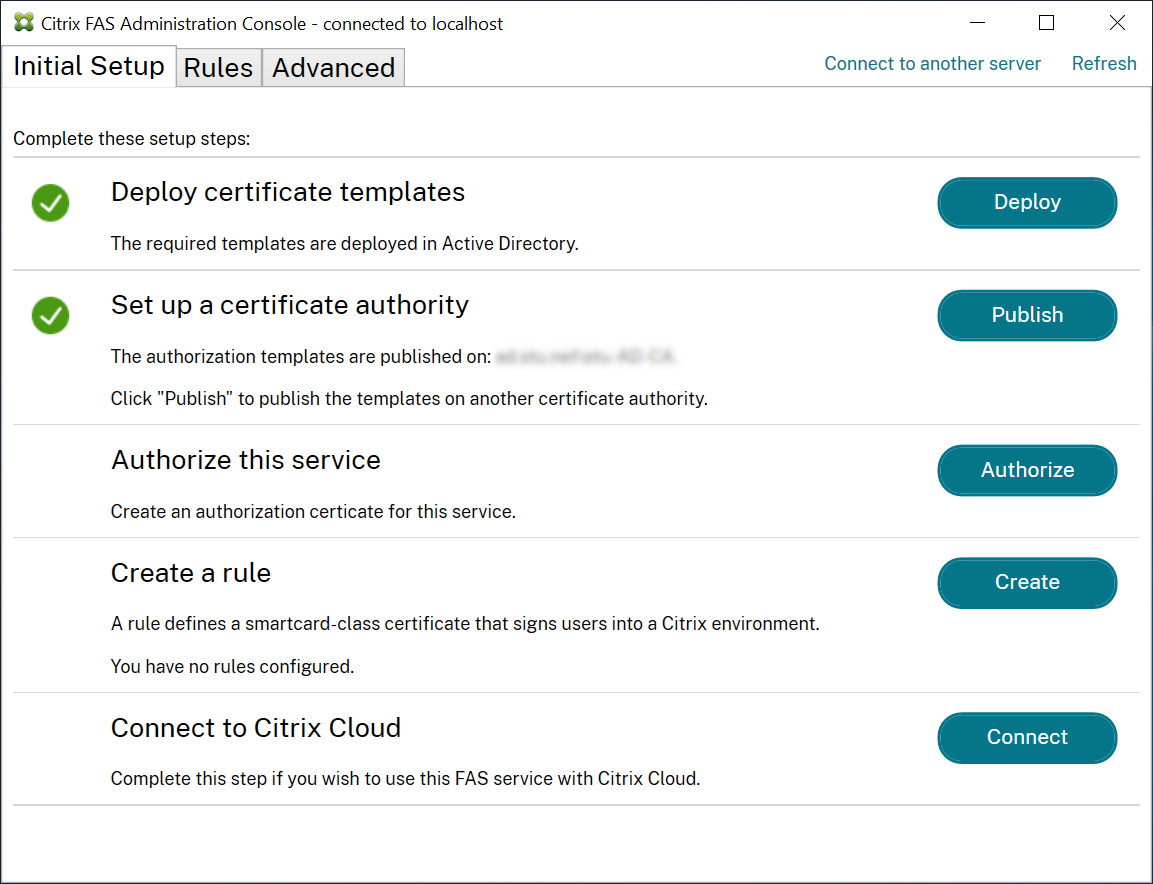
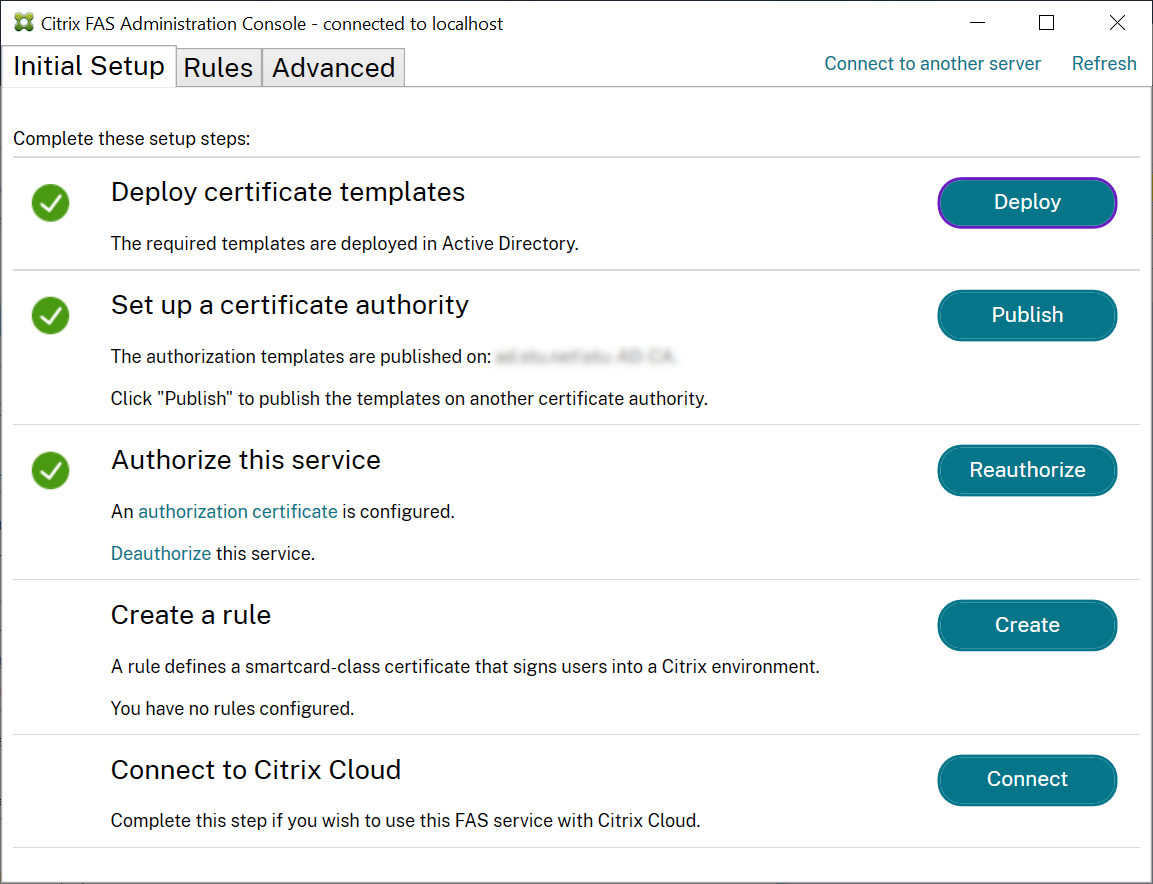
During step 3 of the Initial Setup tab in the Federated Authentication Service (FAS) administration console, when you click Authorize the FAS server generates a keypair and sends a certificate signing request to the certificate authority for the Citrix_RegistrationAuthority_ManualAuthorization certificate. This is a temporary certificate, valid for 24 hours by default. The certificate authority does not automatically issue this certificate; its issuance must be manually authorised on the certificate authority by an administrator. Once the certificate is issued to the FAS server, FAS uses the Citrix_RegistrationAuthority_ManualAuthorization certificate to automatically obtain the Citrix_RegistrationAuthority certificate (valid for two years by default). The FAS server deletes the certificate and key for Citrix_RegistrationAuthority_ManualAuthorization as soon as it obtains the Citrix_RegistrationAuthority certificate.
The private key associated with the registration authority certificate is particularly sensitive, because the registration authority certificate policy allows whoever possesses the private key to issue certificate requests for the set of users configured in the template. As a consequence, whoever controls this key can connect to the environment as any of the users in the set.
You can configure the FAS server to protect private keys in a way that fits your organization’s security requirements, using one of the following:
- Microsoft Enhanced RSA and AES Cryptographic Provider or Microsoft Software Key Storage Provider for both the registration authority certificate and the user certificates’ private keys.
- Microsoft Platform Key Storage Provider with a Trusted Platform Module (TPM) chip for the registration authority certificate’s private key, and Microsoft Enhanced RSA and AES Cryptographic Provider or Microsoft Software Key Storage Provider for the user certificates’ private keys.
- A Hardware Security Module (HSM) vendor’s Cryptographic Service or Key Storage Provider with the HSM device for both the registration authority certificate and the user certificates’ private keys.
Private key configuration settings
Configure FAS to use one of the three options. Use a text editor to edit the Citrix.Authentication.FederatedAuthenticationService.exe.config file. The default location of the file is in the Program Files\Citrix\Federated Authentication Service folder on the FAS server.
FAS reads the config file only when the service starts. If any values are changed, FAS must be restarted before it reflects the new settings.
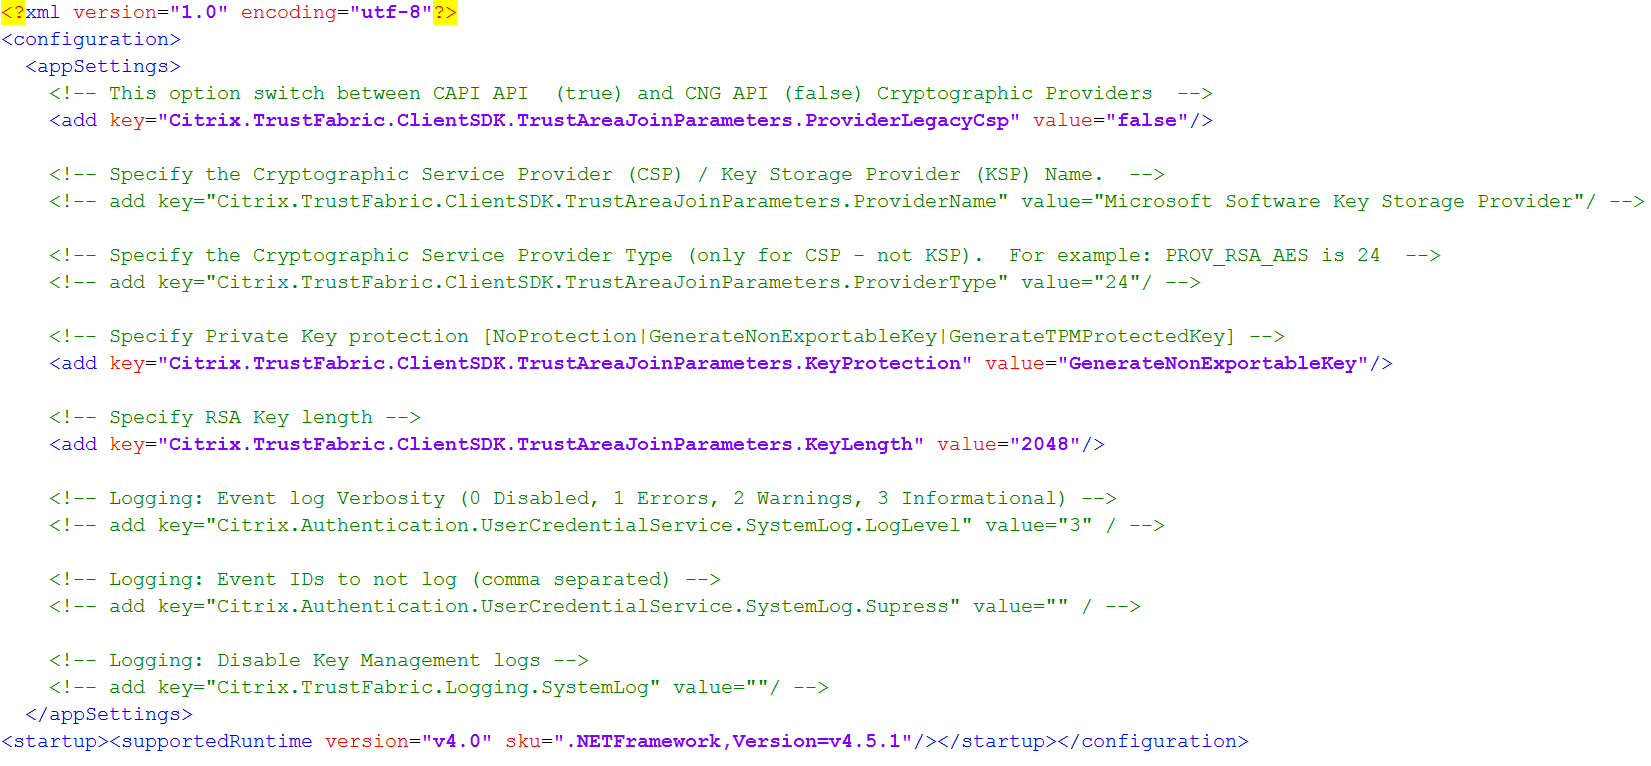
Set the relevant values in the Citrix.Authentication.FederatedAuthenticationService.exe.config file as follows:
Citrix.TrustFabric.ClientSDK.TrustAreaJoinParameters.ProviderLegacyCsp (switch between CAPI and CNG APIs)
| Value | Comment |
|---|---|
| true | Use CAPI APIs |
| false (default) | Use CNG APIs |
Citrix.TrustFabric.ClientSDK.TrustAreaJoinParameters.ProviderName (name of the provider to use)
| Value | Comment |
|---|---|
| Microsoft Enhanced RSA and AES Cryptographic Provider | Default CAPI provider |
| Microsoft Software Key Storage Provider | Default CNG Provider |
| Microsoft Platform Key Storage Provider | Default TPM provider. Note that TPM is not recommended for user keys. Use TPM for the registration authority key only. If you plan to run your FAS server in a virtualized environment, check with your TPM and hypervisor vendor whether virtualization is supported. |
| HSM_Vendor CSP/Key Storage Provider | Supplied by HSM vendor. The value differs between vendors. If you plan to run your FAS server in a virtualized environment, check with your HSM vendor whether virtualization is supported. |
Citrix.TrustFabric.ClientSDK.TrustAreaJoinParameters.ProviderType (Required only in case of CAPI API)
| Value | Comment |
|---|---|
| 24 | Default. Refers to Microsoft KeyContainerPermissionAccessEntry.ProviderType Property PROV_RSA_AES 24. Should always be 24 unless you are using an HSM with CAPI and the HSM vendor specifies otherwise. |
Citrix.TrustFabric.ClientSDK.TrustAreaJoinParameters.KeyProtection (When FAS needs to perform a private key operation, it uses the value specified here) Controls the “exportable” flag of private keys. Allows the use of TPM key storage, if supported by the hardware.
| Value | Comment |
|---|---|
| NoProtection | Private key can be exported. |
| GenerateNonExportableKey | Default. Private key cannot be exported. |
| GenerateTPMProtectedKey | Private key will be managed using the TPM. Private key is stored via the ProviderName you specified in ProviderName (for example, Microsoft Platform Key Storage Provider) |
Citrix.TrustFabric.ClientSDK.TrustAreaJoinParameters.KeyLength (Specify size of private key in bits)
| Value | Comment |
|---|---|
| 2048 | Default. 1024 or 4096 can also be used. |
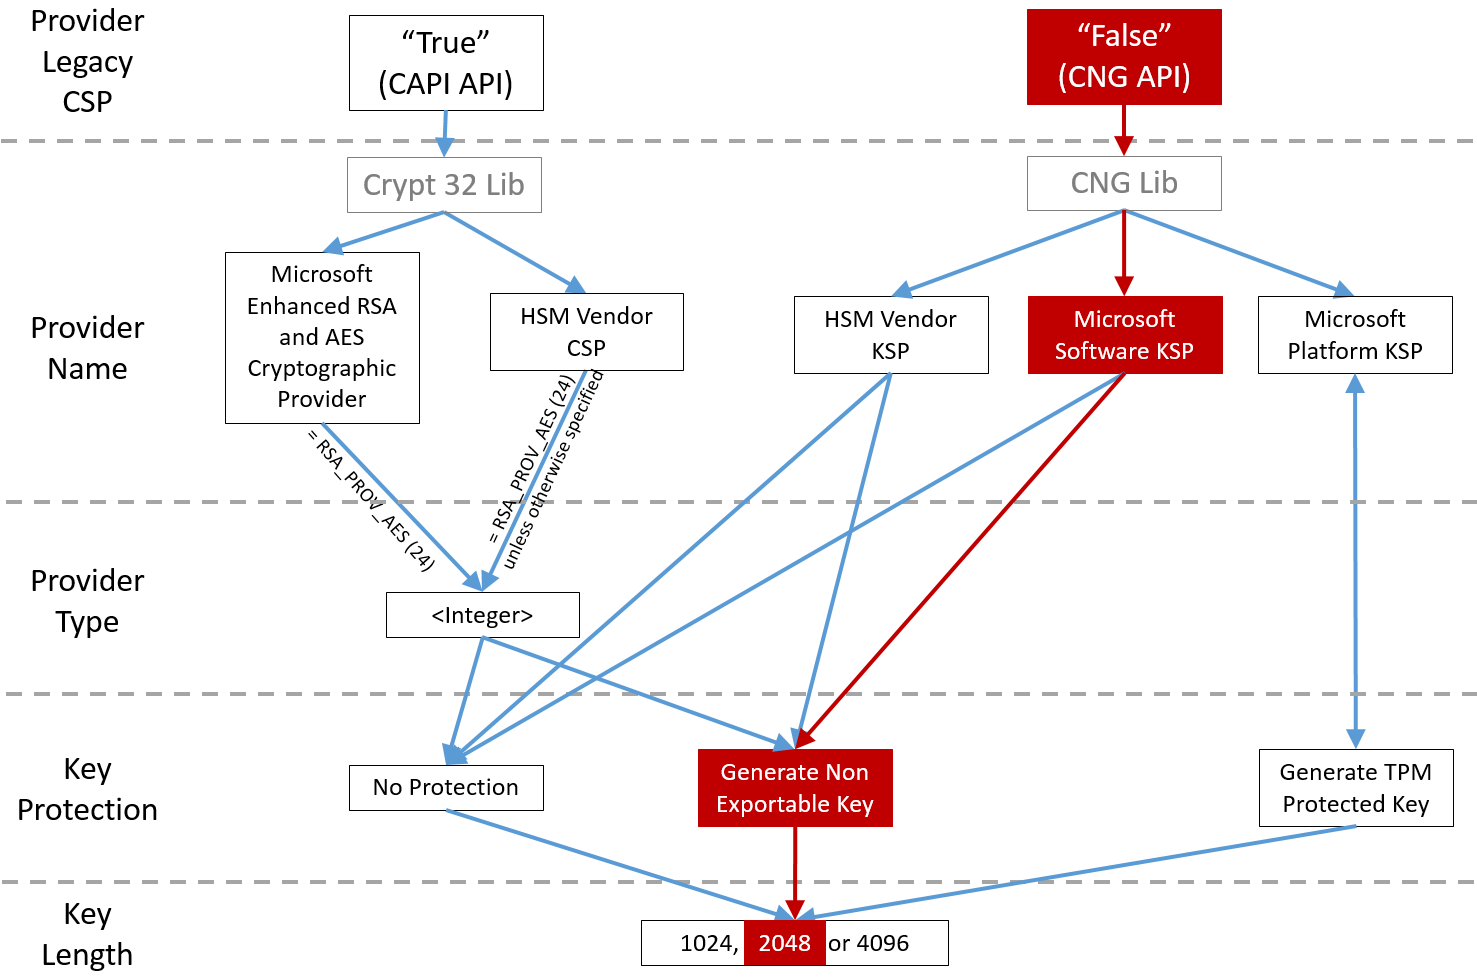
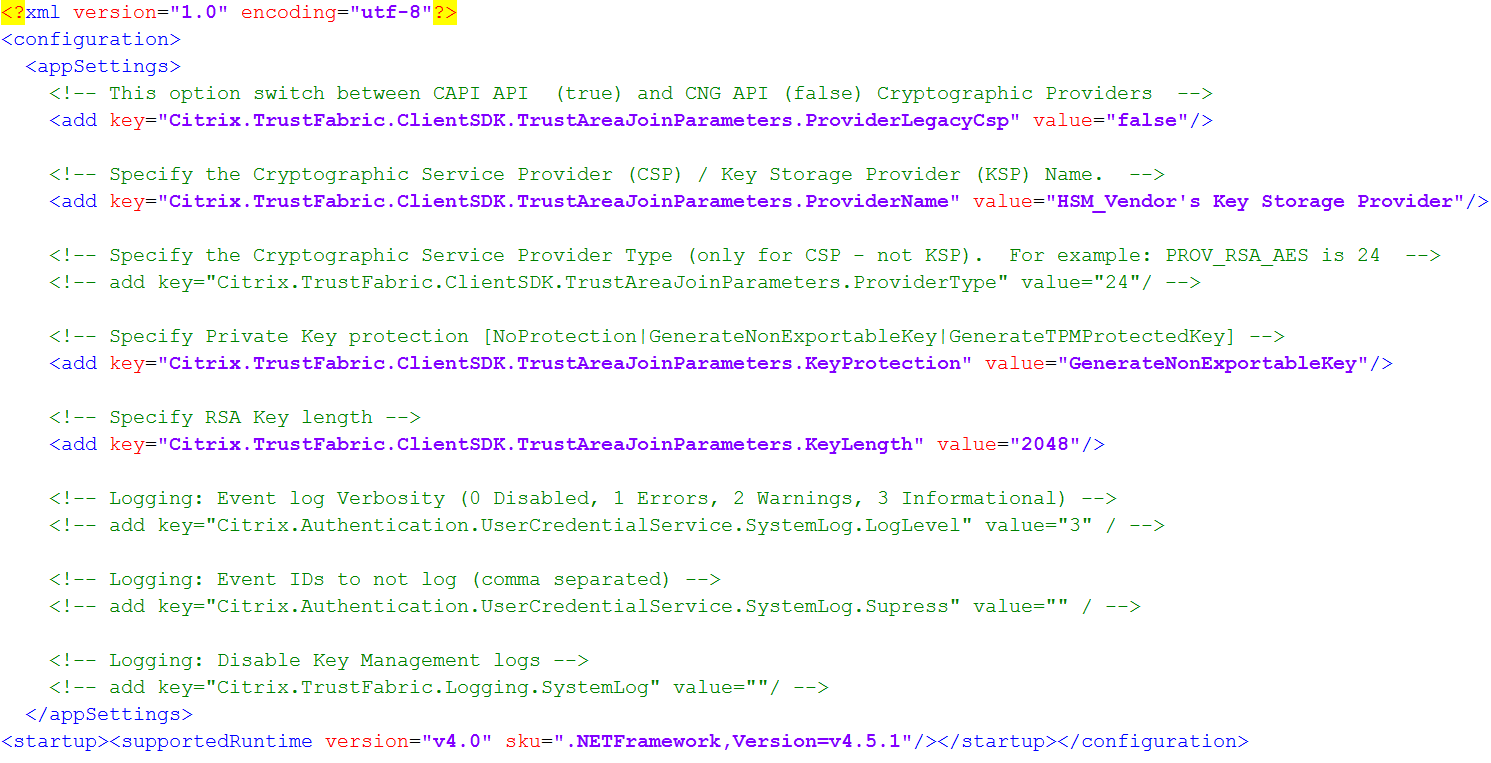
The config file settings are represented graphically as follows (installation defaults are shown in red):
Configuration scenario examples
Example 1
This example covers the registration authority certificate private key and user certificates’ private keys stored using the Microsoft Software Key Storage Provider
This is the default post-install configuration. No additional private key configuration is required.
Example 2
This example shows the registration authority certificate private key stored in the FAS server motherboard’s hardware TPM via the Microsoft Platform Key Storage Provider, and user certificates’ private keys stored using the Microsoft Software Key Storage Provider.
This scenario assumes that the TPM on your FAS server motherboard has been enabled in the BIOS according to the TPM manufacturer’s documentation and then initialized in Windows; see https://docs.microsoft.com/en-us/previous-versions/windows/it-pro/windows-vista/cc749022(v=ws.10).
Using the FAS administration console
The FAS administration console cannot perform offline certificate signing request, so using it is not recommended unless your organization allows online certificate signing request for registration authority certificates.
When performing initial FAS setup, after deploying certificate templates and setting up the certificate authority, but before authorizing the service (step 3 in the configuration sequence):
Step 1: Edit the config file by changing the following line as follows:

The file should now appear as follows:
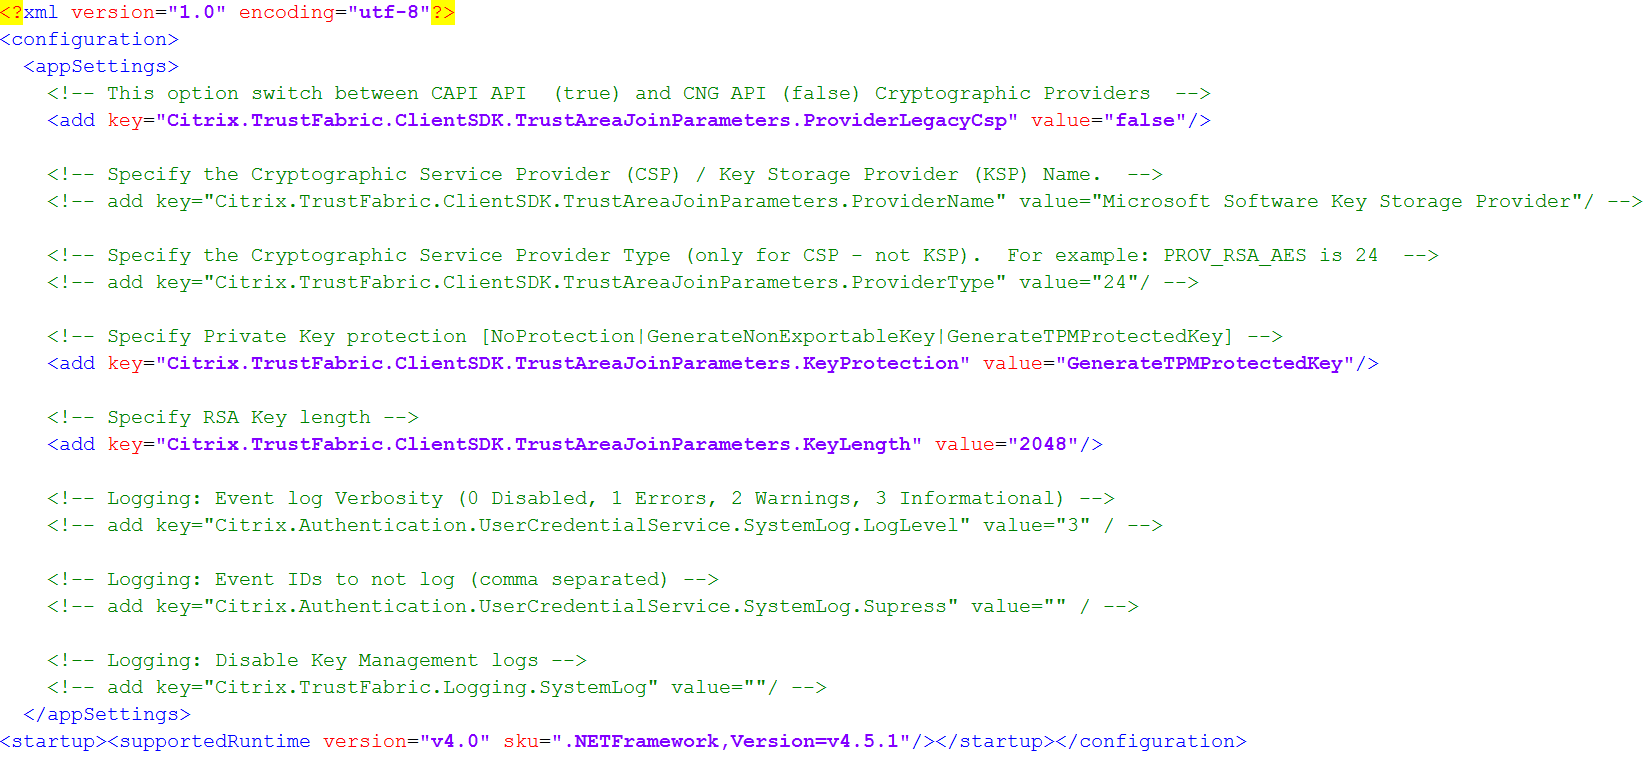
Some TPMs restrict key length. The default key length is 2048 bits. Ensure that you specify a key length supported by your hardware.
Step 2: Restart the Citrix Federated Authentication Service to read the values from the config file.
Step 3: Authorize the service.
Step 4: Manually issue the pending certificate request from the certificate authority server. After the registration authority certificate is obtained, step 3 in the setup sequence in the administration console will be green. At this point, the registration authority certificate’s private key will have generated in the TPM. The certificate will be valid for 2 years by default.
To confirm that the registration authority certificate’s private key is correctly being stored in the TPM, use the following PowerShell commands. The PrivateKeyProvider field will be set to Microsoft Platform Crypto Provider if the registration authority certificate’s private key is stored in the TPM:
Add-PSSnapin Citrix.Authentication.FederatedAuthenticationService.V1
Get-FasAuthorizationCertificate -FullCertInfo -Address localhost
<!--NeedCopy-->
Step 5: Edit the config file back to the following:

Note:
Although FAS can generate user certificates with TPM protected keys, the TPM hardware may be too slow for large deployments.
Step 6: Restart FAS. This forces the service to re-read the config file and reflect the changed values. The subsequent automatic private key operations will affect user certificate keys; those operations will not store the private keys in the TPM, but use the Microsoft Software Key Storage Provider.
Step 7: Select the Rules tab in the FAS administration console and edit the settings as described in Install and configure.
Using PowerShell
The registration authority certificate can be requested offline using PowerShell. This is suitable for organizations that do not want their certificate authority to issue a registration authority certificate through an online certificate signing request. You cannot make an offline registration authority certificate signing request using the FAS administration console.
Step 1: During the initial FAS configuration using the administration console, complete only the first two steps: “Deploy certificate templates” and “Set up a certificate authority.”
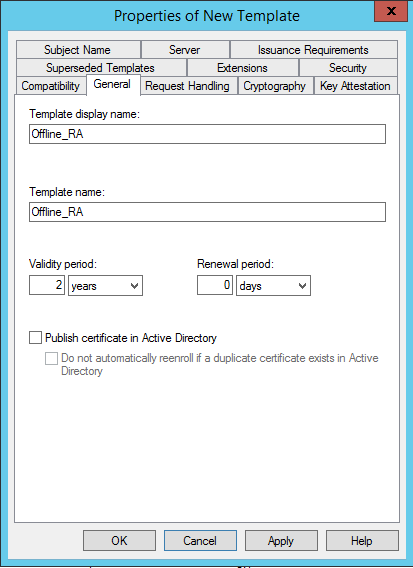
Step 2: On your certificate authority server, add the Certificate Templates MMC snap-in. Right-click the Citrix_RegistrationAuthority_ManualAuthorization template and select Duplicate Template.
Select the General tab. Change the name and validity period. In this example, the name is Offline_RA and the validity period is 2 years:
Step 3: On your certificate authority server, add the certificate authority MMC snap-in. Right-click Certificate Templates. Select New, then click Certificate Template to Issue. Choose the template you just created.
Step 4: Load the following PowerShell cmdlets on the FAS server:
Add-PSSnapin Citrix.Authentication.FederatedAuthenticationService.V1
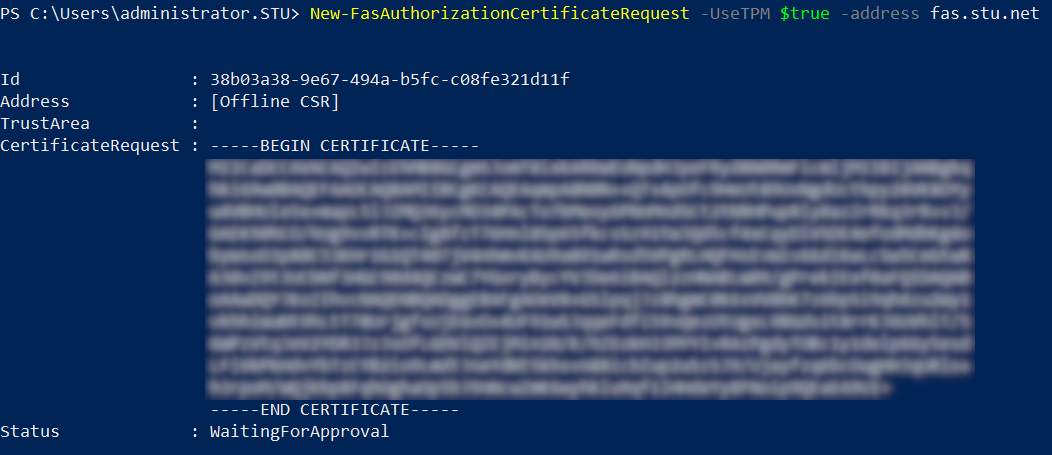
Step 5: Generate the RSA keypair inside the FAS server’s TPM and create the certificate signing request by entering the following PowerShell cmdlet on the FAS server. Note: Some TPMs restrict key length. The default key length is 2048 bits. Be sure to specify a key length supported by your hardware.
New-FasAuthorizationCertificateRequest -UseTPM $true -address \<FQDN of FAS Server>
For example:
New-FasAuthorizationCertificateRequest -UseTPM $true -address fashsm.auth.net
The following is displayed:
Notes:
- The Id GUID (in this example, “5ac3d8bd-b484-4ebe-abf8-4b2cfd62ca39”) is required in a subsequent step.
- Think of this PowerShell cmdlet as a one-time “override” that is used to generate the private key for the registration authority certificate.
- When running this cmdlet, the values that are read from the config file when FAS started are checked to determine the key length to use (the default is 2048).
- Because -UseTPM is set to $true in this manual PowerShell-initiated registration authority certificate private key operation, the system ignores values from the file that do not match the settings required to use a TPM.
- Running this cmdlet does not change any settings in the config file.
- During subsequent automatic FAS-initiated user certificate private key operations, the values that were read from the file when FAS started are used.
- It is also possible to set the KeyProtection value in the config file to GenerateTPMProtectedKey when the FAS server is issuing user certificates to generate user certificate private keys protected by the TPM.
To verify that the TPM was used to generate the keypair, look in the application log in the Windows Event viewer on the FAS server, at the time that the keypair is generated.
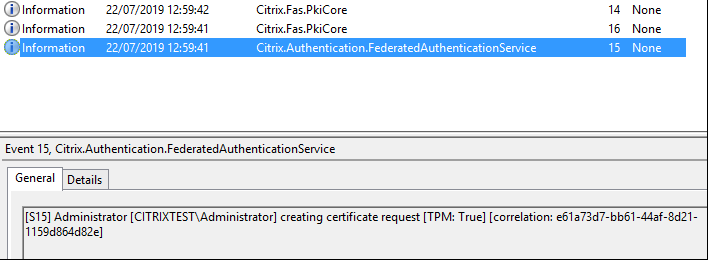
Note: “[TPM: True]”
Followed by:
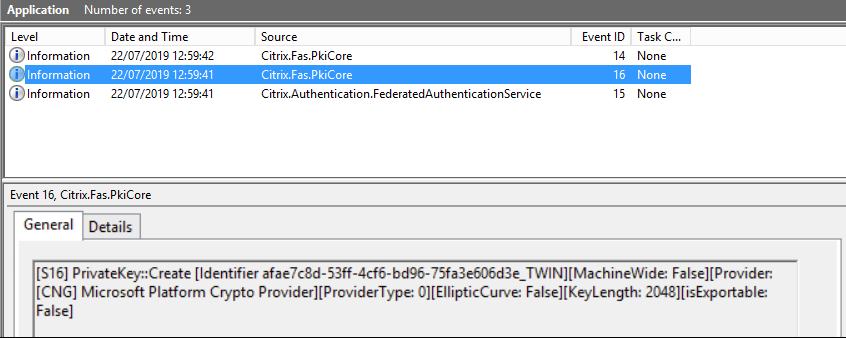
Note: “Provider: [CNG] Microsoft Platform Crypto Provider”
Step 6: Copy the certificate request section into a text editor and save it to disk as a text file.
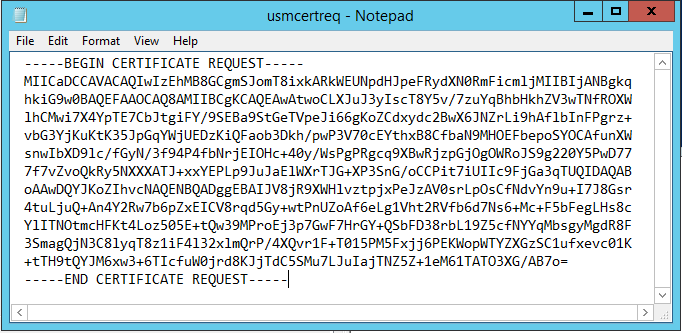
Step 7: Submit the certificate signing request to your certificate authority by typing the following into PowerShell on the FAS server:
certreq -submit -attrib "certificatetemplate:\<certificate template from step 2>" \<certificate request file from step 6>
For example:
certreq -submit -attrib "certificatetemplate:Offline_RA" C:\Users\Administrator.AUTH\Desktop\usmcertreq.txt
The following is displayed:

At this point a Certification Authority List window might appear. The certificate authority in this example has both http (top) and DCOM (bottom) enrolment enabled. Select the DCOM option, if available:
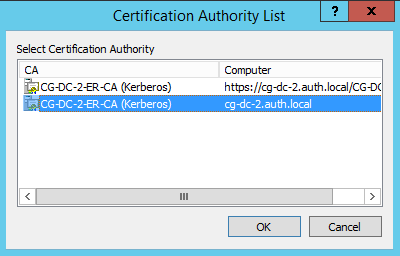
After the certificate authority has been specified, PowerShell displays the RequestID:

Step 8: On the certificate authority server, in the certificate authority MMC snap-in, click Pending Requests. Note the Request ID. Then right-click the request and choose Issue.
Step 9: Select the Issued Certificates node. Find the certificate that was just issued (the Request ID should match). Double-click to open the certificate. Select the Details tab. Click Copy to File. The Certificate Export Wizard launches. Click Next. Choose the following options for the file format:

The format must be “Cryptographic Message Syntax Standard – PKCS #7 Certificates (.P7B)” and “Include all certificates in the certification path if possible” must be selected.
Step 10: Copy the exported certificate file onto the FAS server.
Step 11: Import the registration authority certificate into the FAS server by entering the following PowerShell cmdlet on the FAS server:

For example:

The following is displayed:

To confirm that the registration authority certificate’s private key is correctly being stored in the TPM, use the following PowerShell commands. The PrivateKeyProvider field will be set to Microsoft Platform Crypto Provider if the registration authority certificate’s private key is stored in the TPM:
Add-PSSnapin Citrix.Authentication.FederatedAuthenticationService.V1
Get-FasAuthorizationCertificate -FullCertInfo -Address localhost
<!--NeedCopy-->
Step 12: Close the FAS administration console and then restart it.
Note: The step “Authorize this service” has a green tick.
Step 13: Select the Rules tab in the FAS administration console and edit the settings described in Install and configure.
Example 3
This example covers an registration authority certificate private key and user certificates’ private keys stored in an HSM. This example assumes a configured HSM. Your HSM will have a provider name, for example “HSM_Vendor’s Key Storage Provider.”
If you plan to run your FAS server in a virtualized environment, check with your HSM vendor about hypervisor support.
Step 1. During initial setup of FAS using the administration console, complete only the first two steps: “Deploy certificate templates” and “Set up a certificate authority.”
Step 2: Consult your HSM vendor’s documentation to determine what your HSM’s ProviderName value should be. If your HSM uses CAPI, the provider might be referred to in the documentation as a Cryptographic Service Provider (CSP). If your HSM uses CNG, the provider might be referred to as a Key Storage Provider (KSP).
Step 3: Edit the config file as follows:

The file should now appear as follows:
This scenario assumes that your HSM uses CNG, so the ProviderLegacyCsp value is set to false. If your HSM uses CAPI, ProviderLegacyCsp value should be set to true. Consult your HSM vendor’s documentation to determine whether your HSM uses CAPI or CNG. Also consult your HSM vendor’s documentation on supported key lengths for asymmetric RSA key generation. In this example, the key length is set to the default of 2048 bits. Ensure that the key length you specify is supported by your hardware.
Step 4: Restart the Citrix Federated Authentication Service to read the values from the config file.
Step 5: Generate the RSA keypair inside the HSM and create the certificate signing request by clicking Authorize in the Initial Setup tab of FAS administration console.
Step 6: To verify that the keypair was generated in the HSM, check the application entries in the Windows Event log:

Note: [Provider: [CNG] HSM_Vendor’s Key Storage Provider]
Step 7: On the certificate authority server, in the certificate authority MMC, select the Pending Requests node:

Right-click the request and select Issue.
Note: The step “Authorize this service” has a green tick.
Step 8: Select the Rules tab in FAS administration console and edit the settings as described in Install and configure.
FAS certificate storage
FAS does not use the Microsoft certificate store on the FAS server to store its certificates. It uses an embedded database.
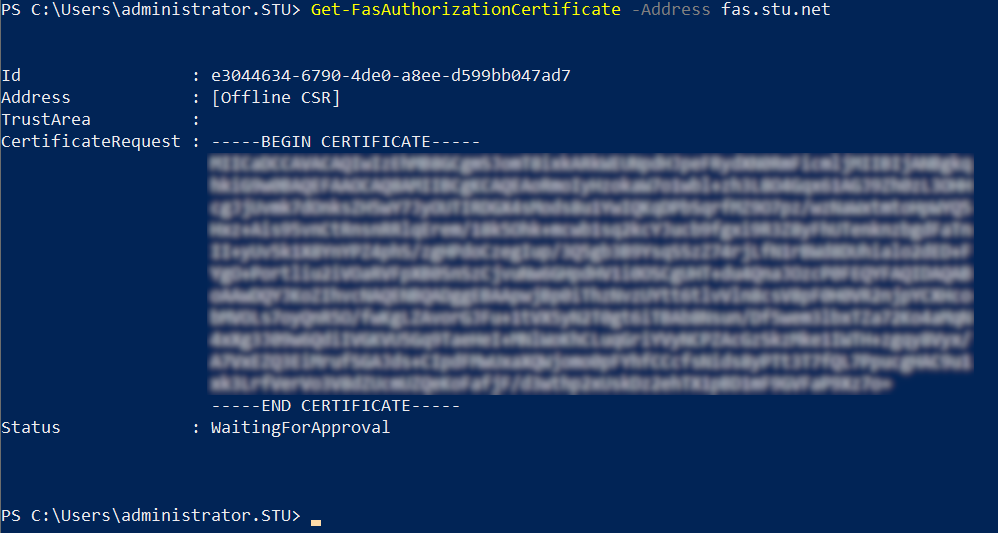
To determine the GUID for the registration authority certificate, enter the following PowerShell cmdlets on the FAS server:
Add-pssnapin Citrix.a\*
Get-FasAuthorizationCertificate –address \<FAS server FQDN>
For example, Get-FasAuthorizationCertificate –address cg-fas-2.auth.net:
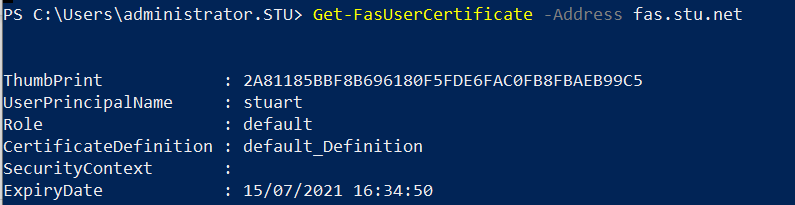
To obtain a list of user certificates, enter:
Get-FasUserCertificate –address \<FAS server FQDN>
For example, Get-FasUserCertificate –address cg-fas-2.auth.net
Note:
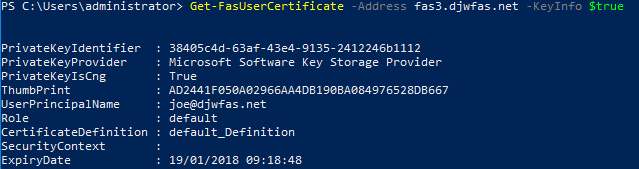
When using an HSM to store private keys, HSM containers are identified with a GUID. The GUID for the private key in the HSM can be obtained using:
Get-FasUserCertificate –address \<FAS server FQDN> -KeyInfo $trueFor example:
Get-FasUserCertificate –address fas3.djwfas.net -KeyInfo $true
Related information
- Install and configure is the primary reference for FAS installation and configuration.
- The common FAS deployments are summarized in the Federated Authentication Services architectures overview article.
- Other “how-to” articles are introduced in the Advanced configuration article.