Azure AD integration
Introduction
This document describes how to integrate a Citrix environment with the Windows 10 Azure AD feature. Windows 10 introduced Azure AD, which is a new domain join model where roaming laptops can be joined to a corporate domain over the Internet for the purposes of management and single sign-on.
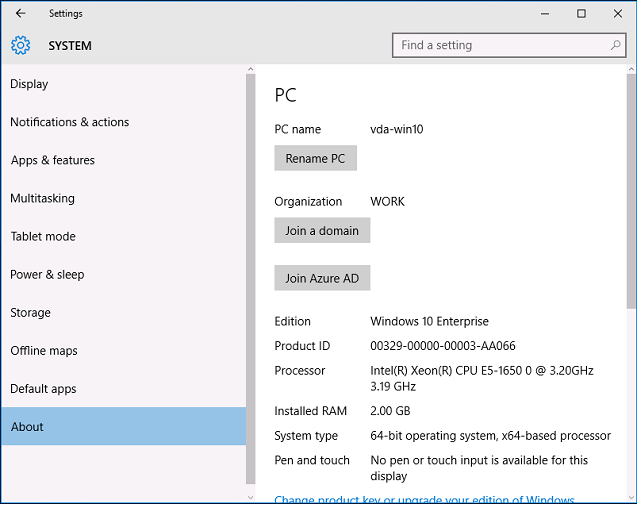
The example deployment in this document describes a system where IT provides new users with a corporate email address and enrollment code for their personal Windows 10 laptops. Users access this code through the System > About > Join Azure AD option in the Settings panel.
After the laptop is enrolled, the Microsoft Edge web browser automatically signs on to company web sites and Citrix published applications through the Azure SaaS applications web page, with other Azure applications such as Office 365.
Architecture
This architecture replicates a traditional company network completely within Azure, integrating with modern cloud technologies such as Azure AD and Office 365. End users are all considered remote workers, with no concept of being on an office intranet.
The model can be applied to companies with existing on premises systems, because the Azure AD Connect Synchronization can bridge to Azure over the Internet.
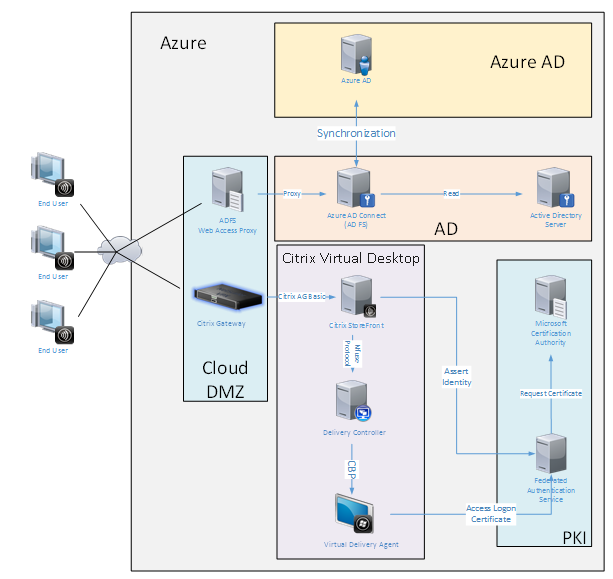
Secure connections and single sign-on, which would traditionally have been firewalled-LAN and Kerberos/NTLM authentication, are replaced in this architecture by TLS connections to Azure and SAML. New services are built as Azure applications joined to Azure AD. Existing applications that require Active Directory (such as a SQL Server database) can be run using a standard Active Directory Server VM in the IAAS portion of the Azure Cloud Service.
When a user launches a traditional application, they are accessed using Citrix Virtual Apps and Desktops™ published applications. The different types of applications are collated through the user’s Azure Applications page, using the Microsoft Edge Single sign-on features. Microsoft also supplies Android and iOS apps that can enumerate and launch Azure applications.
Create a DNS zone
Azure AD requires that the administrator has registered a public DNS address and controls the delegation zone for the domain name suffix. To do this, the administrator can use the Azure DNS zone feature.
This example uses the DNS zone name citrixsamldemo.net.
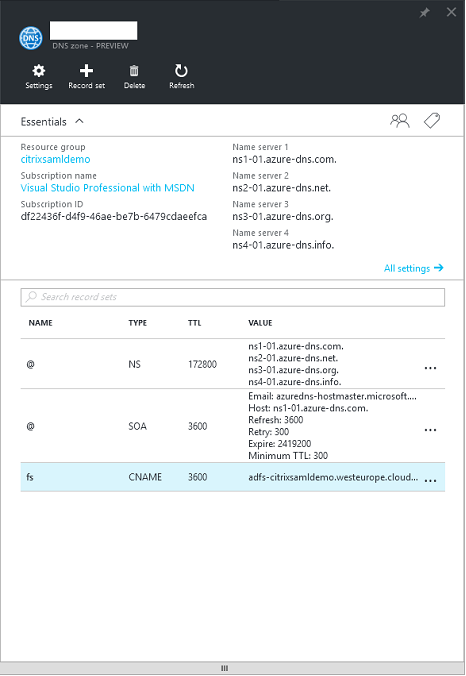
The console shows the names of the Azure DNS name servers. These should be referenced in the DNS registrar’s NS entries for the zone (for example, citrixsamldemo.net. NS n1-01.azure-dns.com)
When adding references to VMs running in Azure, it is easiest to use a CNAME pointer to the Azure-managed DNS record for the VM. If the IP address of the VM changes, you will not need to manually update the DNS zone file.
Both internal and external DNS address suffixes will match for this deployment. The domain is citrixsamldemo.net, and uses a split DNS (10.0.0.* internally).
Add an “fs.citrixsamldemo.net” entry that references the Web Application Proxy server. This is the Federation Service for this zone.
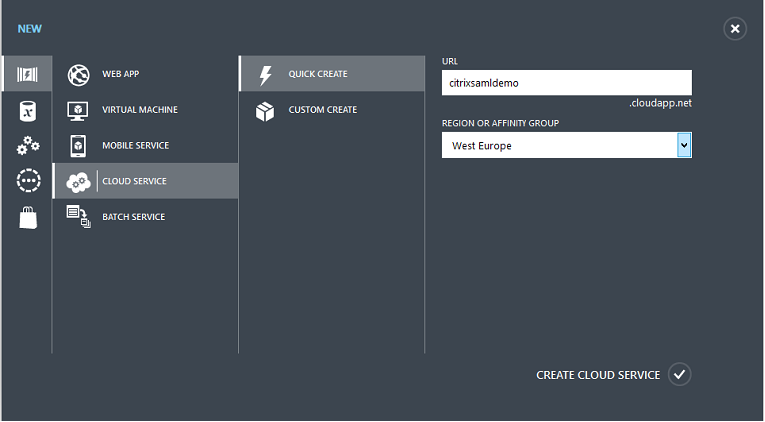
Create a Cloud Service
This example configures a Citrix environment, including an AD environment with an ADFS server running in Azure. A Cloud Service is created, named “citrixsamldemo.”
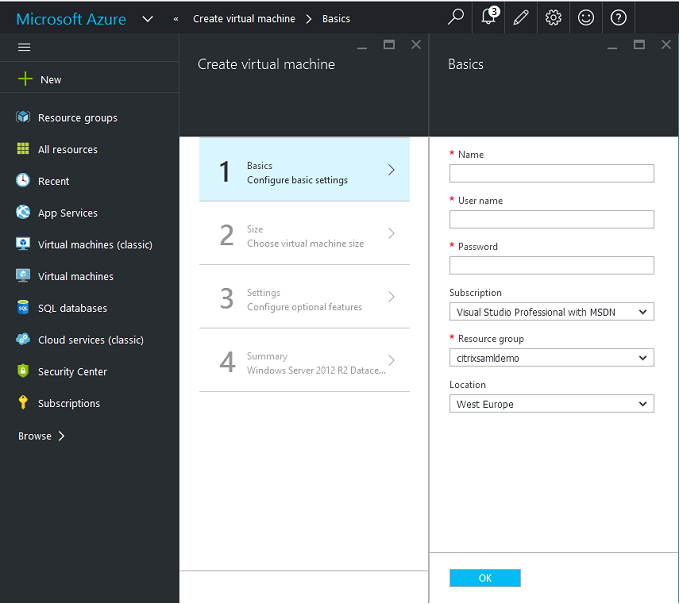
Create Windows virtual machines
Create five Windows VMs running in the Cloud Service:
- Domain controller (domaincontrol)
- Azure Connect ADFS server (adfs)
- ADFS web access proxy (Web Application Proxy, not domain joined)
- Citrix Virtual Apps and Desktops Delivery Controller
- Citrix Virtual Apps and Desktops Virtual Delivery Agent (VDA)
Domain Controller
- Add the DNS Server and Active Directory Domain Services roles to create a standard Active Directory deployment (in this example, citrixsamldemo. net). After domain promotion completes, add the Active Directory Certification Services role.
- Create a normal user account for testing (for example, George@citrixsamldemo.net).
- Since this server will be running internal DNS, all servers should refer to this server for DNS resolution. This can be done through the Azure DNS settings page. (For more information, see the Appendix in this document.)
ADFS controller and Web Application Proxy server
-
Join the ADFS server to the citrixsamldemo domain. The Web Application Proxy server should remain in an isolated workgroup, so manually register a DNS address with the AD DNS.
-
Run the Enable-PSRemoting –Force cmdlet on these servers, to allow PS remoting through firewalls from the AzureAD Connect tool.
Citrix Virtual Desktops™ Delivery Controller and VDA
- Install the Citrix Virtual Apps or Citrix Virtual Desktops Delivery Controller™ and VDA on the remaining two Windows servers joined to citrixsamldemo.
Configure an internal DNS
After the domain controller is installed, configure the DNS server to handle the internal view of citrixsamldemo.net, and act as a forwarder to an external DNS server (for example: 8.8.8.8).

Add a static record for:
- wap.citrixsamldemo.net [the Web Application Proxy VM will not be domain joined]
- fs.citrixsamldemo.net [internal federation server address]
- enterpriseregistration.citrixsaml.net [same as fs.citrixsamldemo.net]
All VMs running in Azure should be configured to use only this DNS server. You can do this through the Network Interface GUI.
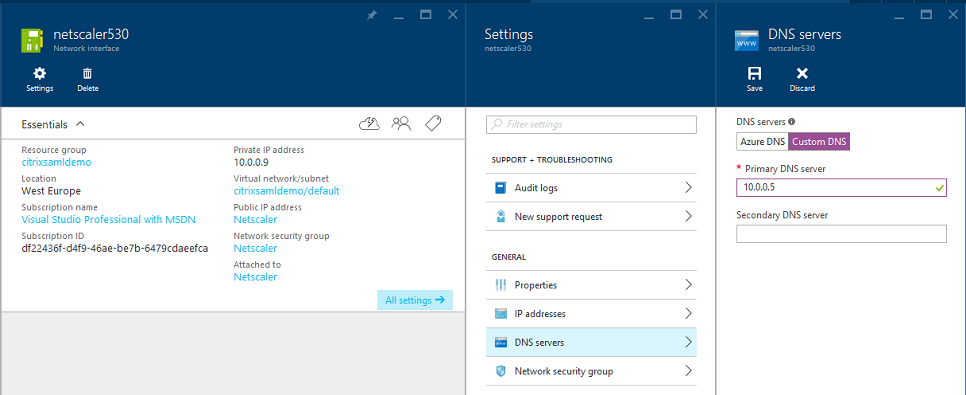
By default, the internal IP (10.0.0.9) address is dynamically allocated. You can use the IP addresses setting to permanently assign the IP address. This should be done for the Web Application Proxy server and the domain controller.
Configure an external DNS address
When a VM is running, Azure maintains its own DNS zone server that points to the current public IP address assigned to the VM. This is a useful feature to enable because Azure assigns IP addresses when each VM starts, by default.
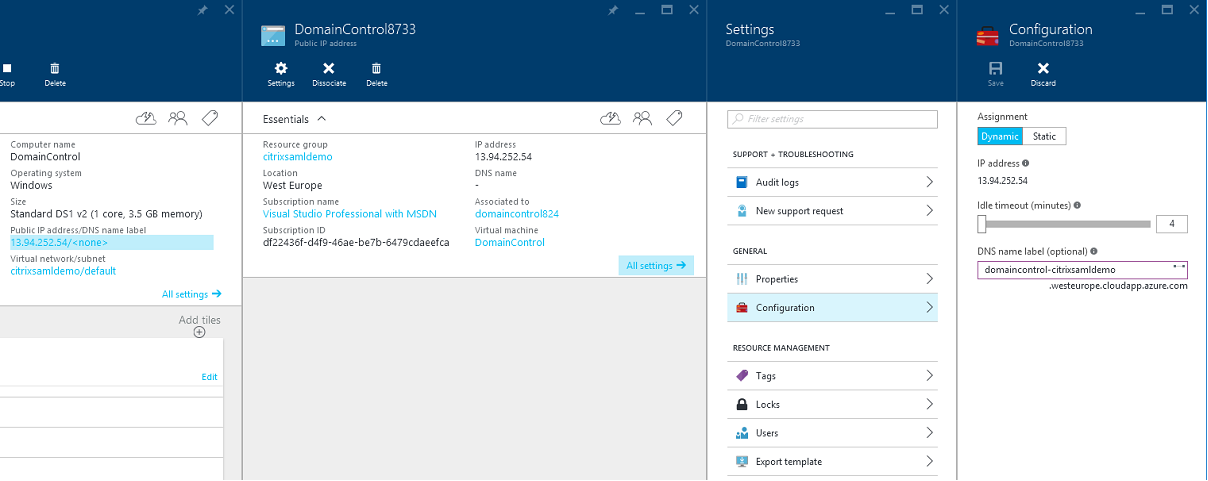
This example assigns a DNS address of domaincontrol-citrixsamldemo.westeurope.cloudapp.azure.com to the domain controller.
Note that when remote configuration is complete, only the Web Application Proxy and Citrix Gateway VMs should have public IP addresses enabled. (During configuration, the public IP address is used for RDP access to the environment).
Configure security groups
The Azure cloud manages firewall rules for TCP/UDP access into VMs from the Internet using security groups. By default, all VMs allow RDP access. The Citrix Gateway and Web Application Proxy servers should also allow TLS on port 443.
Create an ADFS certificate
Enable the Web Server certificate template on the Microsoft certificate authority. This allows creation of a certificate with custom DNS addresses that can be exported (including private key) to a pfx file. You must install this certificate on both the ADFS and Web Application Proxy servers, so the PFX file is the preferred option.
Issue a Web Server certificate with the following subject names:
- Commonname:
- adfs.citrixsamldemo.net [name of computer]
- SubjectAltname:
- *.citrixsamldemo.net [name of zone]
- fs.citrixsamldemo. net [entry in DNS]
- enterpriseregistration.citrixsamldemo.net
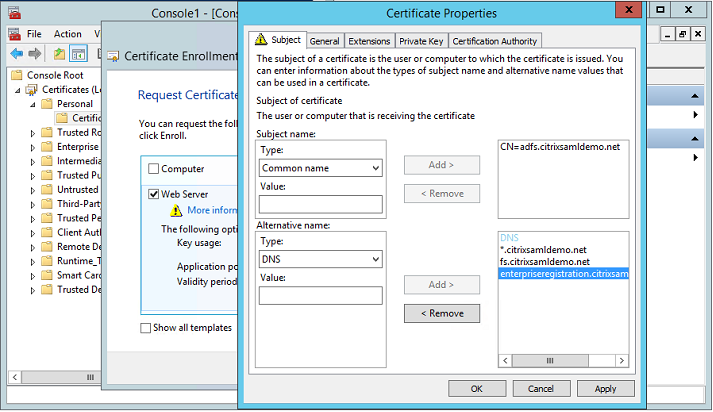
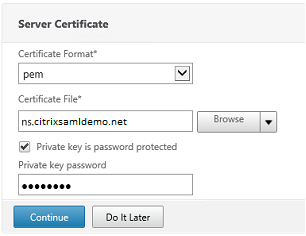
Export the certificate to a pfx file, including a password-protected private key.
Set up Azure AD
This section details the process of setting up a new Azure AD instance and creating user identities that can be used to join Windows 10 to Azure AD.
Create a new directory
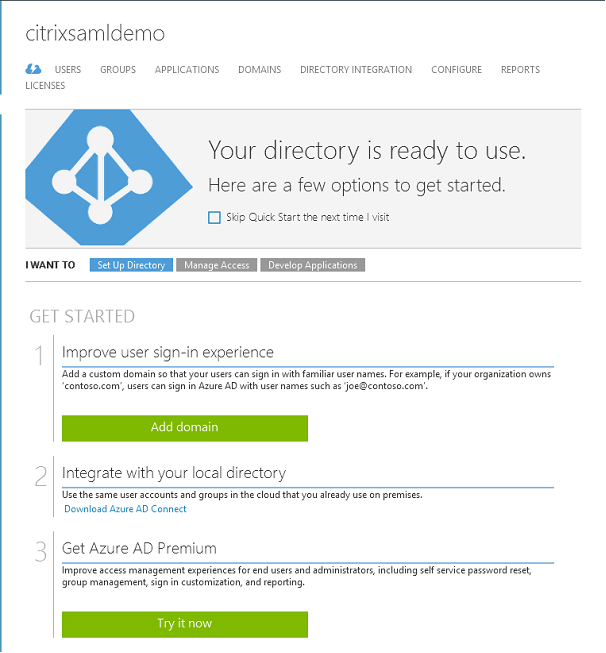
Log on to the classic Azure portal and create a new directory.
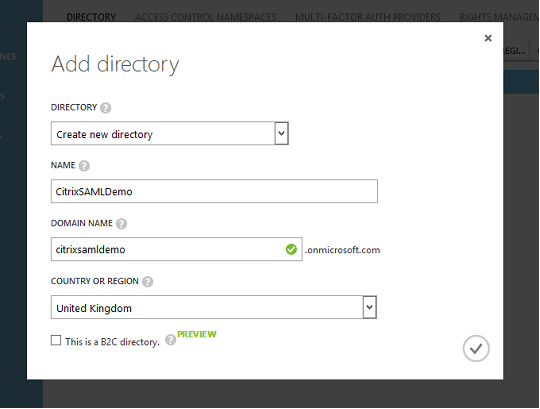
When complete, a summary page appears.
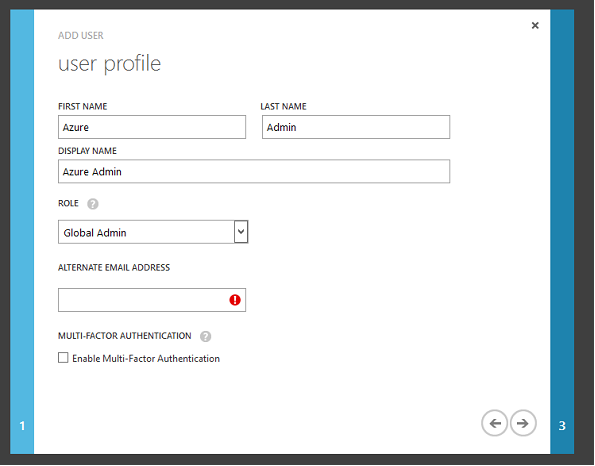
Create a global administrator user (AzureAdmin)
Create a global administrator in Azure (in this example, AzureAdmin@citrixsamldemo.onmicrosoft.com) and log on with the new account to set up a password.
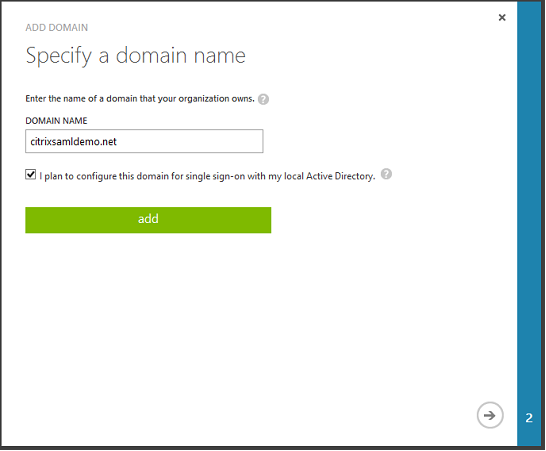
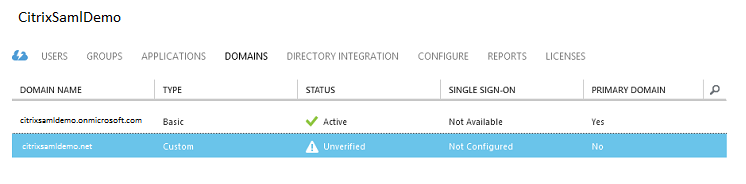
Register your domain with Azure AD
By default, users are identified with an email address in the form: <user.name>@<company>.onmicrosoft.com.
Although this works without further configuration, a standard format email address is better, preferably one that matches the email account of the end user: <user.name>@<company>.com.
The Add domain action configures a redirect from your real company domain. The example uses citrixsamldemo.net.
If you are setting up ADFS for single sign-on, enable the check box.
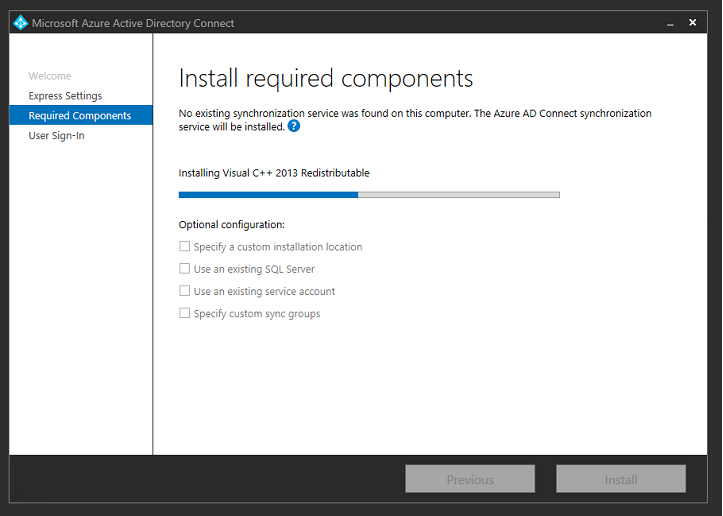
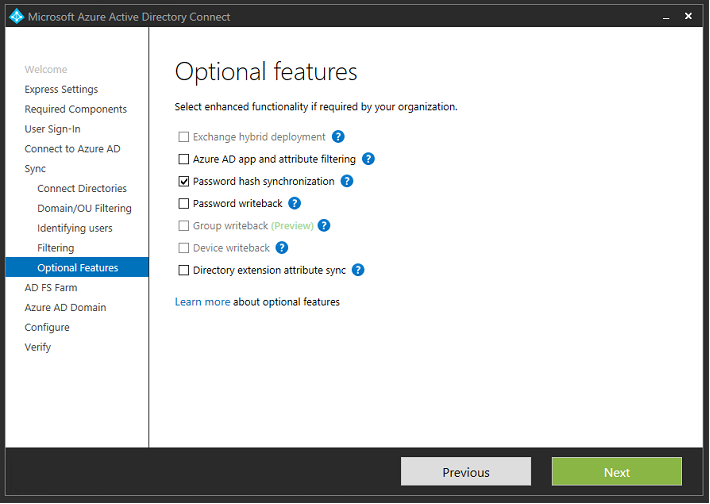
Install Azure AD Connect
Step 2 of the Azure AD configuration GUI redirects to the Microsoft download page for Azure AD Connect. Install this on the ADFS VM. Use Custom install, rather than Express Settings, so that ADFS options are available.
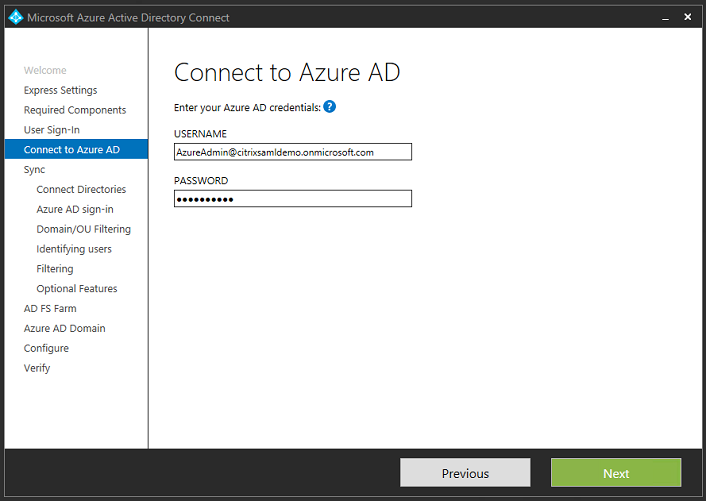
Select the Federation with AD FS Single sign-On option.

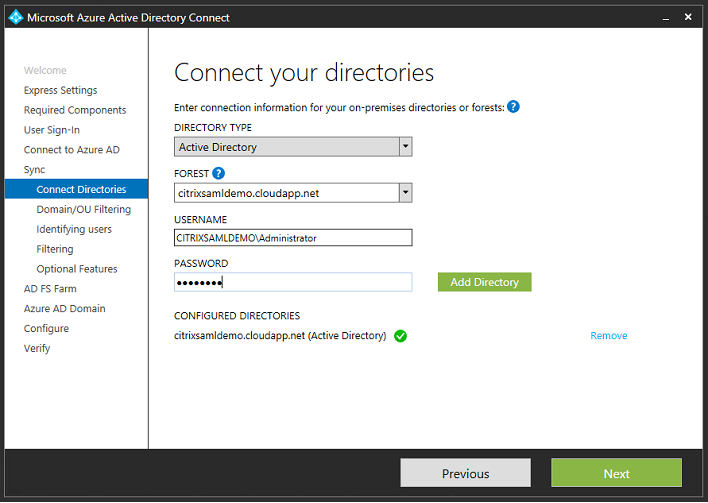
Connect to Azure with the administrator account you created earlier.
Select the internal AD forest.
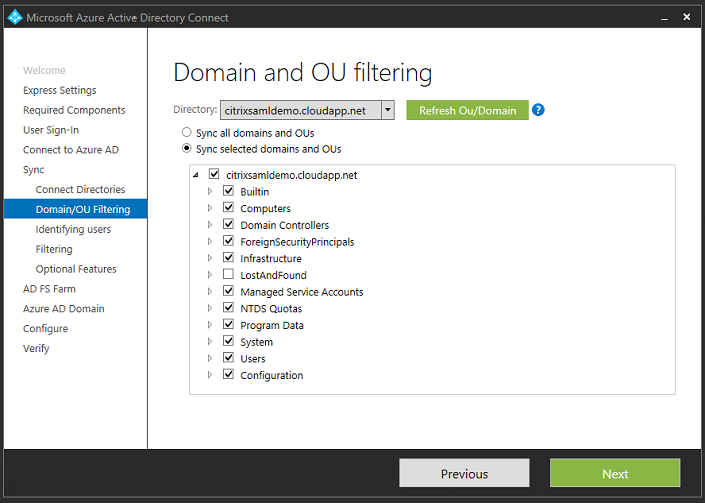
Synchronize all legacy Active Directory objects with Azure AD.
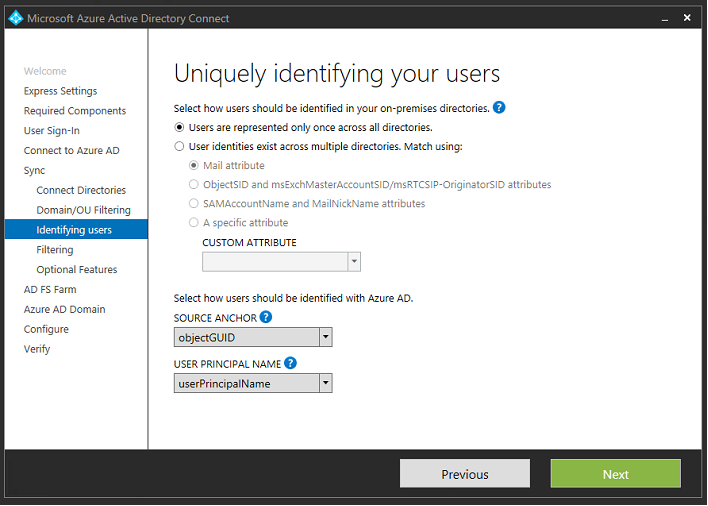
If the directory structure is simple, you can rely on the usernames being sufficiently unique to identify a user who logs on.
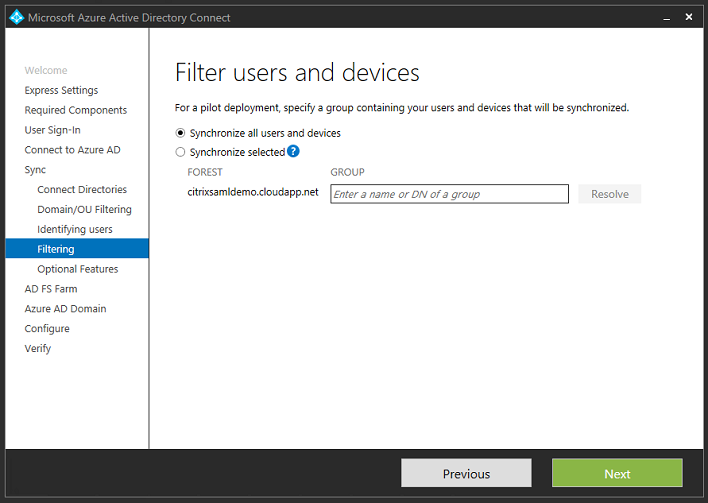
Accept the default filtering options, or restrict users and devices to a particular set of groups.
If desired, you can synchronize the Azure AD passwords with Active Directory. This is usually not required for ADFS-based authentication.
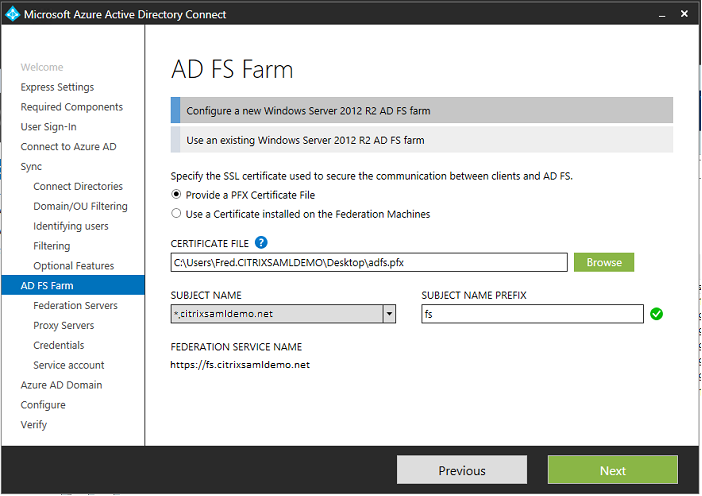
Select the certificate PFX file to use in AD FS, specifying fs.citrixsamldemo.net as the DNS name.
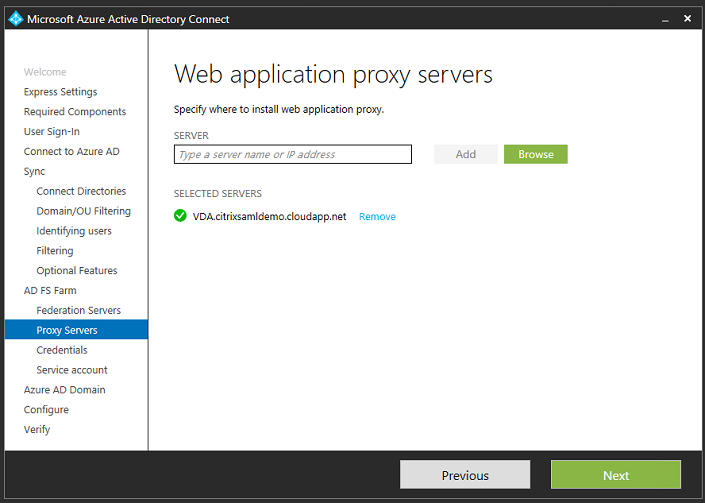
When prompted to select a proxy server, enter the address of the wap.citrixsamldemo.net server. You may need to run the Enable-PSRemoting –Force cmdlet as an administrator on the Web Application Proxy server, so that Azure AD Connect can configure it.
Note:
If this step fails due to Remote PowerShell trust problems, try joining the Web Application Proxy server to the domain.
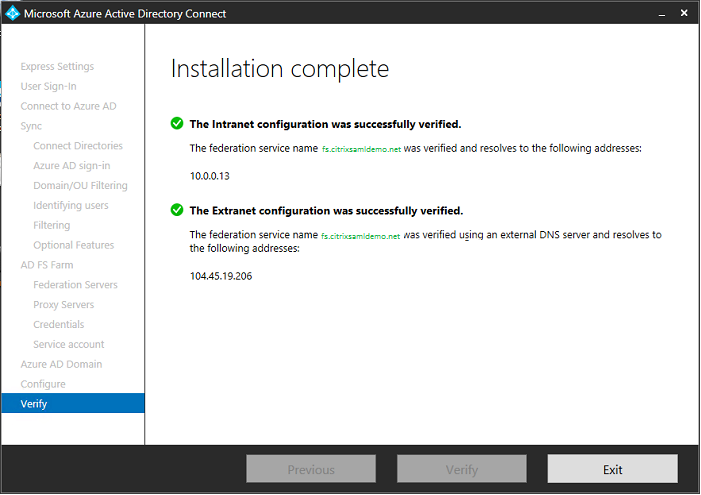
For the remaining steps of the wizard, use the standard administrator passwords, and create a service account for ADFS. Azure AD Connect will then prompt to validate the ownership of the DNS zone.
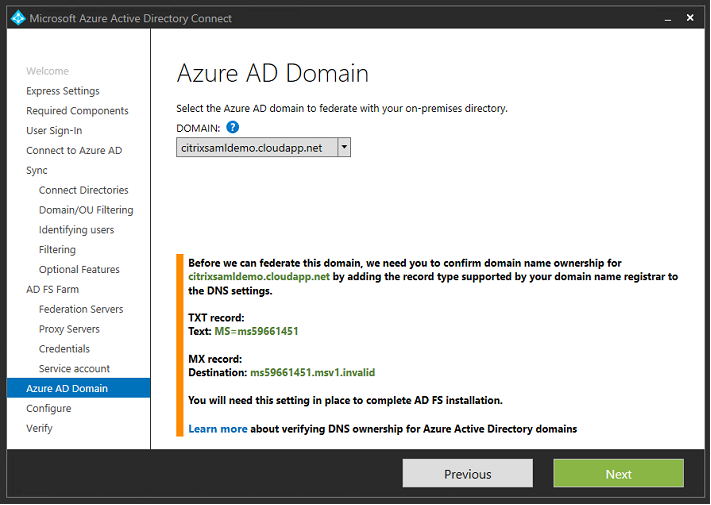
Add the TXT and MX records to the DNS address records in Azure.

Click Verify in the Azure Management Console.
Note:
If this step fails, you can verify the domain before running Azure AD Connect.
When complete, the external address fs.citrixsamldemo.net is contacted over port 443.
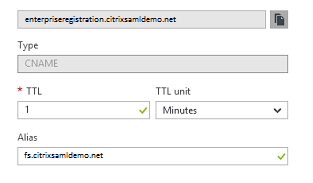
Enable Azure AD Join
When a user enters an email address so that Windows 10 can perform Azure AD join, the DNS suffix is used to construct a CNAME DNS record that should point to ADFS: enterpriseregistration.<upnsuffix>.
In the example, this is fs.citrixsamldemo.net.
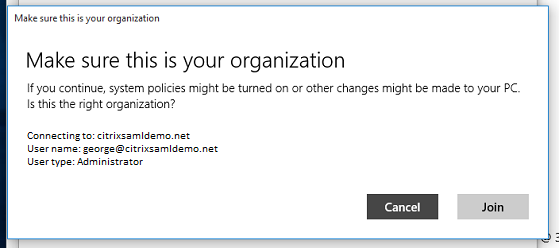
If you are not using a public certificate authority, ensure that the ADFS root certificate is installed on the Windows 10 computer so that Windows trusts the ADFS server. Perform an Azure AD domain join using the standard user account generated earlier.
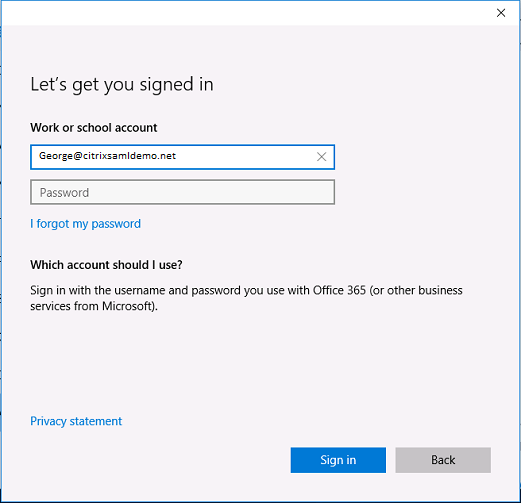
Note that the UPN must match the UPN recognized by the ADFS domain controller.

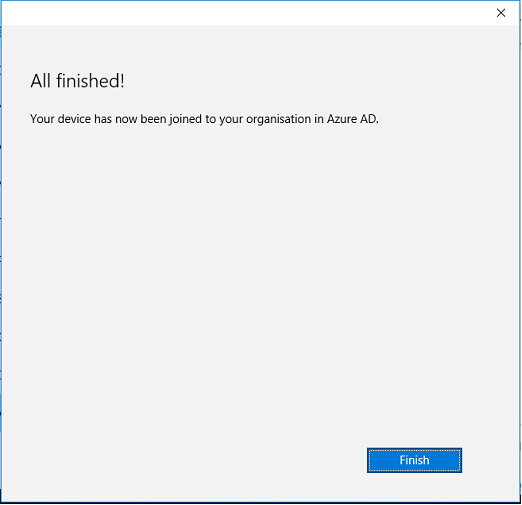
Verify that the Azure AD join was successful by restarting the machine and logging on, using the user’s email address. When logged on, launch Microsoft Edge and connect to http://myapps.microsoft.com. The web site should use single sign-on automatically.
Install Citrix Virtual Apps or Citrix Virtual Desktops
You can install the Delivery Controller and VDA virtual machines in Azure directly from the Citrix Virtual Apps or Citrix Virtual Desktops ISO in the usual way.
In this example, StoreFront is installed on the same server as the Delivery Controller. The VDA is installed as a standalone Windows 2012 R2 RDS worker, without integrating with Machine Creation Services (although that can optionally be configured). Check that the user George@citrixsamldemo.net can authenticate with a password, before continuing.
Run the Set-BrokerSite –TrustRequestsSentToTheXmlServicePort $true PowerShell cmdlet on the Controller to allow StoreFront™ to authenticate without the users’ credentials.
Install Federated Authentication Service
Install FAS on the ADFS server and configure a rule for the Delivery Controller to act as a trusted StoreFront (since, in this example, StoreFront is installed on the same VM as the Delivery Controller). See Install and configure.
Configure StoreFront
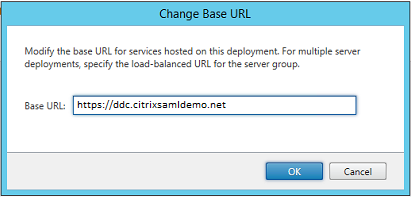
Request a computer certificate for the Delivery Controller, and configure IIS and StoreFront to use HTTPS by setting an IIS binding for port 443, and changing the StoreFront base address to https:.
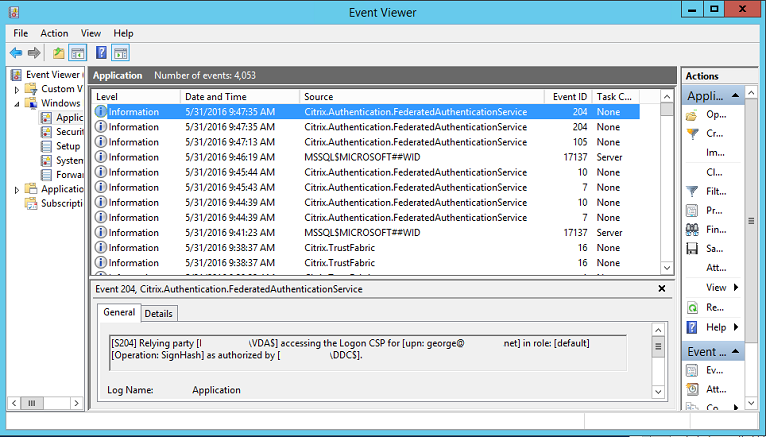
Configure StoreFront to use the FAS server (use the PowerShell script in Install and configure), and test internally within Azure, ensuring that the logon uses FAS by checking the event viewer on the FAS server.
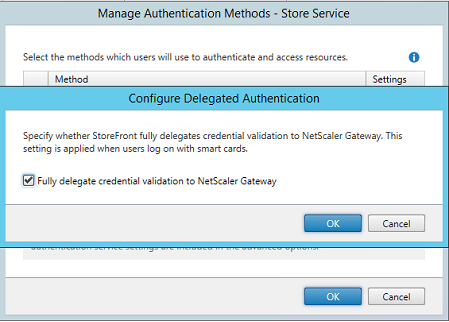
Configure StoreFront to use Citrix Gateway
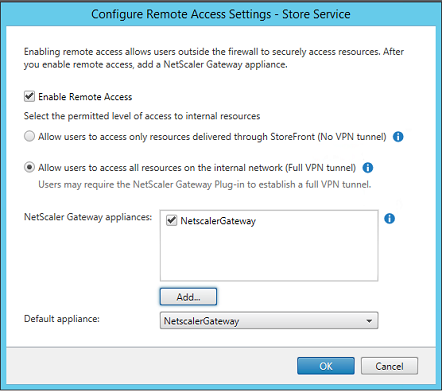
Using the Manage Authentication Methods GUI in the StoreFront management console, configure StoreFront to use Citrix Gateway to perform authentication.
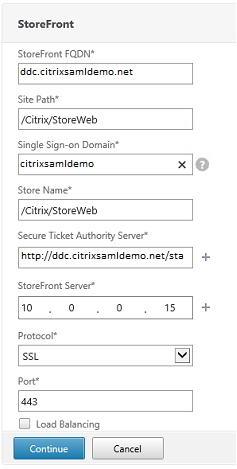
To integrate Citrix Gateway authentication options, configure a Secure Ticket Authority (STA) and configure the Citrix Gateway address.
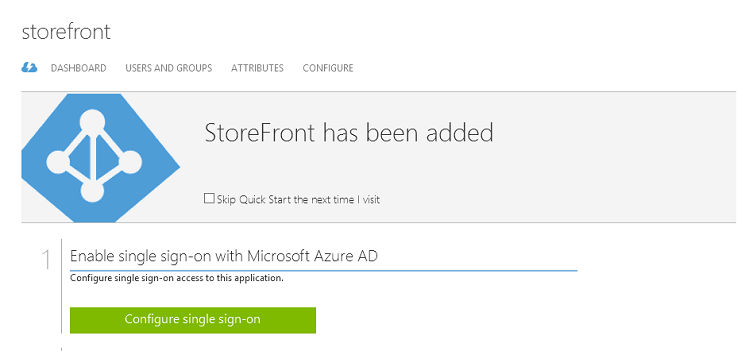
Configure a new Azure AD application for Single Sign-on to StoreFront
This section uses the Azure AD SAML 2.0 Single Sign-on features, which currently require an Azure Active Directory Premium subscription. In the Azure AD management tool, select New Application, choosing Add an application from the Gallery.
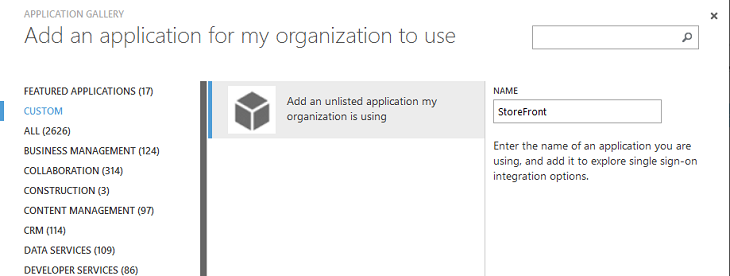
Select CUSTOM > Add an unlisted application my organization is using to create a new custom application for your users.
Configure an icon
Create an image 215 by 215 pixels in size and upload it on the CONFIGURE page to use as an icon for the application.
![]()
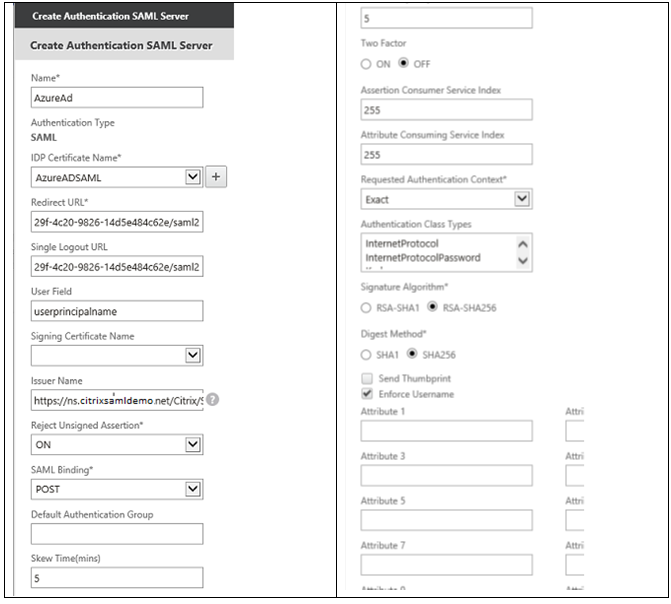
Configure SAML authentication
Return to the Application dashboard overview page and select Configure Single sign-on.
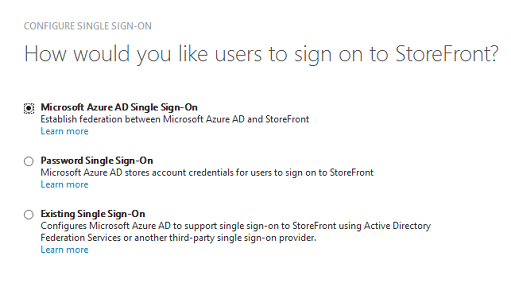
This deployment will use SAML 2.0 authentication, which corresponds to Microsoft Azure AD Single Sign-On.
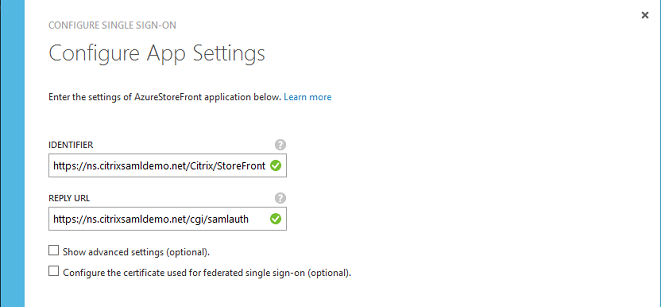
The Identifier can be an arbitrary string (it must match the configuration provided to Citrix Gateway); in this example, the Reply URL is /cgi/samlauth on the Citrix Gateway server.
The next page contains information that is used to configure Citrix Gateway as a relying party to Azure AD.
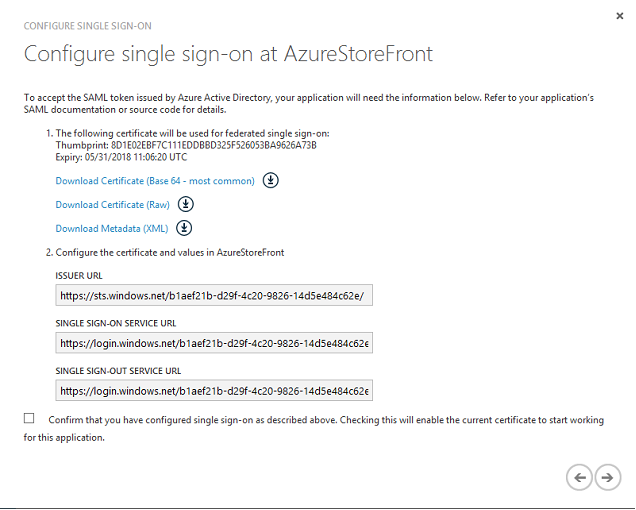
Download the base 64 trusted signing certificate and copy the sign-on and sign-out URLs. You will paste these in Citrix Gateway configuration screens later.
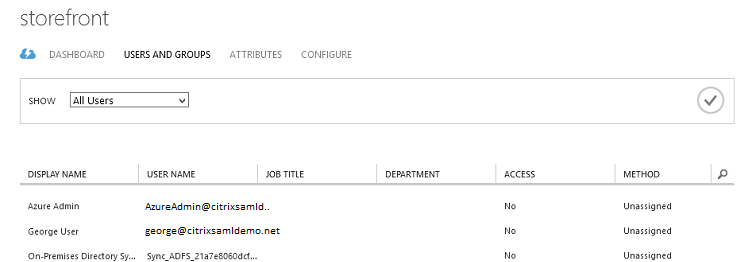
Assign the application to users
The final step is to enable the application so that it appears on users’ “myapps.microsoft.com” control page. This is done on the USERS AND GROUPS page. Assign access for the domain users accounts synchronized by Azure AD Connect. Other accounts can also be used, but they must be explicitly mapped because they do not conform to the <user>@<domain> pattern.
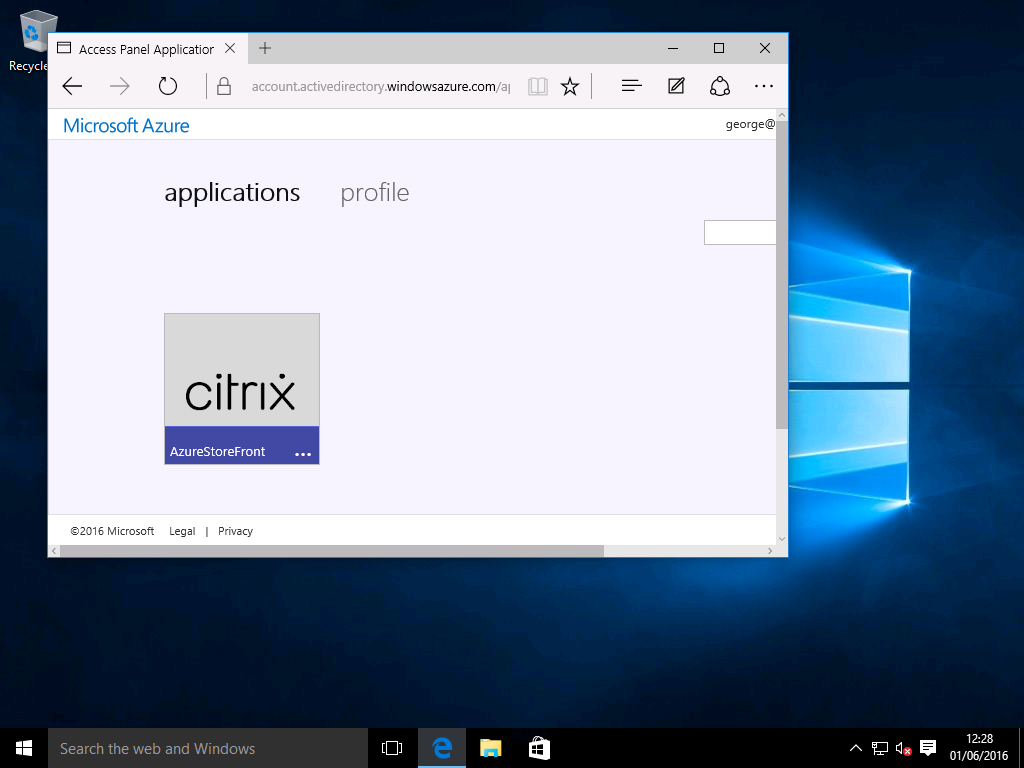
MyApps page
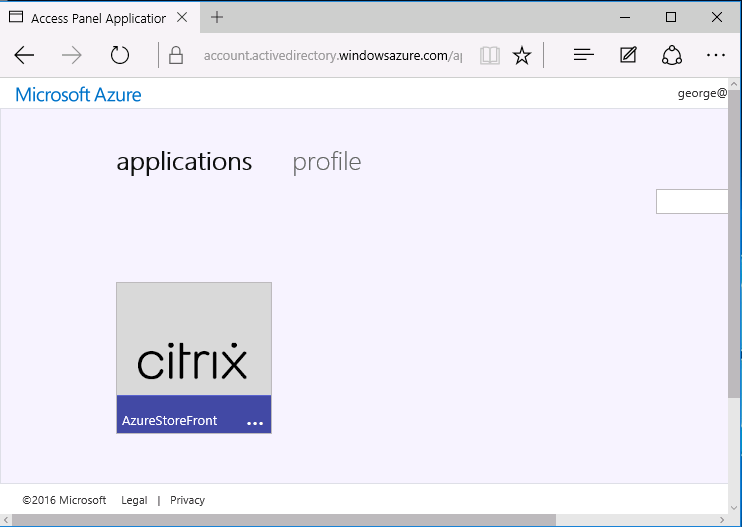
When the application has been configured, it appears on the users’ lists of Azure applications when they visit https://myapps.microsoft.com.
When it is Azure AD joined, Windows 10 supports single sign-on to Azure applications for the user who logs on. Clicking the icon takes the browser to the SAML cgi/samlauth web page that was configured earlier.
Single sign-on URL
Return to the application in the Azure AD dashboard. There is now a single sign-on URL available for the application. This URL is used to provide web browser links or to create Start menu shortcuts that take users directly into StoreFront.
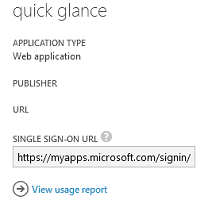
Paste this URL into a web browser to ensure that you are redirected by Azure AD to the Citrix Gateway cgi/samlauth web page configured earlier. This works only for users who have been assigned, and will provide single sign-on only for Windows 10 Azure AD-joined logon sessions. (Other users will be prompted for Azure AD credentials.)
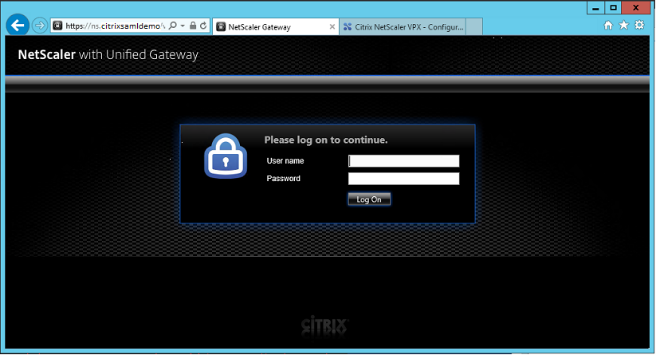
Install and configure Citrix Gateway
To remotely access the deployment, this example uses a separate VM running NetScaler (now Citrix Gateway). This can be purchased from the Azure Store. This example uses the “Bring your own License” version of NetScaler 11.0.
Log on to the NetScaler® VM, pointing a web browser to the internal IP address, using the credentials specified when the user authenticated. Note that you must change the password of the nsroot user in an Azure AD VM.
Add licenses, selecting reboot after each license file is added, and point the DNS resolver to the Microsoft domain controller.
Run the Citrix Virtual Apps and Desktops setup wizard
This example starts by configuring a simple StoreFront integration without SAML. After that deployment is working, it adds a SAML logon policy.
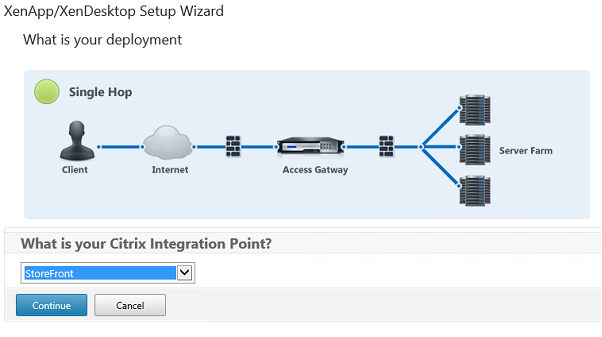
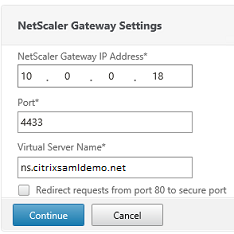
Select the standard Citrix Gateway StoreFront settings. For use in Microsoft Azure, this example configures port 4433, rather than port 443. Alternatively, you can port-forward or remap the Citrix Gateway administrative web site.
For simplicity, the example uploads an existing server certificate and private key stored in a file.
Configure the domain controller for AD account management
The domain controller will be used for account resolution, so add its IP address into the primary authentication method. Note the formats expected in each field in the dialog box.

Configure the StoreFront address
In this example, StoreFront has been configured using HTTPS, so select the SSL protocol options.
Verify the Citrix Gateway deployment
Connect to Citrix Gateway and check that authentication and launch are successful with the username and password.
Enable Citrix Gateway SAML authentication support
Using SAML with StoreFront is similar to using SAMl with other web sites. Add a new SAML policy, with an expression of NS_TRUE.
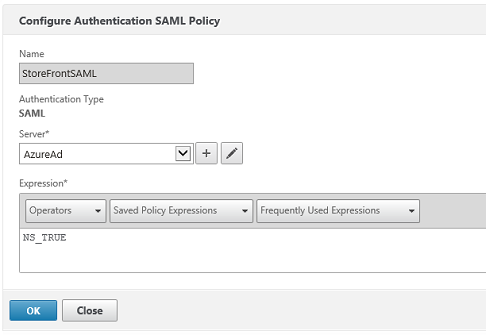
Configure the new SAML IdP server, using information obtained from Azure AD earlier.
Verify the end-to-end system
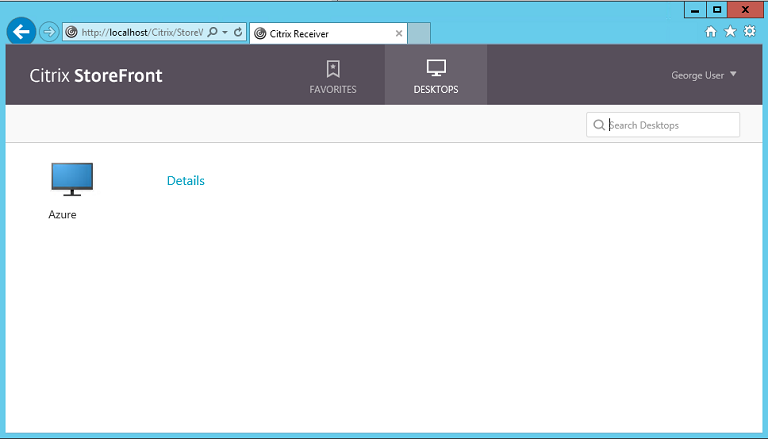
Log on to an Azure AD Joined Windows 10 desktop, using an account registered in Azure AD. Launch Microsoft Edge and connect to: https://myapps.microsoft.com.
The web browser should display the Azure AD applications for the user.
Verify that clicking the icon redirects you to an authenticated StoreFront server.
Similarly, verify that direct connections using the Single Sign-on URL and a direct connection to the Citrix Gateway site redirect you to Microsoft Azure and back.
Finally, verify that non-Azure AD joined machines also function with the same URLs (although there will be a single explicit sign-on to Azure AD for the first connection).
Appendix
You should configure the following standard options when you are setting up a VM in Azure.
Provide a public IP address and DNS address
Azure gives all VMs an IP address on the internal subnet (10.*.*.* in this example). By default a public IP address is also supplied, which can be referenced by a dynamically updated DNS label.
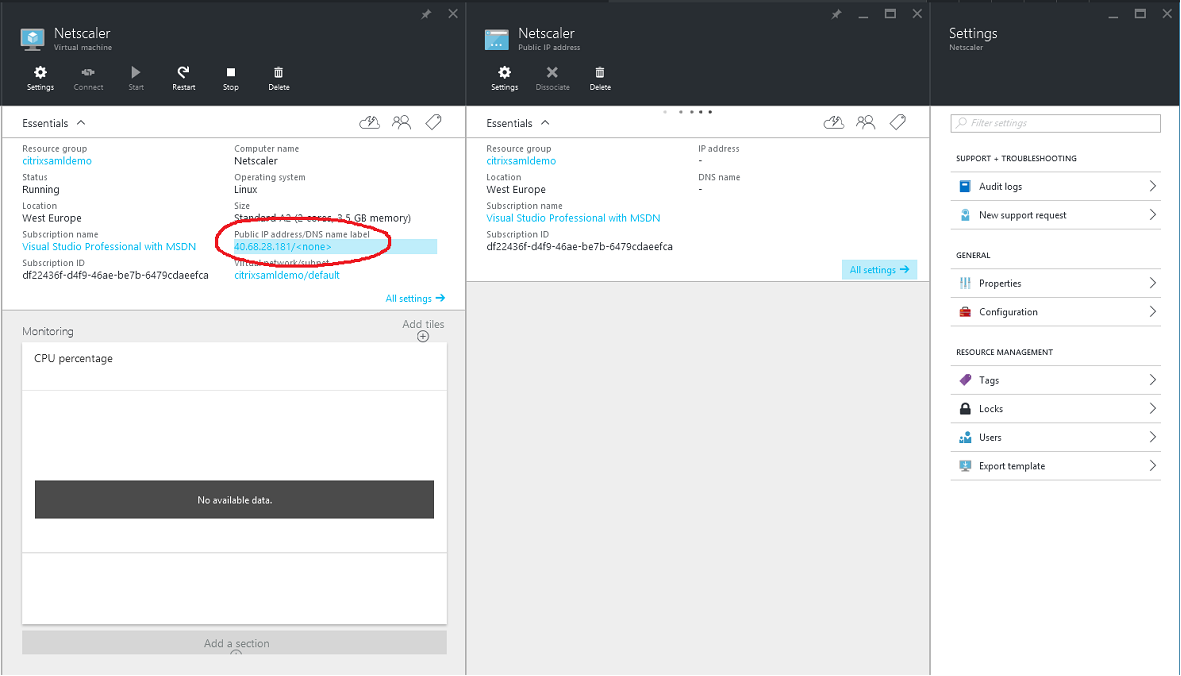
Select Configuration of the Public IP address/DNS name label. Choose a public DNS address for the VM. This can be used for CNAME references in other DNS zone files, ensuring that all DNS records remain correctly pointing to the VM, even if the IP address is reallocated.

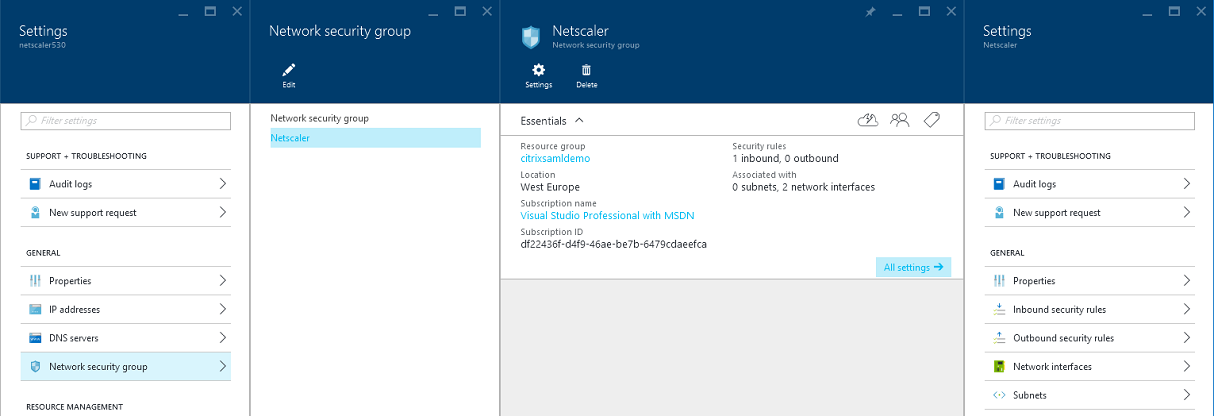
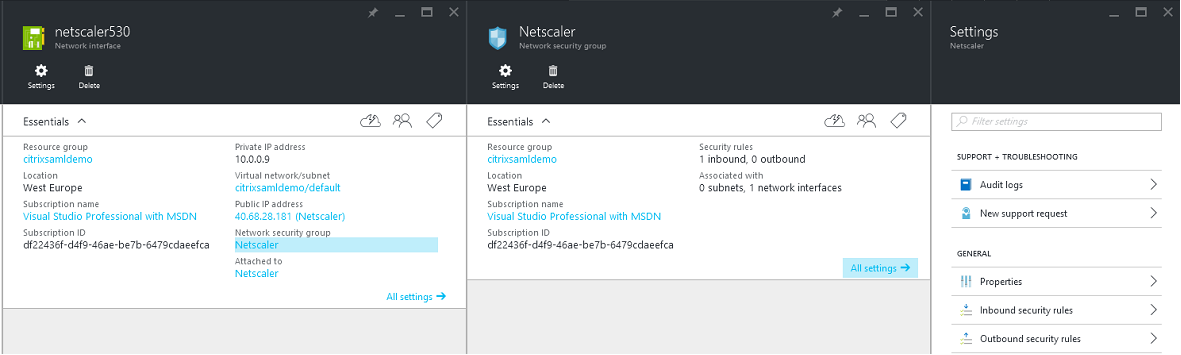
Set up firewall rules (security group)
Each VM in a cloud has a set of firewall rules applied automatically, known as the security group. The security group controls traffic forwarded from the public to the private IP address. By default, Azure allows RDP to be forwarded to all VMs. The Citrix Gateway and ADFS servers must also need to forward TLS traffic (443).
Open Network Interfaces for a VM, and then click the Network Security Group label. Configure the Inbound security rules to allow appropriate network traffic.
Related information
- Install and configure is the primary reference for FAS installation and configuration.
- The common FAS deployments are summarized in the Deployment architectures article.
- “How-to” articles are introduced in the Advanced configuration article.
In this article
- Introduction
- Architecture
- Create a DNS zone
- Create a Cloud Service
- Create Windows virtual machines
- Configure an internal DNS
- Configure an external DNS address
- Configure security groups
- Create an ADFS certificate
- Set up Azure AD
- Enable Azure AD Join
- Install Citrix Virtual Apps or Citrix Virtual Desktops
- Configure a new Azure AD application for Single Sign-on to StoreFront
- Install and configure Citrix Gateway
- Configure the StoreFront address
- Enable Citrix Gateway SAML authentication support
- Verify the end-to-end system
- Appendix
- Related information