Install and configure
Install and setup sequence
- Install the Federated Authentication Service (FAS)
- Enable the FAS plug-in on StoreFront stores
- Configure the Delivery Controller
- Configure Group Policy
- Use the FAS administration console to:
Install the Federated Authentication Service
For security, Citrix recommends that Federated Authentication Service (FAS) is installed on a dedicated server that is secured in a similar way to a domain controller or certificate authority. FAS can be installed from either:
- the Citrix Virtual Apps and Desktops™ installer (from the Federated Authentication Service button on the autorun splash screen when the ISO is inserted), or
- the stand-alone FAS installer file (available as an MSI file on Citrix Downloads).
These install the following components:
- Federated Authentication Service
- PowerShell snap-in cmdlets for advanced FAS configuration
- FAS administration console
- FAS Group Policy templates (CitrixFederatedAuthenticationService.admx/adml)
- Certificate template files
- Performance counters and event logs
Upgrading FAS
You can upgrade FAS to a newer version using an in-place upgrade. Before upgrading, consider the following:
- All FAS server settings are preserved when you perform an in-place upgrade.
- Ensure that the FAS administration console is closed before you upgrade FAS.
- Ensure that at least one FAS server is available at all times. If no server is reachable by a Federation Authentication Service-enabled StoreFront™ server, users cannot log on or start applications.
To start an upgrade, install FAS from the Citrix Virtual Apps and Desktops installer or from the stand-alone FAS installer file.
Enable the FAS plug-in on StoreFront stores
Note:
This step is not needed if you are using FAS only with Citrix Cloud.
To enable FAS integration on a StoreFront Store, run the following PowerShell cmdlets as an Administrator account. If the store has a different name, modify $StoreVirtualPath.
    Get-Module "Citrix.StoreFront.*" -ListAvailable | Import-Module
    $StoreVirtualPath = "/Citrix/Store"
    $store = Get-STFStoreService -VirtualPath $StoreVirtualPath
    $auth = Get-STFAuthenticationService -StoreService $store
    Set-STFClaimsFactoryNames -AuthenticationService $auth -ClaimsFactoryName "FASClaimsFactory"
    Set-STFStoreLaunchOptions -StoreService $store -VdaLogonDataProvider "FASLogonDataProvider"
<!--NeedCopy-->
To stop using FAS, use the following PowerShell script:
    Get-Module "Citrix.StoreFront.*" -ListAvailable | Import-Module
    $StoreVirtualPath = "/Citrix/Store"
    $store = Get-STFStoreService -VirtualPath $StoreVirtualPath
    $auth = Get-STFAuthenticationService -StoreService $store
    Set-STFClaimsFactoryNames -AuthenticationService $auth -ClaimsFactoryName "standardClaimsFactory"
    Set-STFStoreLaunchOptions -StoreService $store -VdaLogonDataProvider ""
<!--NeedCopy-->
Configure the Delivery Controller™
Note:
This step is not needed if you are using FAS only with Citrix Cloud.
To use FAS, configure the Citrix Virtual Apps or Citrix Virtual Desktops™ Delivery Controller to trust the StoreFront servers that can connect to it: run the Set-BrokerSite -TrustRequestsSentToTheXmlServicePort $true PowerShell cmdlet. This only needs to be done once per site, regardless of the number of Delivery Controllers in the site.
Configure Group Policy
After you install FAS, you must specify the fully qualified domain names (FQDNs) of the FAS servers in Group Policy using the Group Policy templates provided in the installation.
Important:
Ensure that the StoreFront servers requesting tickets and the Virtual Delivery Agents (VDAs) redeeming tickets have identical configuration of FQDNs, including the automatic server numbering applied by the Group Policy object.
For simplicity, the following examples configure a single policy at the domain level that applies to all machines; however, that is not required. FAS will function as long as the StoreFront servers, VDAs, and the machine running the FAS administration console see the same list of FQDNs. See Step 6.
Step 1. On the server where you installed FAS, locate the C:\Program Files\Citrix\Federated Authentication Service\PolicyDefinitions\CitrixFederatedAuthenticationService.admx and CitrixBase.admx files, and the en-US folder.
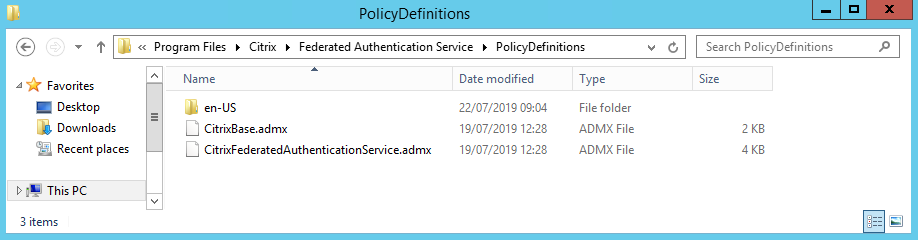
Step 2. Copy these to your domain controllers and place them in the C:\Windows\PolicyDefinitions and en-US subfolder.
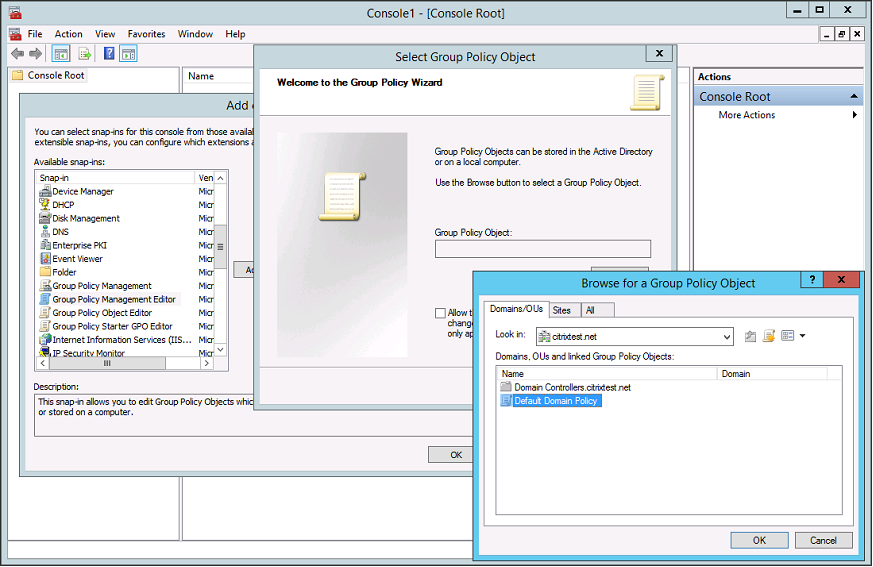
Step 3. Run the Microsoft Management Console (mmc.exe from the command line). From the menu bar, select File > Add/Remove Snap-in. Add the Group Policy Management Editor.
When prompted for a Group Policy Object, select Browse and then select Default Domain Policy. Alternatively, you can create and select an appropriate policy object for your environment, using the tools of your choice. The policy must be applied to all machines running affected Citrix software (VDAs, StoreFront servers, administration tools).
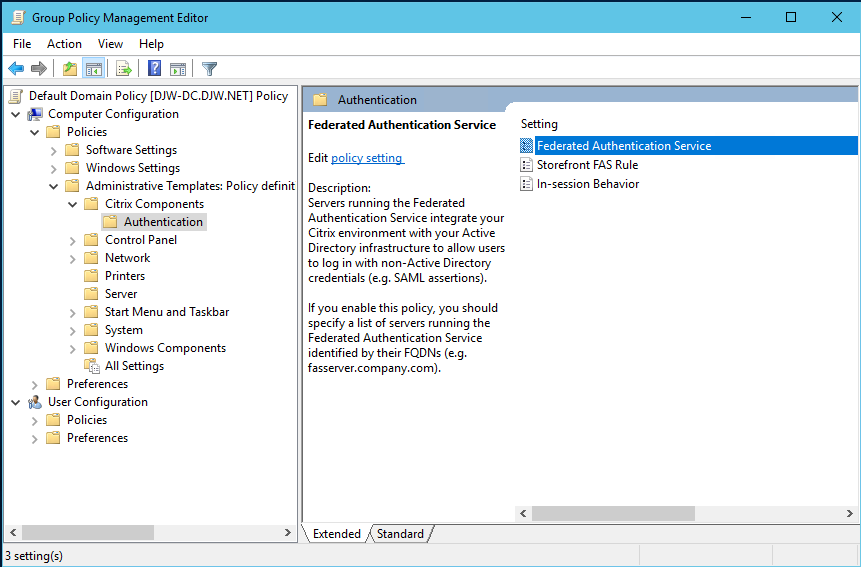
Step 4. Navigate to the Federated Authentication Service policy located in Computer Configuration/Policies/Administrative Templates/Citrix Components/Authentication.
Note:
The Federated Authentication Service policy setting is only available on the domain GPO when you add the CitrixBase.admx/CitrixBase.adml template file to the PolicyDefinitions folder. After Step 3, the Federated Authentication Service policy setting is listed in the Administrative Templates > Citrix Components > Authentication folder.
Step 5. Open the Federated Authentication Service policy and select Enabled. This allows you to select the Show button, where you configure the FQDNs of your FAS servers.
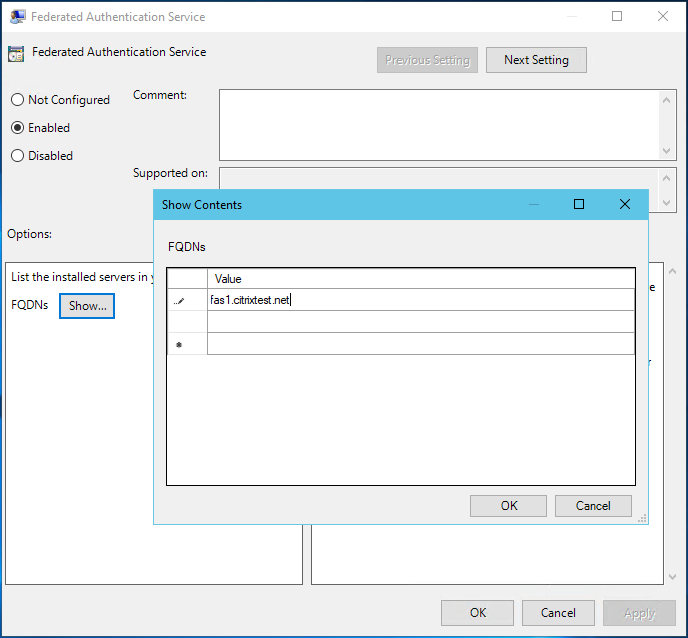
Step 6. Enter the FQDNs of the FAS servers.
Important:
If you enter multiple FQDNs, the order of the list must be consistent as seen by VDAs, StoreFront servers (if present), and FAS servers. See Group Policy settings.
Step 7. Click OK to exit the Group Policy wizard and apply the group policy changes. You may need to restart your machines (or run gpupdate /force from the command line) for the change to take effect.
In-session Behavior
This policy activates an agent process in the user’s VDA session which supports in-session certificates, consent, and disconnect on lock. In-session certificates are only available if this policy is enabled and if the FAS rule used to create the certificate has in-session use allowed, see Configure rules.
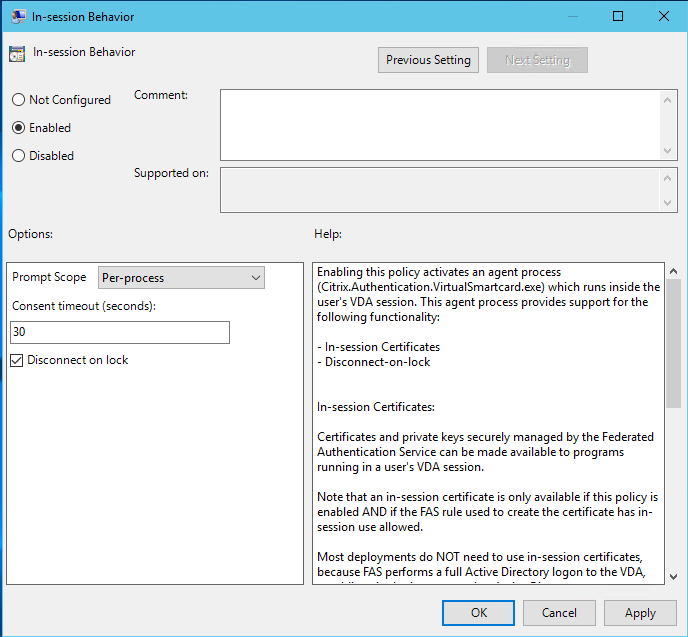
Enable enables this policy and allows a FAS agent process to run in the user’s VDA session.
Disable disables the policy and stops the FAS agent process from running.
Prompt Scope
If this policy is enabled, Prompt Scope controls how users are prompted for consent to allow an application to use an in-session certificate. There are three options:
- No consent required—This option disables the security prompt and private keys are used silently.
- Per-process consent—Each running program individually prompts for consent.
- Per-session consent—Once the user has clicked OK, this applies to all programs in the session.
Consent Timeout
If this policy is enabled, Consent Timeout controls how long (in seconds) the consent lasts. For example, with 300 seconds users see a prompt every five minutes. A value of zero prompts users for every private key operation.
Disconnect on lock
If this policy is enabled the user’s session is automatically disconnected when they lock the screen. This functionality provides similar behaviour to the “disconnect on smart card removal” policy, and is useful for situations where users do not have Active Directory logon credentials.
Note:
The disconnect on lock policy applies to all sessions on the VDA.
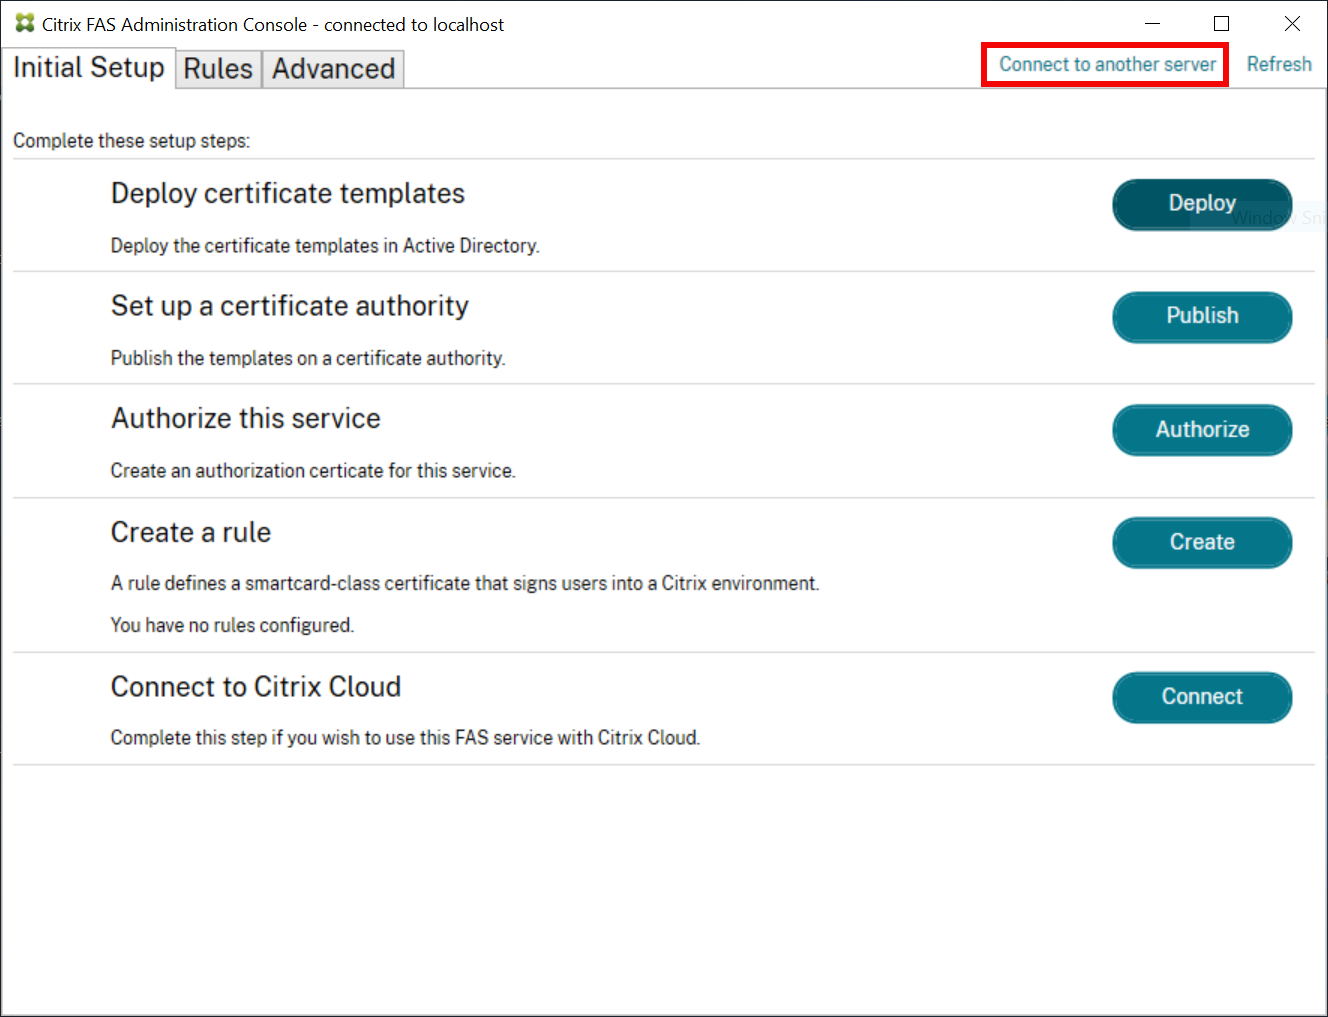
Using the Federated Authentication Service administration console
Note:
Although the FAS administration console is suitable for most deployments, the PowerShell interface offers more advanced options. For information on FAS PowerShell cmdlets, see PowerShell cmdlets.
The FAS administration console is installed as part of FAS. An icon (Citrix Federated Authentication Service) is placed in the Start Menu.
The first time the administration console is used, it guides you through a process that deploys certificate templates, sets up the certificate authority, and authorizes FAS to use the certificate authority. Some of the steps can alternatively be completed manually using OS configuration tools.
The FAS administration console connects to the local FAS service by default. If needed, you can connect to a remote service using Connect to another server in the top right of the console.
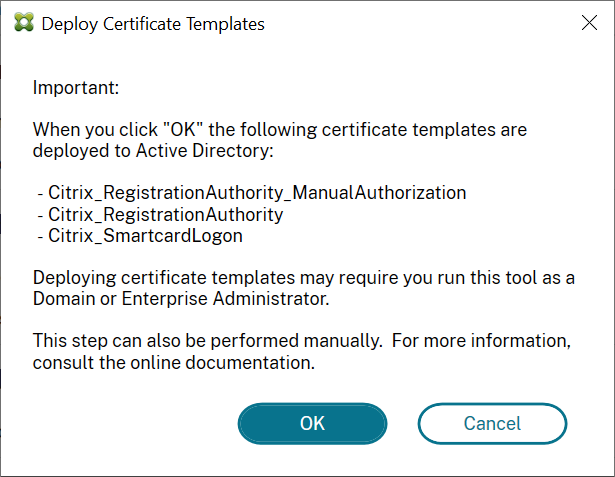
Deploy certificate templates
To avoid interoperability issues with other software, FAS provides three Citrix certificate templates for its own use.
- Citrix_RegistrationAuthority_ManualAuthorization
- Citrix_RegistrationAuthority
- Citrix_SmartcardLogon
These templates must be registered with Active Directory. Click the Deploy button then click OK.
The configuration of the templates can be found in the XML files with extension .certificatetemplate that are installed with FAS in:
C:\Program Files\Citrix\Federated Authentication Service\CertificateTemplates

If you do not have permission to install these template files, give them to your Active Directory Administrator.
To manually install the templates, you can run the following PowerShell commands from the folder containing the templates:
    $template = [System.IO.File]::ReadAllBytes("$Pwd\Citrix_SmartcardLogon.certificatetemplate")
    $CertEnrol = New-Object -ComObject X509Enrollment.CX509EnrollmentPolicyWebService
    $CertEnrol.InitializeImport($template)
    $comtemplate = $CertEnrol.GetTemplates().ItemByIndex(0)
    $writabletemplate = New-Object -ComObject X509Enrollment.CX509CertificateTemplateADWritable
    $writabletemplate.Initialize($comtemplate)
    $writabletemplate.Commit(1, $NULL)
<!--NeedCopy-->
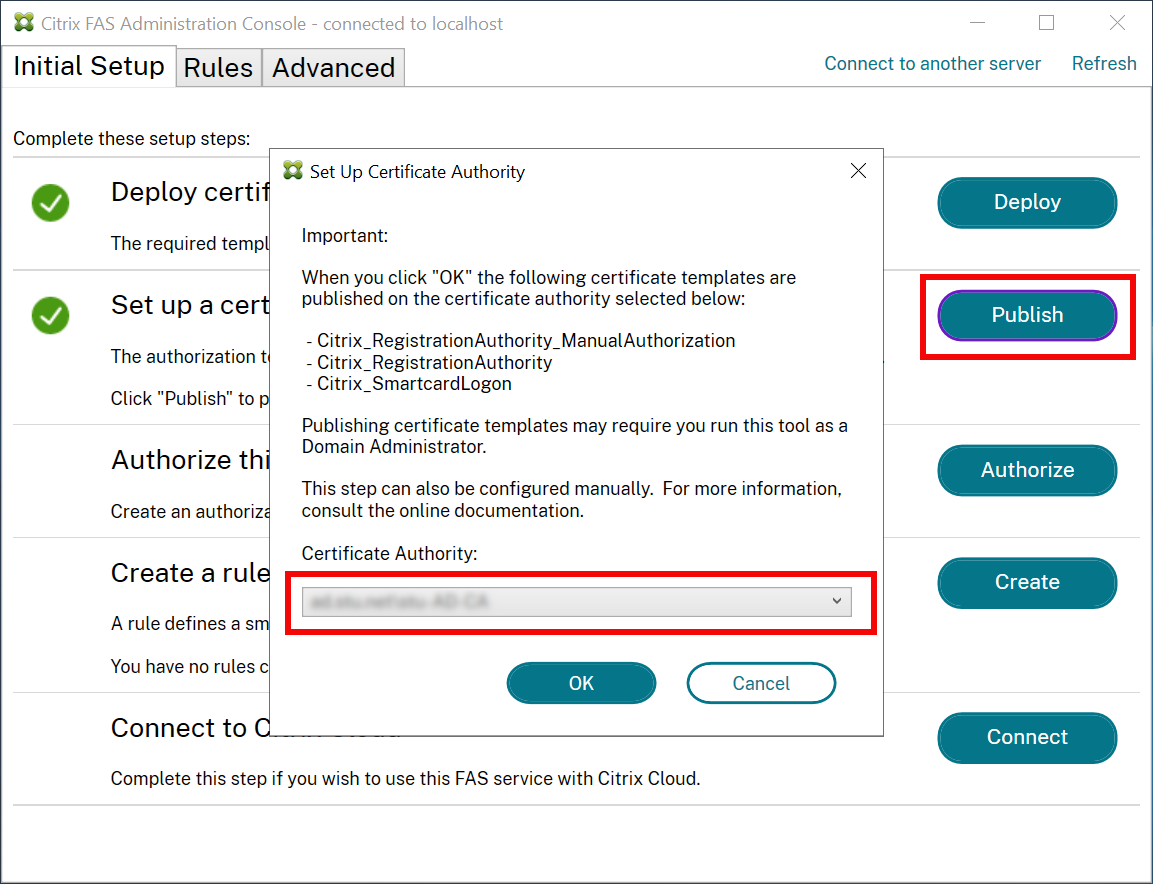
Set up Active Directory Certificate Services
After installing the Citrix certificate templates, they must be published on one or more Microsoft Enterprise Certification Authority servers. Refer to the Microsoft documentation on how to deploy Active Directory Certificate Services.
If the templates are not published on at least one server, use Set Up Certificate Authority to publish them. You must do this as a user that has permissions to administer the certificate authority.
(Certificate templates can also be published using the Microsoft Certification Authority console.)
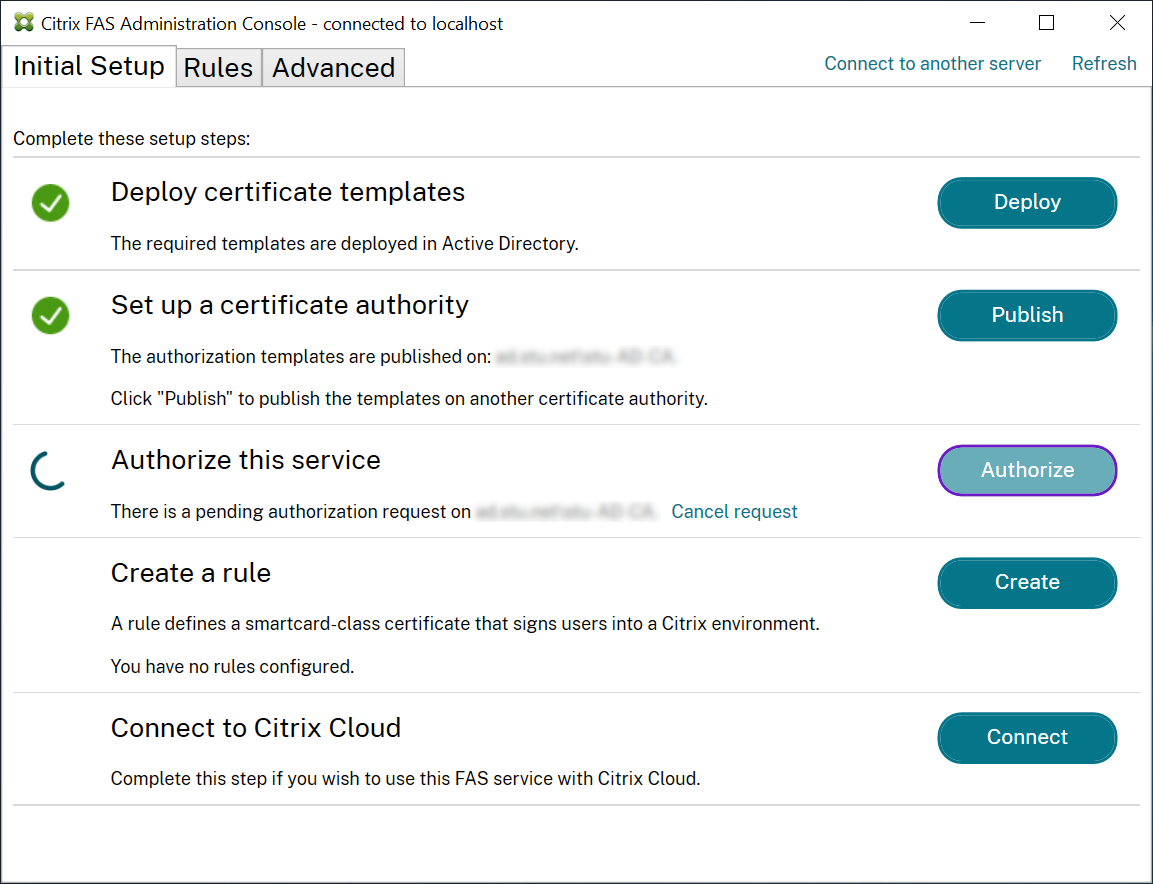
Authorize Federated Authentication Service
This step initiates the authorization of FAS. The administration console uses the Citrix_RegistrationAuthority_ManualAuthorization template to generate a certificate request, and then sends it to one of the certificate authorities that are publishing that template.
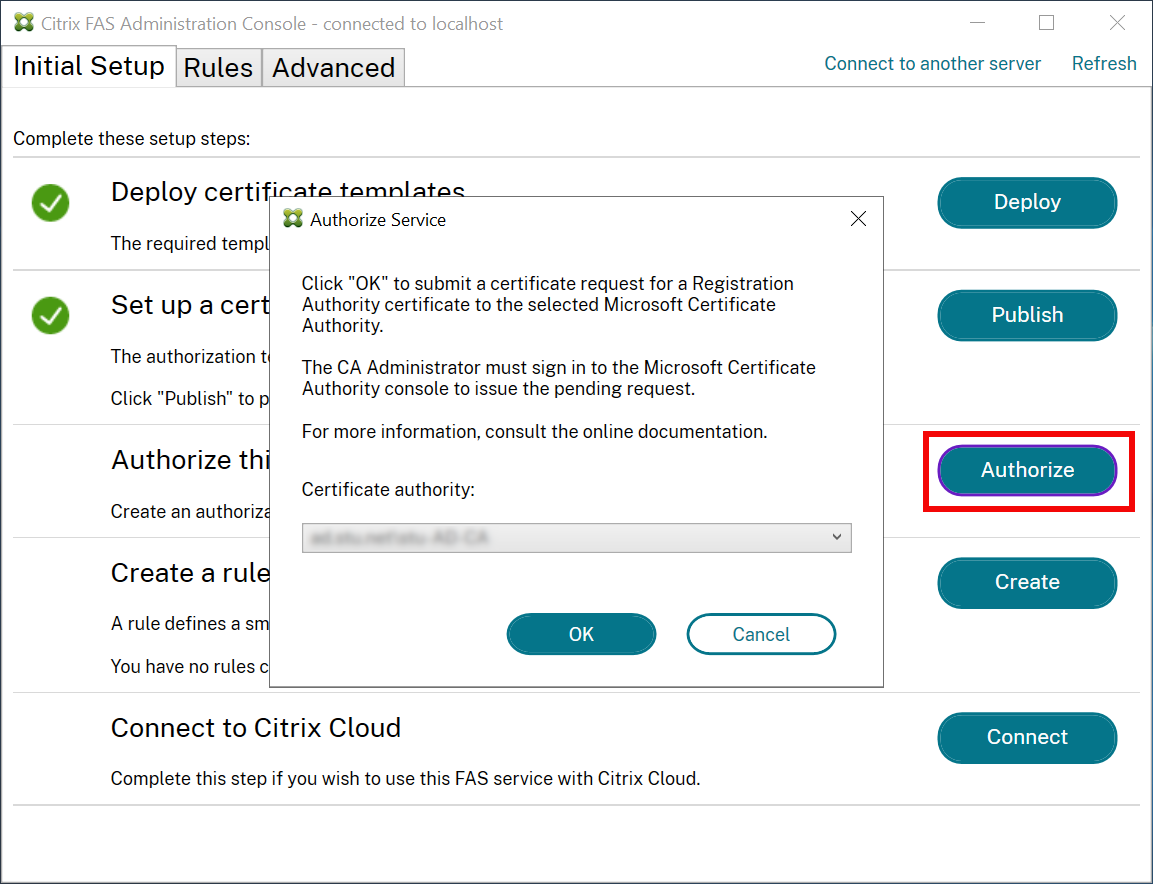
After the request is sent, it appears in the Pending Requests list of the Microsoft Certification Authority console as a pending request from the FAS machine account. The certificate authority administrator must issue or deny the request before configuration of FAS can continue.
The FAS administration console displays a busy ‘spinner’ until the administrator chooses Issue or Deny.
In the Microsoft Certification Authority console, right-click All Tasks and then select Issue or Deny for the certificate request. If you choose Issue, the FAS administration console displays the authorisation certificate. If you choose Deny, the console shows an error message.
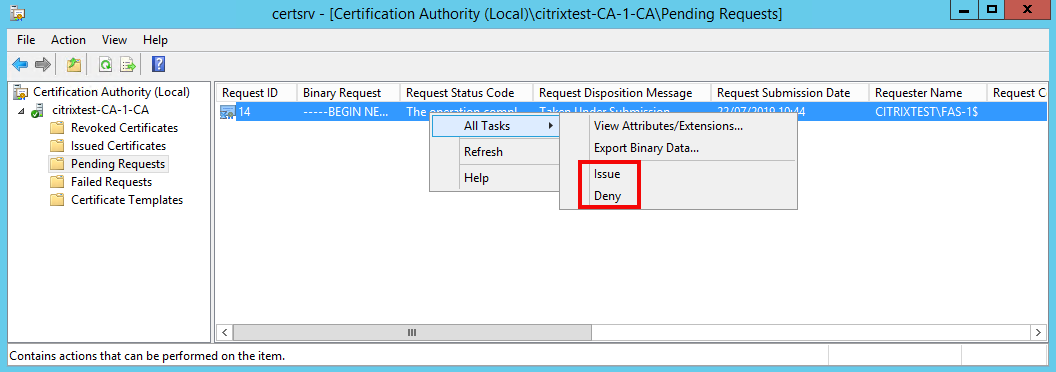
The FAS administration console automatically detects when this process completes. This can take a couple of minutes.
Configure rules
FAS uses rules to authorize the issuance of certificates for VDA logon and in-session use, as directed by StoreFront. Each rule specifies the StoreFront servers that are trusted to request certificates, the set of users for which they can be requested, and the set of VDA machines permitted to use them.
FAS needs at least one rule to be created and configured. We recommend that you create a rule named “default” because by default, StoreFront requests rule named “default” when contacting FAS.
You can create additional custom rules to reference different certificate templates and certificate authorities, and configure them to have different properties and permissions. These rules can be configured for use by different StoreFront servers or by Workspace. Configure StoreFront servers to request the custom rule by name using the Group Policy Configuration options.
Click Create (or Create rule on the “Rules” tab) to start the rule creation wizard which gathers information to create the rule. The “Rules” tab shows a summary of each rule.
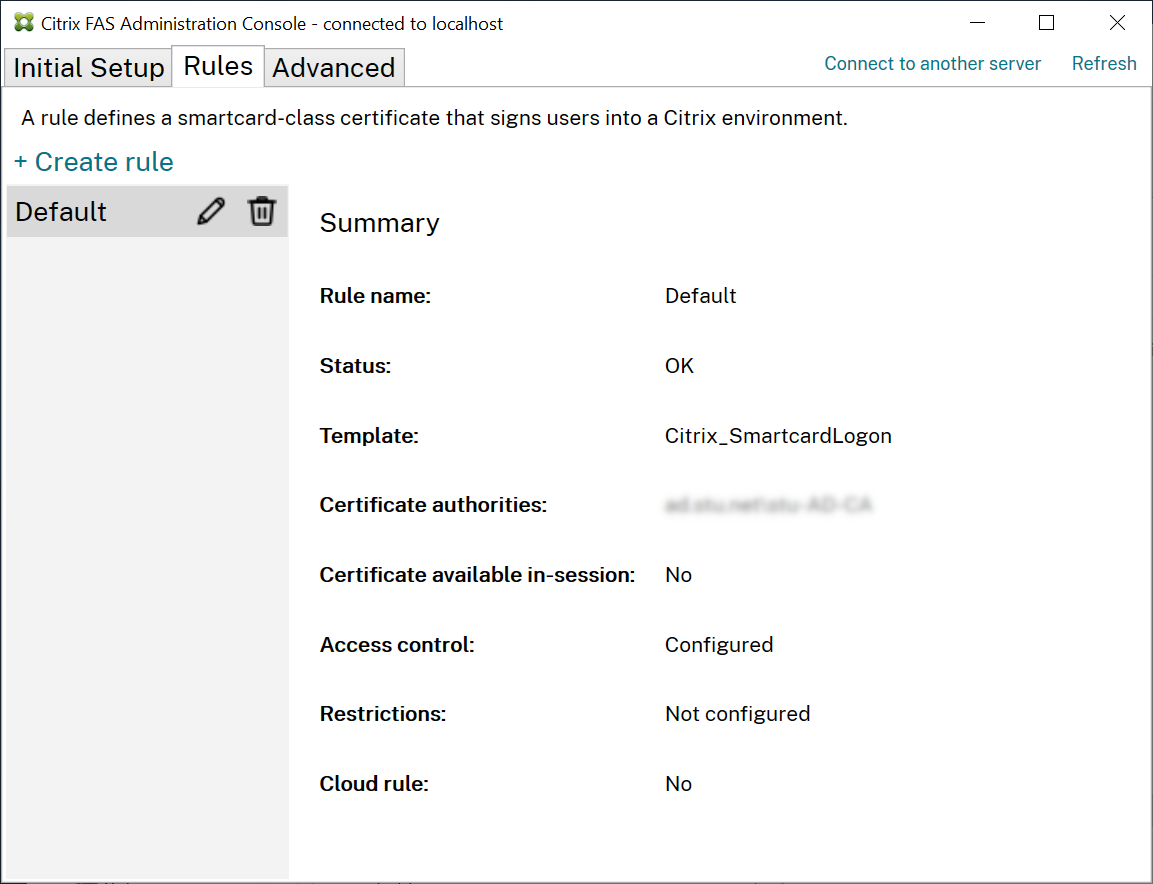
The following information is gathered by the wizard:
Template: The certificate template that is used to issue user certificates. This should be the Citrix_SmartcardLogon template, or a modified copy of it (see Certificate templates).
Certificate Authority: The certificate authority that issues user certificates. The template must be published by the certificate authority. FAS supports adding multiple certificate authorities for failover and load balancing. Make sure the status shows “Template available” for the certificate authority you choose. See Certificate authority administration.
In-Session Use: The Allow in-session use option controls whether a certificate can be used after logon to the VDA.
- Allow in-session use not selected (default, recommended)—the certificate is only used only for logon or reconnection, and users do not have access to the certificate after authenticating.
-
Allow in-session use selected—users have access to the certificate after authenticating. Most customers should not select this option. Resources accessed from within the VDA session, such as intranet websites or fileshares, can be accessed using Kerberos single sign-on, and therefore an in-session certificate is not required.
If you select Allow in-session use, the In-session Behavior group policy must also be enabled and applied to the VDA. Certificates are then placed in the user’s personal certificate store after logon for application use. For example, if you require TLS authentication to web servers within the VDA session, the certificate can be used by Internet Explorer.
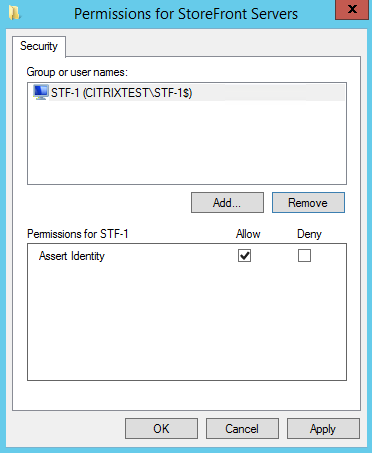
Access control: The list of trusted StoreFront server machines that are authorized to request certificates for logon or reconnection of users. For all these permissions you can add individual AD objects or groups.
Important:
The Access control setting is security critical, and must be managed carefully.
Note:
If you are using the FAS server only with Citrix Cloud you do not need to configure Access control. When a rule is used by Citrix Cloud, the StoreFront access permissions are ignored. You can use the same rule with Citrix Cloud and with an on-premises StoreFront deployment. StoreFront access permissions are still applied when the rule is used by an on-premises StoreFront.
The default permission (“Assert Identity” allowed) denies everything. Therefore you must explicitly allow your Storefront servers.
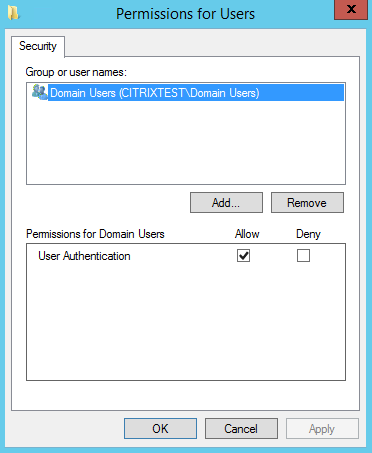
Restrictions: The list of VDA machines that can log users on using FAS and the list of users who can be issued certificates through FAS.
-
Manage VDA permissions lets you specify which VDAs can use FAS to log the user on. The list of VDAs defaults to Domain Computers.
-
Manage user permissions lets you specify which users can use FAS to sign in to a VDA. The list of users defaults to Domain Users.
Note:
If the FAS server is in a different domain from that of the VDAs and users, default restrictions must be modified.

Cloud rule: Indicates if the rule is applied when identity assertions are received from Citrix Workspace. When you connect to Citrix Cloud, you choose which rule to use for Citrix Cloud. You can also change the rule after connecting to Citrix Cloud from a link in the Connect to Citrix Cloud section.

Connect to Citrix Cloud
You can connect the FAS server to Citrix Cloud with Citrix Workspace. See this Citrix Workspace article.
-
In the Initial Setup tab, under Connect to Citrix Cloud click Connect.
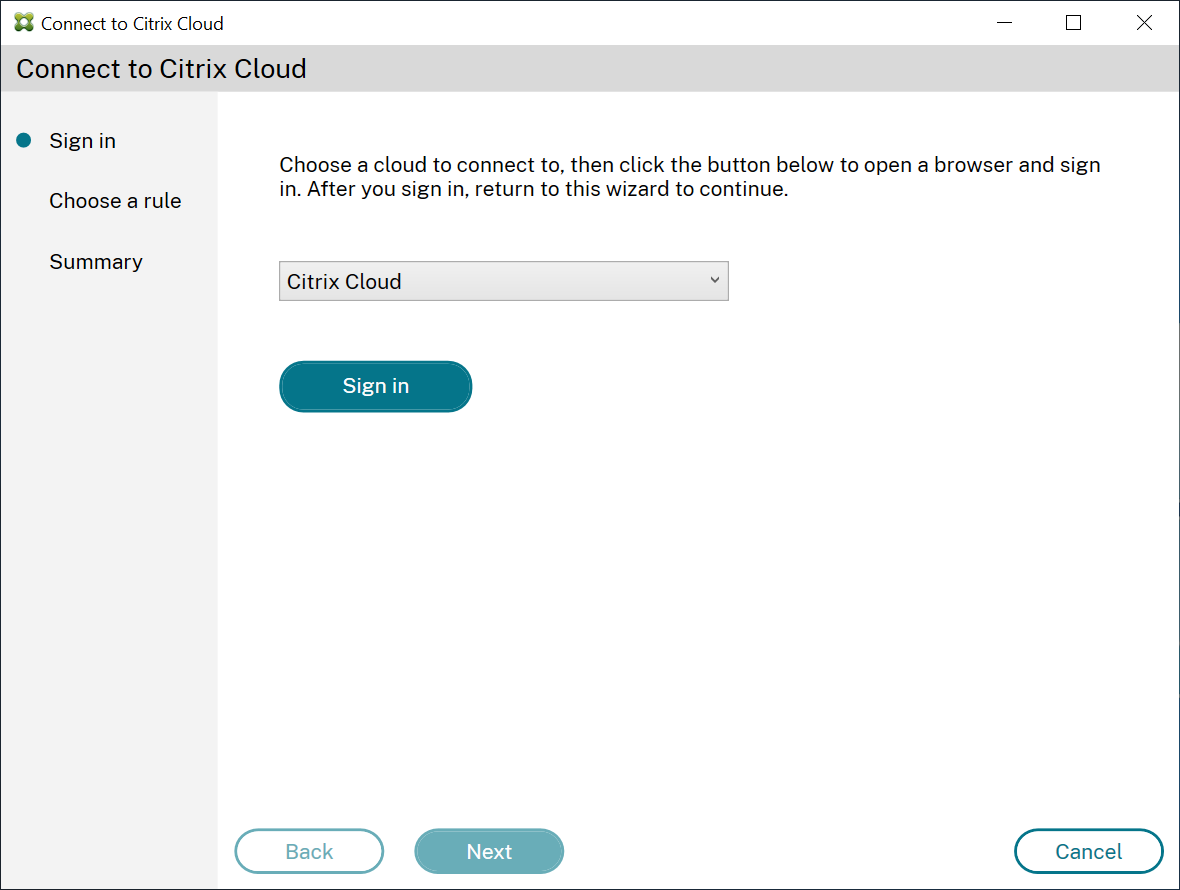
-
Optionally select which cloud to connect to. You can connect to ‘Citrix Cloud’ (default), ‘Citrix Cloud Japan’, or ‘Citrix Cloud US Government’.
-
Click Sign in then sign in to Citrix Cloud using admin credentials for the cloud customer you are connecting to.
-
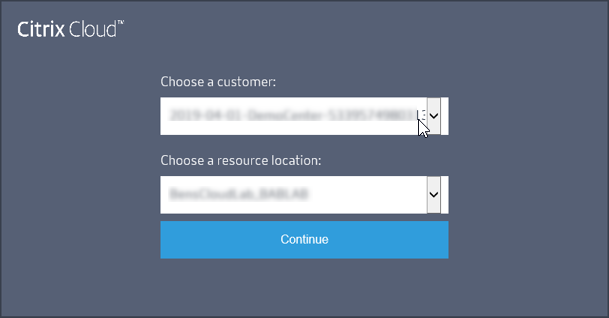
Select the customer account, if applicable, and select the resource location where you want to connect the FAS server. Click Continue and then close the confirmation window.
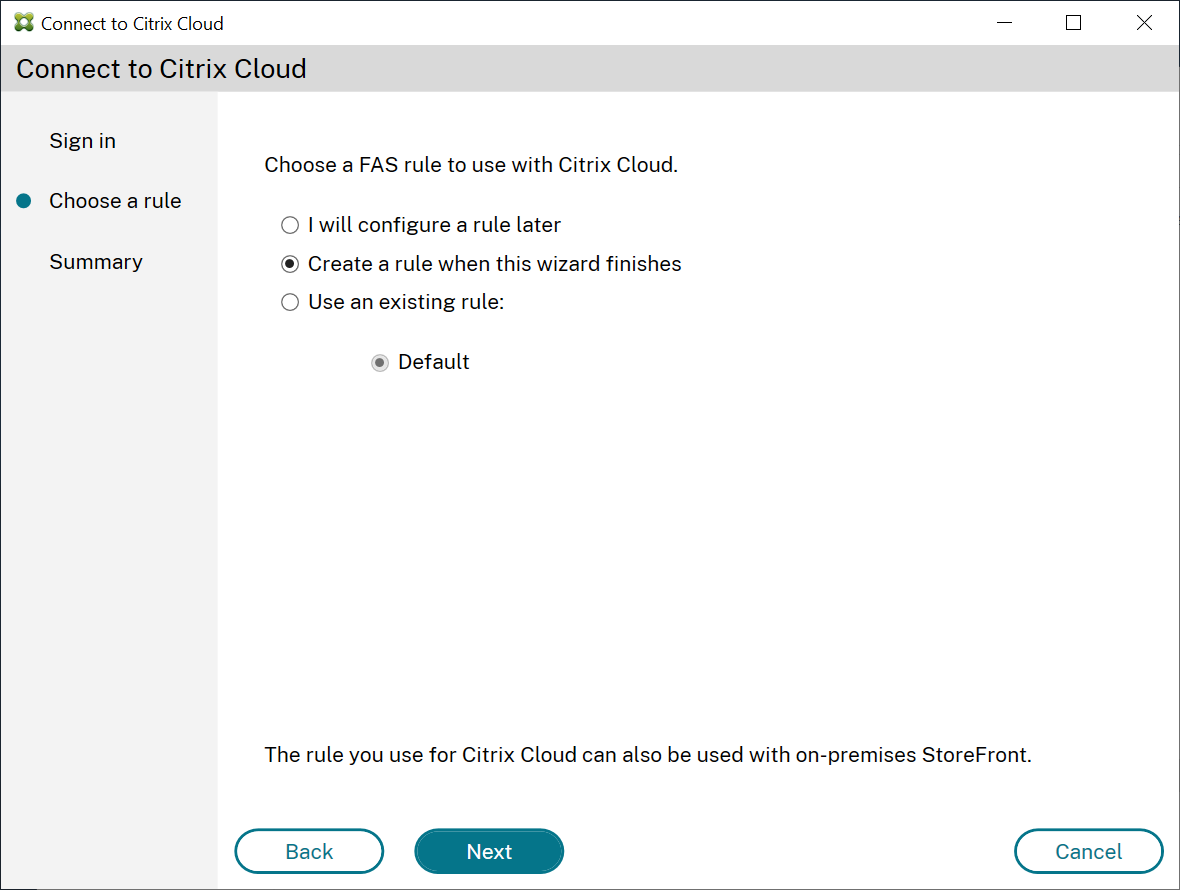
- In the FAS administration console, choose a rule to be applied when identity assertions are received from Citrix Workspace, or select Create a rule when this wizard finishes. (In the “Rules” tab, the Cloud rule value is “Yes” for the rule you select or create.)
- In the “Summary” tab click Finish to complete Citrix Cloud connection.
Citrix Cloud registers the FAS server and displays it on the Resource Locations page in your Citrix Cloud account.
Disconnect from Citrix Cloud
After removing the FAS server from your Citrix Cloud resource location, as described in this Citrix Workspace article, in Connect to Citrix Cloud select Disable.
In this article
- Install and setup sequence
- Install the Federated Authentication Service
- Enable the FAS plug-in on StoreFront stores
- Configure the Delivery Controller™
- Configure Group Policy
- Using the Federated Authentication Service administration console
- Deploy certificate templates
- Set up Active Directory Certificate Services
- Authorize Federated Authentication Service
- Configure rules
- Connect to Citrix Cloud