Developing iOS apps
You can use the MDX API to enable your mobile apps for Citrix Endpoint Management. This article describes how to integrate the MDX App SDK into your app library and the steps required to test, certify, and publish your apps.
How to use the MDX App SDK
Here are some examples of how you might use the APIs.
-
Place restrictions on apps
You can control when your app allows access to certain features or actions based on whether API calls indicate that the app is managed or wrapped. For example, if an app isn’t managed or wrapped, you might allow a user access to all features and actions. If an app is wrapped but not managed, you might then restrict certain features or actions. If an app is wrapped and managed, you might put extra restrictions on the app.
-
Perform actions based on Citrix Endpoint Management policy settings
Suppose that you want to display a notification to users if a Citrix Endpoint Management administrator sets the Require Wi-Fi policy to On. That means that the app is allowed to run only from inside the network of your organization. You can use the API to look up the policy setting and then base your code changes on the policy value.
-
Perform actions based on custom policies
You can use the APIs to read custom policies in your apps. For example, suppose that you want to enable Citrix Endpoint Management administrators to display a notification in the app. To do that, create a custom policy that is empty or contains a system message that is supplied by an administrator in the Citrix Endpoint Management console. If your app is managed, it can detect when the Citrix Endpoint Management administrator changes the policy value. If the policy value contains a message, your app displays the notification.
For API definitions, see API for iOS.
Integrating the SDK into your app library
To add the MDX App SDK to your iOS apps, link the SDK framework into your app as described in this section. The MDX App SDK for iOS, based on Objective-C, is a collection of header files and a static library.
-
If you haven’t already installed the latest MDX Toolkit, do so now.
-
Log on to the Citrix Endpoint Management downloads page.
-
Expand XenMobile® Apps and MDX Toolkit.
-
Locate the MDX Toolkit version you want to install and click the link to begin the download.
-
Open MDXToolkit.mpkg with the macOS Finder tool on macOS 10.9.4 or later and Xcode 7 or later.
For Xcode 8 and above, a known issue exists where the project file must be cleaned before pushing the app to the device.
The installation path is Applications/Citrix/MDXToolkit.
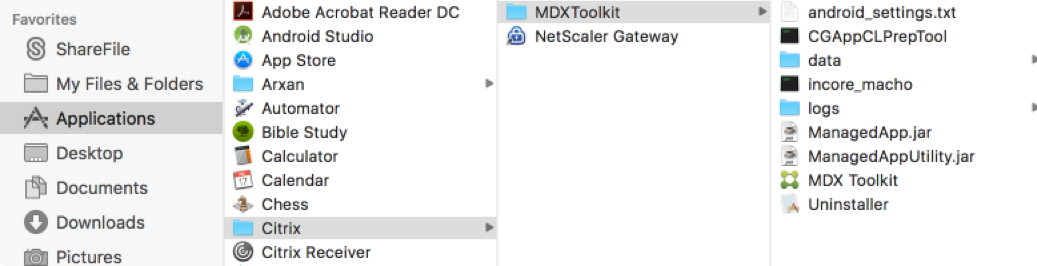
The MDX App SDK files are in Applications/Citrix/MDXToolkit/data/MDXSDK.
After installing the MDX Toolkit on your computer, integrate MDX Framework into your Xcode project.
-
-
Add the data/MDXSDK folder to the Apple Xcode project. To do so, you can drag that folder to the Xcode project.
-
Revise a line of code in the pre-compiled header file in the app project to import MDX.h from MDX.framework as shown in the following example.
    #ifdef__OBJC__
    _
    //import MDX extensions
    #import <AVFoundation/AVFoundation.h>
    #import <SystemConfiguration/SCNetworkReachability.h>
    #import <MDX/MDX.h>
    #endif
<!--NeedCopy-->
If you only include the Network Only version of the MDX framework then you should replace
#import <MDX/MDX.h.>
<!--NeedCopy-->
With
#import <MDXNetworkOnly/MDXNetworkOnly.h>
<!--NeedCopy-->
If wrapping an application that explicitly issues a call to an API exposed by the MDX SDK framework, the MDX.h and MDXNetworkOnly.h lines are optional.
If an application explicitly issues an MDX SDK API call, it must be linked to and embed the MDX.framework or MDXNetworkOnly.framework binary when the application is built.
A prebuilt 3rd party enterprise application that is wrapped by the MDX Toolkit requires no build modifications since it makes no explicit MDX SDK API calls.
After installing the MDX Toolkit on your computer, integrate MDX Framework into your Xcode project.
-
Drag the data/MDXSDK/MDX.framework (or the data/MDXSDK/MDXNetworkOnly.framework) to the Embedded Binaries section of the General properties panel for the application workspace. By doing so, you add that dynamic framework to the frameworks included in the application bundle installed with the application. In addition, the framework is automatically added to the list of frameworks that are linked to the application.
You should only add one MDX framework.
-
Drag the data/MDXSDK/CitrixLogger.framework to the Embedded Binaries section of the General properties panel for the application workspace.
-
Add a run script to remove architectures from embedded frameworks that do not appear in the list of Xcode valid architectures. This addresses the Apple requirement that embedded frameworks can not contain iOS Simulator architectures for Apple Store application builds. This script will automatically handle all build targets both non-Apple Store and Apple Store type builds.
echo "Strip unnecessary archs from Embedded Frameworks" cd "${BUILT_PRODUCTS_DIR}/${FRAMEWORKS_FOLDER_PATH}" for file in $(find . -type f -perm +111); do if ! [[ "$(file "$file")" == *"dynamically linked shared library"* ]]; then continue fi # Get architectures for current file archs="$(lipo -info "${file}" | rev | cut -d ':' -f1 | rev)" # Strip any archs from frameworks not valid for current app build for arch in $archs; do if ! [[ "${VALID_ARCHS}" == *"$arch"* ]]; then lipo -remove "$arch" -output "$file" "$file" || exit 1 fi done done <!--NeedCopy--> -
Add a run script to add the SDKPrep command line.
- Select your project in Xcode, and then select the Build Phases tab. Click the plus (+) icon in the upper-left corner, and then click New Run Script Phase.
- Open the new Run Script, and then type the following text into the Script field. Be sure to change the PACKAGEID, APPTYPE, STOREURL, and POLICYFILE variables to values that are applicable to your app. The PACKAGEID is a unique identifier for your app, typically a UUID. This is not mandatory, as the MDX Toolkit generates a unique packageID whenever the application is built. If you supply a packageID, ensure that it is unique for every new app version you wrap using this command.
- If this app is an Enterprise app, use the parameter -Apptype Enterprise which is the default value. For ISV apps, you can use the Premium or General values.
Note:
The supported keywords for APPTYPE are Enterprise, Premium, and General.
    export PACKAGEID="your-project-PackageID"
    export APPTYPE="keyword"
    export STOREURL="http://your-store-URL"
    export DATE=`date +%Y-%m-%d_%H-%M-%S`
    export POLICYFILE=${SRCROOT}/${EXECUTABLE_NAME}/${EXECUTABLE_NAME}_policy_metadata.xml
    /Applications/Citrix/MDXToolkit/CGAppCLPrepTool SdkPrep -in "${CODESIGNING_FOLDER_PATH}" -out "/Users/<UserName>/Downloads/${EXECUTABLE_NAME}_${DATE}.mdx" -storeUrl "${STOREURL}" -appIdPrefix "ABCDEFGH" -packageId "${PACKAGEID}" -policyXML "${POLICYFILE}" -appType "${APPTYPE}" -entitlements "${CODE_SIGN_ENTITLEMENTS}"
<!--NeedCopy-->
Example:
    export PACKAGEID="a96d6ed5-6632-4739-b9b6-9ad9d5600732"
    export APPTYPE="Enterprise
    export STOREURL="http://example.com/12345"
    export DATE=`date +%Y-%m-%d_%H-%M-%S`
    export POLICYFILE=${SRCROOT}/${EXECUTABLE_NAME}/${EXECUTABLE_NAME}_policy_metadata.xml
    /Applications/Citrix/MDXToolkit/CGAppCLPrepTool SdkPrep -in "${CODESIGNING_FOLDER_PATH}" -out "/Users/<UserName>/Downloads/${EXECUTABLE_NAME}_${DATE}.mdx" -storeUrl "${STOREURL}" -appIdPrefix "ABCDEFGH" -packageId "${PACKAGEID}" -policyXML "${POLICYFILE}" -appType "${APPTYPE}" -entitlements "${CODE_SIGN_ENTITLEMENTS}"
<!--NeedCopy-->
Parameters Description -in file name Path to the .app file generated by Xcode. The MDX Toolkit embeds MDX-specific resources into this file. -out file name Destination path for the .mdx file. Use this file to publish the app on the Citrix Endpoint Management server. -storeURl URL App store URL for the app, embedded into the .mdx file. Cannot use this parameter with -StoreURL. -appType keyword Keywords are “Enterprise,” “Premium,” and “General.” -packageId UUID The unique package ID for this app, typically a UUID. Not mandatory, as the MDX Toolkit generates a unique packageID whenever the application is built. If you supply a packageId, ensure that it is unique for every new app version you wrap using this command. A unique ID is associated with every provisioning profile. If you open the provisioning profile (.mobileprovision) in a text editor, you see the below XML tag with the UUID. <key>UUID</key> <string>4e38fb18-88b0-4806-acfa-e08bf38ec48d</string>-policyXML file name Path to the MDX policy template file for your app. -entitlements file name Mandatory (introduced in version 10.3.10). Path to the entitlements file for the app. The MDX Toolkit adds a keychain access group entry for com.citrix.mdx to this file. It is needed for your app to share secrets with other MDX apps signed with the same certificate, using the iOS keychain. -appIdPrefix prefix Application Identifier Prefix - the Team ID associated with your Apple Developer account. -
Compile your project and generate the app binaries.
- Build your app in Xcode, verifying that it builds correctly.
- Archive your app by selecting Product > Archive.
- The Xcode Organizer opens automatically after your app is archived.
- Select your archived build in Organizer and then click Export.
- Select the applicable export method and then click Next.
Follow the prompts to export your app to an IPA file.
-
Compile and archive the project to generate the app bundle that contains the embedded MDX Framework which is the .ipa package. Xcode generates a corresponding MDX file that you upload to the Citrix Endpoint Management server. After the Xcode build and archive steps creates the IPA bundle, run the SetInfo command on the MDX file. Also run the command -embedBundle option to insert the final IPA file into the MDX file. After that, you can upload the app to Citrix Endpoint Management.
/Applications/Citrix/MDXToolkit/CGAppCLPrepTool SdkPrep -in "${CODESIGNING_FOLDER_PATH}" -out "/Users/<UserName>/Downloads/${EXECUTABLE_NAME}_${DATE}.mdx" " -embedBundle "/Users/deva/Desktop/{EXECUTABLE_NAME}.ipa" <!--NeedCopy--> -
If you have configured the app for distribution via the iTunes Connect website, you can also submit directly to the app store or TestFlight.
Considerations for upgrading apps
The Citrix Endpoint Management software can change significantly between releases. To take advantage of the latest features and bug fixes, you must use the latest version of the MDX Toolkit to wrap your app. Be sure to wrap your original .ipa or .apk file, not the modified file previously generated by the MDX Toolkit.
Be sure to use the corresponding version of the MDX App SDK.