Configuring a Virtual MAC on an interface
A NetScaler instance uses a Virtual MAC (VMAC) for high availability (active-active or active-standby) configurations. A Virtual MAC address (VMAC) is a floating entity shared by the primary and the secondary nodes in a high availability setup.
In a high availability setup, the primary node owns all the floating IP addresses, such as the MIP, SNIP, and VIP addresses. The primary node responds to Address Resolution Protocol (ARP) requests for these IP addresses with its own MAC address. As a result, the ARP table of an external device (for example, an upstream router) is updated with the floating IP address and the primary node’s MAC address.
When a failover occurs, the secondary node takes over as the new primary node. It then uses Gratuitous ARP (GARP) to advertise the floating IP addresses that it acquired from the primary. However, the MAC address that the new primary advertises is the MAC address of its own interface.
Some devices (notably a few routers) do not accept the GARP messages generated by the NetScaler SDX appliance. Such devices retain the old IP to MAC mapping advertised by the old primary node, and a site can go down as a result.
You can overcome this problem by configuring a VMAC on both nodes of an HA pair. Both nodes then possess identical MAC addresses. Therefore, when failover occurs, the MAC address of the secondary node remains unchanged, and the ARP tables on the external devices do not need to be updated.
Configuring a VMAC is a two-step process:
- Configure VMAC on the SDX Management Service. You add a VRID for an interface or an LA channel. Configure VMAC on the SDX Management Service.
- Configure VMAC on the Citrix instance. For information see the Configure VMAC on Channel group support article.
Configure VMAC on the SDX Management Service
To configure VMAC, add an IPv4 or IPv6 VRID to an interface or LA channel from the Management Service. The Management Service internally generates a VMAC. Specify the same VRID when you configure active-active mode on the NetScaler instance. This active-active configuration is not supported on Mellanox interfaces.
Keep the following points in mind:
- Add a VRID from the Management Service and specify the same VRID in the NetScaler instance. If you add a VRID directly in the NetScaler instance, the instance cannot receive a packet that has a VMAC address as the destination MAC address.
- You cannot use the same VRID on different instances running in the same SDX appliance.
- You can add or delete the VRIDs for an interface assigned to an instance while the Instance is running.
- In an active-active configuration, you can specify more than one VRID for an interface assigned to an instance. The active-active deployment is not supported on Mellanox interfaces.
- A maximum of 86 VMACs are allowed on a 10G interface, and a maximum of 16 VMACs on a 1G interface. If no more VMAC filters are available, reduce the number of VRIDs on another instance.
You can add a VRID at the time of adding a NetScaler VPX instance, or you can modify an existing NetScaler instance to add a VRID.
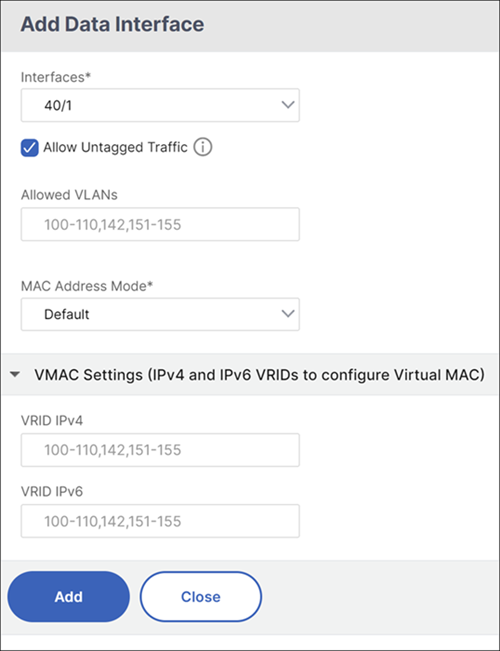
To add an IPv4 or IPv6 VRID to an interface or LA channel
- While adding a VPX instance on SDX, under Network Settings, select Data Interfaces. For more information about how to add a VPX instance on SDX, see Add a NetScaler instance.
- From the Interfaces drop-down menu, select the interface or the LA channel.
- Under VMAC settings, and set one or both of the following values:
- VRID IPv4—The IPv4 VRID that identifies the VMAC. Possible values: 1–255.
- VRID IPv6—The IPv6 VRID that identifies the VMAC. Possible values: 1–255. Note: Use a comma to separate multiple VRIDs. For example, 12,24.
- Click Add to add the VMAC settings to the interface.
- Click Finish, and then click Close.
If the instance is already provisioned, to add an IPv4 or IPv6 VRID, follow these steps.
- From the SDX Management Service, go to Configuration > NetScaler > Instances.
- Select the instance and click Edit.
- Under Data Interfaces, select the interface and click edit.
- Under VMAC settings, set the VRID values. Click Add and then click Done.