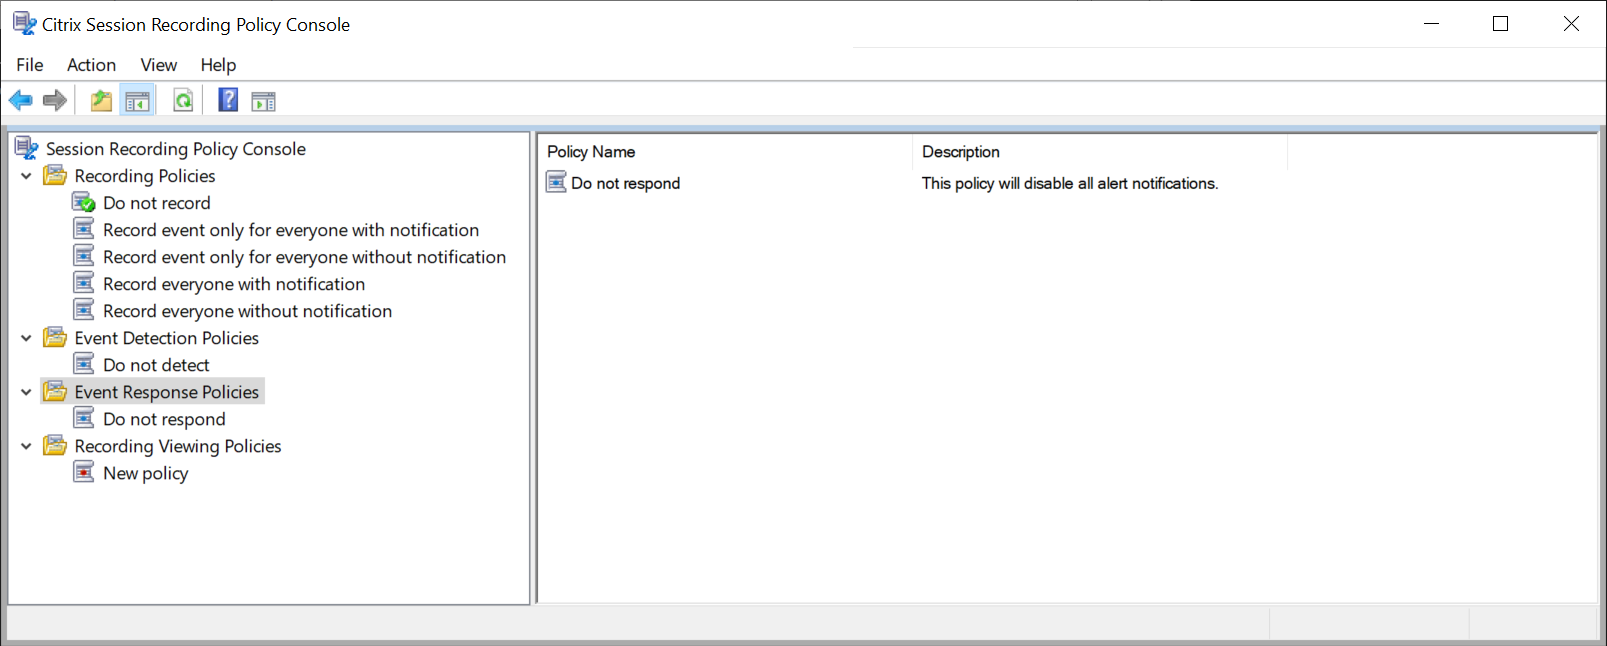
Configure policies
Use the Session Recording Policy Console to create recording policies, event detection policies, event response policies, and recording viewing policies. When creating the policies, you can specify Delivery Controllers from both the Citrix Cloud™ and on-premises environments.
Important:
To use the Session Recording Policy Console, you must have the Broker PowerShell Snap-in (Broker_PowerShellSnapIn_x64.msi) or the Citrix Virtual Apps and Desktops Remote PowerShell SDK (CitrixPoshSdk.exe) installed manually. Locate the Broker PowerShell snap-in on the Citrix Virtual Apps and Desktops ISO (\layout\image- full\x64\Citrix Desktop Delivery Controller), or download the Citrix Virtual Apps and Desktops Remote PowerShell SDK from the Citrix Virtual Apps and Desktops Service download page.
Tip:
You can edit the registry to prevent recording file losses in case that your Session Recording Server might fail unexpectedly. Log on as an administrator to the machine where you installed the Session Recording Agent, open the Registry Editor, and add a DWORD value
DefaultRecordActionOnError=1underHKEY_LOCAL_MACHINE\SOFTWARE\Citrix\SmartAuditor\Agent.
Recording policies
You can activate system-defined recording policies or create and activate your own custom recording policies. System-defined recording policies apply a single rule to all users, published applications, and servers. Custom recording policies specifying which users, published applications, and servers are recorded.
The active recording policy determines which sessions are recorded. Only one recording policy is active at a time.
System-defined recording policies
Session Recording provides the following system-defined recording policies:
-
Do not record. The default policy. If you do not specify another policy, no sessions are recorded.
-
Record only events (for everyone, with notification). This policy records only events that your event detection policy specifies. It does not record screens. Users receive recording notifications in advance.
-
Record only events (for everyone, without notification). This policy records only events that your event detection policy specifies. It does not record screens. Users do not receive recording notifications.
-
Record entire sessions (for everyone, with notification). This policy records entire sessions (screens and events). Users receive recording notifications in advance.
-
Record entire sessions (for everyone, without notification). This policy records entire sessions (screens and events). Users do not receive recording notifications.
You cannot modify or delete the system-defined recording policies.
Create a custom recording policy
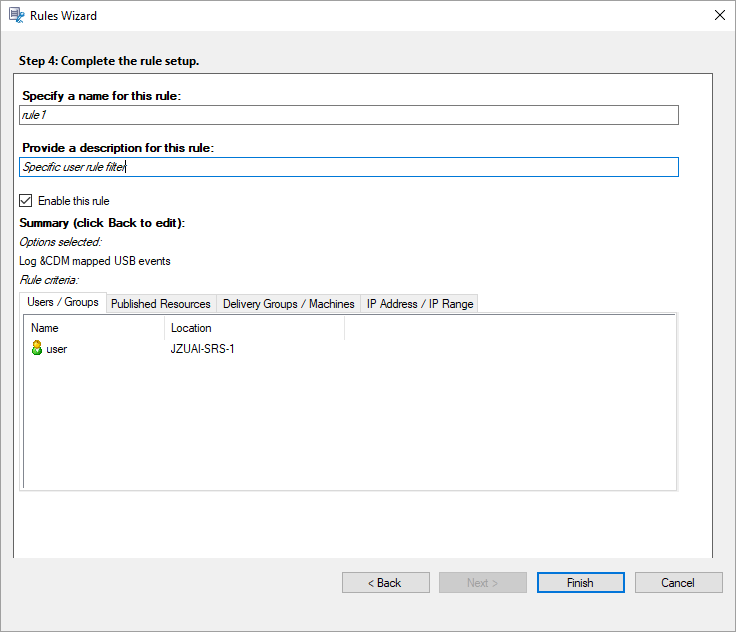
When you create your own recording policy, you make rules to specify which users or groups, published applications or desktops, delivery groups or VDA machines, and Citrix Workspace™ app client IP addresses are being recorded. A wizard within the Session Recording Policy Console helps you create rules. To obtain the list of published applications or desktops and the list of delivery groups or VDA machines, you must have the read permission as a site administrator. Configure the administrator read permission on the Delivery Controller™ of the site.
For each rule you create, you specify a recording action and rule criteria. The recording action applies to sessions that meet the rule criteria.
For each rule, choose one recording action:
-
Enable session recording with notification. This option records entire sessions (screens and events). Users receive recording notifications in advance.
-
Enable session recording without notification. This option records entire sessions (screens and events). Users do not receive recording notifications.
-
Enable event only session recording with notification. This option records throughout sessions only events that your event detection policy specifies. It does not record screens. Users receive recording notifications in advance.
-
Enable event only session recording without notification. This option records throughout sessions only events that your event detection policy specifies. It does not record screens. Users do not receive recording notifications.
-
Disable session recording. This option means that no sessions will be recorded.
For each rule, choose at least one of the following items to create the rule criteria:
- Users or Groups. Creates a list of users or groups to which the action of the rule applies. Session Recording allows you to use Active Directory groups and white list users.
- Published Applications or Desktop. Creates a list of published applications or desktops to which the action of the rule applies. In the Rules wizard, choose the Citrix Virtual Apps and Desktops™ Site or Sites on which the applications or desktops are available.
- Delivery Groups or Machines. Creates a list of Delivery Groups or machines to which the action of the rule applies. In the Rules wizard, choose the location of the Delivery Groups or machines.
-
IP Address or IP Range. Creates a list of IP addresses or ranges of IP addresses to which the action of the rule applies. On the Select IP Address and IP Range screen, add a valid IP address or IP range for which recording is enabled or disabled. The IP addresses mentioned here are the IP addresses of the Citrix Workspace apps.
Note:
The Session Recording Policy Console supports configuring multiple criteria within a single rule. When a rule applies, both the “AND” and the “OR” logical operators are used to compute the final action. Generally speaking, the “OR” operator is used between items within a criterion, and the “AND” operator is used between separate criteria. If the result is true, the Session Recording policy engine takes the rule’s action. Otherwise, it goes to the next rule and repeats the process.
When you create more than one rule in a recording policy, some sessions might match the criteria for more than one rule. In these cases, the rule with the highest priority is applied to the sessions.
The recording action of a rule determines its priority:
- Rules with the Do not record action have the highest priority.
- Rules with the Record with notification action have the second-to-highest priority.
- Rules with the Record without notification action have the second-to-lowest priority.
- Rules with the Enable event only session recording with notification action have the medium priority.
- Rules with the Enable event only session recording without notification action have the lowest priority.
Some sessions might not meet any rule criteria in a recording policy. For these sessions, the action of the policy fallback rule applies. The action of the fallback rule is always Do not record. You cannot modify or delete the fallback rule.
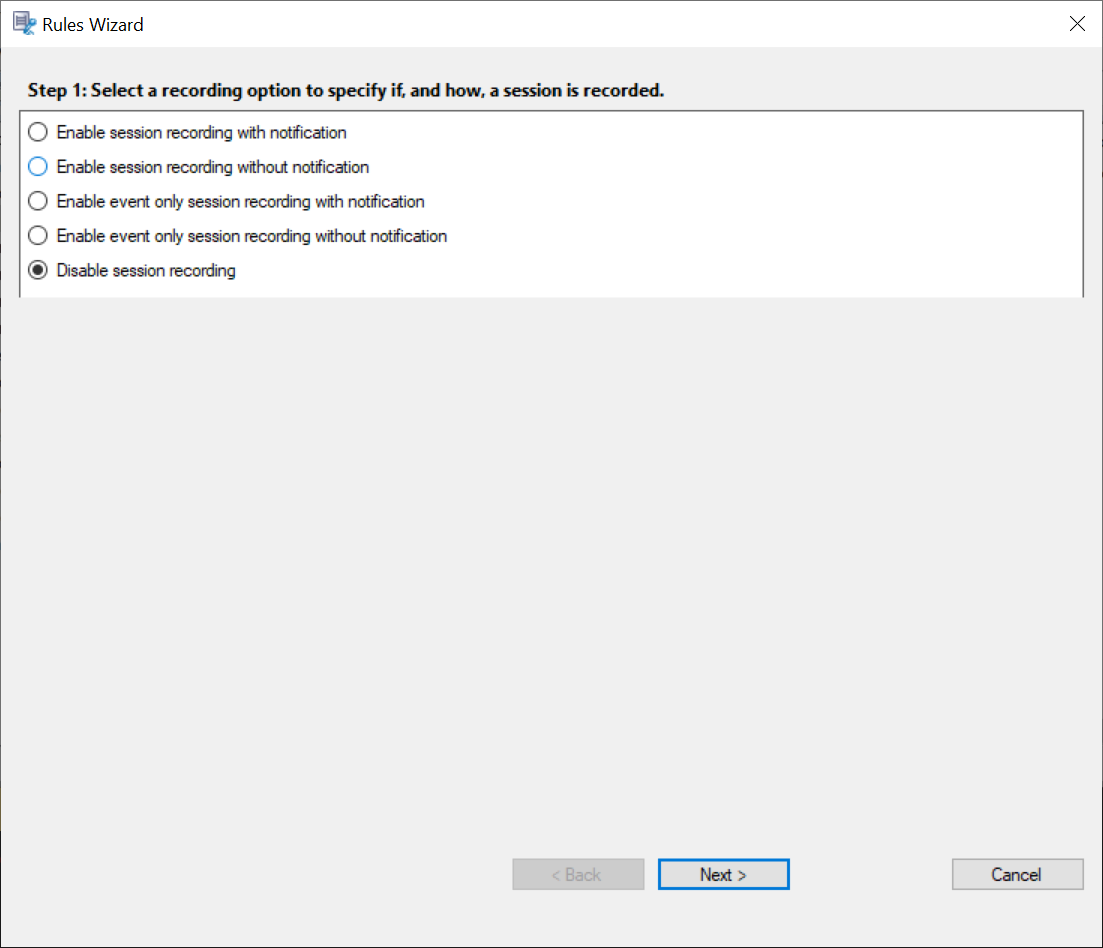
To create a custom recording policy:
- Log on as an authorized Policy Administrator to the server where the Session Recording Policy Console is installed.
- Start the Session Recording Policy Console and select Recording Policies in the left pane. From the menu bar, choose Add New Policy.
- Right-click the New policy and select Add Rule.
-
In the rules wizard, select a recording option and then click Next.
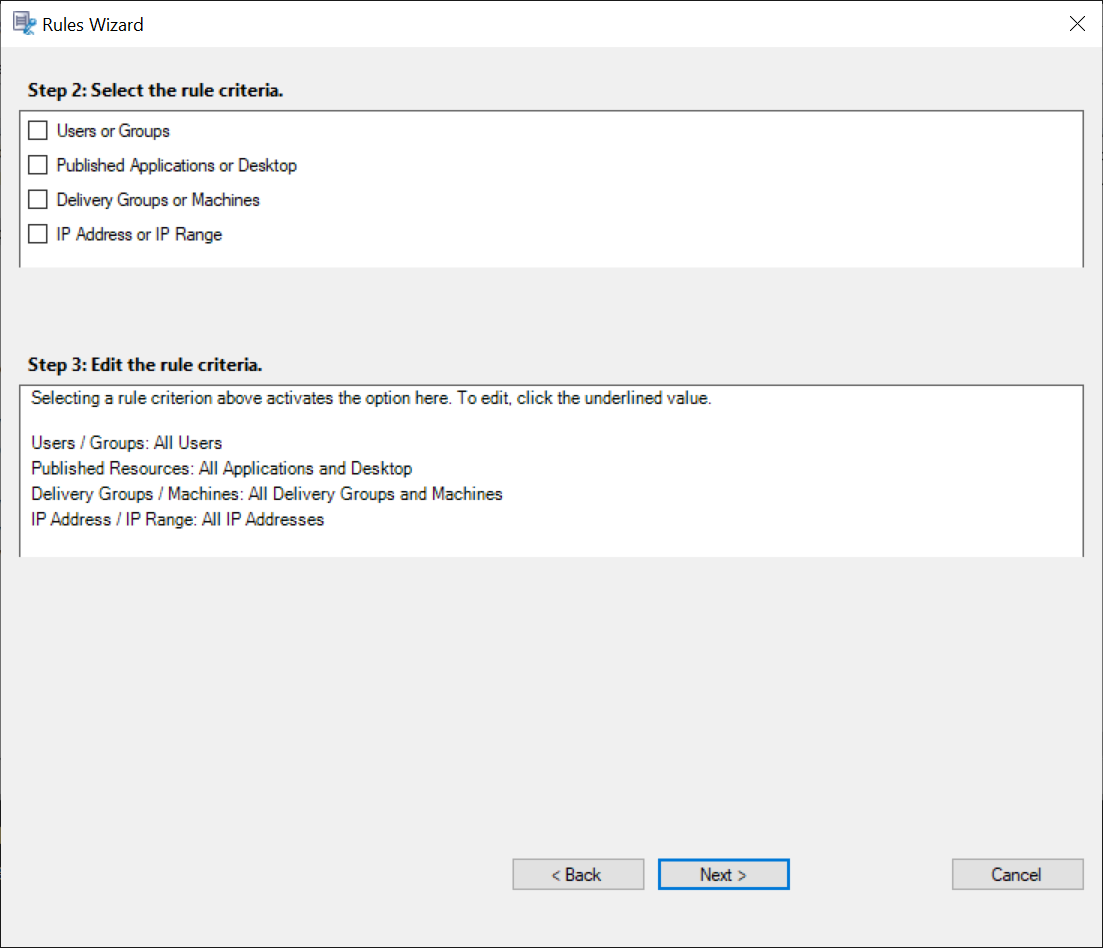
-
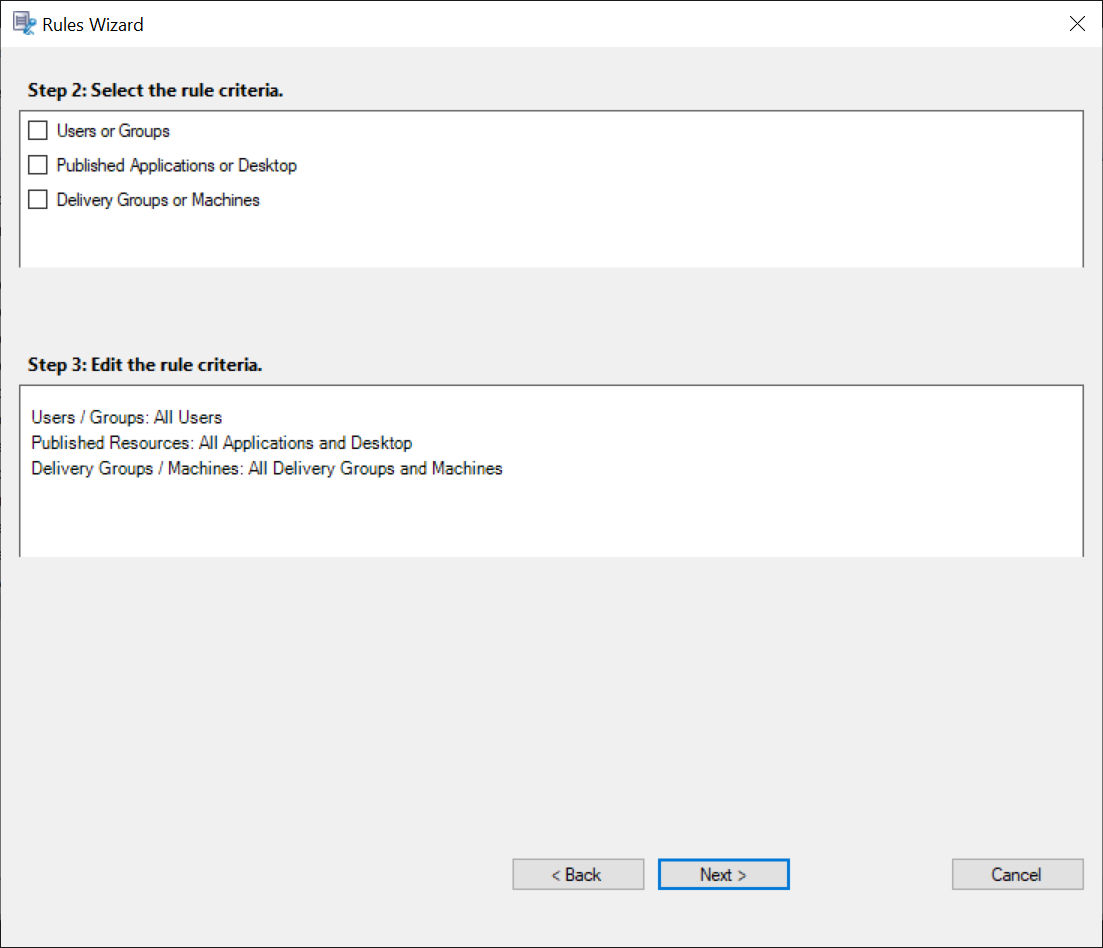
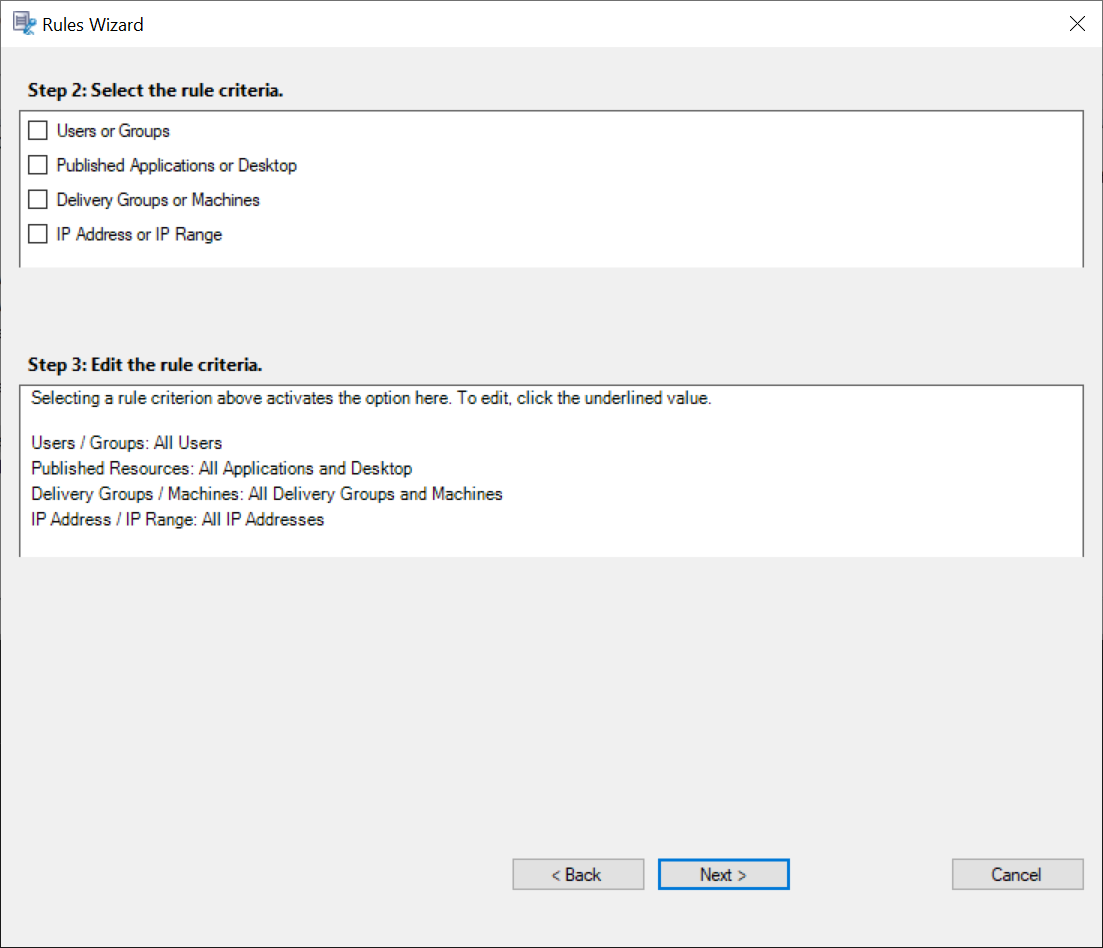
Select the rule criteria - You can choose one or more rule criteria:
Users or Groups
Published Applications or Desktop
Delivery Groups or Machines
IP Address or IP Range -
Edit the rule criteria - To edit, click the underlined values. The values are underlined based on the criteria you chose in the previous step.
Note:
If you choose the Published Applications or Desktop underlined value, the Site Address is the IP address, a URL, or a machine name if the Controller is on a local network. The Name of Application list shows the display name.
When choosing Published Applications or Desktop or Delivery Groups or Machines, specify the Delivery Controller for your Session Recording Policy Console to communicate with.
The Session Recording Policy Console is the only channel to communicate with Delivery Controllers from the Citrix Cloud and on-premises environments.
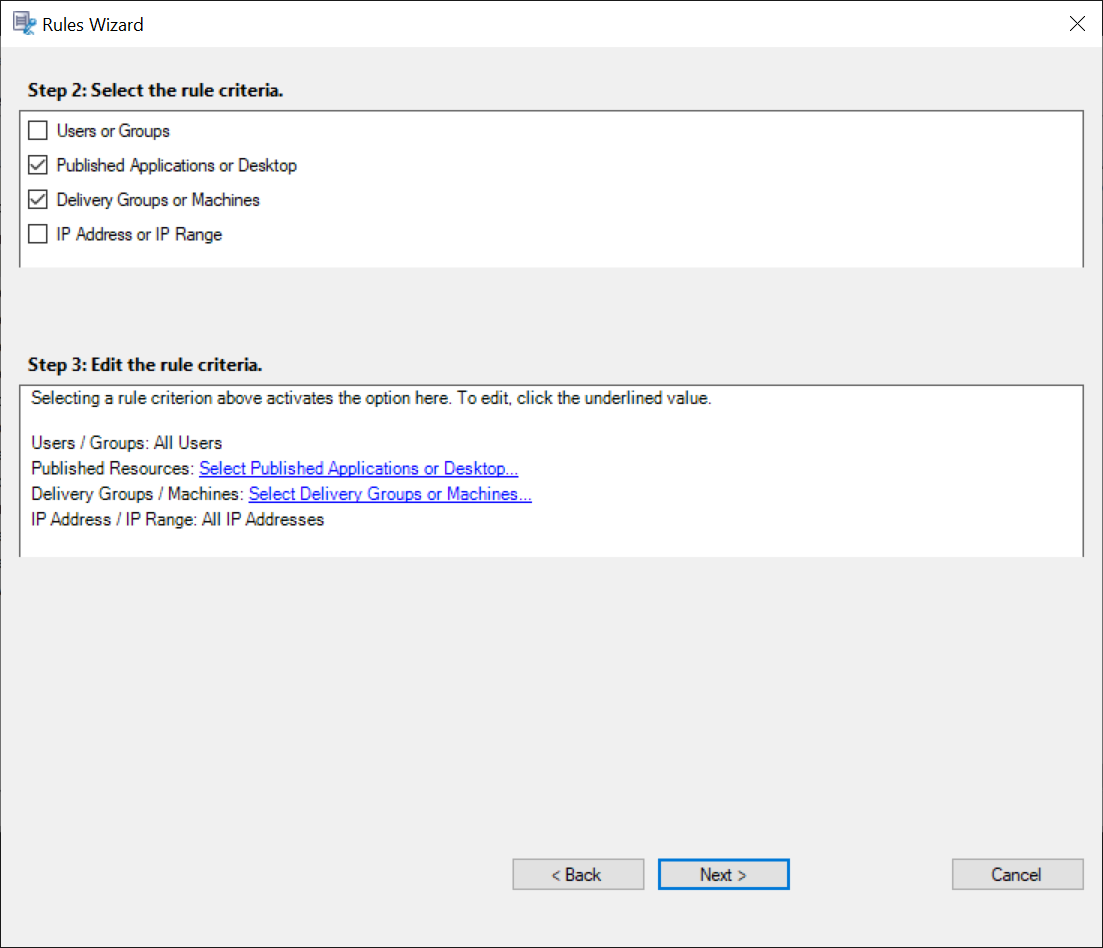
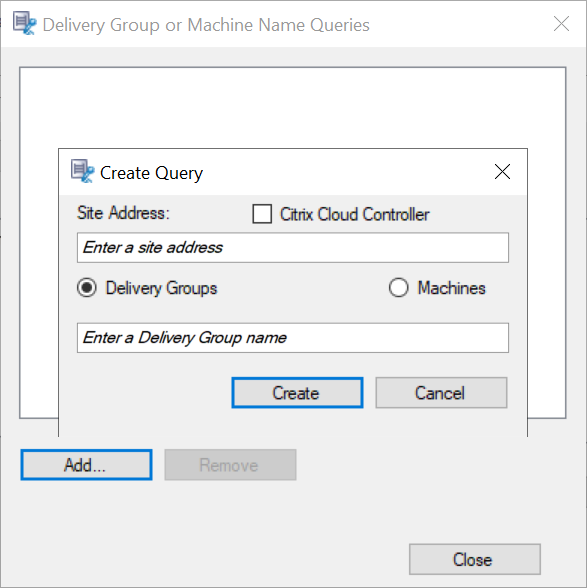
For example, when choosing Delivery Groups or Machines, click the corresponding hyperlink in Step 3 of the preceding screenshot and click Add to add queries to the Controller.
For a description of use cases that cover the on-premises and the Citrix Cloud Delivery Controllers, see the following table:
Use Case Action Required On-Premises Delivery Controller - Install Broker_PowerShellSnapIn_x64.msi. 2. Clear the Citrix Cloud Controller check box.
Citrix Cloud Delivery Controller - Install the Citrix Virtual Apps™ and Desktops Remote PowerShell SDK. 2. Validate the Citrix Cloud account credentials. 3. Select the Citrix Cloud Controller check box.
Switch from an on-premises Delivery Controller to a Citrix Cloud Delivery Controller - Uninstall Broker_PowerShellSnapIn_x64.msi and restart the machine. 2. Install the Citrix Virtual Apps and Desktops Remote PowerShell SDK. 3. Validate the Citrix Cloud account credentials. 4. Select the Citrix Cloud Controller check box.
Switch from a Citrix Cloud Delivery Controller to an on-premises Delivery Controller - Uninstall the Citrix Virtual Apps and Desktops Remote PowerShell SDK and restart the machine. 2. Install Broker_PowerShellSnapIn_x64.msi. 3. Clear the Citrix Cloud Controller check box.
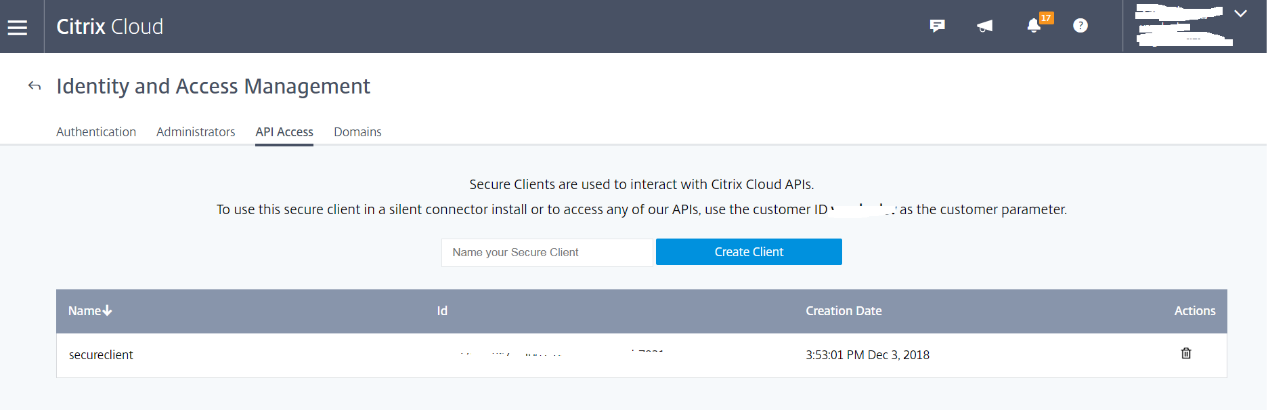
Validating the Citrix Cloud credentials
To query Delivery Controllers hosted in the Citrix Cloud, manually validate your Citrix Cloud credentials on the machine where the Session Recording Policy Console is installed. Failure to comply can cause an error and your Session Recording Policy Console might not work as expected.
To do the manual validation:
-
Log on to the Citrix Cloud console and locate Identity and Access Management > API Access. Create an API access Secure Client for obtaining an authentication profile that can bypass the Citrix Cloud authentication prompts. Download your Secure Client, rename, and save it in a safe location. The file name is defaulted to secureclient.csv.
-
Open a PowerShell session and run the following command to have the authentication profile (obtained in the preceding step) take effect.
asnp citrix.*
Set-XDCredentials -CustomerId "citrixdemo" -SecureClientFile "c:\temp\secureclient.csv" -ProfileType CloudAPI –StoreAs "default"

<!--NeedCopy-->
Set CustomerId and SecureClientFile as required. The preceding command creates a default authentication profile for the customer
citrixdemoto bypass authentication prompts in the current and all subsequent PowerShell sessions.
- Follow the wizard to finish the configuration.
Note: Limitation regarding prelaunched application sessions:
- If the active policy tries to match an application name, the applications launched in the prelaunched session are not matched, which results in the session not being recorded.
- If the active policy records every application, when a user logs on to Citrix Workspace app for Windows (at the same time that a prelaunched session is established), a recording notification appears and the prelaunched (empty) session and any applications to be launched in that session going forward are recorded.
As a workaround, publish applications in separate Delivery Groups according to their recording policies. Do not use an application name as a recording condition. This approach ensures that prelaunched sessions can be recorded. However, notifications still appear.
Use Active Directory groups
Session Recording allows you to use Active Directory groups when creating policies. Using Active Directory groups instead of individual users simplifies the creation and management of rules and policies. For example, if users in your company’s finance department are contained in an Active Directory group named Finance, you can create a rule that applies to all members of this group by selecting the Finance group in the Rules wizard when creating the rule.
White list users
You can create Session Recording policies ensuring that the sessions of some users in your organization are never recorded. This case is called white listing these users. White listing is useful for users who handle privacy-related information or when your organization does not want to record the sessions of a certain class of employees.
For example, if all managers in your company are members of an Active Directory group named Executive, you can ensure that sessions of these users are never recorded by creating a rule that disables session recording for the Executive group. While the policy containing this rule is active, no sessions of members of the Executive group are recorded. The sessions of other members of your organization are sessions recorded based on other rules in the active policy.
Configure Director to use the Session Recording Server
You can use the Director console to create and activate the recording policies.
- For an HTTPS connection, install the certificate to trust the Session Recording Server in the Trusted Root Certificates of the Director server.
- To configure the Director server to use the Session Recording Server, run the C:\inetpub\wwwroot\Director\tools\DirectorConfig.exe /configsessionrecording command.
- Type the IP address or FQDN of the Session Recording Server and the port number and connection type (HTTP/HTTPS) that the Session Recording Agent uses to connect to the Session Recording Broker on the Director server.
Event detection policies
Session Recording supports centralized configuration of event detection policies. You can create policies in the Session Recording Policy Console to log various events.
Note:
To log the insertion of USB mass storage devices and the application starts and ends, use Session Recording Version 1811 or later.
To log file operation events and web browsing activities, use Session Recording Version 1903 or later. To log clipboard activities, use Session Recording Version 2012 or later.
System-defined event detection policy
The system-defined event detection policy is Do not detect. It is inactive by default. When it is active, no events are logged.
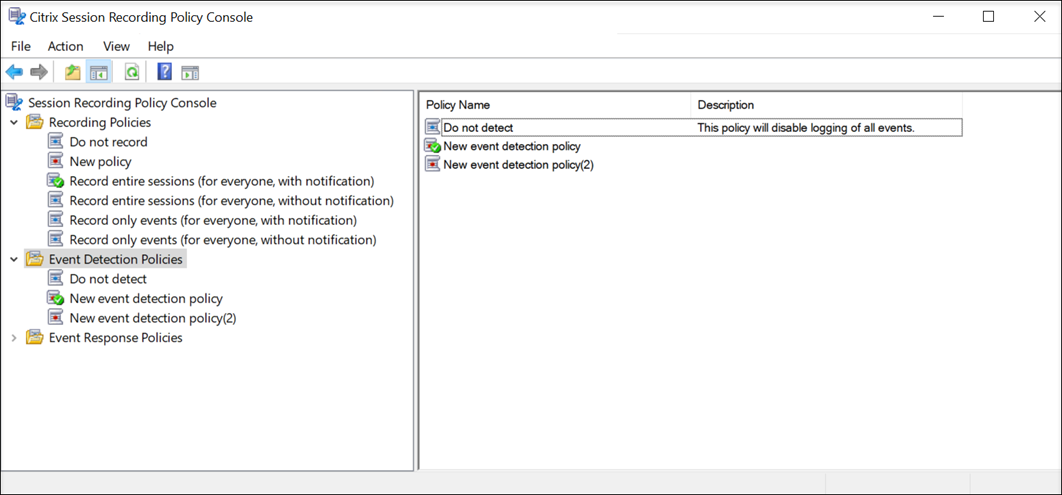
You cannot modify or delete the system-defined event detection policy.
Create a custom event detection policy
When you create your own event detection policy, you make rules to specify which users or groups, published applications or desktops, delivery groups or VDA machines, and Citrix Workspace app client IP addresses have specific events logged during session recording. A wizard within the Session Recording Policy Console helps you create rules. To obtain the list of published applications or desktops and the list of delivery groups or VDA machines, you must have the read permission as a site administrator. Configure the administrator read permission on the Delivery Controller of the site.
To create a custom event detection policy:
-
Log on as an authorized Policy Administrator to the server where the Session Recording Policy Console is installed.
-
Start the Session Recording Policy Console. By default, there is no active event detection policy.
-
Select Event Detection Policies in the left pane. From the menu bar, choose Add New Policy to create an event detection policy.
-
(Optional) Right-click the new event detection policy and rename it.
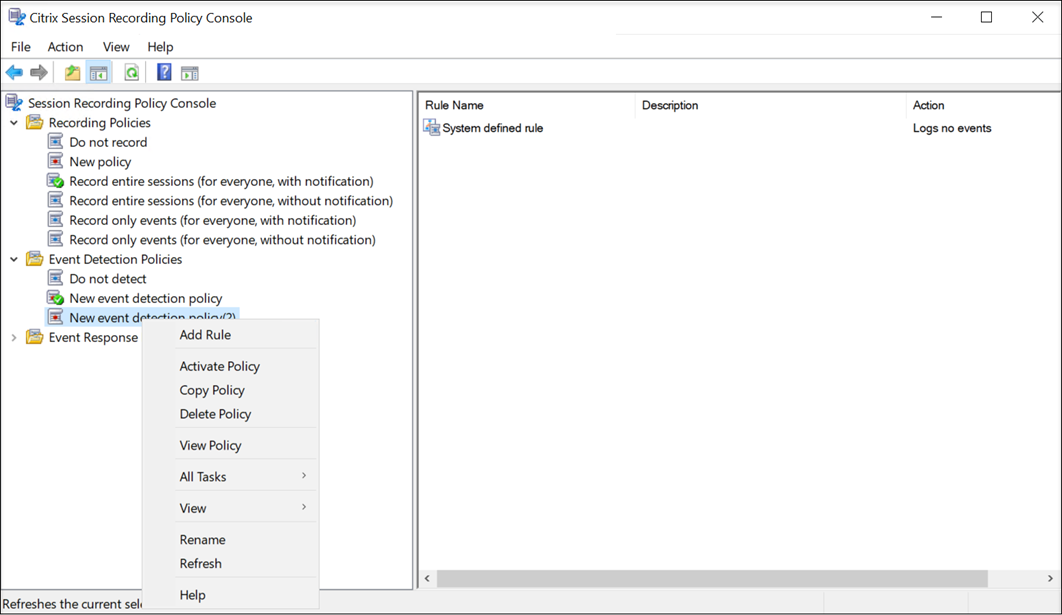
-
Right-click the new event detection policy and select Add Rule.
-
Specify one or more target events to monitor by selecting the check box next to each event type.
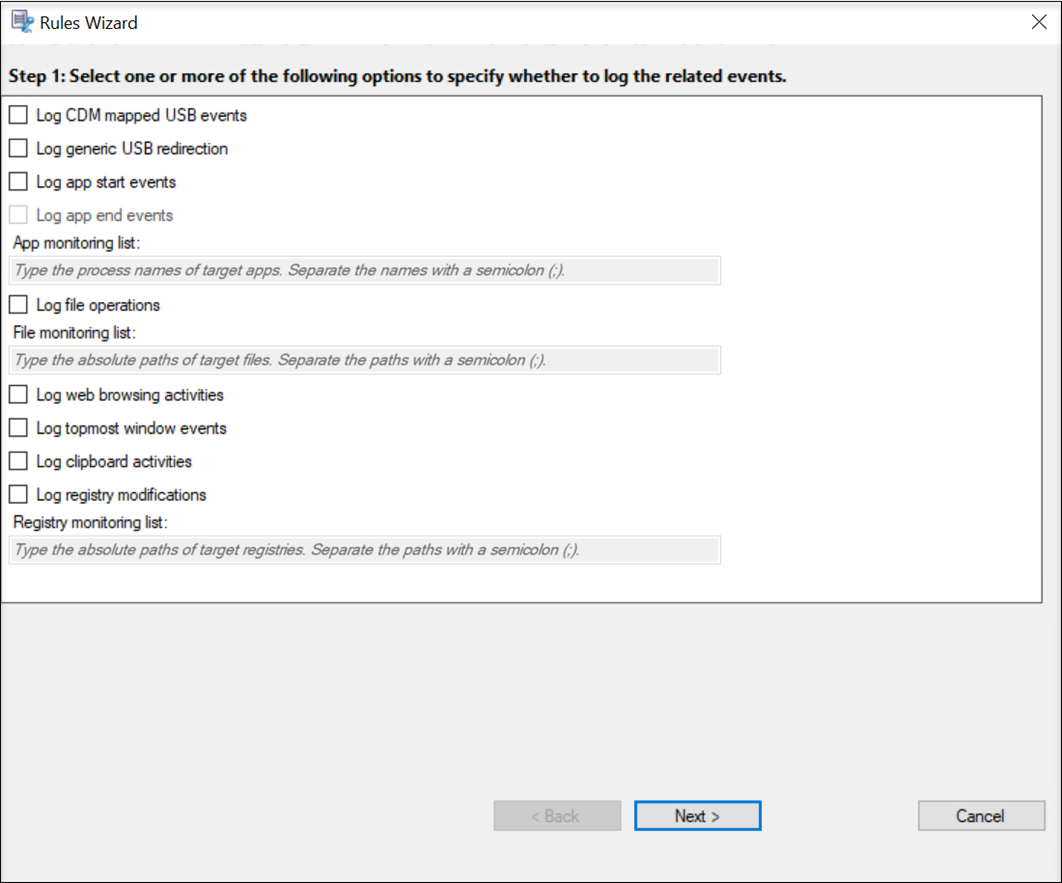
-
Log CDM mapped USB events: Logs the insertion of a Client Drive Mapping (CDM) mapped mass storage device in a client device where Citrix Workspace app for Windows or for Mac is installed, and tags the event in the recording.
-
Log generic redirected USB events: Logs the insertion of a generic redirected mass storage device in a client where Citrix Workspace app for Windows or for Mac is installed, and tags the event in the recording.
-
Log app start events: Logs the starts of target applications and tags the event in the recording.
-
Log app end events: Logs the ends of target applications and tags the event in the recording.
Note:
Session Recording cannot log the end of an application without logging its start. Therefore, in the Rules wizard, the Log app end events check box is grayed out before you select Log app start events.
-
App monitoring list: When you select Log app start events and Log app end events, use the App monitoring list to specify target applications to monitor and to avoid an excessive number of events from flooding the recordings.
Note:
- To capture the start and end of an application, add the process name of the application in the App monitoring list. For example, to capture the start of Remote Desktop Connection, add the process name
mstsc.exeto the App monitoring list. When you add a process to the App monitoring list, applications driven by the added process and its child processes are monitored. Session Recording adds the process names,cmd.exe,powershell.exe, andwsl.exe, to the App monitoring list by default. If you select Log app start events and Log app end events for an event detection policy, the starts and ends of the Command Prompt, PowerShell, and Windows Subsystem for Linux (WSL) apps are logged regardless of whether you manually add their process names to the App monitoring list. The default process names are not visible on the App monitoring list. - Separate process names with a semicolon (;).
- Only the exact match is supported. Wildcards are not supported.
- Process names you add are case-insensitive.
- To avoid an excessive number of events from flooding the recordings, do not add any system process names (for example, explorer.exe) and web browsers in the registry.
- To capture the start and end of an application, add the process name of the application in the App monitoring list. For example, to capture the start of Remote Desktop Connection, add the process name
-
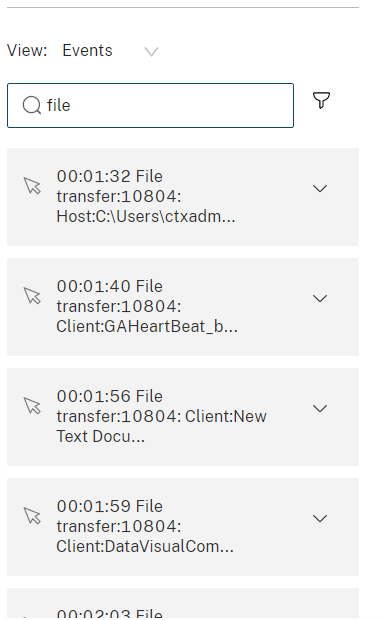
Log file operations: Logs operations on target files that you specified in the File monitoring list and logs file transfers between session hosts (VDAs) and client devices (including mapped client drives and generic redirected mass storage devices). Selecting this option triggers the logging of file transfers, no matter whether or not you specify the File monitoring list.
-
File events presented in the web player
-
File events presented in the Session Recording Player

-
-
File monitoring list: When you select Log file operations, use the File monitoring list to specify target files to monitor. You can specify folders to capture all files within them. No file is specified by default, which means no file is captured by default.
Note:
- To capture renaming, creation, deletion, or moving operations on a file, add the path string of the file folder (not the file name or the root path of the file folder) in the File monitoring list. For example, to capture renaming, creation, deletion, and moving operations on the
sharing.pptfile inC:\User\File, add the path stringC:\User\Filein the File monitoring list. - Both local file paths and remote shared folder paths are supported. For example, to capture operations on the RemoteDocument.txt file in the
\\remote.address\Documentsfolder, add the path string\\remote.address\Documentsin the File monitoring list. - Separate monitored paths with a semicolon (;).
- Only exact matches are supported. Wildcards are not supported.
- Path strings are case-insensitive.
Limitations:
- Copying files or folders from a monitored folder to an unmonitored folder cannot be captured.
- When the length of a file or folder path including the file or folder name exceeds the maximum length (260 characters), operations on the file or folder cannot be captured.
- Pay attention to the database size. To prevent large numbers of events from being captured, back up or delete the “Event” table regularly.
- When large numbers of events are captured at time intervals, the Player displays and the database stores only one event item for each event type to avoid storage expansion.
- To capture renaming, creation, deletion, or moving operations on a file, add the path string of the file folder (not the file name or the root path of the file folder) in the File monitoring list. For example, to capture renaming, creation, deletion, and moving operations on the
-
Log web browsing activities: Logs user activities on supported browsers and tags the browser name, URL, and page title in the recording.

List of supported browsers:
Browser Version Chrome 69 and later Internet Explorer 11 Firefox 61 and later -
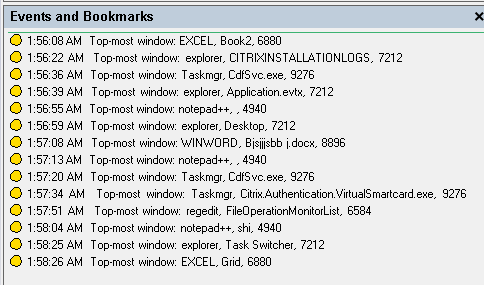
Log topmost window events: Logs the topmost window events and tags the process name, title, and process number in the recording.
-
Log clipboard activities: Logs copy operations of text, images, and files using the clipboard. The process name and file path are logged for a file copy. The process name and title are logged for a text copy. The process name is logged for an image copy.
-
Log registry modifications: Logs modifications in the Windows registry that occur during recorded sessions. The detected registry modifications include adding a key or value, renaming a key or value, changing an existing value, and deleting a key or value.
-
Registry monitoring list: When you select Log registry modifications, type the absolute paths of target registries you want to monitor and separate the paths with a semicolon (;). Start a path with HKEY_USERS, HKEY_LOCAL_MACHINE, or HKEY_CLASSES_ROOT. For example, you can type
HKEY_LOCAL_MACHINE\SOFTWARE\Microsoft\Windows;HKEY_CLASSES_ROOT\GuestStateVDev. If you leave this list unspecified, no registry modification is captured.
-
-
Select and edit the rule criteria.
Similar to creating a custom recording policy, you can choose one or more rule criteria: Users or Groups, Published Applications or Desktop, Delivery Groups or Machines, and IP Address or IP Range. For more information, see the instructions in the Create a custom recording policy section.
Note:
Some sessions might not meet any rule criteria in an event detection policy. For these sessions, the action of the fallback rule applies, which is always Do not detect. You cannot modify or delete the fallback rule.
-
Follow the wizard to complete the configuration.
-
After a session that matches an event detection policy starts, the session ID and its event registry values appear in the Session Recording Agent. For example:
Compatibility with registry configurations
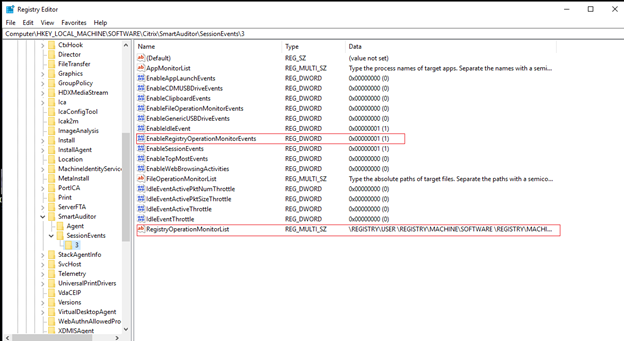
When Session Recording is newly installed or upgraded, no active event detection policy is available by default. At this time, each Session Recording Agent respects the registry values under HKEY_LOCAL_MACHINE\SOFTWARE\Citrix\SmartAuditor\SessionEvents to determine whether to log specific events. For a description of the registry values, see the following table:
| Registry Value | Description |
|---|---|
| EnableSessionEvents | 1: enables event detection globally; 0: disables event detection globally (default value data). |
| EnableCDMUSBDriveEvents | 1: enables detecting the insertion of CDM mapped USB mass storage devices; 0: disables detecting the insertion of CDM mapped USB mass storage devices (default value data). |
| EnableGenericUSBDriveEvents | 1: enables detecting the insertion of generic redirected USB mass storage devices; 0: disables detecting the insertion of generic redirected USB mass storage devices (default value data). |
| EnableAppLaunchEvents | 1: enables detecting only application starts; 2: enables detecting both application starts and ends; 0: disables detecting application starts and ends (default value data). |
| AppMonitorList | Specifies target applications to monitor. No application is specified by default, which means no application is captured by default. |
| EnableFileOperationMonitorEvents | 1: enables detecting file operations; 0: disables detecting file operations (default value data). |
| FileOperationMonitorList | Specifies target folders to monitor. No folder is specified by default, which means no file operation is captured by default. |
| EnableWebBrowsingActivities | 1: enables detecting web browsing activities; 0: disables detecting web browsing activities (default value data). |
Here are some compatible scenarios:
-
Your Session Recording is newly installed or upgraded from a release earlier than 1811 that does not support event detection (logging), the related registry values on each Session Recording Agent are the default. Because there is no active event detection policy by default, no events are logged.
-
If your Session Recording is upgraded from a release earlier than 1811 that supports event detection but has the feature disabled before your upgrade, the related registry values on each Session Recording Agent remain the default. Because there is no active event detection policy by default, no events are logged.
-
If your Session Recording is upgraded from a release earlier than 1811 that supports event detection and has the feature partially or fully enabled before your upgrade, the related registry values on each Session Recording Agent remain the same. Because there is no active event detection policy by default, the event detection behavior remains the same.
-
If your Session Recording is upgraded from 1811, the event detection (logging) policies configured in the Policy Console remain in use.
Caution:
When you activate the system-defined or a custom event detection policy in the Session Recording Policy Console, the relevant registry settings on each Session Recording Agent are ignored and you cannot use registry settings for event detection any longer.
Recording viewing policies
The Session Recording Player supports role-based access control. You can create recording viewing policies in the Session Recording Policy Console and add multiple rules to each policy. Each rule determines which user or user group can view the recordings originating from other users and user groups, published applications and desktops, and delivery groups and VDAs you specify.
Create a custom recording viewing policy
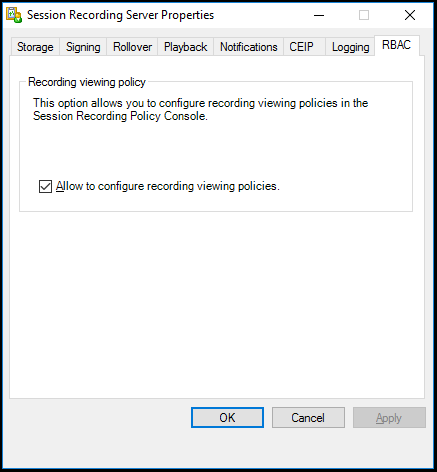
Before you can create recording viewing policies, enable the feature as follows:
- Log on to the machine hosting the Session Recording Server.
- From the Start menu, choose Session Recording Server Properties.
- In Session Recording Server Properties, click the RBAC tab.
-
Select the Allow to configure recording viewing policies check box.
To create a custom recording viewing policy:
Note: Different from recording policies and event detection policies, a recording viewing policy (including all rules added within) is active immediately when it is created. You do not have to activate it.
-
Log on as an authorized Policy Administrator to the server where the Session Recording Policy Console is installed.
-
Start the Session Recording Policy Console. By default, there is no recording viewing policy.
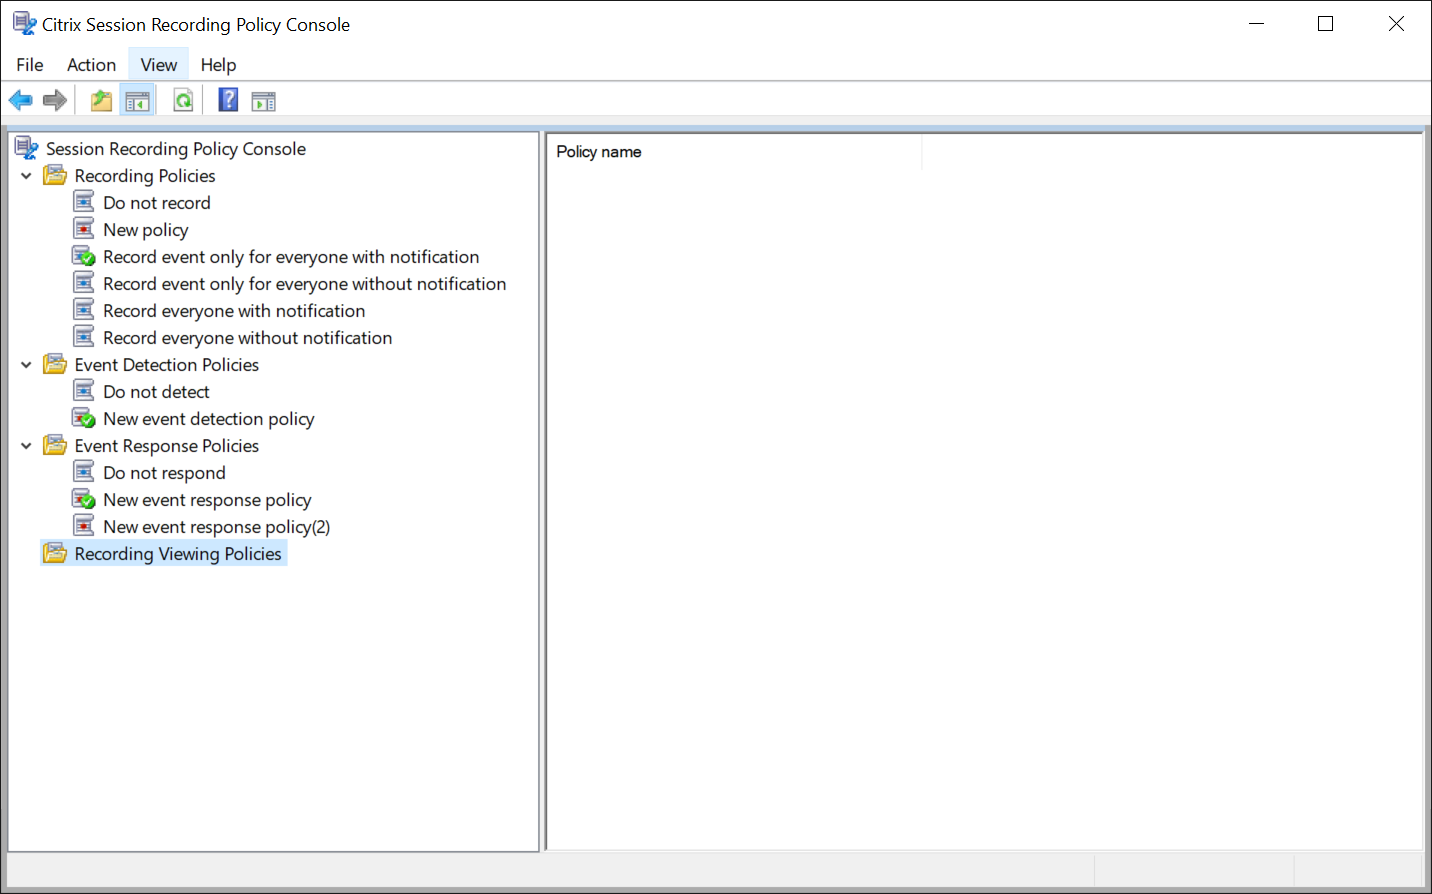
Note: The Recording Viewing Policies menu is not available unless you have enabled the feature in Session Recording Server Properties.
-
Select Recording Viewing Policies in the left pane. From the menu bar, choose Add New Policy to create a recording viewing policy.
-
(Optional) Right-click the new policy and rename it.
-
Right-click the new policy and select Add rule.
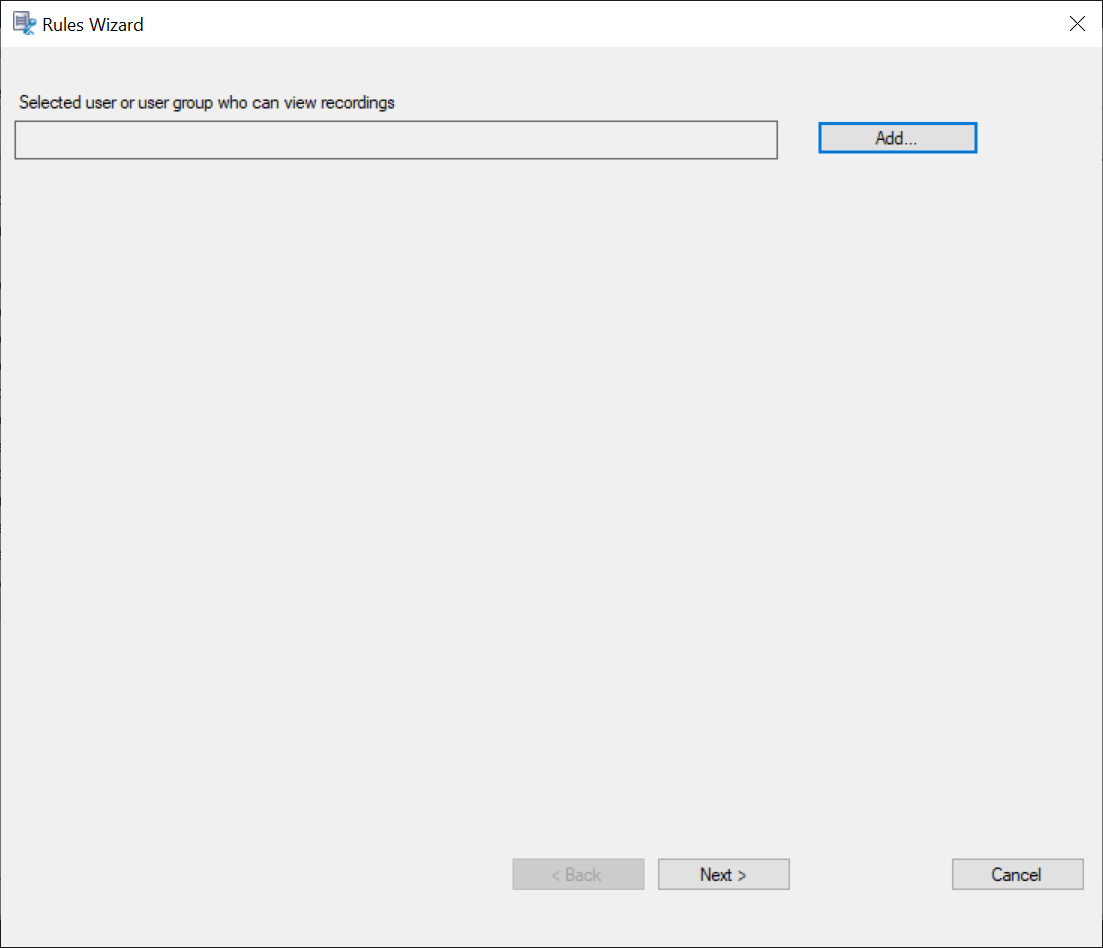
-
Click Add.
-
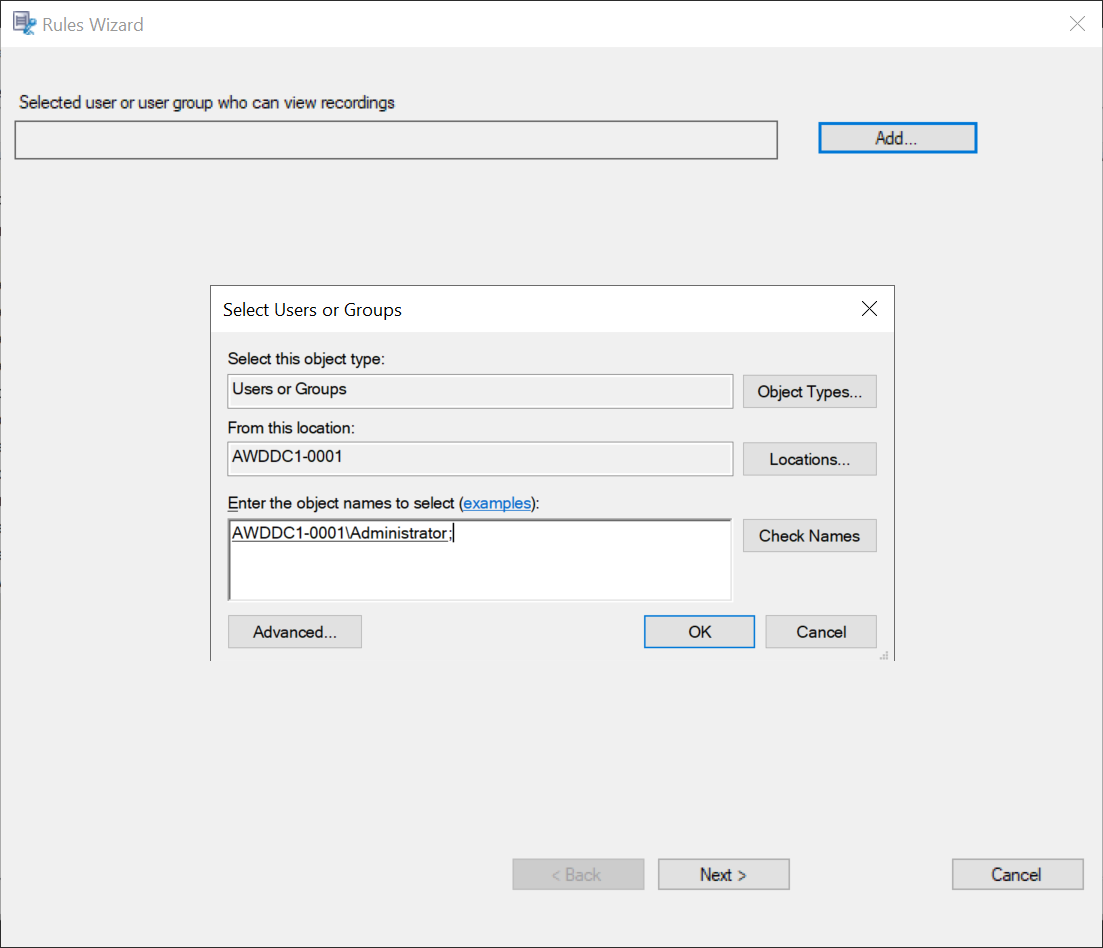
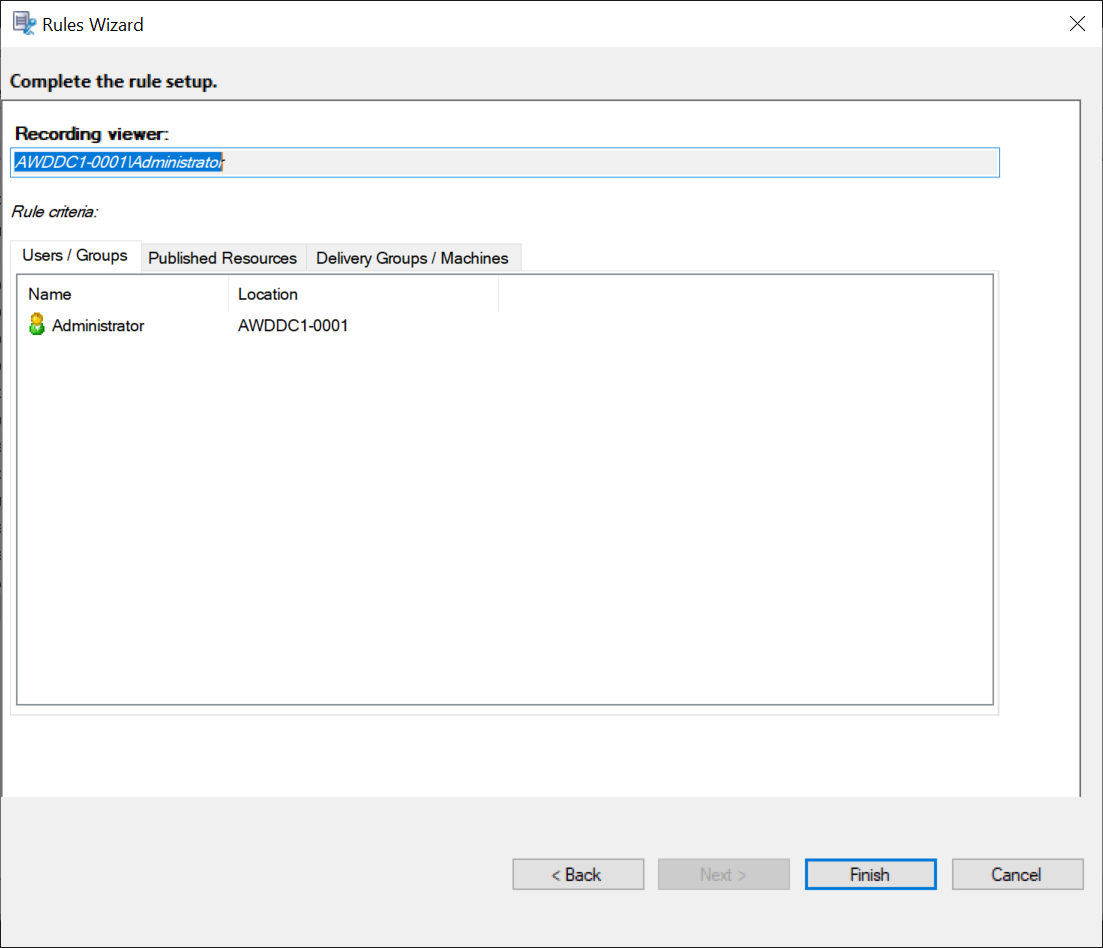
In the Select Users or Groups dialog, select a user or user group as the recording viewer.
Note:
In each rule, you can select only one user or user group as the recording viewer. If you select multiple users or user groups, only your most recent selection takes effect and appears in the text box.
When you specify a recording viewer, ensure that you have assigned the viewer to the Player role. A user without the permission to play recorded sessions receives an error message when trying to play a recorded session. For more information, see Authorize users. -
Click OK and then Next. The dialog for setting rule criteria appears.
- Select and edit the rule criteria to specify whose recordings are visible to the viewer you specified earlier:
- Users or Groups
- Published Applications or Desktop
- Delivery Groups or Machines
Note: If you leave the rule criteria unspecified, the viewer specified earlier has no recordings to view.
-
Follow the wizard to complete the configuration.
For example:
Event response policies
This policy setting allows you to send email alerts, or start screen recording immediately, or take both actions in response to logged events in recorded sessions. If your active recording policy records only specific events without capturing any screens, you can configure an event trigger to start screen recording immediately when a specific event occurs. This is called event-triggered dynamic screen recording.
The only system-defined event response policy is Do not respond. You can create custom event response policies as needed. Only one event response policy can be active at a time.
For an example email alert, see the following screen capture:
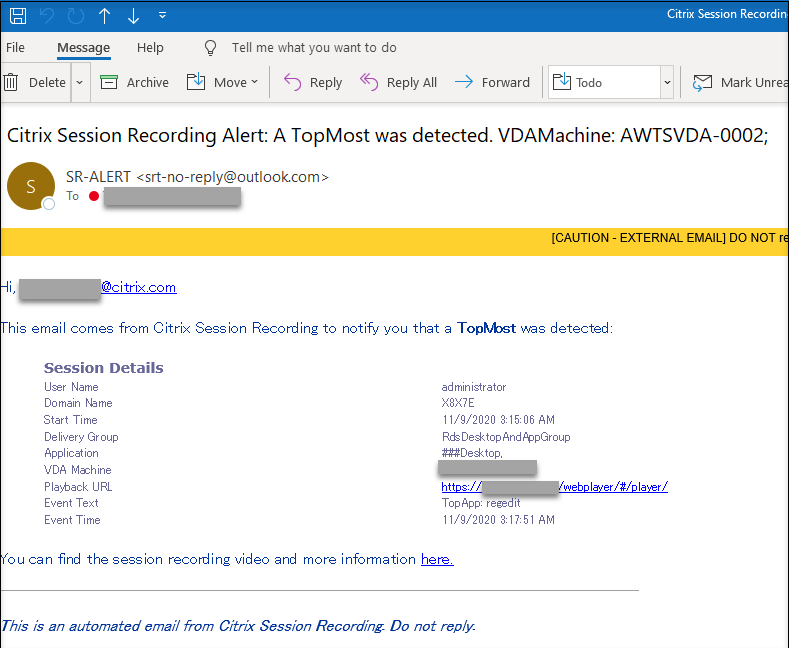
Tip:
Clicking the playback URL opens the playback page of the recorded session in the web player. Clicking here opens the All recordings page in the web player.
System-defined event response policy
Session Recording provides one system-defined event response policy:
- Do not respond. The default event response policy. If you do not specify another event response policy, neither email alerts nor dynamic screen recording is provided in response to logged events in your recordings.
Create a custom event response policy
-
Log on as an authorized policy administrator to the server where the Session Recording Policy Console is installed.
-
Start the Session Recording Policy Console. By default, there is no active event response policy.
-
Select Event Response Policies in the left pane. From the menu bar, choose Add New Policy.
-
(Optional) Right-click the new event response policy and rename it.
-
Right-click the new event response policy and select Add Rule.
-
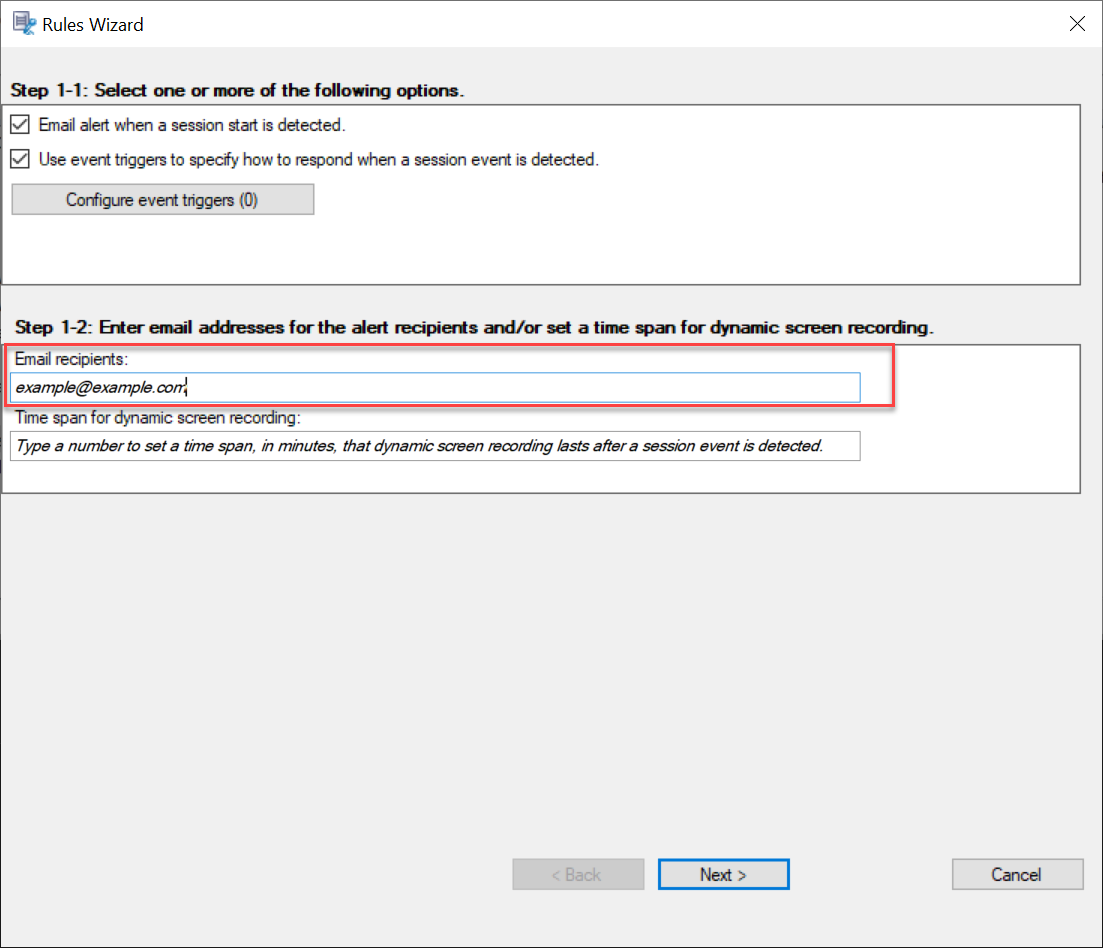
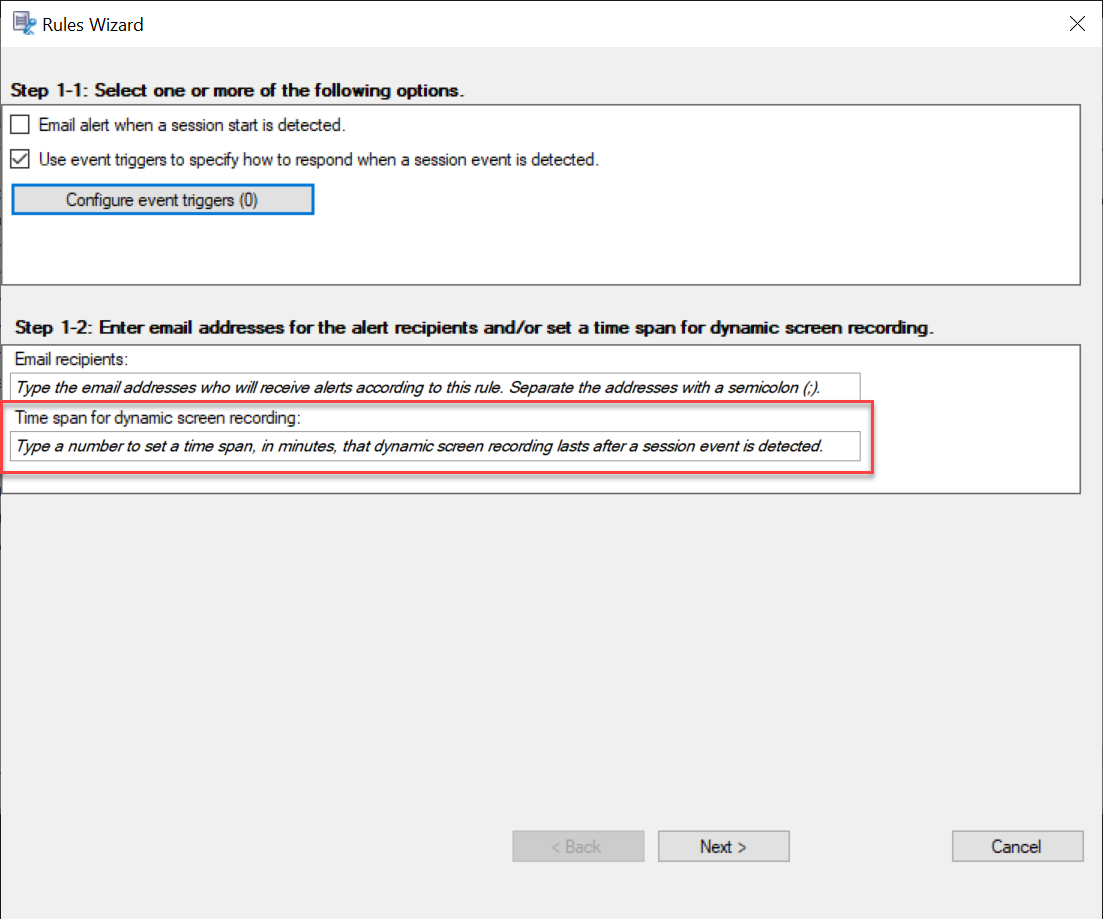
Select Email alert when a session start is detected or Use event triggers to specify how to respond when a session event is detected.
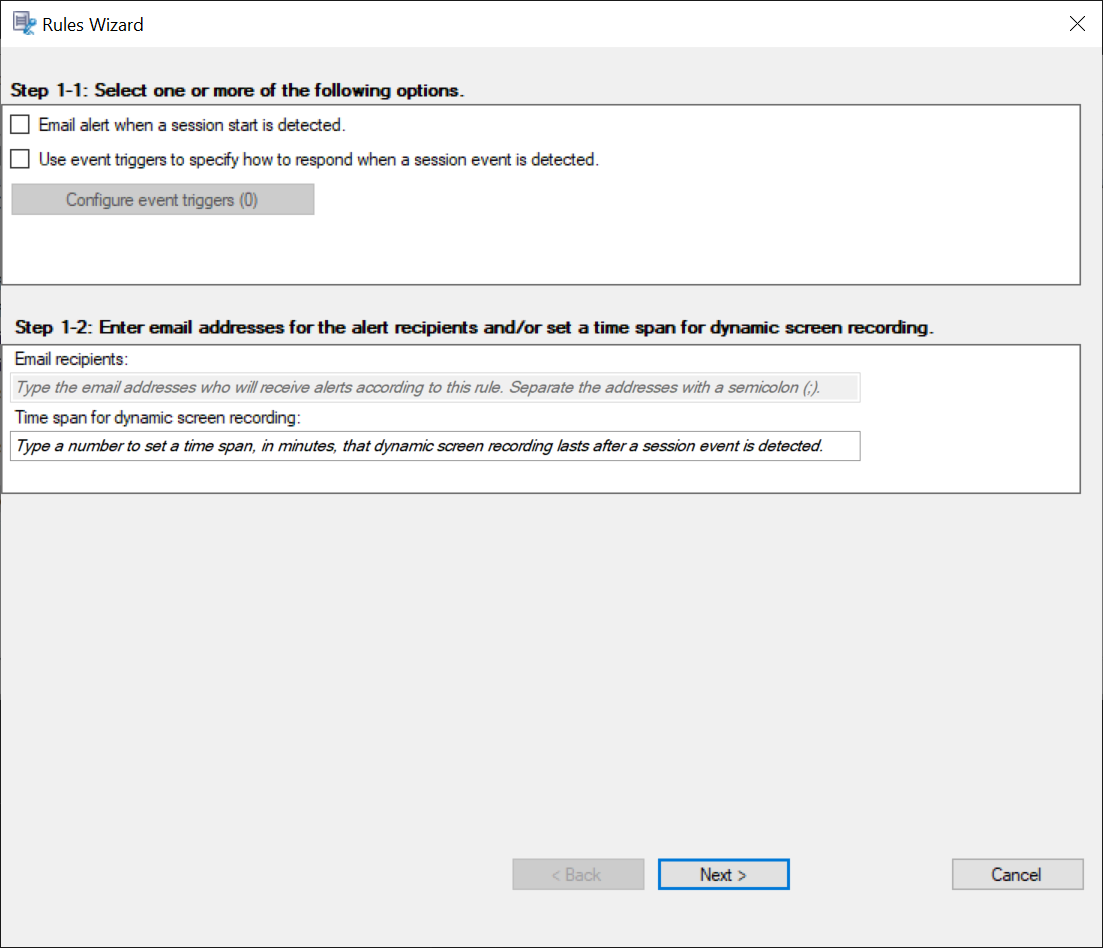
-
(Optional) Set email recipients and the email sender properties.
-
Type email addresses for the alert recipients in the Rules wizard.
-
Configure outgoing email settings in the Session Recording Server Properties.

Note:
If you select more than two options in the Email title section, a warning dialog appears, saying that the email subject might be too long. After you select Allow sending email notifications and click Apply, Session Recording sends an email to verify your email settings. If any setting is incorrect, for example, an incorrect password or port, Session Recording returns an error message with the error details.

Your email settings need about five minutes to take effect. To have your email settings take effect immediately or fix the issue that emails are not sent according to the settings, restart the Storage Manager (CitrixSsRecStorageManager) service. Also, restart the Storage Manager service if you upgrade to the current release from Version 2006 and earlier.
-
Edit registry for accessing the web player.
To make the playback URLs in your alert emails work as expected, browse to the registry key at
HKEY_LOCAL_MACHINE\SOFTWARE\Citrix\SmartAuditor\Serverand do the following:-
Set the value data of LinkHost to the URL of the domain you use to access the web player. For example, to access a web player at
https://example.com/webplayer/#/player/, set the value data of LinkHost tohttps://example.com. -
Add a new value, EmailThreshold, and set its value data to a number in the range of 1 through 100. The value data determines the maximum number of alert emails that an email sending account sends within a second. This setting helps slow down the number of emails that are being sent and thus reduces the CPU usage. If you leave the value data unspecified or set it to a number out of range, the value data falls back to 25.
Note:
-
Your email server might treat an email sending account as a spam bot and thus prevent it from sending emails. To allow an account to send emails, an email client such as Outlook might request that you verify that the account is used by a human user.
-
There is a limit for sending emails within a given period. For example, when the daily limit is reached, you cannot send emails until the start of the next day. In this case, ensure that the limit is more than the number of sessions being recorded within the period.
-
-
-
(Optional) Configure event triggers.
After you select Use event triggers to specify how to respond when a session event is detected, the Configure Event Triggers button becomes available. Click it to specify logged events that can trigger email alerts, dynamic screen recording, or both.
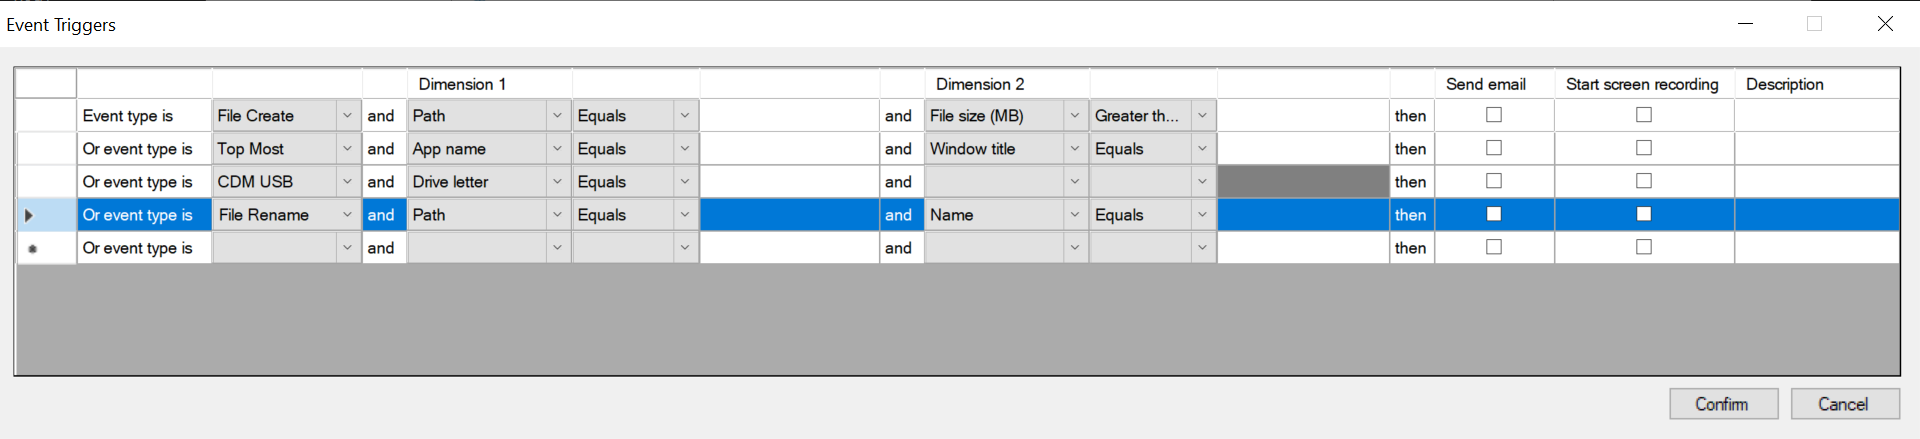
Note:
You must select the event types that the active event detection policy logs. Click Confirm when you are finished.
Select event types from the drop-down list and set event rules through the two dimensions that are combined using the logical AND operator. You can set up to seven event rules. You can also define your event triggers in the Description column or leave the column empty. Your defined description of an event trigger is provided in the alert emails if you have Send email selected and events of the type are logged. If you have Start screen recording selected, dynamic screen recording automatically starts when certain events occur during an event-only recording. Set the time span for dynamic screen recording. If you leave the time span unspecified, screen recording continues until the recorded session ends.
For a complete list of supported event types, see the following table.
Event type Dimension Option App Start App name Full command line App End App name Top Most App name Windows title Web Browsing URL Tab title Browser name File Create Path File size(MB) File Rename Path Name File Move Source path Destination path File size(MB) File Delete Path File size(MB) CDM USB Drive letter Generic USB Device name Idle idle duration(Hrs) -
Click Next to select and edit the rule criteria.
Similar to when creating a custom recording policy, you can choose one or more rule criteria: Users or Groups, Published Applications or Desktop, Delivery Groups or Machines, and IP Address or IP Range. For more information, see the instructions in the Create a custom recording policy section.
Note:
When a session or an event meets more than one rule in a single event response policy, the oldest rule takes effect.
- Follow the wizard to complete the configuration.
- Activate the new event response policy.
Activate a policy
- Log on as an administrator to the machine where you installed the Session Recording Policy Console.
- Start the Session Recording Policy Console.
- If the Connect to Session Recording Server window appears, ensure that the name of the Session Recording Server, protocol, and port are correct. Click OK.
- In the Session Recording Policy Console, expand Recording Policies or Event Logging Policies as required.
- Select the policy to activate.
- From the menu bar, choose Activate Policy.
Modify a policy
- Log on as an administrator to the machine where you installed the Session Recording Policy Console.
- Start the Session Recording Policy Console.
- If the Connect to Session Recording Server window appears, ensure that the name of the Session Recording Server, protocol, and port are correct. Click OK.
- In the Session Recording Policy Console, expand Recording Policies or Event Logging Policies as required.
- Select the policy you want to modify. The rules for the policy appear in the right pane.
- To add, modify, or delete a rule:
- From the menu bar, choose Add New Rule. If the policy is active, a pop-up window appears requesting confirmation of the action. Use the Rules wizard to create a rule.
- Select the rule you want to modify, right-click, and choose Properties. Use the Rules wizard to modify the rule.
- Select the rule you want to delete, right-click, and choose Delete Rule.
Delete a policy
Note:
You cannot delete a system-defined policy or a policy that is active.
- Log on as an administrator to the machine where you installed the Session Recording Policy Console.
- Start the Session Recording Policy Console.
- If the Connect to Session Recording Server window appears, ensure that the name of the Session Recording Server, protocol, and port are correct. Click OK.
- In the Session Recording Policy Console, expand Recording Policies or Event Logging Policies as required.
- In the left pane, select the policy to delete. If the policy is active, you must activate another policy.
- From the menu bar, choose Delete Policy.
- Select Yes to confirm the action.
Understand rollover behavior
When you activate a policy, the previously active policy remains in effect until the session being recorded ends or the session recording file rolls over. Files roll over when they have reached the maximum size. For more information about the maximum file size for recordings, see Specify file size for recordings.
The following table details what happens when you apply a new recording policy while a session is being recorded and a rollover occurs:
| If the previous recording policy was | And the new recording policy is | After a rollover, the recording policy will be |
|---|---|---|
| Do not record | Any other policy | No change. The new policy takes effect only when the user logs on to a new session. |
| Record without notification | Do not record | Recording stops. |
| Record without notification | Record with notification | Recording continues and a notification message appears. |
| Record with notification | Do not record | Recording stops. |
| Record with notification | Record without notification | Recording continues. No message appears the next time a user logs on. |