Troubleshoot VM problems
XenServer provides two forms of support:
- Free, self-help support on the XenServer website
- Paid-for Support Services, which you can buy from the Support Site.
With XenServer Technical Support, you can open a Support Case online or contact the support center by phone if you experience technical difficulties.
The XenServer Support site hosts several resources that might be helpful to you if you experience unusual behavior, crashes, or other problems. Resources include: Support Forums, Knowledge Base articles, and product documentation.
If you see unusual VM behavior, this section aims to help you solve the problem. This section describes where application logs are located and other information that can help your XenServer Solution Provider track and resolve the issue.
Important:
Follow the troubleshooting information in this section only under the guidance of your XenServer Solution Provider or the Support Team.
Vendor Updates: Keep your VMs up-to-date with operating system vendor-supplied updates. The vendor might have provided fixes for VM crashed and other failures.
VM crashes
If you are experiencing VM crashes, it is possible that a kernel crash dump can help identify the problem. Reproduce the crash, if possible, and follow this procedure. Consult your guest OS vendor for further investigation on this issue.
The crashdump behavior of your VMs can be controlled by using the actions-after-crash parameter. The following are the possible values:
| Value | Description |
|---|---|
preserve |
Leave the VM in a paused state. (For analysis) |
restart |
No core dump, reboot VM. (This is the default) |
destroy |
No core dump, leave VM halted. |
To enable saving of VM crash dumps:
-
On the XenServer host, determine the UUID of the desired VM by running the following command:
xe vm-list name-label=<name> params=uuid --minimal <!--NeedCopy--> -
Change the
actions-after-crashvalue by usingxe vm-param-set; for example, run the following command on dom0:xe vm-param-set uuid=<vm_uuid> actions-after-crash=preserve <!--NeedCopy--> -
Crash the VM.
-
Determine the VM’s domain ID by running the following command on dom0:
xe vm-param-get uuid=<vm_uuid> param-name=dom-id <!--NeedCopy--> -
Run the
xl triggercommand in dom0 to trigger the crash:xl trigger <dom_id> nmi <!--NeedCopy-->
-
Windows VM crashdump behavior
By default Windows crash dumps are put into %SystemRoot%\Minidump in the Windows VM itself. You can configure the VMs dump level by following the menu path My Computer > Properties > Advanced > Startup and Recovery.
UEFI and Secure Boot problems
How do I change the screen resolution of the XenCenter console on a UEFI-enabled VM?
To change the screen resolution of the XenCenter console on a UEFI-enabled VM:
- Open the Windows Settings
- Click the Update & Security button
- Under the recovery tab, press the Restart now button.
- Navigate to Troubleshoot > Advanced Options > UEFI firmware settings.
- Press Restart. During restart, the UEFI settings menu loads.
- Navigate to Device Manager > OVMF Platform Configuration. This displays the current screen resolution.
- Press Enter to see the screen resolution options.
- Use the arrow keys to select the desired screen resolution and press Enter.
- Press F10 to save the changes and confirm your choice.
- Reboot the VM to see the XenCenter console in an updated screen resolution.
Why can’t I create a UEFI Secure Boot VM?
Check that your VM operating system supports UEFI Secure Boot mode. The following operating systems support Secure Boot:
- Windows 10 (64-bit)
- Windows 11 (64-bit)
- Windows Server 2016 (64-bit)
- Windows Server 2019 (64-bit)
- Windows Server 2022 (64-bit)
Why is my UEFI Secure Boot VM failing to start?
If you see the following messages on the console of your UEFI Secure Boot VM and an alert in XenCenter, the Secure Boot process has failed and your VM does not start.
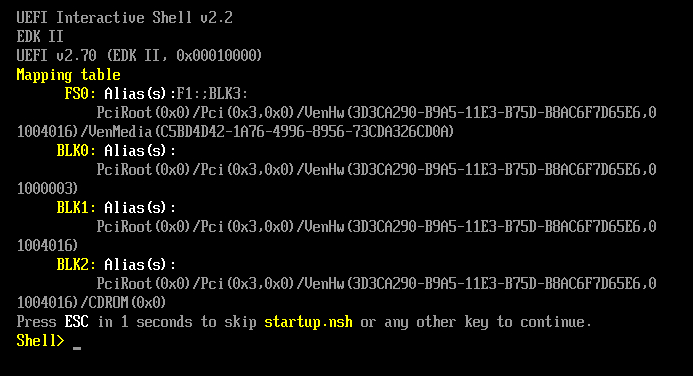
This is usually caused by the installation of unsigned drivers into the VM. Investigate what drivers have been updated or installed since the last successful Secure Boot.
You can disable Secure Boot and start the VM in setup mode to remove the unsigned drivers.
Important:
Before doing this, back up your VM by taking a snapshot.
To change a UEFI Secure Boot VM into a UEFI boot VM, run the following command on the XenServer host that hosts the VM:
varstore-sb-state <VM_UUID> setup
After you have fixed your VM, run the following command to re-enable Secure Boot:
varstore-sb-state <VM_UUID> user
Is Secure Boot causing an issue on my VM?
To diagnose whether an issue on your VM is caused by Secure Boot being enabled for the VM, disable Secure Boot and try to reproduce the issue.
To disable Secure Boot, run the following command on the XenServer host that hosts the VM:
varstore-sb-state <VM_UUID> setup
After you have debugged the issue, you can run the following command to re-enable Secure Boot:
varstore-sb-state <VM_UUID> user
How do I run Windows debug on a Secure Boot Windows VM?
You cannot run Windows debug on a Secure Boot Windows VM. To run Windows debug on your VM, you can do one of the following things:
-
Switch your VM to UEFI boot mode by running the following command:
xe vm-param-set uuid=<UUID> platform:secureboot=falseReboot the VM.
After you have debugged the issue, you can run the following command to re-enable Secure Boot:
xe vm-param-set uuid=<UUID> platform:secureboot=autoReboot the VM.
-
Disable Secure Boot by running the following command on the XenServer host that hosts the VM:
varstore-sb-state <VM_UUID> setupAfter you have debugged the issue, you can run the following command to re-enable Secure Boot:
varstore-sb-state <VM_UUID> user
Why are only two NICs showing up for my UEFI-enabled Windows VM?
Even if you set up more than two NICs when you created your UEFI-enabled VM, when the VM first starts you only see two NICs. After the XenServer VM Tools for Windows have been installed in the VM, this information displays correctly.
Why are my emulated devices showing as different types than expected on a UEFI Windows VM?
UEFI Secure Boot VMs use NVME and E1000 for emulated devices. However, when the VM first starts the emulated devices show as different types. After the XenServer VM Tools for Windows have been installed in the VM, this information displays correctly.
Why can’t I convert my templates from BIOS mode to UEFI or UEFI Secure Boot mode?
You can only create a UEFI-enabled VM template from a template supplied with XenServer.
Do not use the xe template-param-set command for templates that have something installed on them or templates that you created from a snapshot. The boot mode of these snapshots cannot be changed and, if you attempt to change the boot mode, the VM fails to boot.
How do I check UEFI and UEFI Secure Boot variables?
On the XenServer host where the UEFI or UEFI Secure Boot VM is hosted, run the following commands:
varstore-ls
This command lists the GUIDs and names of the available variables. Use the GUID and name in the following command:
varstore-get <VM\_ID> <GUID> <name> | hexdump -C
Why can’t I use a ‘test’ driver with a Secure Boot VM?
If you are also working with a third party to debug and fix issues in their UEFI Secure Boot VM, the third party provide might provide unsigned drivers for test or verification purpose. These drivers do not work in a UEFI Secure Boot VM.
Request a signed driver from the third party. Or you can switch your UEFI Secure Boot VM into setup mode to run with the unsigned driver.
Xentop utility
The xentop utility displays real-time information about a XenServer system and running domains in a semi-graphical format. You can use this tool to investigate the state of the domain associated with a VM.
To run the xentop utility:
- Connect to the XenServer host over SSH or, in XenCenter, go to the Console tab of the host.
-
Run the following command:
xentopThe console displays information about the host in a table. The information is periodically refreshed.
Output columns
The xentop utility displays the following columns in the console:
- NAME - The name of the domain. “Domain-0” is the XenServer control domain. Other domains belong to the VMs.
-
STATE - The state of the domain. The state can have one of the following values:
- d - the domain is dying
- s – the domain is shutting down
- b – the domain is blocked
- c – the domain has crashed
- p – the domain is paused
- r – the domain is actively running on one of the CPUs
- CPU(sec) - The CPU usage of the domain in seconds
- CPU(%) - The CPU usage of the domain as a percentage
- MEM(k) - The current memory usage of the domain in KiB
- MEM(%) - The current memory usage of the domain as a percentage
- MAXMEM(k) - The maximum domain memory usage in KiB
- MAXMEM(%) - The maximum domain memory usage as a percentage
- VCPUS - The number of virtual CPUs assigned to the domain
- NETS - The number of virtual networks used by the domain
- NETTX(k) - The amount of total network tx in KiB
- NETRX(k) - The amount of total network rx in KiB
- VBDS - The number of virtual block devices
- VBD_OO - The total number of times that the VBD has encountered an out of requests error. When that occurs, I/O requests for the VBD are delayed.
- VBD_RD - The total number of VBD read requests
- VBD_WR - The total number of VBD write requests
- VBD_RSECT - The VBD read sectors
- VBD_WSECT - The VBD write sectors
Xentop parameters
You can use the following parameters to configure the output for the xentop command:
- -h - Output the command help for the xentop command.
- -V - Output the version of the xentop command.
- -d or –delay=SECONDS - Set the number of seconds between updates
- -n or –networks - Output the data for each VIF network associated with a domain
- -x or –vbds - Output the data for each VBD block device associated with a domain
- -r or repeat-header - Repeat the table header before each domain
- -v or –vcpus - Output the data for each vCPU associated with a domain
- -i or –iterations - Number of iterations (updates) to display before xentop exits
- -f or –full-name - Output the full domain name instead of a truncated name
You can also configure most of these parameters from within the xentop utility.