Administer Workload Balancing
After Workload Balancing has been running for a while, there are routine tasks that you might need to perform to keep Workload Balancing running optimally. You might need to perform these tasks because of changes to your environment (such as different IP addresses or credentials), hardware upgrades, or routine maintenance.
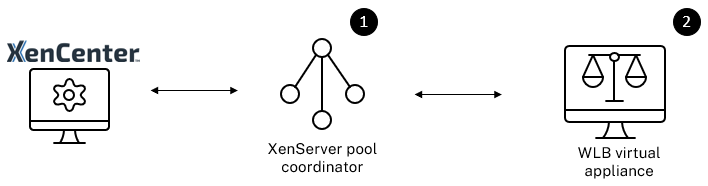
Connect to the Workload Balancing virtual appliance
After Workload Balancing configuration, connect the pool you want managed to the Workload Balancing virtual appliance using either the CLI or XenCenter. Likewise, you might need to reconnect to the same virtual appliance at some point.
To connect a pool to your Workload Balancing virtual appliance, you need the following information:
-
IP address or FQDN of the Workload Balancing virtual appliance
-
To obtain the IP address for the Workload Balancing virtual appliance:
- In XenCenter, go to the Workload Balancing virtual appliance Console tab.
- Log in as
rootwith the root password you created when you imported the appliance. - Run the following command:
ifconfig.
-
To specify the Workload Balancing FQDN when connecting to the Workload Balancing server, first add its host name and IP address to your DNS server.
-
-
The port number of the Workload Balancing virtual appliance. By default, XenServer connects to Workload Balancing on port 8012.
Only edit the port number when you have changed it during Workload Balancing Configuration. The port number specified during Workload Balancing Configuration, in any firewall rules, and in the Connect to WLB Server dialog must match.
-
Credentials for the resource pool you want Workload Balancing to monitor.
-
Credentials for the Workload Balancing account you created during Workload Balancing configuration.
This account is often known as the Workload Balancing user account. XenServer uses this account to communicate with Workload Balancing. You created this account on the Workload Balancing virtual appliance during Workload Balancing Configuration.
When you first connect to Workload Balancing, it uses the default thresholds and settings for balancing workloads. Automatic features, such as automated optimization mode, power management, and automation, are disabled by default.
Working with certificates
If you want to upload a different (trusted) certificate or configure certificate verification, note the following before connecting your pool to Workload Balancing:
-
If you want XenServer to verify the self-signed Workload Balancing certificate, you must use the Workload Balancing IP address to connect to Workload Balancing. The self-signed certificate is issued to Workload Balancing based on its IP address.
-
If you want to use a certificate from a certificate authority, it is easier to specify the FQDN when connecting to Workload Balancing. However, you can specify a static IP address in the Connect to WLB Server dialog. Use this IP address as the Subject Alternative Name (SAN) in the certificate.
For more information, see Certificates.
To connect your pool to the Workload Balancing virtual appliance
-
In XenCenter, select your resource pool and in its Properties pane, click the WLB tab. The WLB tab displays the Connect button.
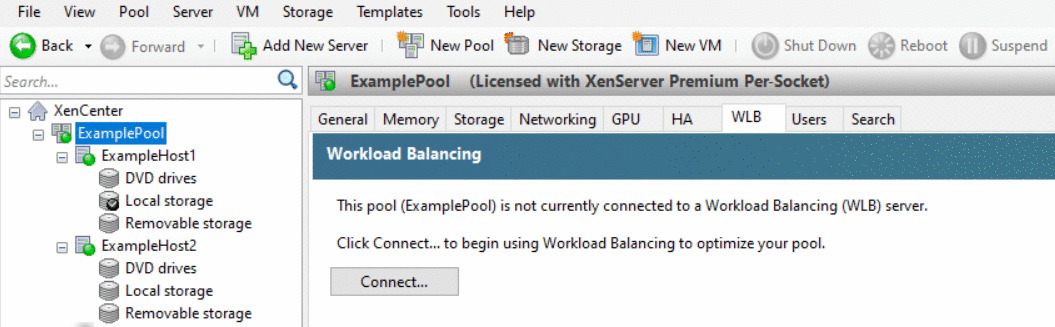
-
In the WLB tab, click Connect. The Connect to WLB Server dialog box appears.
-
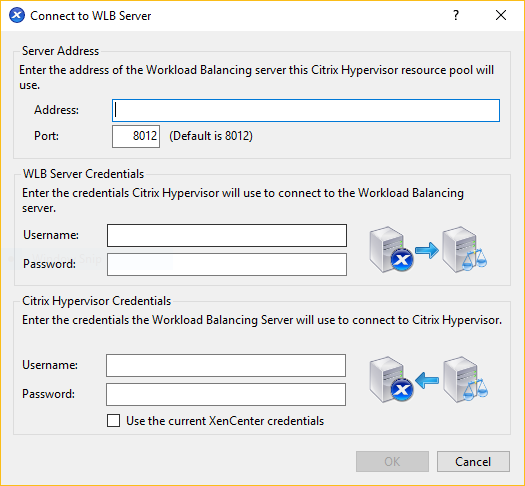
In the Server Address section, enter the following:
-
In the Address box, type the IP address or FQDN of the Workload Balancing virtual appliance. For example,
WLB-appliance-computername.yourdomain.net. -
(Optional) If you changed the Workload Balancing port during Workload Balancing Configuration, enter the port number in the Port box. XenServer uses this port to communicate with Workload Balancing.
By default, XenServer connects to Workload Balancing on port 8012.
-
-
In the WLB Server Credentials section, enter the user name and password that the pool uses to connect to the Workload Balancing virtual appliance.
These credentials must be for the account you created during Workload Balancing configuration. By default, the user name for this account is
wlbuser. -
In the Citrix Hypervisor Credentials section, enter the user name and password for the pool you are configuring. Workload Balancing uses these credentials to connect to the hosts in that pool.
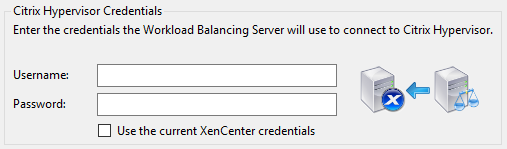
To use the credentials with which you are currently logged into XenServer, select Use the current XenCenter credentials. If you have assigned a role to this account using the role-based access control (RBAC) feature, ensure that the role has sufficient permissions to configure Workload Balancing. For more information, see Workload Balancing Access Control Permissions.
After connecting the pool to the Workload Balancing virtual appliance, Workload Balancing automatically begins monitoring the pool with the default optimization settings. If you want to modify these settings or change the priority given to resources, wait until the XenCenter Log shows that discovery is finished before proceeding.
Important:
After Workload Balancing is running for a time, if you do not receive optimal recommendations, evaluate your performance thresholds as described in Configure Workload Balancing behavior. It is critical to set Workload Balancing to the correct thresholds for your environment or its recommendations might not be appropriate.
Workload Balancing access control permissions
When Role Based Access Control (RBAC) is implemented in your environment, all user roles can display the WLB tab. However, not all roles can perform all operations. The following table lists the minimum role administrators require to use Workload Balancing features:
| Permission | Minimum Required Role |
|---|---|
| Configure, Initialize, Enable, Disable WLB | Pool Operator |
| Apply WLB Optimization Recommendations in WLB tab | Pool Operator |
| Modify WLB report subscriptions | Pool Operator |
| Accept WLB Placement Recommendations | VM Power Admin |
| Generate WLB Reports, including the Pool Audit Trail report | Read Only |
| Display WLB Configuration | Read Only |
The following table provides more details about permissions.
| Permission | Allows Assignee To |
|---|---|
| Configure, Initialize, Enable, Disable WLB | Configure WLB |
| Initialize WLB and change WLB servers | |
| Enable WLB | |
| Disable WLB | |
| Apply WLB Optimization Recommendations in WLB tab | Apply any optimization recommendations that appear in the WLB tab |
| Modify WLB report subscriptions | Change the WLB report generated or its recipient |
| Accept WLB Placement Recommendations | Select one of the hosts Workload Balancing recommends for placement |
| Generate WLB Reports, including the Pool Audit Trail report | View and run WLB reports, including the Pool Audit Trail report |
| Display WLB Configuration | View WLB settings for a pool as shown on the WLB tab |
If a user tries to use Workload Balancing and that user doesn’t have sufficient permissions, a role elevation dialog appears. For more information about RBAC, see Role-based access control.
Reconfigure a pool to use another Workload Balancing virtual appliance
You can reconfigure a resource pool to use a different Workload Balancing virtual appliance.
If you are moving from an older version of the Workload Balancing virtual appliance to the latest version, before disconnecting your old virtual appliance, you can migrate its data to the new version of the virtual appliance. For more information, see Migrate data from an existing virtual appliance.
After disconnecting a pool from the old Workload Balancing virtual appliance, you can connect the pool by specifying the name of the new Workload Balancing virtual appliance.
To use a different Workload Balancing virtual appliance:
-
(Optional) Migrate data from an older version of the virtual appliance. For more information, see Migrate data from an existing virtual appliance.
-
In XenCenter, from the Pool menu, select Disconnect Workload Balancing Server and click Disconnect when prompted.
-
In the WLB tab, click Connect. The Connect to WLB Server dialog appears.
-
Connect to the new virtual appliance. For more information, see Connect to the Workload Balancing virtual appliance
Change the Workload Balancing credentials
After initial configuration, if you want to update the credentials XenServer and the Workload Balancing appliance use to communicate, use the following process:
-
To pause Workload Balancing, go to the WLB tab and click Pause.
-
Change the Workload Balancing credentials by running the
wlbconfigcommand. For more information, see Workload Balancing Commands. -
Re-enable Workload Balancing and specify the new credentials.
-
After the progress bar completes, click Connect.
The Connect to WLB Server dialog box appears.
-
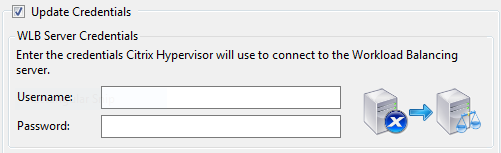
Click Update Credentials.
-
In the Server Address section, modify the following settings as appropriate:
-
In the Address box, type the IP address or FQDN of the Workload Balancing appliance.
-
(Optional.) If you changed the port number during Workload Balancing Configuration, enter that port number. The port number you specify in this box and during Workload Balancing Configuration is the port number XenServer uses to connect to Workload Balancing.
By default, XenServer connects to Workload Balancing on port 8012.
Note:
Only edit this port number if you changed it when you ran the Workload Balancing Configuration wizard. The port number value specified when you ran the Workload Balancing Configuration wizard and the Connect to WLB Server dialog must match.
-
-
In the WLB Server Credentials section, enter the user name (for example,
wlbuser) and password the computers running XenServer uses to connect to the Workload Balancing server. -
In the Citrix Hypervisor Credentials section, enter the user name and password for the pool you are configuring (typically the password for the pool coordinator). Workload Balancing uses these credentials to connect to the computers running XenServer in that pool.
-
In the Citrix Hypervisor Credentials section, enter the user name and password for the pool you are configuring. Workload Balancing uses these credentials to connect to the computers running XenServer in that pool.
To use the credentials with which you are currently logged into XenServer, select Use the current XenCenter credentials.
Change the Workload Balancing IP address
To change the Workload Balancing IP address, complete the following:
-
To view the current Workload Balancing IP address, run the
ifconfigcommand on the virtual appliance. -
Open the
/etc/sysconfig/network-scripts/ifcfg-eth0file by using an editing tool like vi. -
To change the protocol from dhcp to static, change
BOOTPROTO=dhcptoBOOTPROTO=static. -
At the bottom of the file, set the IP address, netmask, gateway, and DNS addresses. For example:
IPADDR=192.168.1.100
NETMASK=255.255.255.0
GATEWAY=192.168.1.1
DNS1=1.1.1.1
DNS2=8.8.8.8
<!--NeedCopy-->
Note:
Add as many DNS entries as you need.
-
Save and close the file.
-
For the changes to take effect, you must restart the networking system by running
systemctl restart network. -
Once the networking system has restarted, run the
ifconfigcommand again to view the new Workload Balancing IP address. -
To check that the Workload Balancing service is running normally, run the
systemctl status workloadbalancingcommand.If the returned result contains
Active: active (running), the Workload Balancing service is running normally. If the result containsActive: inactive (dead)or any other status, the Workload Balancing might exit abnormally.
Change the Workload Balancing virtual appliance configuration
When you first install the Workload Balancing virtual appliance it has the following default configuration:
| Configuration | Value |
|---|---|
| Number of vCPUs | 2 |
| Memory (RAM) | 2 GB |
| Disk space | 30 GB |
These values are suitable for most environments. If you are monitoring very large pools, you might consider increasing these values.
Change the number of vCPUs assigned to the virtual appliance
By default, the Workload Balancing virtual appliance is assigned 2 vCPUs. This value is sufficient for pools hosting 1000 VMs. You do not usually need to increase it. Only decrease the number of vCPUs assigned to the virtual appliance if you have a small environment.
This procedure explains how to change the number of vCPUs assigned to the Workload Balancing virtual appliance. Shut down the virtual appliance before performing these steps. Workload Balancing is unavailable for approximately five minutes.
-
Shut down the Workload Balancing virtual appliance.
-
In the XenCenter resource pane, select the Workload Balancing virtual appliance.
-
In the virtual appliance General tab, click Properties. The Properties dialog opens.
-
In the CPU tab of the Properties dialog, edit the CPU settings to the required values.
-
Click OK.
-
Start the Workload Balancing virtual appliance.
The new vCPU settings take affect when the virtual appliance starts.
Resize the virtual appliance memory
By default, the Workload Balancing virtual appliance is assigned 2 GB of memory.
For large pools, set the Workload Balancing virtual appliance to consume the maximum amount of memory you can make available to it (even up to 16 GB). Do not be concerned about high memory utilization. High memory utilization is normal for the virtual appliance because the database always consumes as much memory as it can obtain.
Note:
Dynamic Memory Control is not supported with the Workload Balancing virtual appliance. Set a fixed value for the maximum memory to assign to the virtual appliance.
This procedure explains how to resize the memory of the Workload Balancing virtual appliance. Shut down the virtual appliance before performing these steps. Workload Balancing is unavailable for approximately five minutes.
-
Shut down the Workload Balancing virtual appliance.
-
In the XenCenter resource pane, select the Workload Balancing virtual appliance.
-
In the virtual appliance Memory tab, click Edit. The Memory Settings dialog opens.
-
Edit the memory settings to the required values.
-
Click OK.
-
Start the Workload Balancing virtual appliance.
The new memory settings take affect when the virtual appliance starts.
Extend the virtual appliance disk
Warning:
You can only extend the available disk space in versions 8.3.0 and later as LVM is not supported before 8.3.0.
Workload Balancing does not support decreasing the available disk space.
By default, the Workload Balancing virtual appliance is assigned 30 GB of disk space.
The greater the number of VMs the Workload Balancing virtual appliance is monitoring, the more disk space it consumes per day.
You can estimate the amount of disk size that the virtual appliance needs by using the following formula:
Total estimated disk size = ( ( number of days * average disk usage ) + base disk usage ) * grooming multiplier
-
number of days is the number of days of data to retain
-
average disk usage depends on the number of VMs being monitored. The following values give an approximation for certain numbers of VMs:
- For 200 VMs - 0.246 GB/day
- For 400 VMs - 0.505 GB/day
- For 600 VMs - 0.724 GB/day
- For 800 VMs - 0.887 GB/day
- base disk usage is 2.4 GB
- grooming multiplier is 1.25. This multiplier accounts for the amount of disk space required by grooming. It assumes that grooming requires an additional 25% of the total calculated disk space.
For versions 8.2.2 and earlier
This procedure explains how to extend the virtual disk of the Workload Balancing virtual appliance for Workload Balancing versions 8.2.2 and earlier.
Warning:
We recommend taking a snapshot of your data before performing this procedure. Incorrectly performing these steps can result in corrupting the Workload Balancing virtual appliance.
-
Shut down the Workload Balancing virtual appliance.
-
In the XenCenter resource pane, select the Workload Balancing virtual appliance.
-
Click the Storage tab.
-
Select the
vdi_xvdadisk, and click the Properties button. -
In the
vdi_xvdaProperties dialog, select Size and Location. -
Increase the disk size as needed, and click OK.
-
Start the Workload Balancing virtual appliance and log in to it.
-
Run the following command on the Workload Balancing virtual appliance:
resize2fs /dev/xvda <!--NeedCopy--> -
Run the
df –hcommand to confirm the new disk size.
Installing resize2fs
If the resize2fs tool is not installed on the Workload Balancing virtual appliance, you can install it by using the following steps.
If you are connected to the internet, run the following command on the Workload Balancing virtual appliance:
yum install -y --enablerepo=base,updates --disablerepo=citrix-* e2fsprogs
<!--NeedCopy-->
If there is no internet access:
-
Download the following from https://centos.pkgs.org/7/centos-x86_64/.
libss-1.42.9-7.el7.i686.rpme2fsprogs-libs-1.42.9-7.el7.x86_64.rpme2fsprogs-1.42.9-7.el7.x86_64.rpm
-
Upload them to Workload Balancing VM using SCP or any other suitable tool.
-
Run the following command from Workload Balancing virtual appliance:
rpm -ivh libss-*.rpm e2fsprogs-*.rpm
<!--NeedCopy-->
The tool
resize2fsis now installed.
For versions 8.3.0 and later
This procedure explains how to extend the virtual disk of the Workload Balancing virtual appliance for Workload Balancing versions 8.3.0 and later, using Linux Volume Manager (LVM).
Warning:
This procedure must only be followed by Experienced Linux System Administrators as incorrectly performing these steps can result in corrupting the Workload Balancing virtual appliance. We cannot guarantee that problems resulting from the incorrect use of the Registry Editor can be solved. Be sure to back up the registry before you edit it and shut down the virtual appliance before performing these steps. Workload Balancing is unavailable for approximately five minutes.
To create new partitions, manipulate Physical Volumes and change your Filesystem size, perform the following actions while logged in as a Super User (root):
-
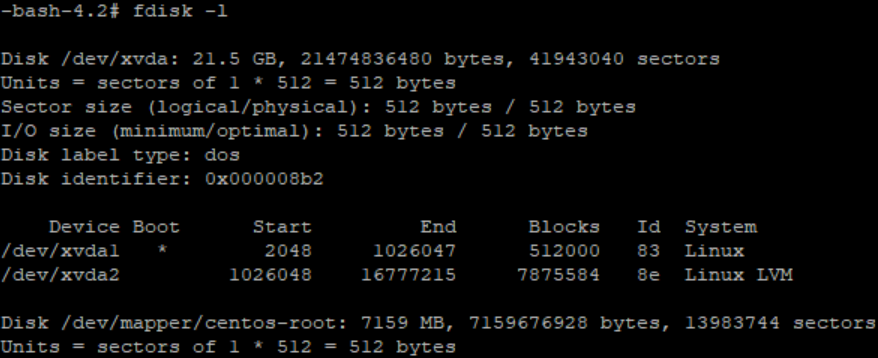
View the current partitions:
fdisk -l <!--NeedCopy-->The default partitions might look like this:
-
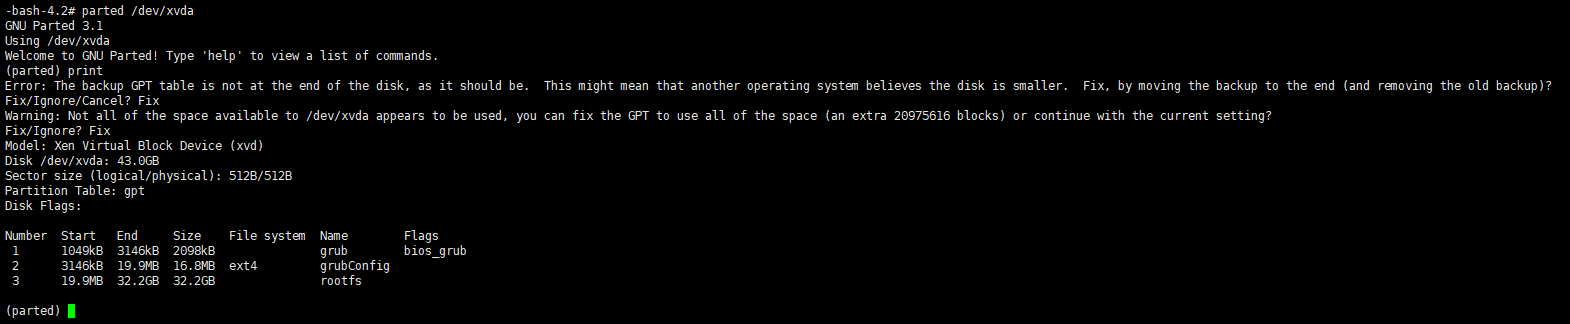
View the disk partition style:
parted <disk>
<!--NeedCopy-->
For example, to view the partition style of
/dev/xvda:parted /dev/xvda <!--NeedCopy--> -
Enter
p.If the following error messages occur, enter
Fixto resolve each one:- “Error: The backup GPT table is not at the end of the disk, as it should be. This might mean that another operating system believes the disk is smaller. Fix, by moving the backup to the end (and removing the old backup)?”
- “Warning: Not all of the space available to
<disk>appears to be used, you can fix the GPT To use all of the space (an extra<block number>blocks) or continue with the current setting?”
- Enter
qand press Enter to exit parted. -
Edit the partitions:
fdisk <disk>
<!--NeedCopy-->
For example, to edit the partitions in Workload Balancing appliances:
fdisk /dev/xvda <!--NeedCopy--> -
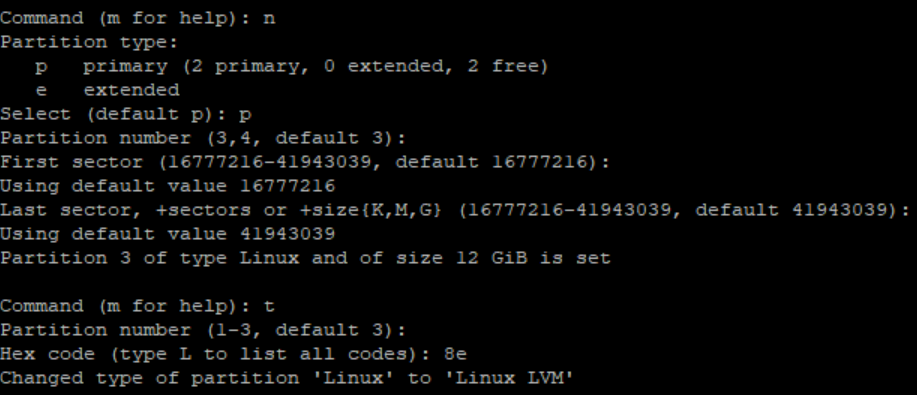
Type
nand press Enter to create a new partition, typepand press Enter to make it a primary partition, and press Enter to use the default which is the next available partition (in this case, as stated above, it’ll be partition number 3).Note:
If no additional space has been allocated yet, you will see a message indicating that there are no free sectors available. Type
qand press Enter to quit fdisk. Allocate the desired space via XenCenter first and then come back to this step. -
Press Enter twice to use the default first and last sectors of the available partition (or manually indicate the desired sectors). Type
tto specify a partition type, choose the desired partition (in this case 3), type8e, and press Enter to make it an LVM type partition.Example output:
-
Type
pand press Enter to print the details of the partition. The output should look similar to the one below (note that the start and end blocks values might vary depending on the amount of space you’ve allocated):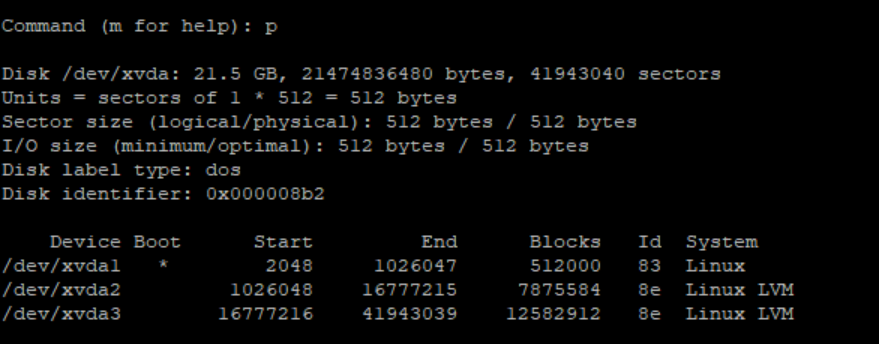
-
If something is incorrect, type
qand press Enter to exit without saving and to prevent your existing partitions from being affected. Start again from step 1. Otherwise, if all looks well, typewand press Enter instead in order to write the changes.After writing these changes, you might get a warning indicating that the device was busy and the kernel is still using the old table. If that’s the case, run this command which will refresh the partition table, before proceeding with the next step:
partprobe.Make sure the new device partition (in this case
/dev/xvda4) is listed now. To do so, run:fdisk -l.The newly created device should be listed now:

-
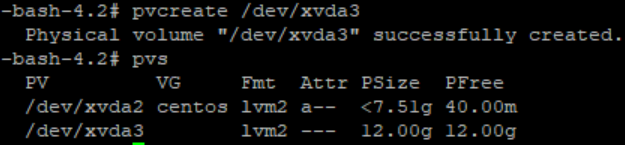
If the output looks correct, create a Physical Volume:
pvcreate <new partition>
<!--NeedCopy-->
For example:
pvcreate /dev/xvda4 <!--NeedCopy--> -
Check that the Physical Volume created above is now listed:
pvs <!--NeedCopy-->In this example, the additional space added was 12G. Example output:
-
Based on the output of the previous command, the Volume Group named centos must be extended:
vgextend <volume group> <new partition>
<!--NeedCopy-->
For example:
vgextend centos /dev/xvda4 <!--NeedCopy--> -
Check the current Volume Groups:
vgs <!--NeedCopy--> -
Run the following command:
pvscan
<!--NeedCopy-->
This should show
/dev/xvda4as part of the centos Volume group. Example output: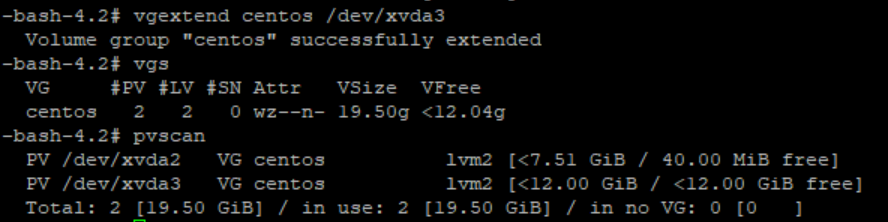
-
If the information shown in the previous steps looks correct, run this command to see the Logic Volume path for the Logical Volume to be extended:
lvdisplay <!--NeedCopy-->In this example, the path is
/dev/centos/root: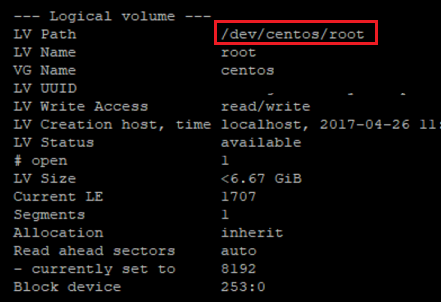
-
Run the following command to view the free PE/size (this tells you the exact value to use when extending the partition):
vgdisplay
<!--NeedCopy-->
Example output:

-
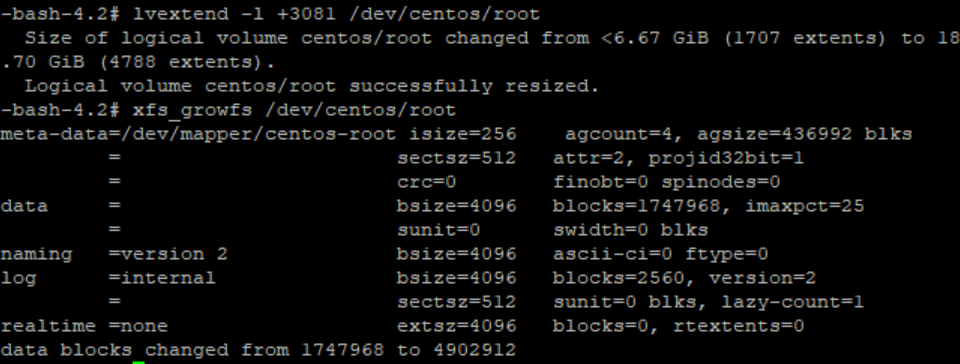
Using the free PE/size value and the Logic Volume path outputted in step 11, extend the Logic Volume:
lvextend -l +100%FREE /dev/centos/root
<!--NeedCopy-->
If this executes successfully, extend the filesystem:
resize2fs /dev/centos/root
<!--NeedCopy-->
Example output:
-
Verify that the filesystem size shows as expected:
df -h /*
<!--NeedCopy-->
If you’re seeing the expected numbers, you have successfully allocated the desired space and correctly extended the partition. For further assistance, please contact XenServer Support.
Stop Workload Balancing
Because Workload Balancing is configured at the pool level, when you want it to stop managing a pool, you must do one of the following:
Pause Workload Balancing. Pausing Workload Balancing stops XenCenter from displaying recommendations for the specified resource pool and managing the pool. Pausing is designed for a short period and lets you resume monitoring without having to reconfigure. When you pause Workload Balancing, data collection stops for that resource pool until you enable Workload Balancing again.
-
In XenCenter, select the resource pool for which you want to disable Workload Balancing.
-
In the WLB tab, click Pause. A message appears on the WLB tab indicating that Workload Balancing is paused.
Tip:
To resume monitoring, click the Resume button in the WLB tab.
Disconnect the pool from Workload Balancing. Disconnecting from the Workload Balancing virtual appliance breaks the connection between the pool and if possible, deletes the pool data from the Workload Balancing database. When you disconnect from Workload Balancing, Workload Balancing stops collecting data on the pool.
-
In XenCenter, select the resource pool on which you want to stop Workload Balancing.
-
From the Infrastructure menu, select Disconnect Workload Balancing Server. The Disconnect Workload Balancing server dialog box appears.
-
Click Disconnect to stop Workload Balancing from monitoring the pool permanently.
Tip:
If you disconnected the pool from the Workload Balancing virtual appliance, to re-enable Workload Balancing on that pool, you must reconnect to a Workload Balancing appliance. For information, see the Connect to the Workload Balancing Virtual Appliance.
Enter maintenance mode with Workload Balancing enabled
With Workload Balancing enabled, if you put a host in maintenance mode, XenServer migrates the VMs running on that host to their optimal hosts when available. XenServer uses Workload Balancing recommendations that are based on performance data, your placement strategy, and performance thresholds to select the optimal host.
If an optimal host is not available, the words Click here to suspend the VM appear in the Enter Maintenance Mode wizard. In this case, because there is not a host with sufficient resources to run the VM, Workload Balancing does not recommend a placement. You can either suspend this VM or exit maintenance mode and suspend a VM on another host in the same pool. Then, if you reenter the Enter Maintenance Mode dialog box, Workload Balancing might be able to list a host that is a suitable candidate for migration.
Note:
When you take a host offline for maintenance and Workload Balancing is enabled, the words “Workload Balancing” appear in the Enter Maintenance Mode wizard.
To enter maintenance mode with Workload Balancing enabled:
-
In the Resources pane of XenCenter, select the physical server that you want to take off-line.
-
From the Server menu, select Enter Maintenance Mode.
-
In the Enter Maintenance Mode wizard, click Enter maintenance mode.
The VMs running on the host are automatically migrated to the optimal host based on the Workload Balancing performance data, your placement strategy, and performance thresholds.
To take the server out of maintenance mode:
-
Right-click the host and select Exit Maintenance Mode.
When you remove a host from maintenance mode, XenServer automatically restores that host’s original VMs to that host.
Remove the Workload Balancing virtual appliance
To remove the Workload Balancing virtual appliance, we recommend you use the standard procedure to delete VMs from XenCenter.
When you delete the Workload Balancing virtual appliance, the PostgreSQL database containing the Workload Balancing is deleted. To save this data, you must migrate it from the database before deleting the Workload Balancing virtual appliance.
Manage the Workload Balancing database
The Workload Balancing database is a PostgreSQL database. PostgreSQL is an open-source relational database. You can find documentation for PostgreSQL by searching the web.
The following information is intended for database administrators and advanced users of PostgreSQL who are comfortable with database administration tasks. If you are not experienced with PostgreSQL, we recommend that you become familiar with it before you attempt the database tasks in the sections that follow.
By default, the PostgreSQL user name is postgres. You set the password for this account during Workload Balancing configuration.
The amount of historical data you can store is based on the size of the virtual disk allocated to Workload Balancing and the minimum required space. By default, the size of the virtual disk allocated to Workload Balancing is 30 GB. In terms of managing the database, you can control the space that database data consumes by configuring database grooming. For more information, see Database grooming parameters.
To store a lot of historical data, for example if you want to enable the Pool Audit trail Report, you can do either of the following:
-
Make the virtual disk size assigned to the Workload Balancing virtual appliance larger. To do so, import the virtual appliance, and increase the size of the virtual disk by following the steps in Extend the virtual appliance disk.
-
Create periodic duplicate backup copies of the data by enabling remote client access to the database and using a third-party database administration tool.
Access the database
The Workload Balancing virtual appliance has firewall configured in it. Before you can access the database, you must add the postgresQL server port to the iptables.
-
From the Workload Balancing virtual appliance console, run the following command:
iptables -A INPUT -i eth0 -p tcp -m tcp --dport 5432 -m \ state --state NEW,ESTABLISHED -j ACCEPT <!--NeedCopy--> -
(Optional) To make this configuration persist after the virtual appliance is rebooted, run the following command:
iptables-save > /etc/sysconfig/potables
<!--NeedCopy-->
Control database grooming
The Workload Balancing database automatically deletes the oldest data whenever the virtual appliance reaches the minimum amount of disk space that Workload Balancing requires to run. By default, the minimum amount of required disk space is set to 1,024 MB.
The Workload Balancing database grooming options are controlled through the file wlb.conf.
When there is not enough disk space left on the Workload Balancing virtual appliance, Workload Balancing automatically starts grooming historical data. The process is as follows:
-
At a predefined grooming interval, the Workload Balancing data collector checks if grooming is required. Grooming is required if the database data has grown to the point where the only space that remains unused is the minimum required disk space. Use
GroomingRequiredMinimumDiskSizeInMBto set the minimum required disk space.You can change the grooming interval if desired using
GroomingIntervalInHour. However, by default Workload Balancing checks to see if grooming is required once per hour. -
If grooming is required, Workload Balancing begins by grooming the data from the oldest day. Workload Balancing then checks to see if there is now enough disk space for it to meet the minimum disk-space requirement.
-
If the first grooming did not free enough disk space, then Workload Balancing repeats grooming up to
GroomingRetryCountertimes without waiting forGroomingIntervalInHourhour. -
If the first or repeated grooming freed enough disk space, then Workload Balancing waits for
GroomingIntervalInHourhour and returns to Step 1. -
If the grooming initiated by the
GroomingRetryCounterdid not free enough disk space, then Workload Balancing waits forGroomingIntervalInHourhour and returns to Step 1.
Database grooming parameters
There are five parameters in the wlb.conf file that control various aspects of database grooming. They are as follows:
-
GroomingIntervalInHour. Controls how many hours elapse before the next grooming check is done. For example, if you enter 1, Workload Balancing checks the disk space hourly. If you enter 2, Workload Balancing checks disk space every two hours to determine if grooming must occur. -
GroomingRetryCounter. Controls the number of times Workload balancing tries rerunning the grooming database query. -
GroomingDBDataTrimDays. Controls the number of days worth of data Workload Balancing deletes from the database each time it tries to groom data. The default value is one day. -
GroomingDBTimeoutInMinute. Controls the number of minutes that the database grooming takes before it times out and is canceled. If the grooming query takes longer than is expected and does not finish running within the timeout period, the grooming task is canceled. The default value is 0 minutes, which means that database grooming never times out. -
GroomingRequiredMinimumDiskSizeInMB. Controls the minimum amount of free space left in the virtual disk assigned to the Workload Balancing virtual appliance. When the data in the virtual disk grows until there is only minimum disk size left on the virtual disk, Workload Balancing triggers database grooming. The default value is 2,048 MB.
To edit these values, see Edit the Workload Balancing configuration file.
Change the database password
We recommend using the wlbconfig command to change the database password. For more information, see Modify the Workload Balancing configuration options. Do not change the password by modifying the wlb.conf file.
Archive database data
To avoid having older historical data deleted, you can, optionally, copy data from the database for archiving. To do so, you must perform the following tasks:
-
Enable client authentication on the database.
-
Set up archiving using the PostgreSQL database administration tool of your choice.
Enable client authentication to the database
While you can connect directly to the database through the Workload Balancing console, you can also use a PostgreSQL database management tool. After downloading a database management tool, install it on the system from which you want to connect to the database. For example, you can install the tool on the same laptop where you run XenCenter.
Before you can enable remote client authentication to the database, you must:
-
Modify the database configuration files, including pg_hba.conf file and the postgresql.conf, to allow connections.
-
Stop the Workload Balancing services, restart the database, and then restart the Workload Balancing services.
-
In the database management tool, configure the IP address of the database (that is, the IP address of the Workload Balancing virtual appliance) and the database password.
Modify the database configuration files
To enable client authentication on the database, you must modify the following files on the Workload Balancing virtual appliance: the pg_hba.conf file and the postgresql.conf file.
To edit the pg_hba.conf file:
-
Modify the
pg_hba.conffile. From the Workload Balancing virtual appliance console, open thepg_hba.conffile with an editor, such as VI. For example:vi /var/lib/pgsql/9.0/data/pg_hba.conf <!--NeedCopy--> -
If your network uses IPv4, add the IP address from the connecting computer to this file. For example:
In the configuration section, enter the following under
#IPv4 local connections:- TYPE: host
- DATABASE: all
- USER: all
- CIDR-ADDRESS: 0.0.0.0/0
- METHOD: trust
-
Enter your IP address in the
CIDR-ADDRESSfield.Note:
Instead of entering 0.0.0.0/0, you can enter your IP address and replace the last three digits with 0/24. The trailing “24” after the / defines the subnet mask and only allows connections from IP addresses within that subnet mask.
When you enter
trustfor theMethodfield, it enables the connection to authenticate without requiring a password. If you enterpasswordfor theMethodfield, you must supply a password when connecting to the database. -
If your network uses IPv6, add the IP address from the connecting computer to this file. For example:
Enter the following under
#IPv6 local connections:- TYPE: host
- DATABASE: all
- USER: all
-
CIDR-ADDRESS:
::0/0 - METHOD: trust
Enter the IPv6 addresses in the
CIDR-ADDRESSfield. In this example, the::0/0opens the database up to connections from any IPv6 addresses. -
Save the file and quit the editor.
-
After changing any database configurations, you must restart the database to apply the changes. Run the following command:
service postgresql-9.0 restart
<!--NeedCopy-->
To edit the postgresql.conf file:
-
Modify the
postgresql.conffile. From the Workload Balancing virtual appliance console, open thepostgresql.conffile with an editor, such as VI. For example:vi /var/lib/pgsql/9.0/data/postgresql.conf <!--NeedCopy--> -
Edit the file so that it listens on any port and not just the local host. For example:
-
Find the following line:
# listen_addresses='localhost' <!--NeedCopy--> -
Remove the comment symbol (
#) and edit the line to read as follows:listen_addresses='*' <!--NeedCopy-->
-
-
Save the file and quit the editor.
-
After changing any database configurations, you must restart the database to apply the changes. Run the following command:
service postgresql-9.0 restart
<!--NeedCopy-->
Change the database maintenance window
Workload Balancing automatically performs routine database maintenance daily at 12:05AM GMT (00:05), by default. During this maintenance window, data collection occurs but the recording of data might be delayed. However, the Workload Balancing user interface controls are available during this period and Workload Balancing still makes optimization recommendations.
Note:
To avoid a loss of Workload Balancing:
- During the maintenance window, the Workload Balancing server restarts. Ensure that you do not restart your VMs at the same time.
- At other times, when restarting all VMs in your pool, do not restart the Workload Balancing server.
Database maintenance includes releasing allocated unused disk space and reindexing the database. Maintenance lasts for approximately 6 to 8 minutes. In larger pools, maintenance might last longer, depending on how long Workload Balancing takes to perform discovery.
Depending on your time zone, you might want to change the time when maintenance occurs. For example, in the Japan Standard Time (JST) time zone, Workload Balancing maintenance occurs at 9:05 AM (09:05), which can conflict with peak usage in some organizations. If you want to specify a seasonal time change, such as Daylight Saving Time or summer time, you must build the change into value you enter.
To change the maintenance time:
-
In the Workload Balancing console, run the following command from any directory:
crontab -e
<!--NeedCopy-->
Workload Balancing displays the following:
05 0 * * * /opt/vpx/wlb/wlbmaintenance.sh
<!--NeedCopy-->
The value
05 0represents the default time for Workload Balancing to perform maintenance in minutes (05) and then hours (0). (The asterisks represent the day, month, and year the job runs: Do not edit these fields.) The entry05 0indicates that database maintenance occurs at 12:05 AM, or 00:05, Greenwich Mean Time (GMT) every night. This setting means that if you live in New York, the maintenance runs at 7:05 PM (19:05) during winter months and 8:05 PM in summer months.Important:
Do not edit the day, month, and year the job runs (as represented by asterisks). Database maintenance must run daily.
-
Enter the time at which you want maintenance to occur in GMT.
-
Save the file and quit the editor.
Customize Workload Balancing
Workload Balancing provides several methods of customization:
-
Command lines for scripting. For more information, see Workload Balancing commands.
-
Host Power On scripting support. You can also customize Workload Balancing (indirectly) through the Host Power On scripting. For more information, see Hosts and resource pools.
Upgrade Workload Balancing
Online upgrading of Workload Balancing has been deprecated for security reasons. Customers cannot upgrade by using the yum repo anymore. Customers can upgrade Workload Balancing to the latest version by importing the latest Workload Balancing virtual appliance downloadable at the XenServer Downloads page.
Workload Balancing commands
This section provides a reference for the Workload Balancing commands. You can perform these commands from the XenServer host or console to control Workload Balancing or configure Workload Balancing settings on the XenServer host. This appendix includes xe commands and service commands.
Run the following service commands on the Workload Balancing appliance. To do so, you must log in to the Workload Balancing virtual appliance.
Log in to the Workload Balancing virtual appliance
Before you can run any service commands or edit the wlb.conf file, you must log in to the Workload Balancing virtual appliance. To do so, you must enter a user name and password. Unless you created extra user accounts on the virtual appliance, log in using the root user account. You specified this account when you ran Workload Balancing Configuration wizard (before you connected your pool to Workload Balancing). You can, optionally, use the Console tab in XenCenter to log in to the appliance.
To log in to the Workload Balancing virtual appliance:
-
At the login prompt, enter the account user name.
-
At the Password prompt, enter the password for the account:
Note:
To log off from the Workload Balancing virtual appliance, simply type
logoutat the command prompt.
wlb restart
Run the wlb restart command from anywhere in the Workload Balancing appliance to stop and then restart the Workload Balancing Data Collection, Web Service, and Data Analysis services.
wlb start
Run the wlb start command from anywhere in the Workload Balancing appliance to start the Workload Balancing Data Collection, Web Service, and Data Analysis services.
wlb stop
Run the wlb stop command from anywhere in the Workload Balancing appliance to stop the Workload Balancing Data Collection, Web Service, and Data Analysis services.
wlb status
Run the wlb status command from anywhere in the Workload Balancing appliance to determine the status of the Workload Balancing server. After you run this command, the status of the three Workload Balancing services (the Web Service, Data Collection Service, and Data Analysis Service) is displayed.
Modify the Workload Balancing configuration options
Many Workload Balancing configurations, such as the database and web-service configuration options, are stored in the wlb.conf file. The wlb.conf file is a configuration file on the Workload Balancing virtual appliance.
To modify the most commonly used options, use the command wlb config. Running the wlb config command on the Workload Balancing virtual appliance lets you rename the Workload Balancing user account, change its password, or change the PostgreSQL password. After you run this command, the Workload Balancing services are restarted.
Run the following command on the Workload Balancing virtual appliance:
wlb config
<!--NeedCopy-->
The screen displays a series of questions guiding you through changing your Workload Balancing user name and password and the PostgreSQL password. Follow the questions on the screen to change these items.
Important:
Double-check any values you enter in the
wlb.conffile: Workload Balancing does not validate values in thewlb.conffile. Therefore, if the configuration parameters you specify are not within the required range, Workload Balancing does not generate an error log.
Edit the Workload Balancing configuration file
You can modify Workload Balancing configuration options by editing the wlb.conf file, which is stored in /opt/vpx/wlb directory on the Workload Balancing virtual appliance. In general, only change the settings in this file with guidance from XenServer. However, there are three categories of settings you can change if desired:
-
Workload Balancing account name and password. It is easier to modify these credentials by running the
wlb configcommand. -
Database password. This value can be modified using the wlb.conf file. However, we recommend modifying it through the
wlb configcommand since this command modifies the wlb.conf file and automatically updates the password in the database. If you choose to modify the wlb.conf file instead, you must run a query to update the database with the new password. - Database grooming parameters. You can modify database grooming parameters, such as the database grooming interval, using this file by following the instructions in the database management section. However, if you do so, we recommend using caution.
For all other settings in the wlb.conf file, we recommend leaving them at their default, unless you have been instructed to modify them.
To edit the wlb.conf file:
-
Run the following from the command prompt on the Workload Balancing virtual appliance (using VI as an example):
vi /opt/vpx/wlb/wlb.conf
<!--NeedCopy-->
The screen displays several different sections of configuration options.
-
Modify the configuration options, and exit the editor.
You do not need to restart Workload Balancing services after editing the wlb.conf file. The changes go into effect immediately after exiting the editor.
Important:
Double-check any values you enter in the
wlb.conffile: Workload Balancing does not validate values in thewlb.conffile. Therefore, if the configuration parameters you specify are not within the required range, Workload Balancing does not generate an error log.
Increase the detail in the Workload Balancing log
The Workload Balancing log provides a list of events on the Workload Balancing virtual appliance, including actions for the analysis engine, database, and audit log. This log file is found in this location: /var/log/wlb/LogFile.log.
You can, if desired, increase the level of detail the Workload Balancing log provides. To do so, modify the Trace flags section of the Workload Balancing configuration file (wlb.conf), which is found in the following location: /opt/vpx/wlb/wlb.conf. Enter a 1 or true to enable logging for a specific trace and a 0 or false to disable logging. For example, to enable logging for the Analysis Engine trace, enter:
AnalEngTrace=1
<!--NeedCopy-->
You might want to increase logging detail before reporting an issue to XenServer Technical Support or when troubleshooting.
| Logging Option | Trace Flag | Benefit or Purpose |
|---|---|---|
| Analysis Engine Trace | AnalEngTrace |
Logs details of the analysis engine calculations. Shows details of the decisions the analysis engine is making and potentially gain insight into the reasons Workload Balancing is not making recommendations. |
| Database Trace | DatabaseTrace |
Logs details about database reads/writes. However, leaving this trace on increases the log file size quickly. |
| Data Collection Trace | DataCollectionTrace |
Logs the actions of retrieving metrics. This value lets you see the metrics Workload Balancing is retrieving and inserting into the Workload Balancing data store. However, leaving this trace on increases the log file size quickly. |
| Data Compaction Trace | DataCompactionTrace |
Logs details about how many milliseconds it took to compact the metric data. |
| Data Event Trace | DataEventTrace |
This trace provides details about events Workload Balancing catches from XenServer. |
| Data Grooming Trace | DataGroomingTrace |
This trace provides details about the database grooming. |
| Data Metrics Trace | DataMetricsTrace |
Logs details about the parsing of metric data. Leaving this trace on increases the log-file size quickly. |
| Queue Management Trace | QueueManagementTrace |
Logs details about data collection queue management processing. (This option is for internal use.) |
| Data Save Trace | DataSaveTrace |
Logs details about the pool being saved to the database. |
| Score server Trace | ScoreHostTrace |
Logs details about how Workload Balancing is arriving at a score for a host. This trace shows the detailed scores generated by Workload Balancing when it calculates the star ratings for selecting optimal hosts for VM placement. |
| Audit Log Trace | AuditLogTrace |
Shows the action of the audit log data being captured and written. (This option is only for internal use and does not provide information that is captured in the audit log.) However, leaving this trace on increases the log file size quickly. |
| Scheduled Task Trace | ScheduledTaskTrace |
Logs details about scheduled tasks. For example, if your scheduled mode changes are not working, you might want to enable this trace to investigate the cause. |
| Web Service Trace | WlbWebServiceTrace |
Logs details about the communication with the web-service interface. |
In this article
- Connect to the Workload Balancing virtual appliance
- Reconfigure a pool to use another Workload Balancing virtual appliance
- Change the Workload Balancing credentials
- Change the Workload Balancing IP address
- Change the Workload Balancing virtual appliance configuration
- Stop Workload Balancing
- Enter maintenance mode with Workload Balancing enabled
- Remove the Workload Balancing virtual appliance
- Manage the Workload Balancing database
- Customize Workload Balancing
- Upgrade Workload Balancing
- Workload Balancing commands
- Modify the Workload Balancing configuration options