nFactor 可扩展性
nFactor 身份验证框架提供了添加自定义设置的灵活性,使登录界面更直观,实现了丰富的用户体验。可以添加自定义登录标签、自定义登录凭据、自定义 UI 显示等。
使用 nFactor,每个因素都可以有自己的登录屏幕。在每个登录屏幕中,您都可以显示以前任何因素中的任何信息或其他因素中不可见的更多信息。例如,您的最后一个因素可以是一个信息页面,用户可以在其中阅读说明并继续单击。
在 nFactor 之前,自定义登录页面受到限制,需要自定义设置和支持。可以替换 tmindex.html 或应用重写规则来更改其某些行为。但是,无法实现基础功能。
本主题将详细捕获下列与 nFactor 相关的自定义设置。
- 自定义登录标签
- 自定义 UI 以显示图像
- 自定义 NetScaler nFactor 登录表单
假设
您熟悉 nFactor、Shell 命令、XML 和文本编辑器。
必备条件
- 只有在 NetScaler 上配置了 RFWeb UI 主题(或基于主题)时,才能进行本主题中描述的自定义。
- 身份验证策略必须绑定到身份验证、授权和审核虚拟服务器,否则流将无法按预期工作。
- 您有以下项目与 nFactor 相关
- XML 架构
- JavaScript
- 身份验证操作
- 身份验证虚拟服务器
- NetScaler 版本 11.1 及更高版本
自定义登录标签
要自定义登录标签,您需要以下对象:
- 描述登录页面外观的 XML 架构。
- 包含用于更改呈现过程的 JavaScript 的 script.js 文件。
注意:
script.js 文件可以在
/var/netscaler/logon/themes/<custom_theme>/目录中找到。
工作原理
JavaScript 解析 XML 文件,将每个项目呈现在 <Requirements> 标签中。每个元素对应 HTML 表单中的一行。例如,登录字段占一行,密码字段占另一行,登录按钮也占一行。要引入新行,则必须使用 StoreFront SDK 在 XML 架构文件中指定新行。StoreFront SDK 允许具有 XML 架构的登录页面使用 <Requirement> 标记并在其上定义元素。这些元素允许使用 JavaScript 在该空间中引入任何所需的 HTML 元素。在这种情况下,将使用 HTML 格式的文本创建一行。
可以使用的 XML 如下:
<Requirement>
<Credential>
<Type>nsg-custom-cred</Type>
<ID>passwd</ID>
</Credential>
<Label>
<Type>nsg-custom-label</Type>
</Label>
</Requirement>
<!--NeedCopy-->
<Requirement>:登录页面中提供的空间。凭据将填充该空间,其他部分则将引擎路由到正确的信息。在这种情况下,键入 nsg-custom-cred。这定义为纯文本,标签是为其正文定义的。
要求 XML 与 JavaScript 代码配对以实现所需的结果。
// Custom Label Handler for Self Service Links
CTXS.ExtensionAPI.addCustomAuthLabelHandler({
getLabelTypeName: function () { return "nsg-custom-label"; },
getLabelTypeMarkup: function (requirements) {
return $("< Enter your HTML codes here>");
},
// Instruction to parse the label as if it was a standard type
parseAsType: function () {
return "plain";
}
});
//Custom Credential Handler for Self Service Links
CTXS.ExtensionAPI.addCustomCredentialHandler({
getCredentialTypeName: function () { return "nsg-custom-cred"; },
getCredentialTypeMarkup: function (requirements) {
return $("<div/>");
},
});
<!--NeedCopy-->
重要提示:
在添加 HTML 代码时,请确保返回值以 HTML 标记开头。
XML 部分指示登录页面要显示的内容,JavaScript 代码提供实际的文本。凭据处理程序会打开空间,标签将填充该空间。由于所有身份验证流量现在对重写和响应程序都不可见,因此您可以更改页面的外观。 用于自定义登录标签的配置
-
基于 RfWeb 创建和绑定主题。
add vpn portaltheme RfWebUI_MOD -basetheme RfWebUI

bind vpn vserver TESTAAA –portaltheme RfWebUI_MOD
<!--NeedCopy-->
基于主题的文件的路径可在目录 /var/netscaler/logon/themes/RfWebUI_MOD 中找到
-
将以下代码片段添加到 script.js 文件的末尾:
注意:
未能将前几行包含在正确的文件中或缺少包含任何 JavaScript 函数会阻止 XML 加载。该错误只能在浏览器的开发者控制台中看到,并带有以下文本:“未定义的类型
nsg-custom-cred。“// Custom Label Handler for Self Service Links CTXS.ExtensionAPI.addCustomAuthLabelHandler({ getLabelTypeName: function () { return "nsg-custom-label"; }, getLabelTypeMarkup: function (requirements) { return $("<a href="https://identity.test.com/identity/faces/register" style="font-size: 16px;" style="text-align: center;">Self Registration</a><br><a href="https://identity.test.com/identity/faces/forgotpassword" style="font-size: 16px;" style="text-align: center;">Forgot Password</a><br><a href="https://identity.test.com/identity/faces/forgotuserlogin" style="font-size: 16px;" style="text-align: center;">Forgot User Login</a>"); }, // Instruction to parse the label as if it was a standard type parseAsType: function () { return "plain"; } }); //Custom Credential Handler for Self Service Links CTXS.ExtensionAPI.addCustomCredentialHandler({ getCredentialTypeName: function () { return "nsg-custom-cred"; }, getCredentialTypeMarkup: function (requirements) { return $("<div/>"); }, }); <!--NeedCopy-->
重要提示:
在添加 HTML 代码时,请确保返回值以 HTML 标记开头。
本示例中使用的登录架构
<?xml version="1.0" encoding="utf-8"?>
<AuthenticateResponse xmlns="http://citrix.com/authentication/response/1">
<Status>success</Status>
<Result>more-info</Result>
<StateContext/>
<AuthenticationRequirements>
<PostBack>/nf/auth/doAuthentication.do</PostBack>
<CancelPostBack>/Citrix/Authentication/ExplicitForms/CancelAuthenticate</CancelPostBack>
<CancelButtonText>Cancel</CancelButtonText>
<Requirements>
<Requirement>
<Credential>
<ID>login</ID>
<SaveID>Username</SaveID>
<Type>username</Type>
</Credential>
<Label>
<Text>User name</Text>
<Type>plain</Type>
</Label>
<Input>
<AssistiveText>Please supply either domain\username or user@fully.qualified.domain</AssistiveText>
<Text>
<Secret>false</Secret>
<ReadOnly>false</ReadOnly>
<InitialValue></InitialValue>
<Constraint>.+</Constraint>
</Text>
</Input>
</Requirement>
<Requirement>
<Credential>
<ID>passwd</ID>
<SaveID>Password</SaveID>
<Type>password</Type>
</Credential>
<Label>
<Text>Password:</Text>
<Type>plain</Type>
</Label>
<Input>
<Text>
<Secret>true</Secret>
<ReadOnly>false</ReadOnly>
<InitialValue/>
<Constraint>.+</Constraint>
</Text>
</Input>
</Requirement>
<Requirement>
<Credential>
<Type>nsg-custom-cred</Type>
<ID>passwd</ID>
</Credential>
<Label>
<Type>nsg-custom-label</Type>
</Label>
</Requirement>
<Requirement>
<Credential>
<ID>loginBtn</ID>
<Type>none</Type>
</Credential>
<Label>
<Type>none</Type>
</Label>
<Input>
<Button>Please Log On</Button>
</Input>
</Requirement>
</Requirements>
</AuthenticationRequirements>
</AuthenticateResponse>
<!--NeedCopy-->
运行以下命令将自定义架构加载到 config 中。
add authentication loginSchema custom -authenticationSchema custom.xml

add authentication loginSchemaPolicy custom -rule true -action custom

bind authentication vserver AAATEST -policy custom -priority 100 -gotoPriorityExpression END
<!--NeedCopy-->
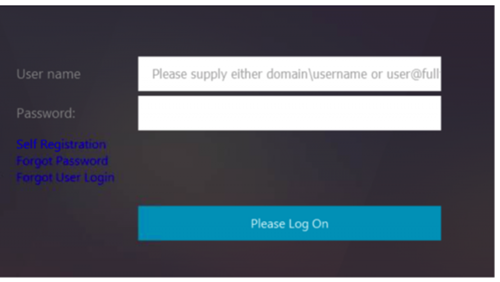
下图显示了使用此配置呈现的登录页面。
自定义 UI 以显示图像
nFactor 允许使用登录架构文件进行自定义显示。除了内置登录架构文件提供的自定义之外,可能还需要进一步的自定义。例如,在 UI 中显示超链接或编写自定义逻辑。这些可以使用包含登录架构扩展和相应的javascript文件的“自定义凭据”来实现。
登录架构文件可以在 /nsconfig/loginschema/LoginSchema 目录中找到。
对于显示图像的界面自定义,以“NetScaler-Swivel”集成中的部署流程为例。
此流中有两个因素。
- 第一个因素:检查用户的AD凭据。
- 第二个因素:根据组成员身份提示用户登录。
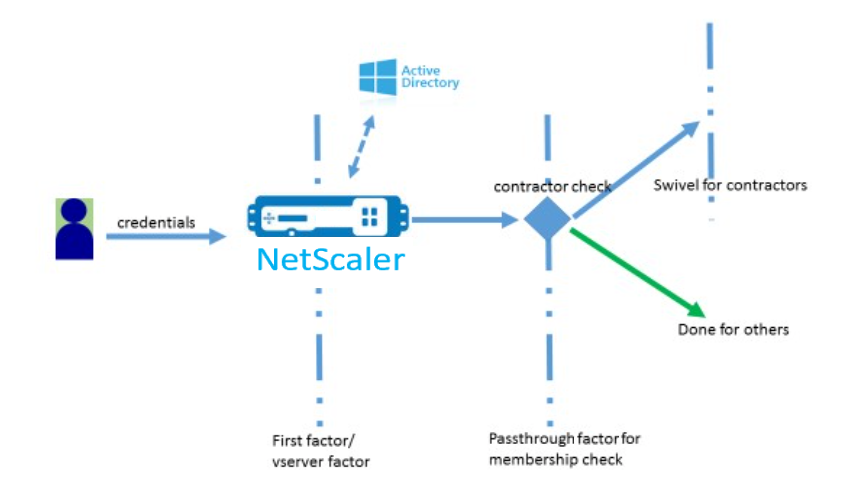
在此流程中,所有用户都要经历第一个因素。在第二个因素之前,有一个伪因素可以检查是否可以从“旋转”因子中省略某些用户。如果用户需要“旋转”因子,将显示图像和文本框以输入代码。
解决方案
自定义用户界面以显示图像的解决方案包含两个部分;
- 登录架构扩展。
- 用于处理登录架构扩展的自定义脚本。
登录架构扩展
为了控制表单呈现,自定义的“id’/’credential”被注入到登录架构中。这可以通过重用现有模式并根据要求进行修改来完成。
在该示例中,考虑只有一个文本字段(如 /nsconfig/LoginSchema/LoginSchema/OnlyPassword.xml)的登录架构。 以下代码段已添加到登录架构中。
<Requirement><Credential><ID>swivel_cred</ID><Type>swivel_cred</Type><Input><Text><Hidden>true</Hidden><InitialValue>${http.req.user.name}</InitialValue></Text></Input></Credential></Requirement>
<!--NeedCopy-->
在代码段中,“swivel_cred”被指定为凭证的“类型”。因为这不会被识别为内置的“credential”,所以 UI 会查找此类型的处理程序,如果存在,则调用它。 将为此凭据发送初始值,此凭据是 NetScaler 动态填充的表达式。在示例中,它是用于向旋转服务器通知用户名的用户名。可能不是任何时候都需要,也可以用其他一些数据对其进行增强。必须根据需要添加这些详细信息。
用于处理自定义凭据的 JavaScript
当 UI 找到自定义凭据时,则会查找处理程序。对于默认门户主题,所有自定义处理程序都是用 /var/netscaler/logon/LogonPoint/custom/script.js 编写的。
对于自定义门户主题,可以在目录中找到 script.js /var/netscaler/logon/themes/<custom_theme>/。
添加了以下脚本以渲染自定义凭据的标记。
CTXS.ExtensionAPI.addCustomCredentialHandler({
    // The name of the credential, must match the type returned by the server
    getCredentialTypeName: function () { return "swivel_cred"; },
    // Generate HTML for the custom credential
    getCredentialTypeMarkup: function (requirements) {
        var div = $("<div></div>");
        var image = $("<img/>");
        var username = requirements.input.text.initialValue; //Get the secret from the response
        image.attr({
            "style" : "width:200px;height:200px;",
            "id" : "qrcodeimg",
            "<Enter your server URL here>"
        });
        div.append(image);
        return div;
    }
});
<!--NeedCopy-->
此片段用于处理“swivel_cred”的加价。突出显示的凭据名称必须与登录架构扩展中先前指定的“类型”匹配。 要生成标记,需要添加源指向旋转服务器的图像。完成此操作后,UI 将从指定位置加载图像。由于此登录架构还具有文本框,因此 UI 会呈现该文本框。
注意:
管理员可以修改图像元素的“样式”以调整图像大小。当前图像配置为 200x200 像素。
用于自定义 UI 以显示图像的配置
nFactor配置最好由下而上构造,这是最后一个因素,因为当您尝试为之前的因子指定“nextFactor”时,需要后续因子的名称。
旋转因素配置:
add loginschema swivel_image –authenticationSchema /nsconfig/loginschema/SwivelImage.xml

add authentication policylabel SwivelFactor –loginSchema swivel_image

bind authentication policylabel SwivelFactor –policy <policy-to-check-swivel-image> -priority 10
<!--NeedCopy-->
注意:
从示例中使用的登录架构下载 SwivelImage.xml。
组检查配置的伪因素:
add authentication policylabel GroupCheckFactor

add authentication policy contractors_auth_policy –rule ‘http.req.user.is_member_of(“contractors”)’ –action NO_AUTHN

add authentication policy not_contractors _auth_policy–rule true –action NO_AUTHN

bind authentication policylabel GroupCheckFactor –policy contractors_auth_policy –pri 10 –nextFactor SwivelFactor

bind authentication policylabel GroupCheckFactor –policy not_contractors_auth_policy –pri 20
<!--NeedCopy-->
Active Directory 登录的第一个因素:
add ldapAction <>

add authentication policy user_login_auth_policy –rule true –action <>

bind authentication vserver <> -policy user_login_auth_policy –pri 10 –nextFactor GroupCheckFactor
<!--NeedCopy-->
在此配置中,指定了三个因素,其中一个是隐式因素/伪因素。
本示例中使用的登录架构
下面是带旋转凭据和文本框的示例架构。
注意:为
Web 浏览器复制数据时,报价的显示方式可能会有所不同。请先在记事本等编辑器中复制数据,然后再将其保存到文件。
<?xml version="1.0" encoding="UTF-8"?>
<AuthenticateResponse xmlns="http://citrix.com/authentication/response/1">
<Status>success</Status>
<Result>more-info</Result>
<StateContext></StateContext>
<AuthenticationRequirements>
<PostBack>/nf/auth/doAuthentication.do</PostBack>
<CancelPostBack>/nf/auth/doLogoff.do</CancelPostBack>
<CancelButtonText>Cancel</CancelButtonText>
<Requirements>
<Requirement><Credential><ID>swivel_cred</ID><Type>swivel_cred</Type><Input><Text><Hidden>true</Hidden><InitialValue>${http.req.user.name}</InitialValue></Text></Input></Credential></Requirement>
<Requirement><Credential><ID>passwd</ID><SaveID>ExplicitForms-Password</SaveID><Type>password</Type></Credential><Label><Text>Password:</Text><Type>plain</Type></Label><Input><Text><Secret>true</Secret><ReadOnly>false</ReadOnly><InitialValue></InitialValue><Constraint>.+</Constraint></Text></Input></Requirement>
<Requirement><Credential><Type>none</Type></Credential><Label><Text>Hello ${http.req.user.name}, Please enter passcode from above image.</Text><Type>confirmation</Type></Label><Input /></Requirement>
<Requirement><Credential><ID>saveCredentials</ID><Type>savecredentials</Type></Credential><Label><Text>Remember my password</Text><Type>plain</Type></Label><Input><CheckBox><InitialValue>false</InitialValue></CheckBox></Input></Requirement>
<Requirement><Credential><ID>loginBtn</ID><Type>none</Type></Credential><Label><Type>none</Type></Label><Input><Button>Log On</Button></Input></Requirement>
</Requirements>
</AuthenticationRequirements>
</AuthenticateResponse>
<!--NeedCopy-->
输出
执行配置后,将显示以下图像。
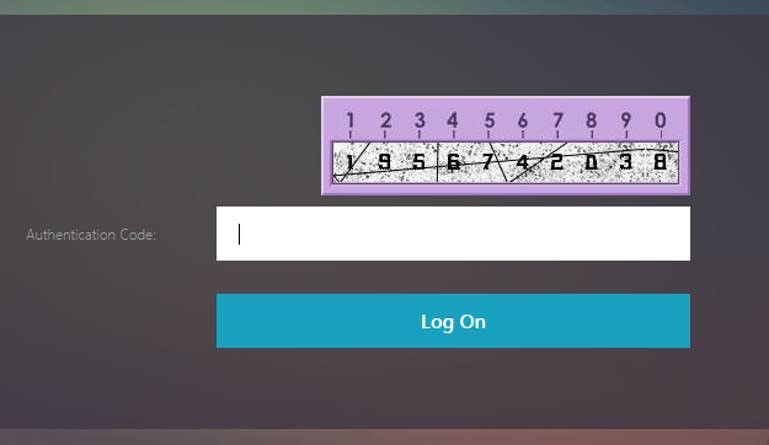
注意:
可以在 JavaScript 中更改图像的高度和位置。
自定义 NetScaler nFactor 登录表单以显示或隐藏字段
NetScaler Gateway 的 RFWeb 用户界面允许进行各种各样的自定义。此功能与 nFactor 身份验证框架结合使用后,可让客户在不影响现有工作流的情况下配置复杂的流程。
在此示例中,“Logon Type”(登录类型)列表中有两个身份验证选项 OAuth 和 LDAP。首次加载表单时,将显示用户名和密码字段(首先显示 LDAP)。如果选择了 OAuth,则所有字段都将隐藏,因为 OAuth 意味着将身份验证卸载到第三方服务器。这样,管理员就可以根据用户方便配置直观的工作流程。
注意:
- 只需简单修改脚本文件即可修改“Logon Type”(登录类型)列表中的值。
- 本部分仅介绍流的 UI 部分。身份验证的运行时处理不在本文的讨论范围之内。建议用户参阅 nFactor 文档以进行身份验证配置。
如何自定义 nFactor 登录表单
自定义 nFactor 登录表单可分为两个部分
- 将正确的登录架构发送到 UI
- 编写处理程序来解释登录架构和用户选择
将正确的登录架构发送到 UI
在此示例中,在登录架构中发送了一个简单的声明/要求。
为此,SingleAuth.xml 文件已修改。SingleAuth.xml 随 NetScaler 固件一起提供,可以在 /nsconfig/loginschema/LoginSchema 目录中找到。
发送登录架构的步骤:
-
通过 SSH 登录并放置到 shell(键入 shell)。
-
将 SingleAuth.xml 复制到另一个文件进行修改。
注意:
目标文件夹不同于默认的 NetScaler 登录架构文件夹。
cp /nsconfig/LoginSchema/LoginSchema/SingleAuth.xml /nsconfig/LoginSchema/SingleAuthDynamic.xml
-
将以下声明添加到 SingleAuthDynamic.xml。
<Requirement><Credential><ID>nsg_dropdown</ID><Type>nsg_dropdown</Type></Credential><Label><Text>Logon Type:</Text><Type>plain</Type></Label></Requirement> <!--NeedCopy--> -
配置 NetScaler 以发送此登录架构以加载第一个表单。
add loginschema single_auth_dynamic –authenticationSchema SingleAuthDynamic.xml

add loginschemaPolicy single_auth_dynamic –rule true –action single_auth_dynamic

bind authentication vserver aaa_nfactor –policy single_auth_dynamic –pri 10
<!--NeedCopy-->
脚本发生变化以加载表单和处理用户事件
您可以修改允许管理员自定义登录表单显示的 JavaScript。在本例中,如果选择了 LDAP,则会显示用户名和密码字段;如果选择了 OAuth,则会隐藏“用户名和密码”字段。管理员也可以只隐藏密码。
管理员必须将以下代码段附加到“/var/netscaler/logon/LogonPoint/custom”目录下的“script.js”中。
注意:
由于此目录是全局目录,因此请创建一个门户主题,然后在该文件夹中编辑“script.js”文件,位于
"/var/netscaler/logon/themes/<THEME_NAME>"。
CTXS.ExtensionAPI.addCustomCredentialHandler({
    // The name of the credential, must match the type returned by the server
    getCredentialTypeName: function () { return "nsg_dropdown"; },
    // Generate HTML for the custom credential
    getCredentialTypeMarkup: function (requirements) {
        var div = $("<div></div>");
        var select = $("<select name='nsg_dropdown'></select>").attr("id", "nsg_dropdown");

        var rsa = $("<option></option>").attr("selected", "selected").text("LDAP").val("LDAP");
        var OAuthID = $("<option></option>").text("OAuth").val("OAuth");
        select.append(rsa, OAuthID);

        select.change(function(e) {
            var value = $(this).val();
            var ldapPwd = $($(".credentialform").find(".CredentialTypepassword")[0]);
            var ldapUname = $($(".credentialform").find(".CredentialTypeusername"));
            if(value == "OAuth") {
                if (ldapPwd.length)
                        ldapPwd.hide();
                if (ldapUname.length)
                        ldapUname.hide();
            } else if(value == "LDAP") {
                if (ldapPwd.length)
                        ldapPwd.show();
                if (ldapUname.length)
                        ldapUname.show();
            }
        });
       div.append(select);
        return div;
    }
});
<!--NeedCopy-->
最终用户体验
最终用户首次加载登录页面时,将显示以下屏幕。
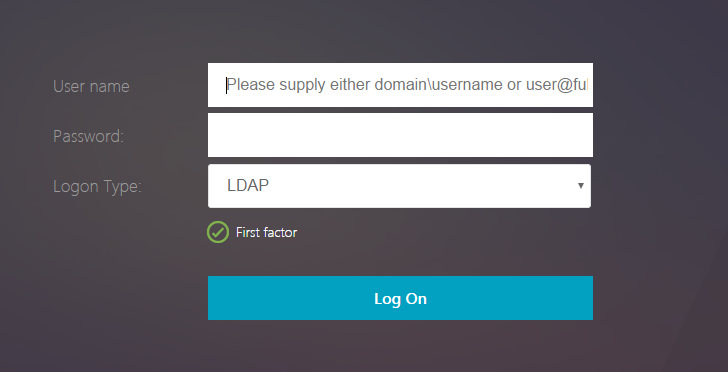
如果在 Logon Type(登录类型)中选择 OAuth,用户名和密码字段将隐藏。
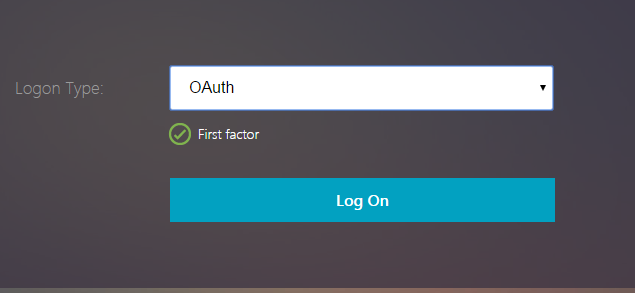
如果选择 LDAP,则将显示用户名和密码。这样,可以根据用户选择动态加载登录页面。
本示例中使用的登录架构
<?xml version="1.0" encoding="UTF-8"?>
<AuthenticateResponse xmlns="http://citrix.com/authentication/response/1">
<Status>success</Status>
<Result>more-info</Result>
<StateContext></StateContext>
<AuthenticationRequirements>
<PostBack>/nf/auth/doAuthentication.do</PostBack>
<CancelPostBack>/nf/auth/doLogoff.do</CancelPostBack>
<CancelButtonText>Cancel</CancelButtonText>
<Requirements>
<Requirement><Credential><ID>login</ID><SaveID>ExplicitForms-Username</SaveID><Type>username</Type></Credential><Label><Text>User name</Text><Type>plain</Type></Label><Input><AssistiveText>Please supply either domain\username or user@fully.qualified.domain</AssistiveText><Text><Secret>false</Secret><ReadOnly>false</ReadOnly><InitialValue></InitialValue><Constraint>.+</Constraint></Text></Input></Requirement>
<Requirement><Credential><ID>passwd</ID><SaveID>ExplicitForms-Password</SaveID><Type>password</Type></Credential><Label><Text>Password:</Text><Type>plain</Type></Label><Input><Text><Secret>true</Secret><ReadOnly>false</ReadOnly><InitialValue></InitialValue><Constraint>.+</Constraint></Text></Input></Requirement>
<Requirement><Credential><ID>nsg_dropdown</ID><Type>nsg_dropdown</Type></Credential><Label><Text>Logon Type:</Text><Type>plain</Type></Label></Requirement>
<Requirement><Credential><Type>none</Type></Credential><Label><Text>First factor</Text><Type>confirmation</Type></Label><Input /></Requirement>
<Requirement><Credential><ID>saveCredentials</ID><Type>savecredentials</Type></Credential><Label><Text>Remember my password</Text><Type>plain</Type></Label><Input><CheckBox><InitialValue>false</InitialValue></CheckBox></Input></Requirement>
<Requirement><Credential><ID>loginBtn</ID><Type>none</Type></Credential><Label><Type>none</Type></Label><Input><Button>Log On</Button></Input></Requirement>
</Requirements>
</AuthenticationRequirements>
</AuthenticateResponse>
<!--NeedCopy-->
注意:
有关各种 nFactor 相关主题的更多详细信息,请参阅 nFactor 身份验证。