Devices
Citrix XenMobile® can provision, manage, secure, and inventory a broad range of device types within a single management console.
The XenMobile Server database stores a list of mobile devices. A unique serial number or International Mobile Station Equipment Identity (IMEI)/Mobile Equipment Identifier (MEID) uniquely defines each mobile device. To populate the XenMobile console with your devices, you can add the devices manually or you can import a list of devices from a file. For more information about device provisioning file formats, see Device provisioning file formats later in this article.
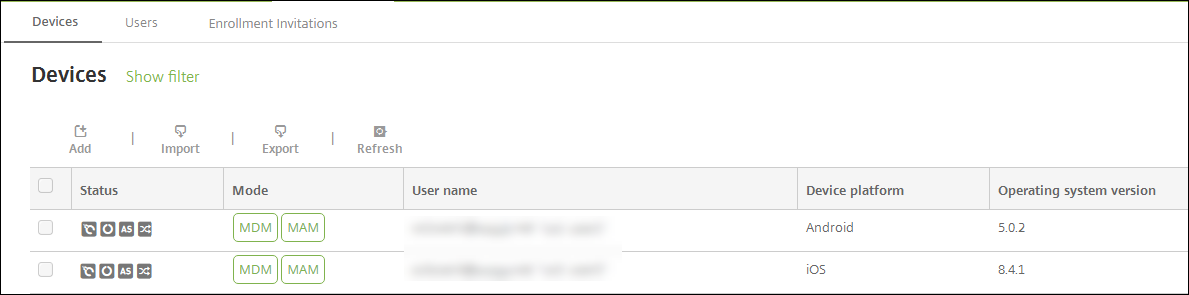
The Devices page in the XenMobile console lists each device and the following information:
- Status: Icons indicate whether the device is jailbroken, is managed, whether Active Sync Gateway is available, and the deployment state.
- Mode: Whether the device mode is MDM, MAM, or both.
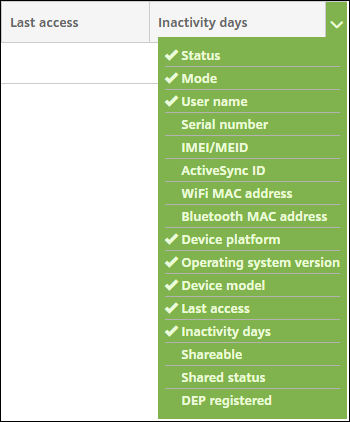
- Other information about the device, such as User name, Device platform, Operating system version, Device model, Last access, and Inactivity days. Those headings are the defaults shown.
To customize the Devices table, click the down arrow on the last heading. Then, select the additional headings you want to see in the table or clear any headings to remove.
You can add devices manually, import devices from a device provisioning file, edit device details, do security actions, and send notifications to devices. You can also export all device table data to a .csv file to create a custom report. The server exports all device attributes. If you apply filters, XenMobile uses the filters when creating the .csv file.
Add a device manually
-
In the XenMobile console, click Manage > Devices. The Devices page appears.
-
Click Add. The Add Device page appears.

-
Configure these settings:
- Select platform: Click either iOS or Android.
- Serial Number: Type the device serial number.
- IMEI/MEID: Optionally, for Android devices only, type the device IMEI/MEID information.
-
Click Add. The Devices table appears with the device added to the bottom of the list. Choose the device that you added and then in the menu that appears, click Edit to view and confirm the device details.
Note:
When you select the checkbox next to a device, the options menu appears above the device list. When you click anywhere else in the list, the options menu appears on the right side of the listing.
-
XenMobile Server configured in Enterprise (XME) or MDM mode
-
LDAP configured
-
If using local groups and local users:
-
One or more local groups.
-
Local users assigned to local groups.
-
Delivery groups are associated with local groups.
-
-
If using Active Directory:
- Delivery groups are associated with Active Directory groups.
-
-
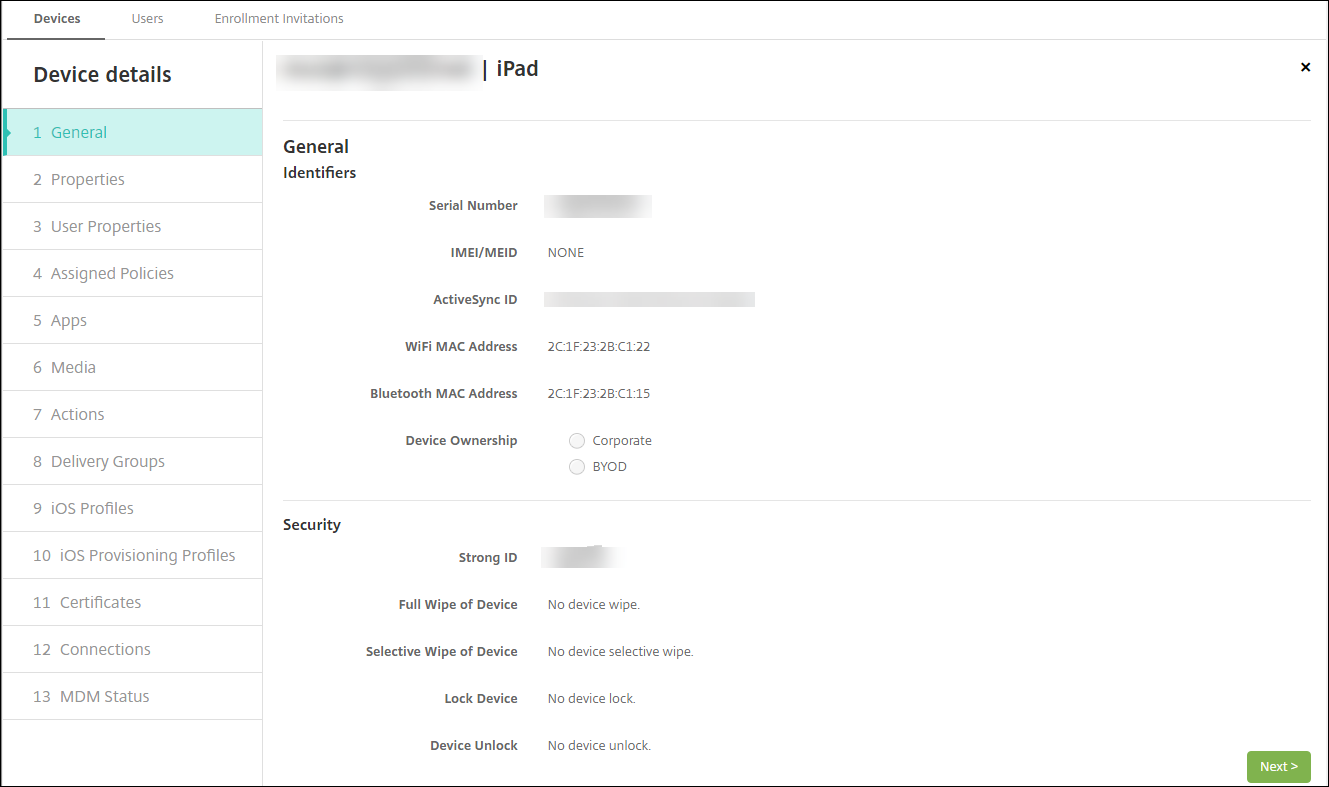
The General page lists the device Identifiers such as the serial number, ActiveSync ID, and other information for the platform type. For Device Ownership, select Corporate or BYOD.
The General page also lists device Security properties, such as Strong ID, Lock Device, Activation Lock Bypass, and other information for the platform type. The Full Wipe of Device field includes the user PIN code. The user must enter that code after the device is wiped. If the user forgets the code, you can look it up here.
-
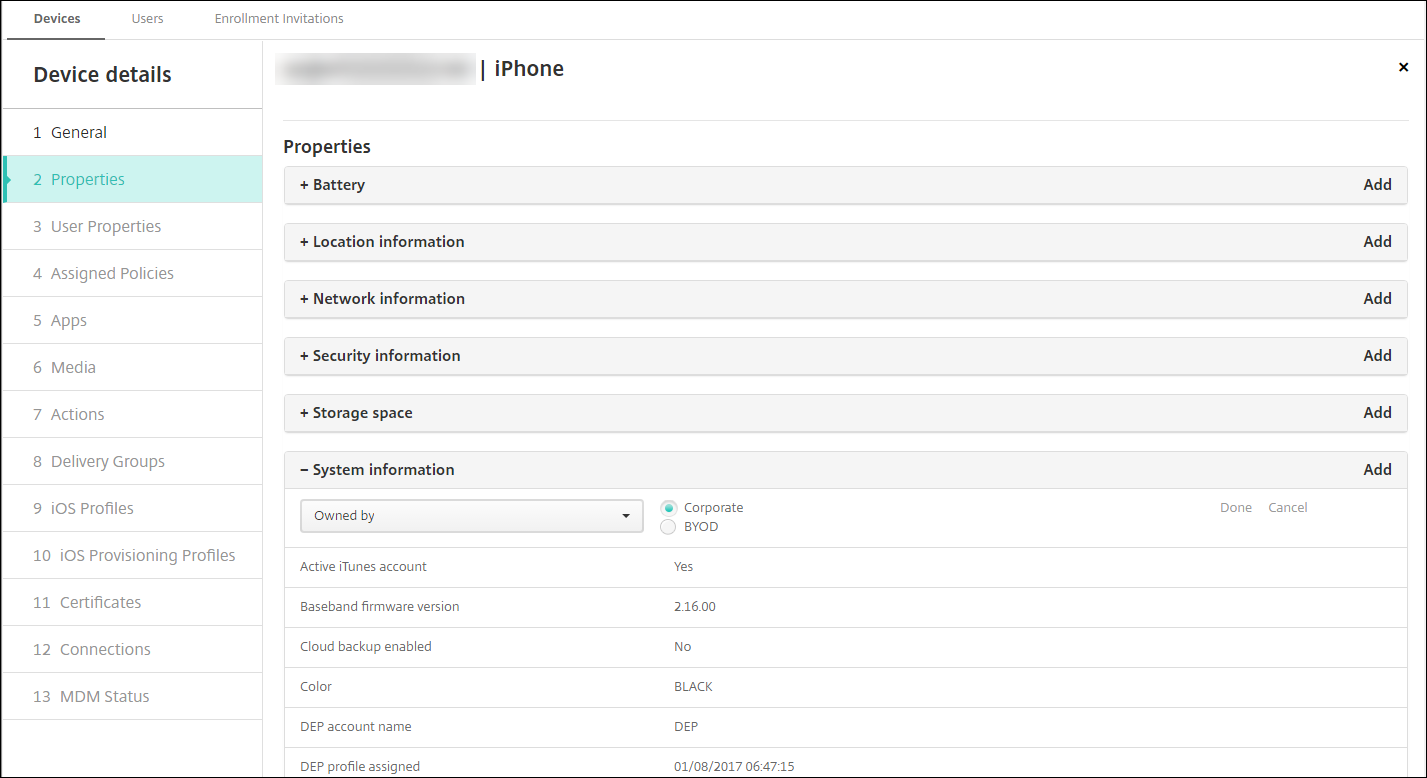
The Properties page lists the device properties that XenMobile is to provision. This list shows any device properties included in the provisioning file used to add the device. To add a property, click Add and then select a property from the list. For valid values for each property, see the PDF Device property names and values.
When you add a property, it initially appears under the category where you added it. After you click Next and then return to the Properties page, the property appears in the appropriate list.
To delete a property, hover over the listing and then click the X on the right side. XenMobile deletes the item immediately.
-
The remaining Device Details sections contain summary information for the device.
- User Properties: Displays RBAC roles, group memberships, volume purchase accounts, and properties for the user. You can retire a volume purchase account from this page.
- Assigned Policies: Displays the number of assigned policies including the number of deployed, pending, and failed policies. Provides the policy name, type and last deployed information for each policy.
- Apps: Displays, for the last inventory, the number of installed, pending, and failed app deployments. Provides the app name, identifier, type, and other information.
- Media: Displays, for the last inventory, the number of deployed, pending, and failed media deployments.
- Actions: Displays the number of deployed, pending, and failed actions. Provides the action name and time of the last deployment.
- Delivery Groups: Displays the number of successful, pending, and failed delivery groups. For each deployment, provides the delivery group name and deployment time. Select a delivery group to view more detailed information, including status, action, and channel or user.
- iOS Profiles: Displays the last iOS profile inventory, including name, type, organization, and description.
- iOS Provisioning Profiles: Displays enterprise distribution provisioning profile information, such as the UUID, expiration date, and whether it is managed.
- Certificates: Displays, for valid, expired, or revoked certificates, information such as the type, provider, issuer, serial number, and the number of remaining days before expiration.
- Connections: Displays the first connection status and the last connection status. Provides for each connection, the user name, penultimate (next to last) authentication time, and last authentication time.
- MDM Status: Displays information such as the MDM status, last push time, and last device reply time.
Import devices from a provisioning file
You can import a file supplied by mobile operators or device manufacturers, or you can create your own device provisioning file. For details, see Device provisioning file formats later in this article.
-
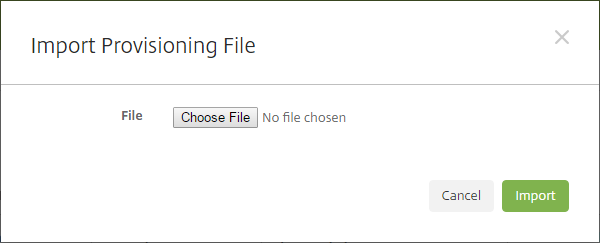
Go to Manage > Devices and then click Import. The Import Provisioning File dialog box appears.
-
Click Choose File and then navigate to the file you want to import.
-
Click Import. The Devices table lists the imported file.
-
To edit the device information, select it and then click Edit. For information about the Device details pages, see Add a device manually.
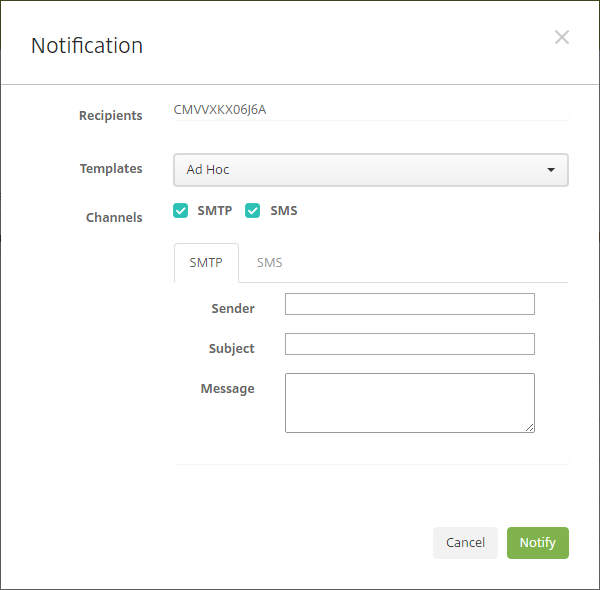
Send a notification to devices
You can send notifications to devices from the Devices page. For more information about notifications, see Notifications.
-
On the Manage > Devices page, select the device or devices to which you want to send a notification.
-
Click Notify. The Notification dialog box appears. The Recipients field lists all devices to receive the notification.
-
Configure these settings:
- Templates: In the list, click the type of notification you want to send. For each template except for Ad Hoc, the Subject and Message fields show the text configured for the template that you choose.
- Channels: Select how to send the message. The default is SMTP and SMS. Click the tabs to see the message format for each channel.
- Sender: Enter an optional sender.
- Subject: Enter a subject for a Ad Hoc message.
- Message: Enter the message for an Ad Hoc message.
-
Click Notify.
Export the Devices table
-
Filter the Devices table according to what you want to appear in the export file.
-
Click the Export button above the Devices table. XenMobile extracts the information in the filtered Devices table and converts it to a .csv file.
-
When prompted, open or save the .csv file.
Tag user devices manually
You can manually tag a device in XenMobile in the following ways:
- During the invitation-based enrollment process.
- During the Self-Help Portal enrollment process.
- By adding device ownership as a device property
You have the option of tagging the device as either corporate- or employee-owned. When using the Self-Help Portal to self-enroll a device, you can tag the device as corporate- or employee-owned. You can also tag a device manually, as follows.
- Add a property to the device from the Devices tab in the XenMobile console.
-
Add the property named Owned by and choose either Corporate or BYOD (employee-owned).
Device provisioning file formats
Many mobile operators or device manufacturers provide lists of authorized mobile devices. You can use these lists to avoid having to enter a long list of mobile devices manually. XenMobile supports an import file format that is common to all three supported device types: Android, iOS, and Windows.
A provisioning file that you create manually and use to import devices to XenMobile must be in the following format:
SerialNumber;IMEI;OperatingSystemFamily;propertyName1;propertyValue1;propertyName2;propertyValue2; … propertyNameN;propertyValueN
Keep in mind the following:
- For valid values for each property, see the PDF Device property names and values.
- Use the UTF-8 character set.
-
Use a semi-colon (;) to separate the fields within the provisioning file. If part of a field contains a semi-colon, escape it with a backslash character (\).
For example, for this property:
propertyV;test;1;2Escape it as follows:
propertyV\;test\;1\;2 - The serial number is required for iOS devices because the serial number is the iOS device identifier.
- For other device platforms, you must include either the serial number or the IMEI.
- Valid values for OperatingSystemFamily are WINDOWS, ANDROID, or iOS.
Example of a device provisioning file:
`1050BF3F517301081610065510590391;15244201625379901;WINDOWS;propertyN;propertyV\;test\;1\;2;prop 2
2050BF3F517301081610065510590392;25244201625379902;ANDROID;propertyN;propertyV$*&&ééétest
3050BF3F517301081610065510590393;35244201625379903;iOS;test;
4050BF3F517301081610065510590393;;iOS;test;
;55244201625379903;ANDROID;test.testé;value;`
Each line in the file describes a device. The first entry in the above sample means the following:
- SerialNumber:
1050BF3F517301081610065510590391 - IMEI:
15244201625379901 - OperatingSystemFamily:
WINDOWS - PropertyName:
propertyN - PropertyValue:
propertyV\;test\;1\;2;prop 2