XenServer VM Tools for Windows
XenServer VM Tools (formerly Citrix VM Tools or XenServer PV Tools) for Windows provide high performance I/O services without the overhead of traditional device emulation. XenServer VM Tools for Windows consist of I/O drivers (also known as paravirtualized drivers or PV drivers) and the Management Agent.
XenServer VM Tools for Windows must be installed on each Windows VM for the VM to have a fully supported configuration. A VM functions without them, but performance is hampered.
The version of the XenServer VM Tools for Windows is updated independently of the version of XenServer. Ensure that your XenServer VM Tools for Windows are regularly updated to the latest version, both in your VMs and in any templates that you use to create your VMs. For more information about the latest version of the tools, see What’s new.
Install XenServer VM Tools
Note:
To install XenServer VM Tools for Windows on a Windows VM, the VM must be running the Microsoft .NET Framework Version 4.0 or later.
The XenServer VM Tools for Windows are installed by default in the C:\Program Files\XenServer\XenTools directory on the VM.
To install XenServer VM Tools for Windows:
-
We recommend that you snapshot your VM before installing or updating the XenServer VM Tools.
-
Download the XenServer VM Tools for Windows file from the XenServer Downloads page.
-
Verify your download against the provided SHA256 value.
-
Copy the file to your Windows VM or to a shared drive that the Windows VM can access.
-
Run the
managementagentx64.msifile to begin XenServer VM Tools installation.Msiexec.exe /package managementagentx64.msi -
Follow the prompts in the installer.
-
Follow the instructions on the wizard to accept the license agreement and choose a destination folder.
-
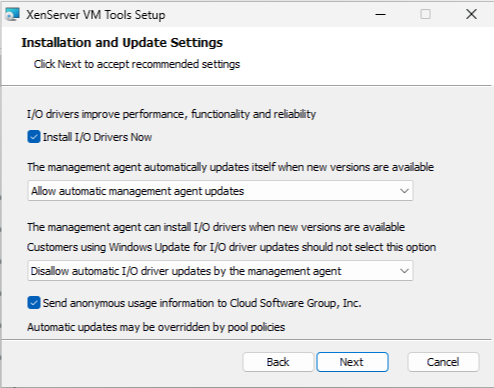
Customize the settings on the Installation and Updates Settings page.
By default, the wizard displays the following recommended settings:
- Install I/O Drivers Now
- If the VM has
has-vendor-device=trueset, this option is unselected because the I/O drivers have been already installed by Windows Update. - IF the VM has
has-vendor-device=falseset, this option is selected.
- If the VM has
- Allow automatic Management Agent updates
- Disallow automatic I/O driver updates by the Management Agent
- Send anonymous usage information to Cloud Software Group, Inc.
For some use cases, different update settings are recommended. For more information, see Update XenServer VM Tools.
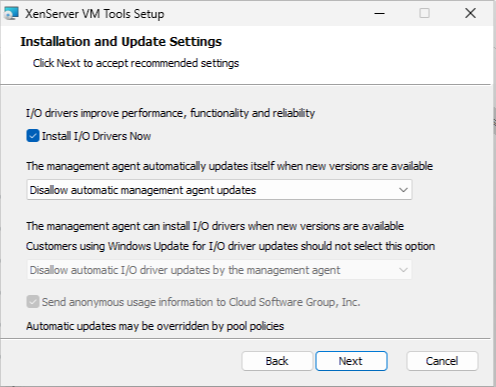
To configure the update settings, you can make the following changes:
- If you do not want to allow the automatic updating of the Management Agent, select Disallow automatic Management Agent updates from the list.
- If you want to allow the Management Agent to update the I/O drivers automatically, select Allow automatic I/O driver updates by the Management Agent. However, we recommend that you use Windows Update to update the I/O drivers, not the Management Agent. If you have chosen to receive I/O driver updates through the Windows Update mechanism, do not allow the Management Agent to update the I/O drivers automatically.
- If you do not want to share anonymous usage information with us, clear the Send anonymous usage information to Cloud Software Group, Inc. checkbox. The information transmitted to Cloud Software Group contains the first four characters of the UUID of the VM requesting the update. No other information relating to the VM is collected or transmitted.
- Install I/O Drivers Now
-
Click Next and then Install to begin the XenServer VM Tools for Windows installation process.
-
-
Restart the VM when prompted to complete the installation process.
Customers who install the XenServer VM Tools for Windows or the Management Agent through RDP might not see the restart prompt as it only appears on the Windows console session. To ensure that you restart your VM (if necessary) and to get your VM to an optimized state, specify the force restart option in RDP. The force restart option restarts the VM only if it is required to get the VM to an optimized state.
Warning:
Installing or upgrading the XenServer VM Tools for Windows can cause the friendly name and identifier of some network adapters to change. Any software which is configured to use a particular adapter might have to be reconfigured following XenServer VM Tools for Windows installation or upgrade.
Silent installation
To install the XenServer VM Tools for Windows silently and to prevent the system from rebooting, run one of the following commands:
Msiexec.exe /package managementagentx64.msi /quiet /norestart
<!--NeedCopy-->
Or
Setup.exe /quiet /norestart
<!--NeedCopy-->
A non-interactive, but non-silent installation can be obtained by running:
Msiexec.exe managementagentx64.msi /passive
<!--NeedCopy-->
Or
Setup.exe /passive
<!--NeedCopy-->
Notes:
- The
/quietparameter applies to the installation dialogs only, but not to the device driver installation. When the/quietparameter is specified, the device driver installation requests permission to reboot if necessary.
- When
/quiet /norestartis specified, the system doesn’t reboot after the entire tools installation is complete. This behavior is independent of what the user specifies in the reboot dialog.- When
/quiet /forcerestartis specified, the upgrade or installation process can trigger multiple reboots. This behavior is independent of what the user specifies in the reboot dialog.- When the device driver installation requests permission to reboot, a tools installation with the
quietparameter specified can still be in progress. Use the Task Manager to confirm whether the installer is still running.
To customize the installation settings, use the following parameters with the silent installation commands:
| Parameter | Allowed values | Default | Description |
|---|---|---|---|
| ALLOWAUTOUPDATE | YES or NO | YES | Allow automatic Management Agent updates |
| ALLOWDRIVERINSTALL | YES or NO | YES | Install the I/O Drivers now |
| ALLOWDRIVERUPDATE | YES or NO | NO | Allow the automatic Management Agent updates to install updated drivers |
| IDENTIFYAUTOUPDATE | YES or NO | YES | Send anonymous usage information to us |
For example, to do a silent install of the tools that does not allow future automatic Management Agent updates and does not send anonymous information to Cloud Software Group, Inc., run one of the following commands:
Msiexec.exe /package managementagentx64.msi ALLOWAUTOUPDATE=NO IDENTIFYAUTOUPDATE=NO /quiet /norestart
<!--NeedCopy-->
For interactive, silent, and passive installations, following the next system restart there might be several automated reboots before the XenServer VM Tools for Windows are fully installed. This behavior is also the case for installations with the /norestart flag specified. However, for installations where the /norestart flag is provided, the initial restart might be manually initiated.
Update XenServer VM Tools
Ensure that your XenServer VM Tools for Windows are regularly updated to the latest version, both in your VMs and in any templates that you use to create your VMs. We recommend that you snapshot your VM before updating the XenServer VM Tools. For more information about the latest version of the tools, see What’s new.
Important:
Ensure that all requested VM restarts are completed as part of the update. Multiple restarts might be required. If all requested restarts are not completed, the VM might show unexpected behavior.
XenServer provides automatic update mechanisms for each of its components:
- The Management Agent can automatically update itself
- The I/O drivers can be updated either by the Management Agent or through Windows Update.
Alternatively, you can update either or both of these components manually.
The update method to choose for each component of the tools can depend on your environment.
Recommended update settings
For most use cases, we recommend using the following settings for updating the different components of the XenServer VM Tools for Windows:
-
Set the value of the following registry key to a REG_DWORD value of ‘3’:
HLKM\System\CurrentControlSet\services\xenbus_monitor\Parameters\Autoreboot.For more information, see ### Automatic reboots.
During installation:
The first two settings are the default when you run the installer:
Settings for Citrix Provisioning targets or reset-on-boot machines
If you intend to use your Windows VM as a Citrix Provisioning target or with the reset-on-boot flag set, you cannot use any of the automated update mechanisms. We recommend that you set the following configuration on the master template that you use to create these VMs:
-
During creation of your VM, ensure that the
has-vendor-deviceflag is set tofalse.For more information, see Create a Windows VM by using the CLI.
During installation:
Specify this configuration when first installing the XenServer VM Tools:
Settings for automatic updates by the Management Agent only
You can configure the Management Agent to update both itself and the I/O drivers. If you use this configuration, ensure that the VMs are prevented from updating the I/O drivers through Windows Update. If both mechanisms attempt to update the I/O drivers, this can result in unnecessary updates.
Choose this approach if your organization requires that you review any updates before applying them to your Windows VMs. If this is the case, you must also redirect the Management Agent to get its updates from an internal server.
-
(Optional) Redirect the Management Agent updates.
During installation:
Specify this configuration when first installing the XenServer VM Tools:

Update the Management Agent
XenServer enables you to update the Management Agent automatically on both new and existing Windows VMs. By default, XenServer allows the automatic updating of the Management Agent. However, it does not allow the Management Agent to update the I/O drivers automatically. You can customize the Management Agent update settings during XenServer VM Tools for Windows installation. The automatic updating of the Management Agent occurs seamlessly, and does not reboot your VM. In scenarios where a VM reboot is required, a message appears on the Console tab of the VM notifying users about the required action.
You can get the Management Agent updates automatically, provided the Windows VM has access to the internet.
Manage Automatic Updates by using the CLI
XenServer enables you to use the command line to manage the automatic updating of the I/O drivers and the Management Agent. You can run msiexec.exe with the arguments listed in the following table to specify whether the I/O drivers and the Management Agent are automatically updated. For information about installing XenServer VM Tools for Windows by using msiexec.exe, see Silent installation.
Note:
For VMs managed using either PVS or MCS, automated updates are turned off automatically when the Citrix Virtual Desktops VDA is present and it reports that the machine is non-persistent.
| Argument | Values | Description |
|---|---|---|
| ALLOWAUTOUPDATE | YES/NO | Allow/disallow auto updating of the Management Agent |
| ALLOWDRIVERINSTALL | YES/NO | Allow/disallow the XenServer VM Tools for Windows installer to install I/O drivers |
| ALLOWDRIVERUPDATE | YES/NO | Allow/disallow the Management Agent to update the I/O drivers automatically |
| IDENTIFYAUTOUPDATE | YES/NO | Allow/disallow the auto update mechanism to send anonymous usage information to us |
For example:
setup.exe  /passive /forcerestart ALLOWAUTOUPDATE=YES ALLOWDRIVERINSTALL=NO \
     ALLOWDRIVERUPDATE=NO IDENTIFYAUTOUPDATE=YES
<!--NeedCopy-->
Enable Management Agent updates
To enable automatic updating of the Management Agent on a per-VM basis:
-
On the VM, open a command prompt as an administrator.
-
Run the following command:
reg.exe ADD HKLM\SOFTWARE\XenServer\XenTools\AutoUpdate /t REG_DWORD /v DisableAutoUpdate /d 0 <!--NeedCopy--> -
Ensure that Management Agent updates are allowed by your pool. In the host console, run the following command:
xe pool-param-set uuid=pooluuid guest-agent-config:auto_update_enabled=true
<!--NeedCopy-->
Disable Management Agent updates
To disable automatic updating of the Management Agent on a per-VM basis:
-
On the VM, open a command prompt as an administrator.
-
Run the following command:
reg.exe ADD HKLM\SOFTWARE\XenServer\XenTools\AutoUpdate /t REG_DWORD /v DisableAutoUpdate /d 1
<!--NeedCopy-->
To disable automatic updating of the Management Agent on a per-pool basis, run the following command i nthe host console:
xe pool-param-set uuid=pooluuid guest-agent-config:auto_update_enabled=false
<!--NeedCopy-->
Redirect the Management Agent updates
XenServer enables customers to redirect Management Agent updates to an internal web server before they are installed. This redirection allows customers to review the updates before they are automatically installed on the VM.
The Management Agent uses an updates file to get information about the available updates. The name of this updates file depends on the version of the Management Agent that you use:
- For Management Agent 9.2.1.35 and later use https://pvupdates.vmd.citrix.com/autoupdate.v1.json.
- For Management Agent 9.0.0.0 to 9.2.0.27 https://pvupdates.vmd.citrix.com/updates.v9.json.
Complete the following steps to redirect the Management Agent updates:
-
Download the updates file.
-
Download the Management Agent MSI files referenced in the updates file.
-
Upload the MSI files to an internal web server that your VMs can access.
-
Update the updates file to point to the MSI files on the internal web server.
-
Upload the updates file to the web server.
Automatic updates can also be redirected on a per-VM or a per-pool basis. To redirect updates on a per-VM basis:
-
On the VM, open a command prompt as an administrator.
-
Run the command
reg.exe ADD HKLM\SOFTWARE\XenServer\XenTools /t REG_SZ /v update_url /d \
    url of the update file on the web server
<!--NeedCopy-->
To redirect automatic updating of the Management Agent on a per-pool basis, run the following command:
xe pool-param-set uuid=pooluuid guest-agent-config:auto_update_url=url of the update file on the web server
<!--NeedCopy-->
Update the I/O drivers
You can update the I/O drivers through Windows Update or by using the Management Agent. You can also turn off automatic updates and manage updates to the I/O drivers manually.
Each of the I/O drivers (xennet, xenvif, xenvbd, xeniface, and xenbus) has its own version. For information about the latest versions, see What’s New.
Set the I/O drivers to update through Windows Update
You can get I/O driver updates automatically from Microsoft Windows Update, provided:
-
Windows Update is enabled within the VM
-
The VM has access to the internet, or it can connect to a WSUS proxy server
-
You are not running the Core version of Windows Server. Windows Server Core does not support using Windows Update to install or update the I/O drivers.
The Virtualization state section on a VM’s General tab in XenCenter specifies whether the VM can receive updates from Windows Update. The mechanism to receive I/O driver updates from Windows Update is turned on by default. If you do not want to receive I/O driver updates from Windows Update, disable Windows Update on your VM, or specify a group policy.
Disable update of the I/O drivers through Windows Update
The Virtualization state section on a VM’s General tab in XenCenter specifies whether the VM can receive updates from Windows Update. The mechanism to receive I/O driver updates from Windows Update is turned on by default.
For Windows VMs that already exist, if you do not want to receive I/O driver updates from Windows Update, specify a group policy.
For new Windows VMs, you can set a flag in the VM during VM creation to prevent I/O driver updates from Windows Update. For more information, see Settings for Citrix Provisioning targets or reset-on-boot machines and Create a Windows VM by using the CLI.
Set the Management Agent to update the I/O drivers
During the XenServer VM Tools for Windows installation, you can specify for the Management Agent to update the I/O drivers automatically. If you prefer to update this setting after completing the XenServer VM Tools for Windows installation process, perform the following steps:
-
On the VM, open a command prompt as an administrator.
-
Run the following command:
reg.exe ADD HKLM\SOFTWARE\XenServer\XenTools\AutoUpdate /t REG_SZ /v \
    InstallDrivers /d YES
<!--NeedCopy-->
Stop the Management Agent from updating the I/O drivers
To prevent the Management Agent from updating the I/O drivers, perform the following steps:
-
On the VM, open a command prompt as an administrator.
-
Run the following command:
reg.exe ADD HKLM\SOFTWARE\XenServer\XenTools\AutoUpdate /t REG_SZ /v \
    InstallDrivers /d NO
<!--NeedCopy-->
Automatic reboots
Ensure that all requested VM restarts are completed as part of the update. Multiple restarts might be required. If all requested restarts are not completed, you might see unexpected behavior.
You can set a registry key that specifies the maximum number of automatic reboots that are performed when you install the drivers through Device Manager or Windows Update. After you have installed the xenbus driver version 9.1.1.8 or later, the XenServer VM Tools for Windows use the guidance provided by this registry key.
To use this feature, we recommend that you set the following registry key as soon as possible: HLKM\System\CurrentControlSet\services\xenbus_monitor\Parameters\Autoreboot. The value of the registry key must be a positive integer. We recommend that you set the number of reboots in the registry key to 3.
When this registry key is set, the XenServer VM Tools for Windows perform as many reboots as are needed to complete the updates or the number of reboots specified by the registry key - whichever value is lower.
Before each reboot, Windows can display an alert for 60 seconds that warns of the upcoming reboot. You can dismiss the alert, but this action does not cancel the reboot. Because of this delay between the reboots, wait a few minutes after the initial reboot for the reboot cycle to complete.
Notes:
This setting is required for headless servers with static IP addresses.
This automatic reboot feature only applies to updates to the Windows I/O drivers through Device Manager or Windows Update. If you are using the Management Agent installer to deploy your drivers, the installer disregards this registry key and manages the VM reboots according to its own settings.
Other configuration and queries
Find the I/O driver version
To find out the version of the I/O drivers installed on the VM:
-
Navigate to
C:\Windows\System32\drivers. -
Locate the driver from the list.
-
Right-click the driver and select Properties and then Details.
The File version field displays the version of the driver installed on the VM.
Find the Management Agent version
To find out the version of the Management Agent installed on the VM:
-
Navigate to
C:\Program Files\XenServer\XenTools. -
Right-click
XenGuestAgentfrom the list and click Properties and then Details.The File version field displays the version of the Management Agent installed on the VM.
Configure anonymous usage information
During the XenServer VM Tools for Windows installation, you can specify whether you would like to send anonymous usage information to Cloud Software Group, Inc. If you prefer to update this setting after completing the XenServer VM Tools for Windows installation process, perform the following steps:
-
On the VM, open a command prompt as an administrator.
-
Run the following command:
reg.exe ADD HKLM\SOFTWARE\XenServer\XenTools\AutoUpdate REG_SZ /v \
    IDENTIFYAUTOUPDATE /d YES/NO
<!--NeedCopy-->
Uninstall XenServer VM Tools
We don’t recommend removing the XenServer VM Tools from your Windows VMs. These tools are required for your Windows VMs to be fully supported. Removing them can cause unexpected behavior. Manually uninstall your XenServer VM Tools only as a last resort.
Standard uninstall
To do a standard uninstall of the XenServer VM Tools, you can use the Windows Add or Remove Programs feature:
- Create a snapshot of the VM before you start.
- In the Windows VM, go to Add or Remove Programs.
- Select XenServer VM Tools and click Uninstall.
- Reboot the VM.
The uninstall.exe command
Uninstalling the XenServer VM Tools by using the Windows Add or Remove Programs feature calls the <tools-install-directory>\uninstall.exe file to perform the uninstall actions. You can instead choose to call this command from a PowerShell terminal or a command prompt with administrator privileges.
- Create a snapshot of the VM before you start.
- As an administrator, open a command prompt or PowerShell terminal.
- Run the command
<tools-install-directory>\uninstall.exe. - Reboot the VM.
Command options
The uninstall.exe command accepts the following parameters:
-
help- Displays usage information for the command. -
log- Generates a log file that indicates what the command has done. -
verbose- Prints to the console what the command has done. -
disable- Disables drivers that were installed by the installer MSI. -
force-disable- Disables the drivers in all situations. -
hidden- Deletes hidden devices. These devices are unused and have been superseded, but might have left stale registry entries. -
cleanup- Removes old uninstallers from Add or Remove Programs. These uninstallers can include duplicate entries from older versions of the tools. -
purge- (9.3.1 and later) Resets the VM to a clean state as it was before any part of the XenServer VM Tools were installed. For more information, see Full uninstall of all XenServer VM Tools components. -
install- (9.3.1 and later) Installs the current set of I/O drivers and prompts for a VM reboot when required. -
reboot- Reboots the VM after all other command operations have completed.
Full uninstall of all XenServer VM Tools components
The latest version of XenServer VM Tools for Windows (9.3.1 and later) includes the command uninstall.exe purge. The purge option on the uninstall.exe application resets a VM to the state before any of the I/O drivers were installed. If you are experiencing issues when upgrading your tools to a newer version or need a clean state to install a later set of tools on your VM, use this utility.
- Create a snapshot of the VM before you start.
- As an administrator, open a command prompt or PowerShell terminal.
- Run the command
<tools-install-directory>\uninstall.exe purge verbose - Reboot the VM.
After using this command, you do not need to perform any manual cleanup steps like you might have had to with previous versions of the XenServer VM Tools. All changes related to the XenServer VM Tools have been removed.
What does the purge option remove?
If you use the command uninstall.exe purge, all traces of the XenServer VM Tools are removed from your Windows VM. The list of actions taken by this command are as follows:
- Services:
- Disables all XenServer VM Tools services, which prevents installed drivers and services from starting on reboot.
- Stops any running XenServer VM Tools services.
- Drivers:
- Uninstalls I/O drivers from all device nodes.
- Uninstalls hidden devices. This action is the same as that performed the
hiddencommand line option. - Uninstalls cached driver packages, which removes them from the driver store. As a result, the I/O drivers are not automatically reinstalled.
- Registry:
- Removes stale registry information used by out of support versions of the drivers.
- Deletes tools-related keys from
HKLM\System\CurrentControlSet\Control\Class\... - Deletes tools-related keys from
HKLM\System\CurrentControlSet\Services. - Deletes tools-related keys from
HKLM\System\CurrentControlSet\Enum\...
- Files:
- Deletes any XenServer VM Tools driver files from
C:\Windows\System32andC:\Windows\System32\drivers. - Deletes XenServer VM Tools
INFfiles fromC:\Windows\INF. - Deletes any stale files left by out of support versions of the tools from
C:\Program Files\Citrix\XenToolsandC:\Program Files\XenServer\XenTools.
- Deletes any XenServer VM Tools driver files from
- Other:
- Deletes old entires in Add or Remove Programs. This action is the same as that performed the
cleanupcommand line option. - Clears some of the InstallAgent’s stale state information.
- Removes
xenfilt.sysfrom upper-filters. This change preventsxenfilt.sysfrom loading on any driver nodes. - Removes the
unplugkeys, which causes the VM to revert to emulated devices on reboot. - Removes StorNvme’s StartOverride. This change forces
stornvme.systo start on boot and allows emulated NVMe (UEFI) boot devices to function.
- Deletes old entires in Add or Remove Programs. This action is the same as that performed the
What’s new
The version of the XenServer VM Tools for Windows is updated independently of the version of XenServer. Ensure that your XenServer VM Tools for Windows are regularly updated to the latest version, both in your VMs and in any templates that you use to create your VMs.
The latest version of the XenServer VM Tools for Windows is available from the XenServer Downloads page.
XenServer VM Tools for Windows 9.3.2
Released Nov 27, 2023
This release rebrands the Citrix VM Tools to XenServer VM Tools.
This set of tools contains the following component versions:
- Installer: 9.3.2
- Management Agent: 9.2.2.435
- xenbus: 9.1.7.80
- xeniface: 9.1.8.69
- xennet: 9.1.5.51
- xenvbd: 9.1.6.58
- xenvif: 9.1.10.83
Improvements in 9.3.2
This release also contains the following improvements:
- Improvements to the
uninstall.execommand. - Changes to enable some Windows VMs to use up to 64 vCPUs where your version of XenServer and the Windows operating system support it.
Fixed issues in 9.3.2
This release includes a fix for the following issue:
- Sometimes, when installing the XenServer VM Tools, a non-fatal error can cause the installation to fail.
Earlier releases
9.3.1
Released Jan 25, 2023
This set of tools contains the following component versions:
- Installer: 9.3.1
- Management Agent: 9.2.1.35
- xenbus: 9.1.5.54
- xeniface: 9.1.5.42
- xennet: 9.1.3.34
- xenvbd: 9.1.4.37
- xenvif: 9.1.8.58
This release includes the following improvements:
- Improvements to the
uninstall.exeutility, including thepurgeparameter. For more information, see Uninstall XenServer VM Tools. - General improvements to the XenServer VM Tools installer.
- General improvements to string handling of registry keys.
This release contains fixes for the following issues:
- Sometimes, when the XenServer VM Tools are updated through Windows Update, the static IP settings are lost and the network settings change to use DHCP.
- On Windows VMs, the grant tables can easily become exhausted. When this occurs, read and write requests can fail or additional VIFs are not enabled correctly and fail to start.
- On rare occasions, when upgrading the XenServer VM Tools for Windows, the existing Management Agent can fail to shut down and prevent the upgrade from succeeding.
- On a Windows VM, you might see both the previous and a later version of the tools or Management Agent listed in your Installed Programs.
- (PREVIOUS) Citrix XenServer Windows Management Agent
- (LATER) Citrix Hypervisor PV Tools.
After you update to the latest version of the tools, neither of these earlier names are listed. Only XenServer VM Tools is listed in your Installed Programs.
9.3.0
Released Jul 26, 2022
This set of tools contains the following component versions:
- Installer: 9.3.0
- Management Agent: 9.2.0.27
- xenbus: 9.1.4.49
- xeniface: 9.1.4.34
- xennet: 9.1.3.34
- xenvbd: 9.1.3.33
- xenvif: 9.1.6.52
This release includes the following improvements:
- General improvements to the XenServer VM Tools installer.
This release contains fixes for the following issues:
- Security software was blocking secondary disks that are marked as removable from being exposed to the OS, as a data-exfiltration prevention measure. This update enables you to flag a VBD as non-removable and have this correctly exposed through the OS.
- On a Windows VM, sometimes the IP address of an SR-IOV VIF is not visible in XenCenter.
9.2.3
Released Apr 28, 2022
This set of tools contains the following component versions:
- Installer: 9.2.3
- Management Agent: 9.1.1.13
- xenbus: 9.1.3.30
- xeniface: 9.1.4.34
- xennet:
- 9.1.1.8 (for Windows Server 2012 and Windows Server 2012 R2)
- 9.1.2.23 (for all other supported Windows operating systems)
- xenvbd: 9.1.2.20
- xenvif: 9.1.5.48
This release contains fixes for the following issues:
- In XenServer VM Tools for Windows version 9.2.2, time sync options are not available.
- A race condition can cause Windows VMs to show a blue screen error after live migration on Citrix Hypervisor 8.2 Cumulative Update 1.
- Windows VMs that have version 9.2.1 or 9.2.2 of the XenServer VM Tools installed and that are PVS targets can sometimes freeze with a black screen. The message “Guest Rx stalled” is present in the dom0 kernel logs. This issue more often occurs on pool coordinators than on other pool members.
- On Windows VMs with more than 8 vCPUs, Receive Side Scaling might not work because the xenvif driver fails to set up the indirection table.
9.2.2
Released Jan 14, 2022
This set of tools contains the following component versions:
- Installer: 9.2.2
- Management Agent: 9.1.1.13
- xenbus: 9.1.3.30
- xeniface: 9.1.2.22
- xennet:
- 9.1.1.8 (for Windows Server 2012 and Windows Server 2012 R2)
- 9.1.2.23 (for all other supported Windows operating systems)
- xenvbd: 9.1.2.20
- xenvif: 9.1.3.31
This release contains fixes for the following issues:
- During an update of the tools, the xenbus driver can prompt a reboot before driver installation is complete. Accepting the reboot can cause a blue screen error in your Windows VM.
- When compressing collected diagnostic information, the xt-bugtool diagnostics tool times out after 20s. This behavior can result in the diagnostics zip file not being correctly created.
- VNC clipboard sharing doesn’t work.
- The previous versions of the drivers were not released through Windows Update.
9.2.1
Released Jun 24, 2021
This set of tools contains the following component versions:
- Installer: 9.2.1
- Management Agent: 9.1.0.10
- xenbus: 9.1.2.14
- xeniface: 9.1.1.11
- xennet: 9.1.1.8
- xenvbd: 9.1.1.8
- xenvif: 9.1.2.16
Note:
This set of drivers was not provided through Windows Update.
This release contains fixes for the following issues:
- In some cases, the Laptop/Slate state of the VM cannot be changed.
- After a VM is restarted it can sometimes begin to send excessive log messages to the daemon.log file.
- A race condition in driver load dependencies after an OS upgrade can prevent the XenServer VM Tools from being upgraded.
- A storage error can cause Windows VMs to crash.
- Sometimes the IP address of an SR-IOV VIF is not visible in XenCenter. To fix the issue, restart the Management Agent from within the VM’s Service Manager.
- Under high network and system load, and low resources, VMs can experience bugchecks in both Citrix and third party drivers, typically with the code IRQL_NOT_LESS_OR_EQUAL. This fix improves network buffering to prevent these bugchecks.
- Upgrading the Windows I/O drivers can cause UEFI VMs to fail to boot, reporting “0xC000000E. A required device isn’t connected or can’t be accessed.””
- An issue can occur when installing the XenServer VM Tools after uninstalling a previous version of the XenServer VM Tools that returns the following error message: “This Device cannot start (code 10) (Operation failed) The requested operation was unsuccessful”.