Overview of the XenServer Management API
This chapter introduces the XenServer Management API (after here referred to as the “API”) and its associated object model. The API has the following key features:
-
Management of all aspects of the XenServer host.
The API allows you to manage VMs, storage, networking, host configuration, and pools. Performance and status metrics can also be queried from the API.
-
Persistent Object Model.
The results of all side-effecting operations (for example: object creation, deletion, and parameter changes) are persisted in a server-side database that is managed by XenServer.
-
An event mechanism.
Through the API, clients can register to be notified when persistent (server-side) objects are changed. This enables applications to track datamodel changes performed by concurrently running clients.
-
Synchronous and asynchronous invocation.
All API calls can be invoked synchronously (that is, block until completion). Any API call that might be long-running can also be invoked asynchronously. Asynchronous calls return immediately with a reference to a task object. This task object can be queried (through the API) for progress and status information. When an asynchronously invoked operation completes, the result (or error code) is available from the task object.
-
Remotable and Cross-Platform.
The client issuing the API calls doesn’t have to be resident on the host being managed. The client also does not have to be connected to the host over ssh to run the API. API calls use the RPC protocol to transmit requests and responses over the network.
-
Secure and Authenticated Access.
The RPC API backend running on the host accepts secure socket connections. This allows a client to run the APIs over the https protocol. Further, all the API calls run in the context of a login session generated through user name and password validation at the server. This provides secure and authenticated access to the XenServer installation.
XenServer Management API Deprecation Policy
Items that will be removed in a future release are marked as deprecated.
By default, deprecated APIs and product functionality continue to be supported up to and including the next XenServer Long Term Service Release (LTSR). Deprecated items are usually removed in releases following that LTSR.
In exceptional cases, an item might be deprecated and removed before the next LTSR. For example, a change might be required to improve security. If this happens, customers are made aware of the change to the API or the product functionality.
This deprecation policy applies only to APIs and functionality that are documented at the following locations:
Getting Started with the API
Let’s start our tour of the API by describing the calls required to create a VM on a XenServer installation, and take it through a start/suspend/resume/stop cycle. This section does not reference code in any specific language. At this stage we just describe the informal sequence of RPC invocations that do our “install and start” task.
Note:
We recommend strongly against using the
VM.createcall, which might be removed or changed in a future version of the API. Read on to learn other ways to make a new VM.
Authentication: acquiring a session reference
The first step is to call Session.login_with_password(username, password, client_API_version, originator). The API is session based, so before you can make other calls you must authenticate with the server. Assuming the user name and password are authenticated correctly, the result of this
call is a session reference. Subsequent API calls take the session
reference as a parameter. In this way, we ensure that only API users who
are suitably authorized can perform operations on a XenServer
installation. You can continue to use the same session for any number of
API calls. When you have finished the session, it is recommended that you call Session.logout(session) to clean up (see section Logging out).
Acquiring a list of templates to base a new VM installation on
The next step is to query the list of “templates” on the host. Templates
are specially marked VM objects that specify suitable default parameters
for various supported guest types. (If you want to see a quick
enumeration of the templates on a XenServer installation for
yourself, you can run the xe template-list CLI command.) To
get a list of templates from the API, find the VM objects on
the server that have their is_a_template field set to true. One way to
do find these objects is by calling VM.get_all_records(session) where the session parameter is the reference we acquired
from our Session.login_with_password call earlier. This call queries the server, returning a
snapshot (taken at the time of the call) containing all the VM object
references and their field values.
(Remember that at this stage we are not concerned with how the returned object references and field values can be manipulated in any particular client language: that detail is dealt with by each language-specific SDK and described concretely in the following chapter. For now, assume the existence of an abstract mechanism for reading and manipulating objects and field values returned by API calls.)
Now we have a snapshot of the VM objects’ field values in the
memory of our client application, iterate through them and
find the VMs that have their is_a_template value set to true. At this
stage, let’s assume that our example application further iterates through
the template objects and remembers the reference corresponding to the
one that has its “name_label” set to “Debian Buster 10” (one of the
default Linux templates supplied with XenServer).
Installing the VM based on a template
Continuing through our example, we must now install a new VM based on the template we selected. The installation process requires two API calls:
-
First we must now invoke the API call
VM.clone(session, t_ref, "my first VM"). This call tells the server to clone the VM object referenced byt_refto make a new VM object. The return value of this call is the VM reference corresponding to the newly created VM. Let’s call thisnew_vm_ref. -
At this stage, the object referred to by
new_vm_refis still a template (like the VM object referred to byt_ref, from which it was cloned). To makenew_vm_refinto a VM object, we must callVM.provision(session, new_vm_ref). When this call returns thenew_vm_refobject will have had itsis_a_templatefield set to false, indicating thatnew_vm_refnow refers to a regular VM ready for starting.
Note:
The provision operation can take a few minutes, as it is during this call that the template’s disk images are created. For the Debian template, the newly created disks are also at this stage populated with a Debian root filesystem.
Taking the VM through a start/suspend/resume/stop cycle
Now we have an object reference representing our newly installed VM, it is trivial to take it through a few lifecycle operations:
-
To start our VM, we can call
VM.start(session, new_vm_ref) -
After it’s running, we can suspend it by calling
VM.suspend(session, new_vm_ref), -
We can resume it by calling
VM.resume(session, new_vm_ref). -
We can call
VM.shutdown(session, new_vm_ref)to shut down the VM cleanly.
Logging out
When an application is finished interacting with a XenServer host,
it is good practice to call Session.logout(session). This call invalidates
the session reference (so it cannot be used in subsequent API calls) and
deallocates server-side memory used to store the session object.
Although inactive sessions eventually time out, the server has a
hardcoded limit of 500 concurrent sessions for each username or
originator. After this limit has been reached, fresh logins evict
the session objects that have been used least recently. The session
references of these evicted session objects become invalid. For successful
interoperability with other applications, concurrently accessing the
server, the best policy is:
-
Choose a string that identifies your application and its version.
-
Create a single session at start-of-day, using that identifying string for the
originatorparameter toSession.login_with_password. -
Use this session throughout the application and then explicitly logout when possible.
Note:
Sessions can be used across multiple separate client-server network connections.
If a poorly written client leaks sessions or otherwise exceeds the
limit, then as long as the client uses an appropriate originator
argument, it is easily identifiable from the XenServer logs.
XenServer destroys the longest-idle sessions of the rogue
client only. This behavior might cause problems for that client but not for other
clients. If the misbehaving client doesn’t specify an originator, it is harder to identify and causes
the premature destruction of other client sessions that also didn’t
specify an originator.
Install and start example: summary
We have seen how the API can be used to install a VM from a XenServer template and perform various lifecycle operations on it. Note that the number of calls we had to make to affect these operations was small:
-
One call to acquire a session:
Session.login_with_password() -
One call to query the VM (and template) objects present on the XenServer installation:
VM.get_all_records(). Recall that we used the information returned from this call to select a suitable template to install from. -
Two calls to install a VM from our chosen template:
VM.clone(), followed byVM.provision(). -
One call to start the resultant VM:
VM.start()(and similarly other single calls to suspend, resume, and shut down accordingly) -
And then one call to log out
Session.logout().
Although the API as a whole is complex and fully featured, common tasks (such as VM lifecycle operations) are straightforward, requiring only a few simple API calls. Keep this fact in mind as you study the next section which might, on first reading, appear a little daunting!
Object Model Overview
This section gives a high-level overview of the object model of the API. For a more detailed description of the parameters and methods of each class, see the XenServer Management API reference.
We start by giving a brief outline of some of the core classes that make up the API. (Don’t worry if these definitions seem abstract in their initial presentation. The textual description in the following sections, and the code-sample walk through in the next section make these concepts concrete.)
VM
A VM object represents a particular Virtual Machine instance on a XenServer host or resource pool. Example methods include start, suspend, pool_migrate. Example parameters include power_state, memory_static_max, and name_label. (In the previous section we saw how the VM class is used to represent both templates and regular VMs).
Host
A host object represents a physical host in a XenServer pool. Example methods include reboot and shutdown. Example parameters include software_version, hostname, and [IP]address.
VDI
A VDI object represents a Virtual Disk Image. Virtual Disk Images can be attached to VMs. A
block device appears inside the VM through which the bits encapsulated by the attached Virtual Disk Image can be read
and written. Example methods of the VDI class include resize and clone. Example fields include
virtual_size and sharable.
When we called VM.provision on the VM template in our previous example, some VDI objects were automatically created to
represent the newly created disks. These VDIs were attached to the VM object.
SR
An SR object (Storage Repository) aggregates a collection of VDIs, It encapsulates the properties of physical storage on which the VDIs’ bits reside. Example parameters include:
-
typewhich determines the storage-specific driver a XenServer installation uses to read/write the SR’s VDIs physical_utilisation
Example methods include
-
scanwhich invokes the storage-specific driver to acquire a list of the VDIs contained with the SR and the properties of these VDIs -
createwhich initializes a block of physical storage so it is ready to store VDIs
Network
A network object represents a layer-2 network that exists in the environment in which the XenServer host instance lives. Since XenServer does not manage networks directly, network is a lightweight class that models physical and virtual network topology. VM and Host objects that are attached to a particular Network object can send network packets to each other. The objects are attached through VIF and PIF instances. For more information, see the following section.
If you are finding this enumeration of classes rather terse, you can skip to the code walk-throughs of the next chapter. There are plenty of useful applications that can be written using only a subset of the classes already described. If you want to continue this description of classes in the abstract, read on.
In addition to the classes listed in the previous section, there are four more that act as connectors. These connectors specify relationships between VMs and Hosts and Storage and Networks. The first two of these classes that we consider, VBD and VIF, determine how VMs are attached to virtual disks and network objects respectively.
VBD
A VBD object (Virtual Block Device) represents an attachment between a VM and a VDI. When a VM is booted, its VBD objects are queried to determine which disk images (VDIs) to attach.
Example methods of the VBD class include:
-
plugwhich hot plugs a disk device into a running VM, making the specified VDI accessible therein -
unplugwhich hot unplugs a disk device from a running guest
Example fields include:
-
devicewhich determines the device name inside the guest under which the specified VDI is made accessible
VIF
A VIF object (Virtual Network Interface) represents an attachment between a VM and a Network object. When a VM is booted, its VIF objects are queried to determine which network devices to create.
Example methods of the VIF class include:
-
plugwhich hot plugs a network device into a running VM -
unplugwhich hot unplugs a network device from a running guest
The second set of “connector classes” that we consider determine how Hosts are attached to Networks and Storage.
PIF
A PIF object (Physical Interface) represents an attachment between a Host and a Network object. If a host is connected to a Network over a PIF, packets from the specified host can be transmitted/received by the corresponding host. Example fields of the PIF class include:
-
devicewhich specifies the device name to which the PIF corresponds. For example, eth0 -
MACwhich specifies the MAC address of the underlying NIC that a PIF represents
PIFs abstract both physical interfaces and VLANs (the latter distinguished by the existence of a positive integer in the “VLAN” field).
PBD
A PBD object (Physical Block Device) represents an attachment between a Host and an SR object. Fields include:
-
currently-attachedwhich specifies whether the chunk of storage represented by the specified SR object is available to the host -
device_configwhich specifies storage-driver specific parameters that determine how the low-level storage devices are configured on the specified host. For example, when an SR rendered on an NFS filer, device_config can specify the host-name of the filer and the path on the filer in which the SR files live.
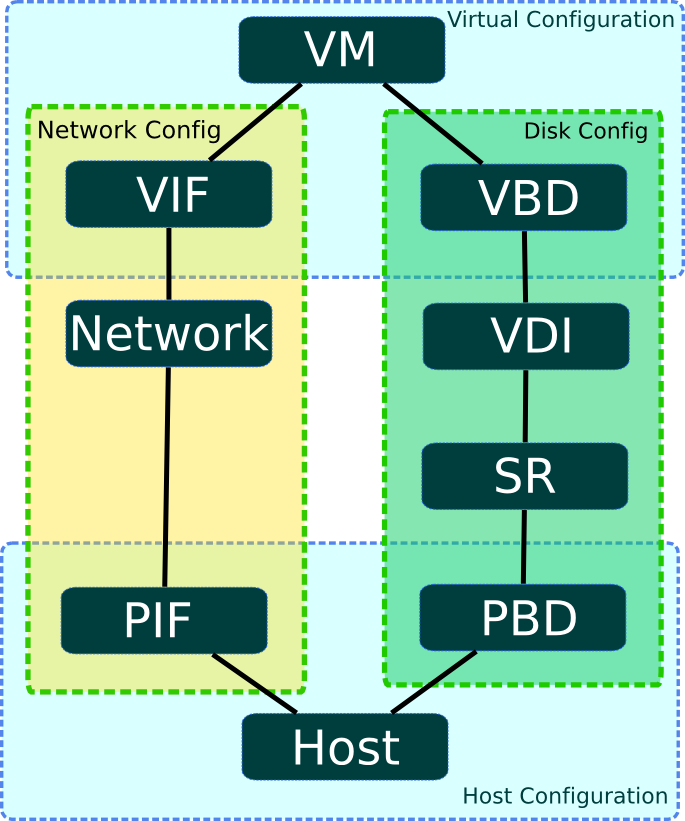
This figure presents a graphical overview of the API classes involved in managing VMs, Hosts, Storage, and Networking. From this diagram, the symmetry between storage and network configuration, and also the symmetry between virtual machine and host configuration is plain to see.
Working with VIFs and VBDs
In this section we walk through a few more complex scenarios. These scenarios describe how various tasks involving virtual storage and network devices can be done using the API.
Creating disks and attaching them to VMs
Let’s start by considering how to make a new blank disk image and attach
it to a running VM. We assume that we already have a
running VM, and we know its corresponding API object reference. For example, we
might have created this VM using the procedure described in the previous
section and had the server return its reference to us.
We also assume that we have authenticated with the XenServer installation
and have a corresponding session reference. Indeed, the rest of this chapter, for the sake of brevity, does not mention sessions altogether.
Creating a new blank disk image
First, instantiate the disk image on physical storage by calling VDI.create().
The VDI.create call takes a number of parameters, including:
-
name_labelandname_description: a human-readable name/description for the disk (for example, for convenient display in the UI). These fields can be left blank if desired. -
SR: the object reference of the Storage Repository representing the physical storage in which the VDI’s bits are placed. -
read_only: setting this field to true indicates that the VDI can only be attached to VMs in a read-only fashion. (Attempting to attach a VDI with itsread_onlyfield set to true in a read/write fashion results in error.)
Invoking the VDI.create call causes the XenServer installation to
create a blank disk image on physical storage, create an associated VDI
object (the datamodel instance that refers to the disk image on physical
storage) and return a reference to this newly created VDI object.
The way in which the disk image is represented on physical storage
depends on the type of the SR in which the created VDI resides. For
example, if the SR is of type “lvm” then the new disk image will be
rendered as an LVM volume; if the SR is of type “nfs” then the new disk
image will be a sparse VHD file created on an NFS filer. (You can query
the SR type through the API using the SR.get_type() call.)
Note:
Some SR types might round up the
virtual-sizevalue to make it divisible by a configured block size.
Attaching the disk image to a VM
So far we have a running VM (that we assumed the existence of at the start of this example) and a fresh VDI that we just created. Right now, these are both independent objects that exist on the XenServer Host, but there is nothing linking them together. So our next step is to create such a link, associating the VDI with our VM.
The attachment is formed by creating a new “connector” object called a
VBD (Virtual Block Device). To create our VBD we invoke the
VBD.create() call. The VBD.create() call takes a number of parameters including:
-
VM- the object reference of the VM to which the VDI is to be attached -
VDI- the object reference of the VDI that is to be attached -
mode- specifies whether the VDI is to be attached in a read-only or a read-write fashion -
userdevice- specifies the block device inside the guest through which applications running inside the VM will be able to read/write the VDI’s bits. -
type- specifies whether the VDI is presented inside the VM as a regular disk or as a CD. (Note that this particular field has more meaning for Windows VMs than it does for Linux VMs, but we will not explore this level of detail in this chapter.)
Invoking VBD.create makes a VBD object on the XenServer
installation and returns its object reference. However, this call in
itself does not have any side-effects on the running VM (that is, if you
go and look inside the running VM you will see that the block device has
not been created). The fact that the VBD object exists but that the
block device in the guest is not active, is reflected by the fact that
the VBD object’s currently_attached field is set to false.
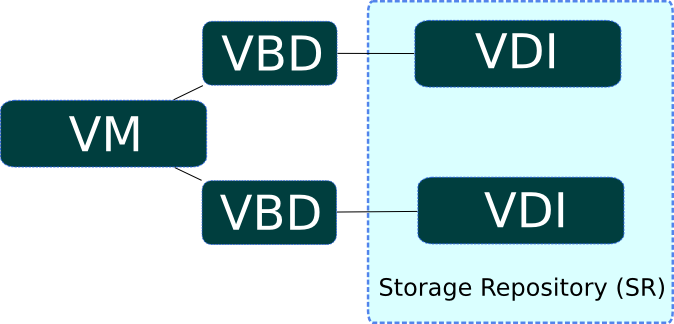
For expository purposes, this figure presents a graphical example that shows the relationship between VMs, VBDs, VDIs and SRs. In this instance a VM object has 2 attached VDIs: there are two VBD objects that form the connections between the VM object and its VDIs; and the VDIs reside within the same SR.
Hotplugging the VBD
If we rebooted the VM at this stage then, after rebooting, the block device corresponding to the VBD would appear: on boot, XenServer queries all VBDs of a VM and actively attaches each of the corresponding VDIs.
Rebooting the VM is all very well, but recall that we wanted to attach a
newly created blank disk to a running VM. This can be achieved by
invoking the plug method on the newly created VBD object. When the
plug call returns successfully, the block device to which the VBD
relates will have appeared inside the running VM – i.e. from the
perspective of the running VM, the guest operating system is led to
believe that a new disk device has just been hot plugged. Mirroring
this fact in the managed world of the API, the currently_attached field of the VBD is set to true.
Unsurprisingly, the VBD plug method has a dual called “unplug”.
Invoking the unplug method on a VBD object causes the associated block
device to be hot unplugged from a running VM, setting the
currently_attached field of the VBD object to false accordingly.
Creating and attaching Network Devices to VMs
The API calls involved in configuring virtual network interfaces in VMs are similar in many respects to the calls involved in configuring virtual disk devices. For this reason we will not run through a full example of how one can create network interfaces using the API object-model; instead we will use this section just to outline briefly the symmetry between virtual networking device and virtual storage device configuration.
The networking analogue of the VBD class is the VIF class. Just as a VBD
is the API representation of a block device inside a VM, a VIF (Virtual
network InterFace) is the API representation of a network device inside
a VM. Whereas VBDs associate VM objects with VDI objects, VIFs associate
VM objects with Network objects. Just like VBDs, VIFs have a
currently_attached field that determines whether or not the network
device (inside the guest) associated with the VIF is currently active or
not. And as we saw with VBDs, at VM boot-time the VIFs of the VM are
queried and a corresponding network device for each created inside the
booting VM. Similarly, VIFs also have unplug and unplug methods for hot plugging/unplugging network devices in/out of
running VMs.
Host configuration for networking and storage
We have seen that the VBD and VIF classes are used to manage configuration of block devices and network devices (respectively) inside VMs. To manage host configuration of storage and networking there are two analogous classes: PBD (Physical Block Device) and PIF (Physical [network] Interface).
Host storage configuration: PBDs
Let us start by considering the PBD class. A PBD.create() call takes a
number of parameters including:
| Parameter | Description |
|---|---|
| host | physical machine on which the PBD is available |
| SR | the Storage Repository that the PBD connects to |
| device_config | a string-to-string map that is provided to the host’s SR-backend-driver, containing the low-level parameters required to configure the physical storage device(s) on which the SR is to be realized. The specific contents of the device_config field depend on the type of the SR to which the PBD is connected. (Running xe sm-list will show a list of possible SR types; the configuration field in this enumeration specifies the device_config parameters that each SR type expects.) |
For example, imagine we have an SR object s of type “nfs”
(representing a directory on an NFS filer within which VDIs are stored
as VHD files); and let’s say that we want a host, h, to be able to
access s. In this case we invoke PBD.create() specifying host h, SR s, and a value for the device_config parameter that is the following map:
("server", "my_nfs_server.example.com"), ("serverpath", "/scratch/mysrs/sr1")
This tells the XenServer host that SR s is accessible on host
h, and further that to access SR s, the host needs to mount the
directory /scratch/mysrs/sr1 on the NFS server named my_nfs_server.example.com.
Like VBD objects, PBD objects also have a field called currently_attached. Storage repositories can be attached
and detached from a given host by invoking PBD.plug and PBD.unplug
methods respectively.
Host networking configuration: PIFs
Host network configuration is specified by virtue of PIF objects. If a PIF object connects a network object, n, to a host object h, then the network corresponding to n is bridged onto a physical interface (or a physical interface plus a VLAN tag) specified by the fields of the PIF object.
For example, imagine a PIF object exists connecting host h to a
network n, and that device field of the PIF object is set to eth0.
This means that all packets on network n are bridged to the NIC in the
host corresponding to host network device eth0.
Importing and Exporting VMs
VMs can be exported to a file and later imported to any XenServer host. Because the import and export operations can take some time to complete, they are performed using an asynchronous HTTP(S) interface exposed by XenServer.
XenServer supports a VM input format called XVA. This is a format specific to Xen-based hypervisors and packages a single VM as a single file archive consisting of a metadata descriptor file and disk images.
Detailed information on how to use the HTTP(S) interface to import and export VMs, and a description of the XVA file format can be found in chapter Using HTTP to interact with XenServer.
Note:
Single VMs and virtual appliances (vApps) of multiple VMs can be exported to and imported from OVF/OVA packages using XenCenter. For more details visit chapter Importing and Exporting VMs of XenCenter’s documentation.
Where to look next
In this chapter we have presented a brief high-level overview of the API and its object-model. The aim here is not to present the detailed semantics of the API, but just to provide enough background for you to start reading the code samples of the next chapter and to find your way around the more detailed XenServer Management API reference.
There are a number of places you can find more information:
-
The Command line interface documentation contains an overview of the
xeCLI. Since a good deal ofxecommands are a thin veneer over the API, playing withxeis a good way to start finding your way around the API object model described in this chapter. -
The code samples in the next chapter provide some concrete instances of API coding in a variety of client languages.
-
The XenServer Management API reference provides a more detailed description of the API semantics as well as the wire protocol of the RPC messages.
-
There are a few scripts that use the API in the XenServer host dom0 itself under
/opt/xensource/libexec/. -
There is a number of examples for each of the SDK languages at XenServer SDK usage examples on GitHub. These include ready-to-run programs demonstrating operations like creating a VM and taking it through a start/suspend/resume/stop cycle, monitoring events, creating a shared SR, migrating a VM between servers in a pool, etc.