Push notification for OTP
NetScaler Gateway supports push notifications for OTP. Users do not have to manually enter the OTP received on their registered devices to log in to NetScaler Gateway. Admins can configure NetScaler Gateway such that login notifications are sent to users’ registered devices using push notification services. When users receive the notification, they have to simply tap Allow on the notification to log in to NetScaler Gateway. When the gateway receives acknowledgment from the user, it identifies the source of the request, and sends a response to that browser connection.
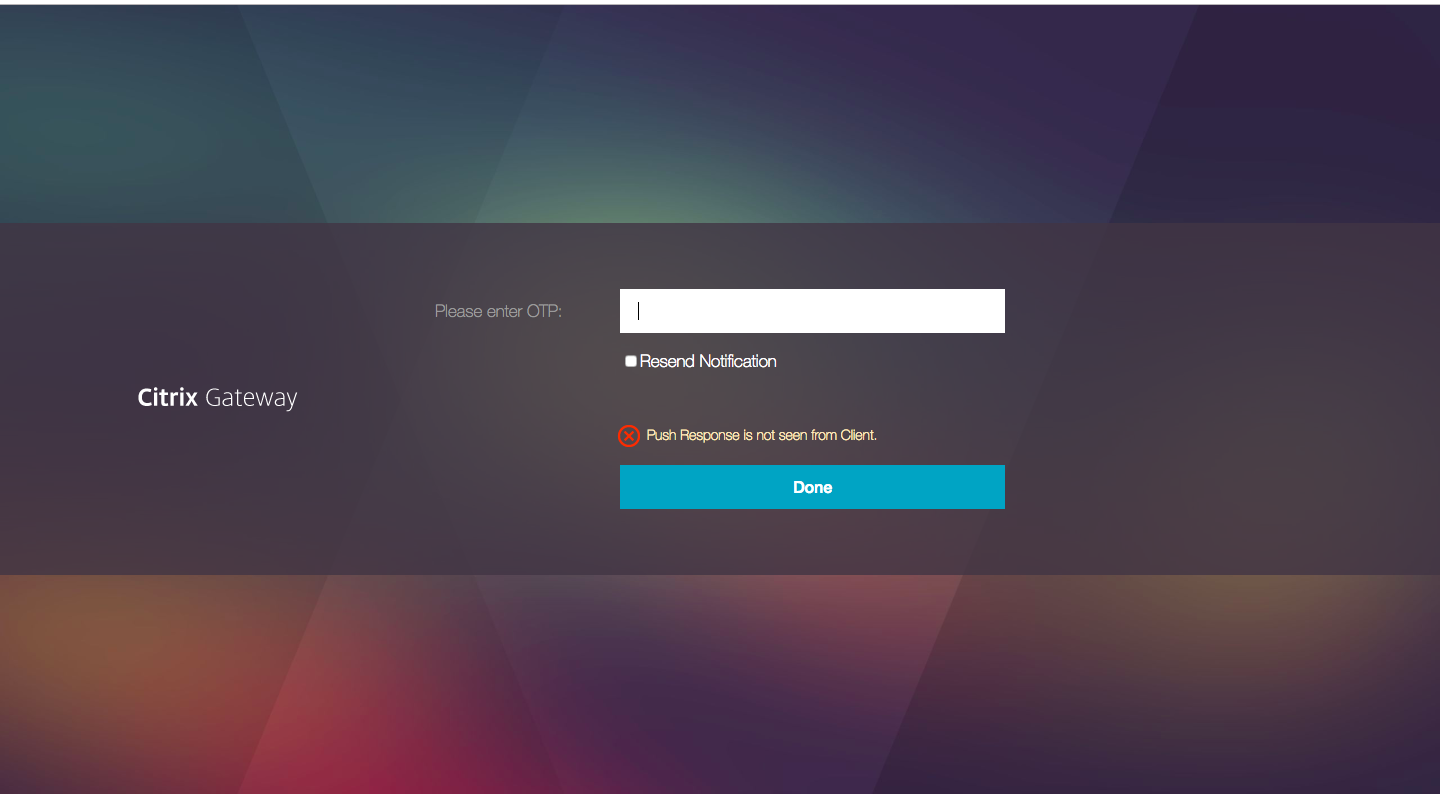
If the notification response is not received within the timeout period (30 seconds), users are redirected to the NetScaler Gateway login page. The users can then enter the OTP manually or click Resend Notification to receive the notification again on the registered device.
Admins can make push notification authentication as the default authentication by using the login schemas created for push notification.
Important:
Push notification feature is available with a NetScaler Premium edition license.
Advantages of push notifications
- Push notifications provide a more secure multifactor authentication mechanism. Authentication to NetScaler Gateway is not successful until the user approves the login attempt.
- Push notification is easy to administer and use. Users have to download and install the Citrix SSO mobile app that does not require any administrator assistance.
- Users do not have to copy or remember the code. They have to simply tap on the device to get authenticated.
- Users can register multiple devices.
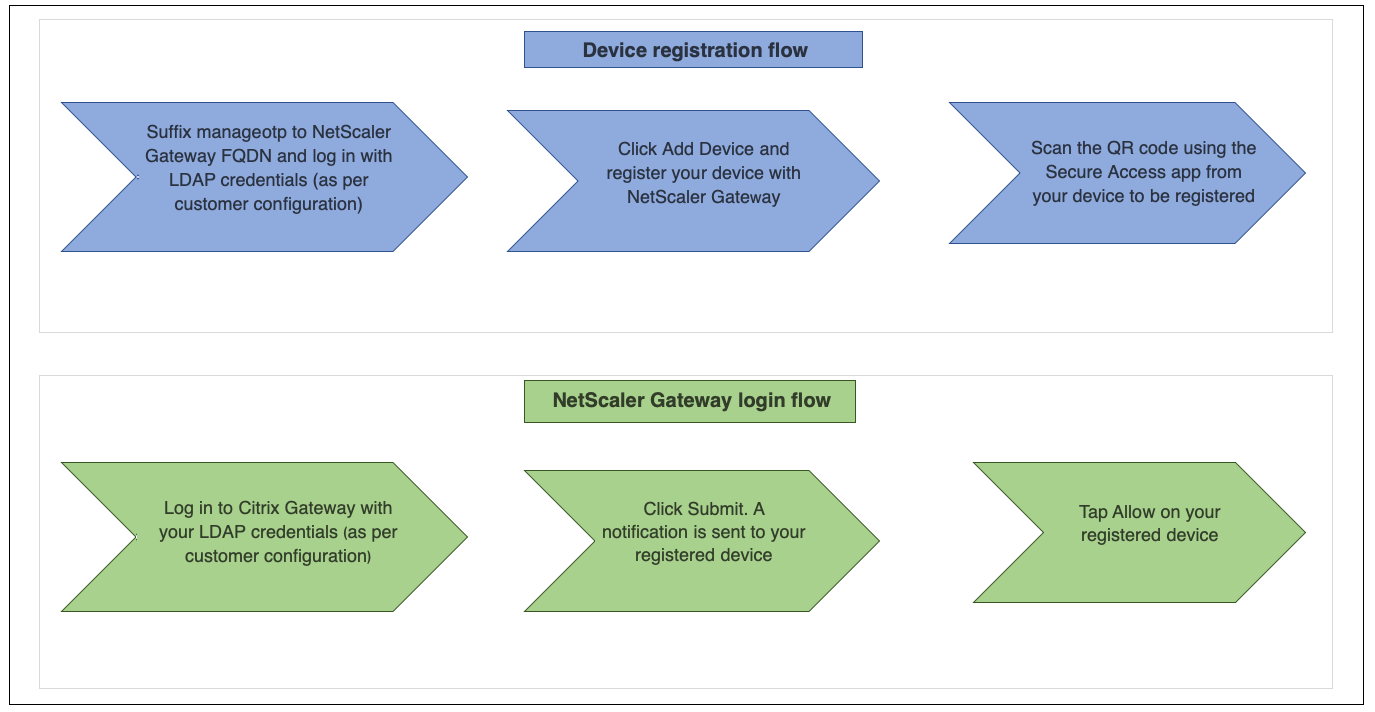
How push notifications work
The push notification workflow can be classified into two categories:
- Device registration
- End user login
Prerequisites for using push notification
-
Complete the Citrix Cloud onboarding process.
-
Create a Citrix Cloud company account or join an existing one. For detailed processes and instructions on how to proceed, see Create a Citrix Cloud account.
-
Log in to https://citrix.cloud.com, and select the customer.
-
From the menu, select Identity and Access Management and then navigate to the API Access tab to create a client for the account.
-
Copy the ID, secret, and customer ID. The ID and secret are required to configure the push service in NetScaler as “ClientID” and “ClientSecret” respectively.
-
Important:
- The same API credentials can be used on multiple data centers.
- On-premises NetScaler appliances must be able to resolve server addresses mfa.cloud.com and trust.citrixworkspacesapi.net and are accessible from the appliance. This is to ensure that there are no firewalls or IP address blocks for these servers over port 443.
- The Citrix Cloud administrator account requires full access permission to use the push notification OTP service. For details on granting full access permission to the administrator, see Manage administrator access to Citrix Cloud.
-
Download the Citrix SSO mobile app from the App Store and Play Store for iOS devices and Android devices respectively. Push notification is supported on iOS from build 1.1.13 on Android from 2.3.5.
-
Ensure the following for the Active Directory.
- The minimum attribute length must be at least 256 characters.
- The attribute type must be ‘DirectoryString’ that can store string values (for example, UserParameters).
- Attribute string type must be Unicode, if the device name is in non-English characters.
- NetScaler LDAP administrator must have write access to the selected AD attribute.
- NetScaler and the client machine must be synchronized to a common Network Time Server.
Push notification configuration
The following are the high-level steps that must be completed to use the push notification functionality.
-
The NetScaler Gateway administrator must configure the interface to manage and validate users.
-
Configure a push service.
-
Configure NetScaler Gateway for OTP management and end user login.
Users must register their devices with the gateway for logging in to NetScaler Gateway.
-
Register your device with NetScaler Gateway.
-
Log in to NetScaler Gateway.
-
Create a push service
-
Navigate to Security > AAA-Application Traffic > Policies > Authentication > Advanced Policies > Actions > Push Service and click Add.
-
In Name, enter the name of the push service.
-
In Client ID, enter the unique identity of the relying party for communicating with the NetScaler Push server in the cloud.
-
In Client Secret, enter the unique secret of the relying party for communicating with the NetScaler Push server in the cloud.
-
In Customer ID, enter the customer ID or name of the account in the cloud that is used to create the Client ID and the Client Secret pair.
Important
The TLS 1.2 version is required for push service.
Configure NetScaler Gateway for OTP management and end user login
Complete the following steps for OTP management and end user login.
- Create login schema for OTP management
- Configure authentication, authorization, and auditing virtual server
- Configure VPN or load balancing virtual servers
- Configure policy label
- Create login schema for end user login
For details on configuration, see Native OTP support.
Important: For push notification, admins must explicitly configure the following:
- Create a push service.
- While creating a login schema for OTP management, select the SingleAuthManageOTP.xml login schema or equivalent as per the need.
- While creating a login schema for end user login, select the DualAuthOrPush.xml login schema or equivalent as per the need.
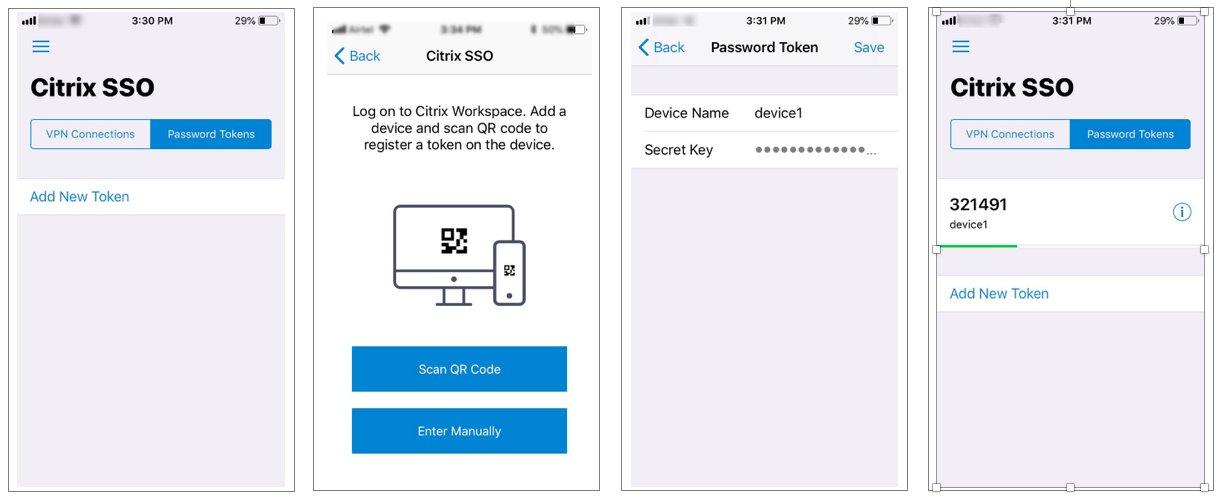
Register your device with NetScaler Gateway
Users must register their devices with NetScaler Gateway to use the push notification functionality.
-
In your web browser, browse to your NetScaler Gateway FQDN, and suffix /manageotp to the FQDN.
This loads the authentication page. Example: https://gateway.company.com/manageotp
-
Log in using your LDAP credentials or appropriate two-factor authentication mechanisms, as required.

-
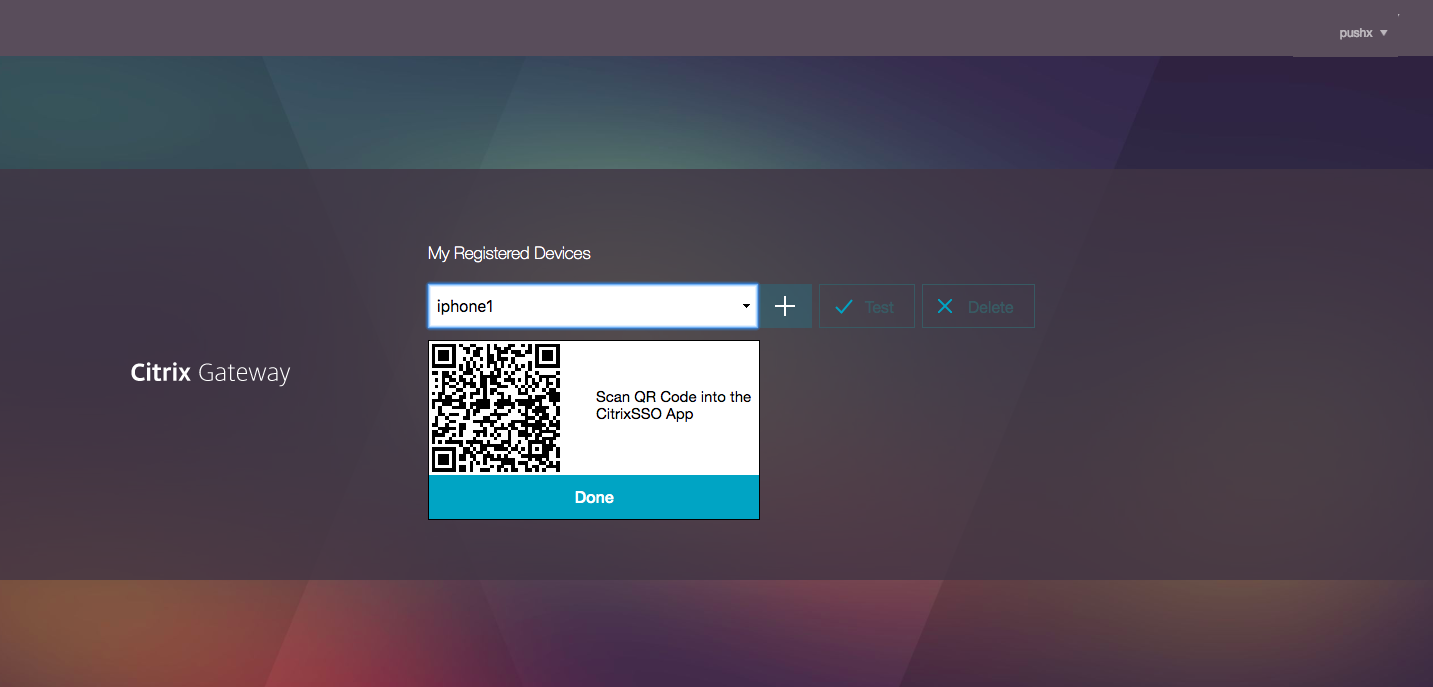
Click Add Device.
-
Enter a name for your device, then click Go.
A QR code is displayed on the NetScaler Gateway browser page.
-
Scan this QR code using the Citrix SSO app from the device to be registered.
Citrix SSO validates the QR code and then registers with the gateway for push notifications. If there are no errors in the registration process, the token is successfully added to the password tokens page.
Important:
The login fails if you manually enter the secret key provided in the QR code.
-
If there are no additional devices to add/manage logout using the list at the top right corner of the page.
Test one-time password authentication
-
To test the OTP, click your device from the list and then click Test.
-
Enter the OTP that you have received on your device and click Go.
The OTP verification successful message appears.
-
Log out using the list at the top right corner of the page.
Note: You can use the OTP management portal anytime to test authentication, remove registered devices, or register more devices.
Log in to NetScaler Gateway
After registering their devices with NetScaler Gateway, users can use the push notification functionality for authentication.
-
Navigate to your NetScaler Gateway authentication page (for example: https://gateway.company.com)
You are prompted to enter only your LDAP credentials depending on the login schema configuration.
-
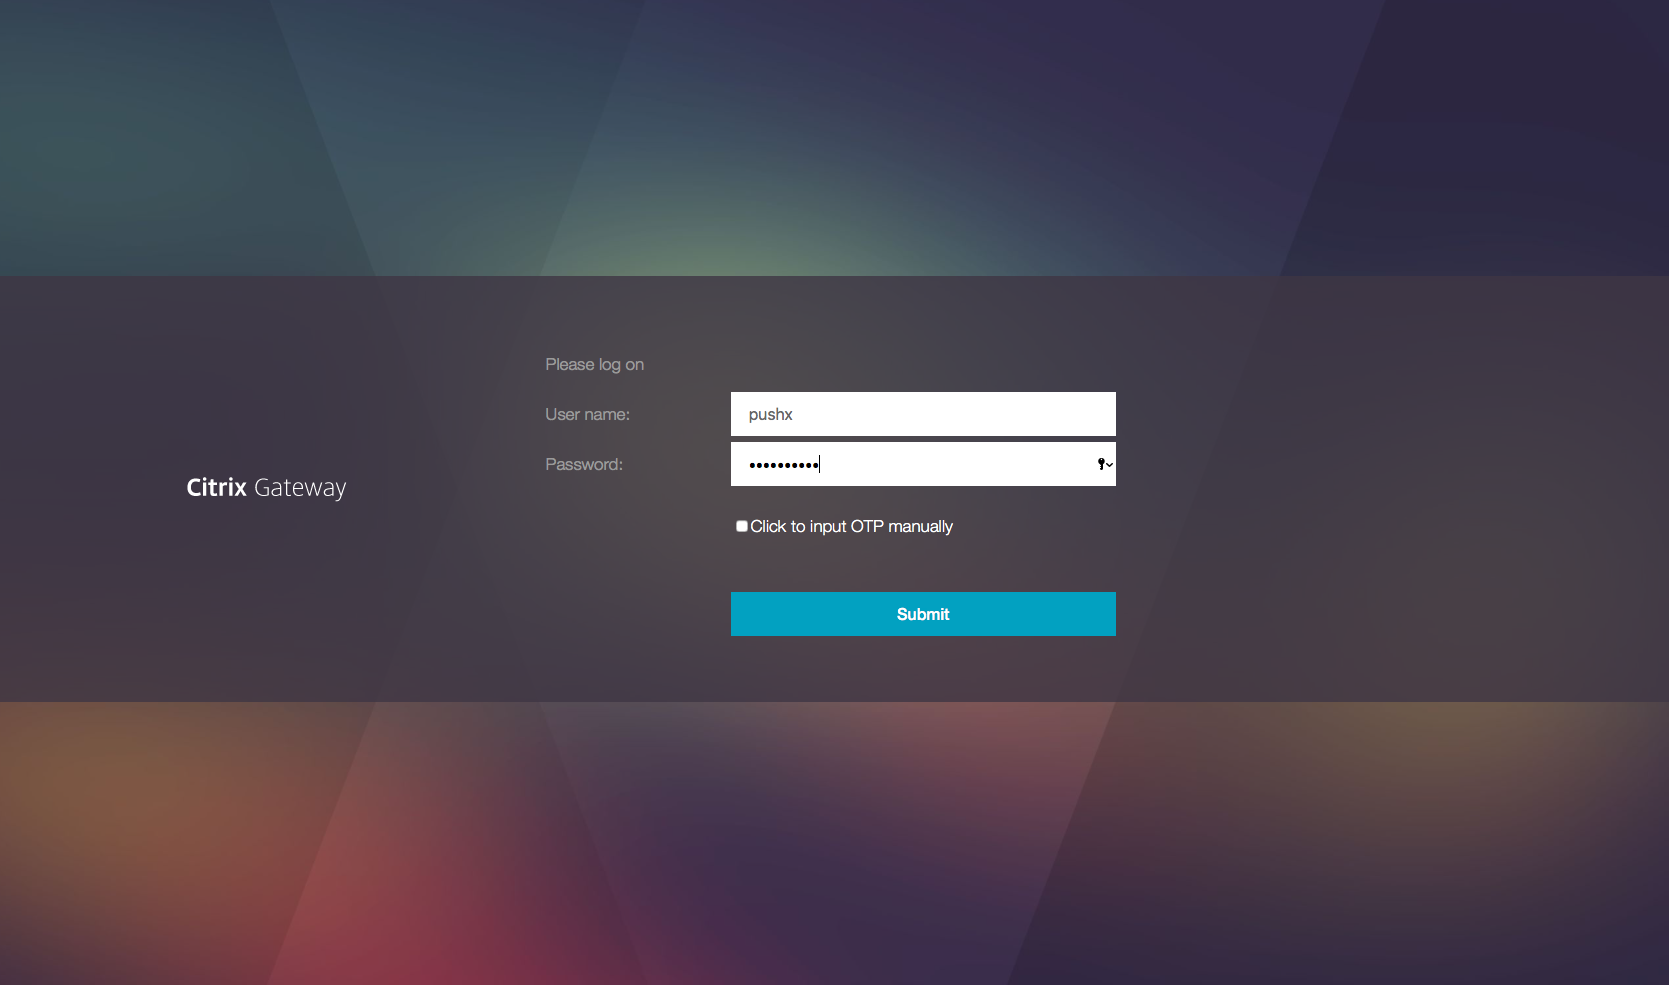
Enter your LDAP user name and password, then select Submit.
A notification is sent to your registered device.
Note: If you want to enter the OTP manually, you must select Click to input OTP manually and enter the OTP in the TOTP field.
-
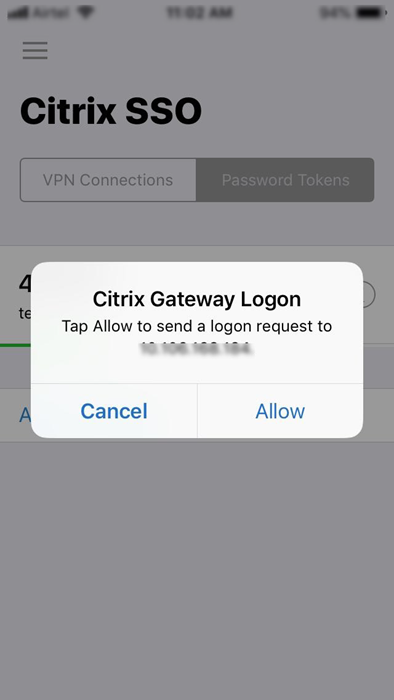
Open the Citrix SSO app on your registered device and tap Allow.
Note:
-
In an iOS device, you are prompted for Touch-ID/Face-ID/Passcode as an extra factor of authentication.
-
The authentication server waits for the push server notification response until the configured timeout period expires. After the timeout, NetScaler Gateway displays the login page. The users can then enter the OTP manually or click Resend Notification to receive the notification again on the registered device. Based on your selected option, the gateway validates the OTP that you have entered or resends the notification on your registered device.
- No notification is sent to your registered device regarding login failure.
-
Failure conditions
- The device registration might fail in the following cases.
- The server certificate might not be trusted by the end-user device.
- NetScaler Gateway used to register for OTP is not reachable by the client.
- The notifications might fail in the following cases.
- The user device is not connected to the internet
- Notifications on the user device are blocked
- The user does not approve the notification on the device
In these cases, the authentication server waits until the configured timeout period expires. After the timeout, the NetScaler Gateway displays a login page with the options to manually enter the OTP or to resend the notification again on your registered device. Based on the selected option, further validation occurs.
Failure logs
The following are the expected logs when the OTP push service is not reachable.
- Push notification failure when the user device is not connected to the internet - Push: Failed to prepare Push Request to “
client name” for Push service. - Device registration failure log - Push: No devices are registered to send Push Request to cloud for “
client name”. - In case the user does not accept the push - Push: Response is not seen from client, for “
user name”, checking retry options.
Citrix SSO app behavior on iOS – points to note
Notification shortcuts
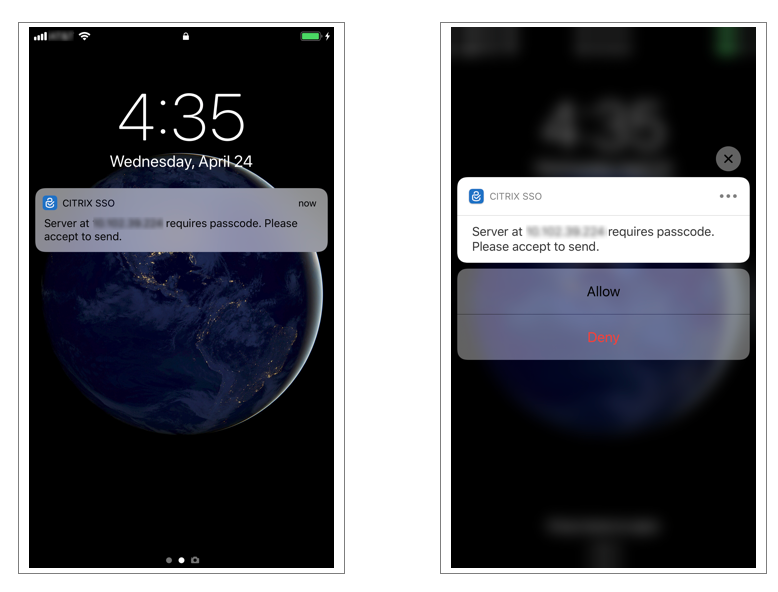
Citrix SSO iOS app includes support for actionable notifications to enhance user experience. Once a notification is received on an iOS device, and if the device is locked or the Citrix SSO app is not in the foreground, users can use the shortcuts built into the notification to either approve or deny the login request.
To access notification shortcuts, users need to either force touch (3D touch) or long press the notification depending on the device’s hardware. Selecting the Allow shortcut action sends a login request to NetScaler. Depending on how the authentication policy is configured on the authentication, authorization, and auditing virtual server;
- The login request might be sent in the background without any need to launch the app into the foreground or unlock the device.
- The app might prompt for Touch-ID/Face-ID/Passcode as an extra factor in which case the app is launched into the foreground.
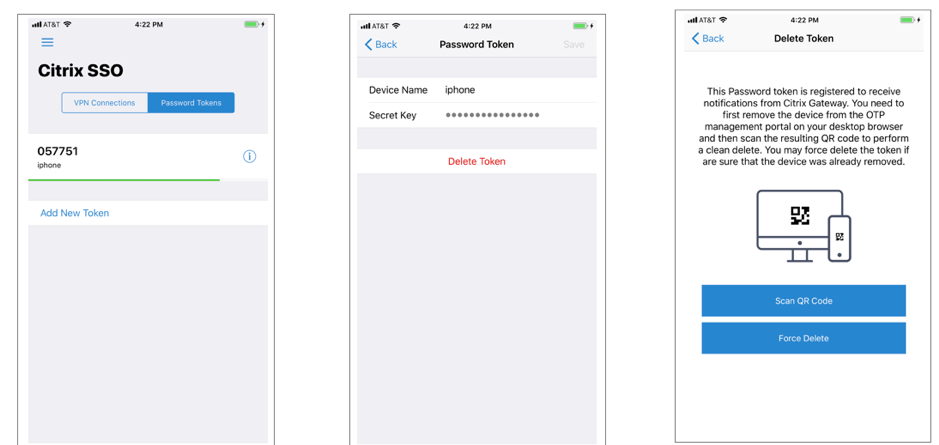
Deleting password tokens from Citrix SSO
-
To delete a password token registered for push in the Citrix SSO app, users must perform the following steps:
- Unregister (remove) the iOS/Android device on the gateway. A QR code for removing registration from the device appears.
- Open the Citrix SSO app and tap the info button of the password token to be deleted.
- Tap Delete Token and scan the QR code.
Note:
- If the QR code is valid, the token is successfully removed from the Citrix SSO app.
- Users can tap Force Delete to delete a password token without having to scan the QR code if the device is already removed from the gateway. Force deleting might result in the device continuing to receive notifications if the device has not been removed from NetScaler Gateway.