Prepare your OS image for layering in XenServer, Hyper-V, or vSphere
Before you start, ensure that you meet the requirements. While preparing the image, you can Expedite a Microsoft Ngen.exe operation, if necessary, if you think it is taking too long.
If using Windows 10, you can speed up desktop start times as long as you are not running Citrix Provisioning, machine creation, or VMware View. In this situation, you can remove Windows 10 built-in applications. We recommend removing the apps on a new version of the OS layer, rather than in the OS image itself.
Note:
XenServer supports UEFI-based machines after a new XenServer connector was added.
Install the OS on a virtual machine
It is crucial to start with an OS freshly installed from ISO, preferably from your hypervisor.
In this procedure, be sure to follow steps and notes specific to the Windows version you are installing.
- Log in to your hypervisor client.
-
Create a virtual machine with the correct CPU, RAM, hard drive, and network settings for your operating system type. Guidance:
- XenServer virtual machine: Ensure that only one network is selected.
-
vSphere virtual machine:
- Network: (Required) Select the VMXNET 3 network adapter.
Important:
You can have one, and only one, network device, and the E1000 NIC must never have been used. The default E1000 adapter (or even a ghost NIC leftover from an E1000 adapter) can cause customization timeout errors on the virtual machines.
- Thin Provision: Select Thin Provision.
-
All hypervisors:
- Hard drive: Ensure that the appliance can access the hard drive that you create.
- Attach the ISO and install the operating system. This machine must not be joined to the domain. Domain join must be done in the Platform layer, and any domain group membership changes must be done through Group Policy.
-
Install the hypervisor tools for the platform where you plan to package layers. If you support multiple hypervisors, put the tools for the hypervisor you plan to use for publishing images in the Platform layer.
- For Hyper-V: Use the Microsoft Windows Integration Services Setup Disk to install Hyper-V Integration Services.
If using a Server OS, install the Remote Desktop Session Host feature
When using a Windows Server, you need to install the Remote Desktop Session Host feature. When the Remote Desktop Session Host role is installed in the OS layer, it is updated as part of Windows. You can install the role on the platform layer with the VDA instead if you prefer.
If you install RDS in the OS layer, you need to use local GPOs to define the RDS license servers. Otherwise, over time, you will lose the ability to log in to packaging machines.
To install the Session Host feature:
- In the Server Manager, select Add roles and features.
- For the Installation Type, select Role-based or Feature-based installation.
- For the Server role, select Remote Desktop Services > Remote Desktop Session Host (Installed). This installs the C++ library and the RDS role.
- Complete the process of adding the Server Roles.
Ensure the correct versions of .NET Framework are installed (Windows 10 and Windows Server 2016)
The .NET Framework is a software framework provided by Microsoft, and it is required for many third-party applications to run. Any installation of the .NET Framework must be included in the OS layer. This includes .NET 3.5 and .NET 4.0 or later.
Note:
Citrix Virtual Apps and Desktops (CVAD) 2303 requires .NET version 4.8 to add VDAs.
Be sure to install the .NET Framework and any updates on your OS layer.
Install Windows updates
Be sure to install all Windows updates.
- Install all important updates.
- Check for updates again after the virtual machine is rebooted. Some updates became available only after others are installed.
- Install all required service packs:
- If using Windows 2008 with Citrix Provisioning, install Windows Server 2008 R2 Service Pack 1 (SP1).
Note:
If KB3125574 is installed, uninstall it before installing this service pack.
- If using Windows 2008 with Citrix Provisioning, install Windows Server 2008 R2 Service Pack 1 (SP1).
- Clear Windows Automatic Updates and disable Windows System Restore using the local group policy editor,
gpedit.msc. The system handles restore points for you. Layer versions allow you to specify when updates occur. -
Windows 10: Clear Hibernation by entering this command:
powercfg.exe /hibernate off <!--NeedCopy--> - Enable the built-in administrator and select Password never expires.
-
If using Key Management Service (KMS) licensing, run a command window as Administrator, and enter these commands:
slmgr /skms <kmsserverhost> slmgr /rearm reboot slmgr /ipk XXXX-YOUR-KMS-KEY-XXXX slmgr /ato <!--NeedCopy--> -
If using a server OS, run the following commands in PowerShell:
Set-ExecutionPolicy Unrestricted
Enable-PSRemoting
<!--NeedCopy-->
Expedite a Microsoft Ngen.exe operation, if necessary
Once all software updates have been installed, you must allow Ngen.exe to essentially recompile .NET byte code into native images and construct the registry entries to manage them.
Ngen.exe is the Microsoft Native Image Generator, which is part of the .NET system. Windows determines when to run Ngen.exe based on what software is being installed and what Windows detects in the configuration.
Important:
When
Ngen.exeis running, you must let it complete. An interruptedNgen.exeoperation can leave you with non-functioning.NETassemblies or other problems in the.NETsystem.
Normally, Ngen.exe is a background operation that pauses when there is a foreground activity. If you want to expedite an Ngen.exe operation, you can bring the task into the foreground to complete it as quickly as possible.
To bring the task into the foreground:
- Open a command prompt as Administrator.
-
Go to the
Microsoft.NET\Frameworkdirectory for the version currently in use:cd C:\Windows\Microsoft.NET\FrameworkNN\vX.X.XXXXX <!--NeedCopy--> -
Enter the following
Ngen.execommand to run all queued items. This command processes queued component installs before building assemblies.ngen eqi 3 <!--NeedCopy-->Note:
This variation of the
ngencommand has been tested and is the variation that works in this situation in App Layering.The
Ngen.exetask moves to the foreground in the command prompt and lists the assemblies being compiled. It is OK if you see compilation messages.You can use the Task Manager to see if an instance of
MSCORSVW.EXEis running. If it is, allow it to complete, or runngen eqi 3.Warning:
Do not reboot to stop the task. Allow the task to complete!
- Ensure that all
Ngen.exeprocesses have run to completion.
Run the App Layering OS Machine Tools on the image
To prepare the OS image to run in a layer, you run the OS Machine Tools file on the image. This executable runs a GPO setup script (gposetup.cmd), and a script to set the Key Management Service (KMS) version. The script is called SetKMSVersion.hta.
- Download the following zip file onto the OS image: App_Layering_Citrix_App_Layering_OS_Machine_Tools_20.x.zip
-
Extract the files to:
c:\windows\setup\scripts
<!--NeedCopy-->
Note:
The file must be extracted to the directory. Do not change the directory.
If using KMS, configure license activation
Once the Key Management Service (KMS) scripts are extracted, the SetKMSVersion utility asks you to choose whether to use KMS licensing.
Note:
Publishing images into environments where both KMS and Active Directory-based activation (ADBA) are being used at the same time causes problems with activation.
-
In the dialog box that appears, select whether to use Key Management Service (KMS) licensing.
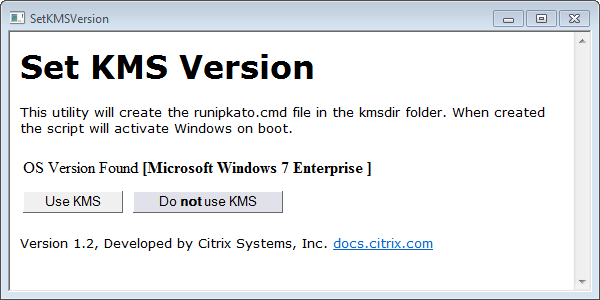
To configure scripts for KMS, do the following.
-
Go to:
c:\windows\setup\scripts -
Run SetKMSVersion.hta as Administrator to create a script in the
c:\windows\setup\scripts\kmsdir folder.
When the operating system starts, the appropriate KMS activation script is run.
Install the App Layering services
- In the
c:\windows\setup\scriptsfolder, run the setup_x86.exe (32-bit) or setup_x64.exe (64-bit).
You are ready to import the image into a new OS layer.
Note:
Ensure that the image preparation tools installer is run once before the OS has been imported. Don’t run the image preparation tools installer after the OS is imported as this might cause unknown issues.
In this article
- Install the OS on a virtual machine
- If using a Server OS, install the Remote Desktop Session Host feature
- Ensure the correct versions of .NET Framework are installed (Windows 10 and Windows Server 2016)
- Install Windows updates
- Expedite a Microsoft Ngen.exe operation, if necessary
- Run the App Layering OS Machine Tools on the image
- If using KMS, configure license activation
- Install the App Layering services