Create catalogs and add users
When used for published desktops and apps, a catalog is a group of identical virtual machines. When you deploy desktops, the machines in the catalog are shared with selected users. When you publish applications, multi-session machines host applications that are shared with selected users.
Machine types
A catalog can contain one of the following types of machines:
-
Static: The catalog contains single-session static machines (also known as personal, dedicated, or persistent desktops). Static means that when a user starts a desktop, that desktop “belongs” to that user. Any changes that that user makes to the desktop are retained at logoff. Later, when that user returns to and starts a desktop, it is the same virtual machine.
- Associated personas: Knowledge worker, Power worker, and custom persona.
-
Random: The catalog contains single-session random machines (also known as non-persistent or pooled desktops). Random means that when a user starts a desktop, any changes that that user makes to that desktop are discarded after logoff. Later, when that user returns to Citrix Workspace and starts a desktop, it might or might not be the same desktop.
- Associated personas: Knowledge worker, Power worker, and custom persona.
-
Multi-session: The catalog contains machines that deliver apps, desktops, or both. More than one user can access each of those machines simultaneously. Users can launch a desktop or apps from their workspace.
- Associated personas: Task worker (medium) (8 users per VM), Task worker (heavy) (4 users per VM), and custom persona.
When deploying desktops, the static and random machine types are sometimes called desktop types.
Create a catalog
- From the Citrix DaaS Flex dashboard, click Create catalog.
-
Select Flat rate (Citrix-managed Azure).

-
Choose the persona of the catalog.
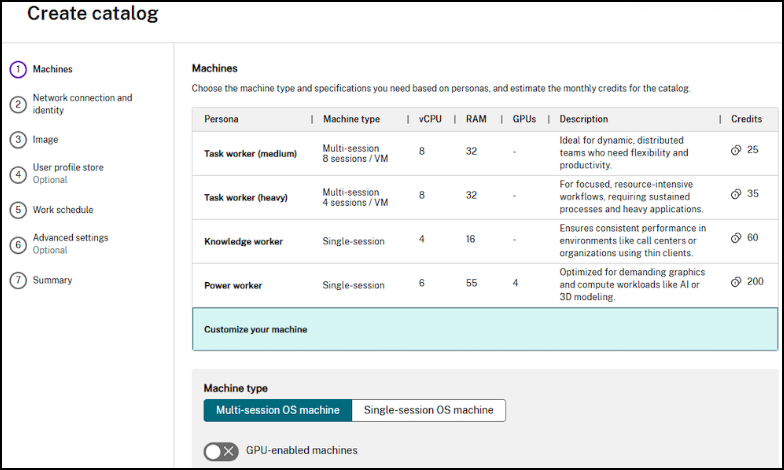
- If selecting a Knowledge worker or Power worker, choose whether the VDAs must be delivered as static or random desktops.
-
If selecting a custom persona, choose the specifications based on the requirements of your users.
Note:
Flex credits for custom personas varies based on the specifications.
- Input the Number of unique users who will access the catalog.
-
Configure the Network connection and identity.
- Subscription: Select an Azure subscription. For details, see Azure subscriptions.
- Network connection: Select the connection to use for accessing resources in your network. For details, see Network connections.
- Region: Select a region where you want the desktops created. Consider selecting a region close to your users. If you selected to use a connection, the catalog uses that network connection’s region.
-
Domain configuration: Choose if your VDAs must be non-domain-joined, Active Directory domain-joined, hybrid-joined, or Entra ID joined.
- Non-domain joined: VDAs in the catalog are not joined to an Active Directory domain.
- Active Directory: VDAs are joined to an Active Directory domain. A network connection is required for domain-joined VDAs. If selecting Active Directory, you must also input the Fully qualified domain name (FQDN), Organizational Unit (optional), Service account name (used for adding newly created VDAs to the domain), and a Password for the service account.
- Entra ID Hybrid-joined: VDAs are joined to Active Directory domain and Entra ID. A network connection is required for Hybrid domain-joined VDAs. If selecting Active Directory, you must also input the Fully qualified domain name (FQDN), Organizational Unit (optional), Service account name (used for adding newly created VDAs to the domain), and a Password for the service account.
- Entra ID: VDAs are joined to an Entra ID domain. A network connection is not required for domain-joined VDAs. If selecting Entra ID, you must also create or select an existing Service Account and choose whether you want to enroll the machines in Microsoft Intune for device management capabilities.
-
Specify the machine naming scheme: Specify a naming scheme for the newly created machines. Use from one to four wildcards (hash marks) to indicate where sequential numbers or letters appear in the name. If you do not specify a naming scheme, the machines use the default naming scheme:
DAS%%%%%-**-###where % is a random alphanumeric character matching the resource location prefix, * is a random alphanumeric character, and # is a sequential digit.Rules:
- The naming scheme must contain at least one wildcard, but not more than four wildcards. All the wildcards must be together.
- The entire name, including wildcards, must be between 2 and 15 characters.
- A name cannot include blanks (spaces), slashes, backslashes, colons, asterisks, angle brackets, pipes, commas, tildes, exclamation points, at signs, dollar signs, percent signs, carets, parentheses, braces, or underscores.
- A name cannot begin with a period.
- A name cannot contain only numbers.
- Do not use the following letters at the end of a name: ‘-GATEWAY’, ‘-GW’, and ‘-TAC’.
-
Leave enough room for growth.
For example, a naming scheme with 2 wildcards and 13 other characters (for example, MachineSales-##) uses the maximum number of characters (15).
Once the catalog contains 99 machines, the next machine creation fails. The service tries to create a machine with three digits (100), but that would create a name with 16 characters. The maximum is 15.
So, in this example, a shorter name (for example, PC-Sales-##) allows scaling beyond 99 machines. Note: MCS adds an additional wildcard if all available spaces are taken and the machine name has not hit the character limit.
Wildcard (#) type: Indicate whether wildcards must be numbers (0-9) or letters (A-Z).
-
Configure the Resource location for the catalog. When creating an additional catalog with the same network connection, region, and domain name as another catalog, the resource location is reused. Non-domain joined catalogs in Citrix DaaS Flex have a resource location automatically created for them.
- Resource location name: Choose the resource location where your machines will reside.
-
Connectivity types: Choose how endpoints connect to VDAs.
- Gateway service: Uses a Citrix-managed Gateway for connectivity to virtual apps and desktops. HDX connections between clients and VDAs are proxied through the Gateway service.
- NetScaler Gateway: Usa a customer-managed Gateway for external connectivity to apps and desktops. If you choose this option, you have to add the FQDN of your NetScaler Gateway virtual server.
- Direct: Allow direct access to apps and desktops only for users on your corporate network. Users will not have external access.
-
Choose an Image for your catalog.
Note:
Only images compatible with your catalog (single-session vs multi-session, domain-joined vs non-domain-joined) are displayed in the dropdown.
-
Input the Work schedule of the users accessing the catalog. Citrix optimizes connectivity for the defined work schedule.
- Time zone: Choose the time zone of the users accessing the catalog.
- Autoscale settings: Consider using the Citrix-recommended default timeout and power policies to align with Citrix best practices. If customizations are required, select from the dropdown to define peak working hours and adjust timeouts and power policies.
- Adjust Advanced settings as appropriate. For example, select Enable Secure Boot to ensure the best options are selected based on the image used.
- Add a name for your catalog in the Name your catalog input.
- Review the Summary of your configurations and click Create Catalog to begin provisioning machines to the catalog.
Add users to a catalog
Once the catalog is provisioned, add users to the catalog to provide them access to the resources.
-
From the Citrix DaaS Flex dashboard, click Add users if you haven’t added any users to a catalog.

- To add users to a catalog that already has users, click anywhere in the catalog’s entry.
- On the Users tab, click Add Users.
-
Select a directory and users or user groups.
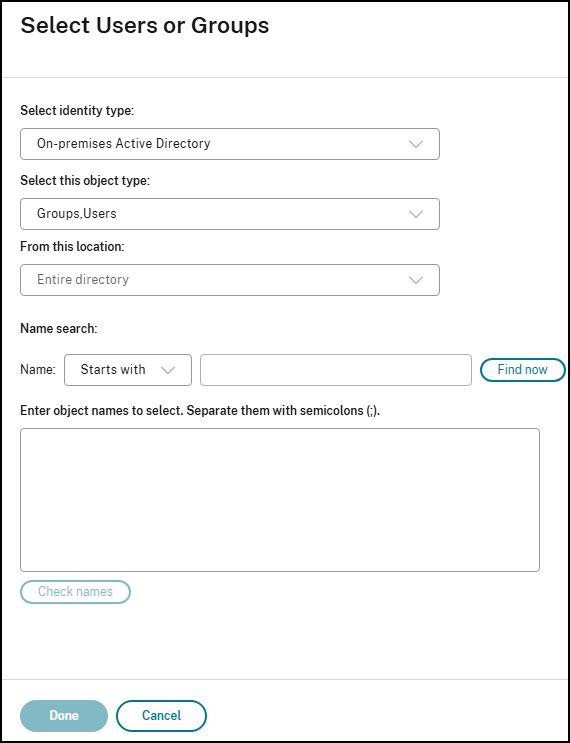
- When all users and groups have been added, click Done.
Remove users from the catalog
- Click anywhere in the catalog’s entry.
- On the Users tab, click the trash icon next to the user or group you want to delete. This action removes the user from the catalog, not from the source.