Network connections
Introduction
When creating a catalog, you indicate if and how users access locations and resources on their corporate on-premises network from their Citrix DaaS Flex VDAs.
When using a Citrix DaaS Flex subscription, the available options are:
- No connectivity
- Virtual network peering
- Azure VPN Gateway
- Virtual vWAN Peering
Note:
You cannot change a catalog’s connection type after the catalog is created.
No connectivity
When a catalog is configured with No connectivity, users cannot access resources on their on-premises or other networks. Only non-domain-joined deployments are supported for VDAs in a resource location with no connectivity.
Requirements for all network connectivity methods
- When creating a connection, you must have valid DNS server entries.
- When using Secure DNS or a third-party DNS provider, you must add the address range that is allocated for use by Citrix DaaS Flex to the DNS provider’s IP addresses on the allow list. That address range is specified when you create a connection.
- All service resources that use the connection (domain-joined machines) must be able to reach your Network Time Protocol (NTP) server to ensure time synchronization.
Virtual network peering
To facilitate VDA access to resources within your corporate network, establish a virtual network peering connection between the Citrix-managed Azure subscription and your own. This configuration is required for domain-joined VDAs or for those requiring access to services in your Azure subscription or on-premises data center.
To extend access from VDAs to resources in your on-premises data center, a further connection is required from your Azure subscription to the on-premises data center. This can be achieved through an Azure ExpressRoute or VPN. Connectivity between customer-managed subscriptions and on-premise data centers is outside of the scope of Citrix DaaS Flex and is managed by the customer.
Important:
A virtual network peer must be created before creating a catalog that uses it.
Requirements for configuring a virtual network peer
- A customer-managed Azure subscription, resource group, and virtual network.
- Credentials for an Azure Resource Manager subscription owner permissions. The account must be an Azure Active Directory account native to the same Azure AD which is associated with the subscription of the customer-managed virtual network. Citrix DaaS Flex does not support other account types, such as live.com or external (guest) Azure AD accounts in a different tenant.
- Azure network routes in which VDAs in the Citrix-managed Azure subscription can communicate with your network.
- Network Security Group (NSG) rules that allow communication from the IP range of the Citrix DaaS Flex VDAs to your virtual network.
- If you plan for VDAs to be domain-joined, Citrix recommends Active Directory services running in the peered virtual network in your subscription to take advantage of the low latency between the peered virtual networks.
-
When creating the connection, you must provide an available CIDR address space (IP address and network prefix) that is unique among the network resources and the Azure virtual networks being connected. This is the IP range assigned to the VMs within the Citrix DaaS Flex virtual network. Ensure that you specify an IP range that does not overlap any addresses that you use in your Azure and on-premises networks.
- For example, if your Azure virtual network has an address space of 10.0.0.0 /16, create the virtual network peering connection in Citrix DaaS Flex as 192.168.0.0 /24.
- In this example, creating a peering connection with a 10.0.0.0 /24 IP range would be considered an overlapping address range.
- If addresses overlap, the virtual network peering connection might not be created successfully. It might also cause issues when performing site administration tasks.
- A /24 IP range is the minimum size of a virtual network within the Citrix DaaS Flex tenant.
Azure virtual network peering connection custom routes
To enhance the security posture of your environment, you might want to route all outbound traffic from the VDA through a security appliance in your managed Azure subscription. This can be achieved through a custom, or user-defined, route in Azure. Custom routes override Azure’s default system routes for directing traffic between virtual machines in a virtual network peering, on-premises networks, and the Internet.
To use custom routes:
- You must have an existing Azure VPN gateway or a network appliance in your Citrix DaaS Flex environment.
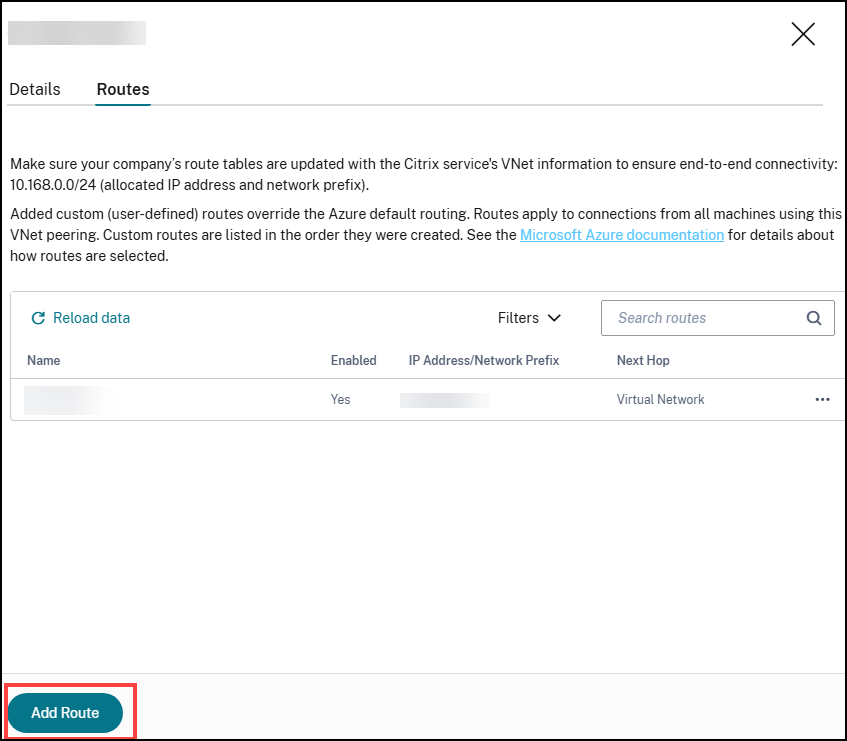
- When you add custom routes, you must update your company’s route tables with the Citrix DaaS Flex destination virtual network information to ensure end-to-end connectivity.
- Custom routes are displayed in Citrix DaaS Managed Azure in the order in which they are entered. This display order does not affect the order in which Azure selects routes.
Before using custom routes, review the Microsoft article Virtual network traffic routing to learn about using custom routes, next hop types, and how Azure selects routes for outbound traffic.
You can add custom routes when you create an Azure virtual network peering connection or to existing virtual network peering connections in your Citrix DaaS Flex environment.
Create an Azure virtual network peering connection
- From the Quick Deploy > Microsoft Azure dashboard, expand Network connections on the right.
-
Click Add network Connection.
-
On Add network Connection page, click Azure vNet peering.

- Click Authenticate Azure Account.
- Citrix DaaS Flex automatically takes you to the Azure sign-in page to authenticate your Azure subscriptions. After you sign in to Azure and accept the terms, you are returned to the connection creation details dialog.
-
On the dialog:
- Type a name for the Azure virtual network peer.
- Select the Azure subscription, resource group, and the virtual network to peer with.
- Indicate whether the selected virtual network uses an Azure Virtual Network Gateway. For information, see the Microsoft article Azure VPN Gateway.
-
If your virtual network uses an Azure Virtual Network Gateway, indicate whether you want to enable virtual network gateway route propagation. When enabled, Azure automatically adds all routes through the gateway.
Note:
You can change this setting later from the connection’s Details page. However, changing it can cause route pattern changes and VDA traffic interruptions. Also, if you disable it later, you must manually add routes to networks that VDAs use.
- Type an IP address and select a network mask. The address range to be used is displayed, along with the number of addresses supported by the range. Ensure that the IP range does not overlap any addresses that you use in your Azure and on-premises networks.
-
Indicate whether you want to add custom routes to the virtual network peering connection. If you select Yes, enter the following information:
- Type a friendly name for the custom route.
- Enter the destination IP address and network prefix. The network prefix must be between 16 and 24.
- Select the next hop type for where you want traffic to be routed. If you select Virtual appliance, enter the internal IP address of the appliance.
- Click Add route to create another custom route for the connection.
- Click Add VNet Peering to add the network connection.
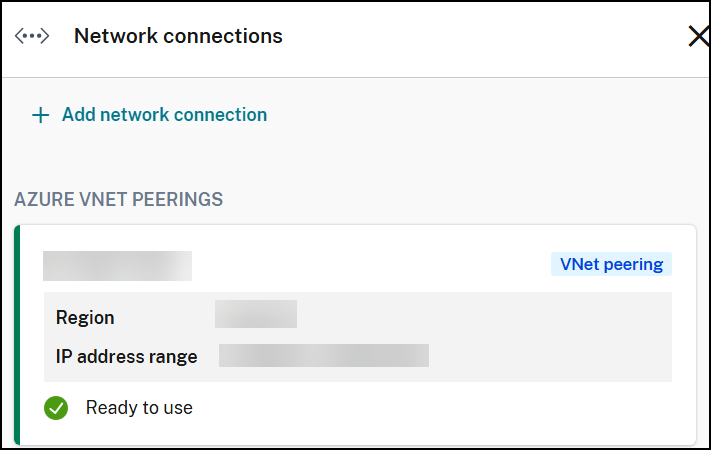
After the connection is created, it is listed under Network Connections > AZURE VNET PEERINGS on the right side of the Quick Deploy > Microsoft Azure dashboard. When you create a catalog, this connection is included in the available network connections list.
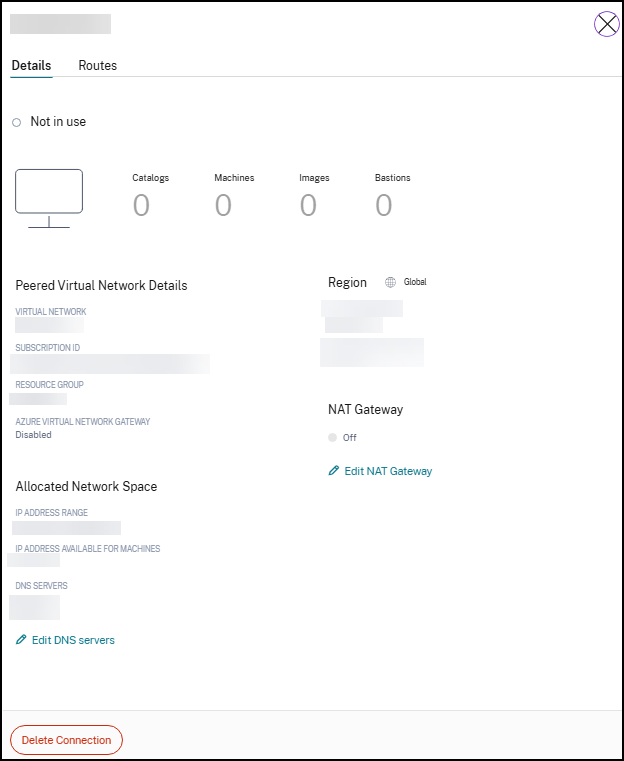
View Azure virtual network peering connection details
- From Quick Deploy > Microsoft Azure, expand Network connections on the right.
-
Select the Azure virtual network peering connection you want to display.
The Details tab displays:
- The number of catalogs, machines, images, and bastions that use this connection.
- The region, allocated network space, and peered virtual networks.
The Routes tab displays:
- The routes that are currently configured for the virtual network peering connection.
Manage custom routes for existing Azure virtual network peer connections
You can add new custom routes to an existing connection or modify existing custom routes, including disabling or deleting custom routes.
Important:
Modifying, disabling, or deleting custom routes changes the traffic flow of the connection and might disrupt any user sessions that might be active.
Add a custom route
-
From the virtual network peering connection details, click Routes > Add Route.
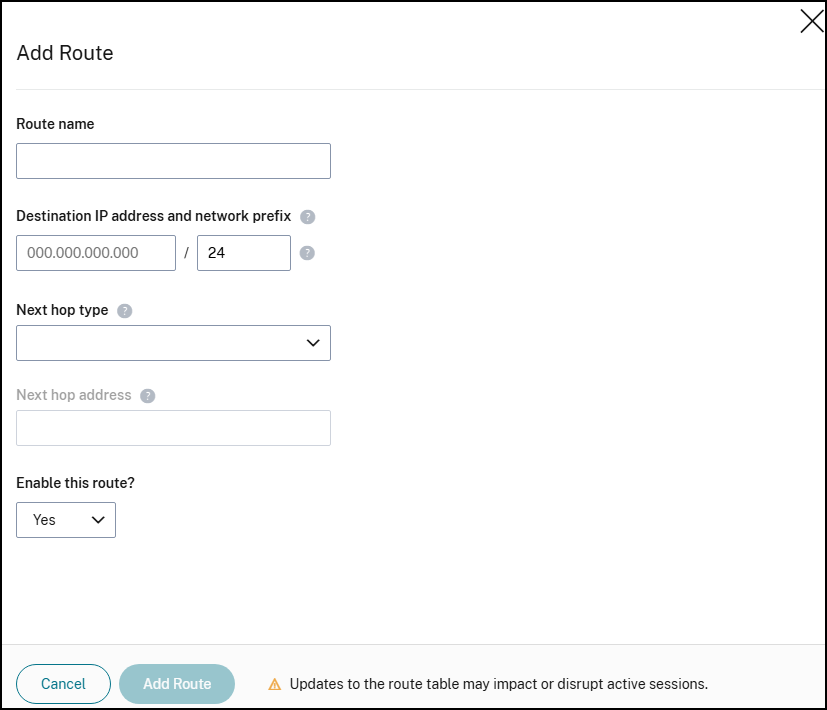
- Enter a friendly name, the destination IP address and prefix, and the next hop type you want to use. If you select Virtual Appliance as the next hop type, enter the internal IP address of the appliance.
- Indicate whether you want to enable the custom route. By default, the custom route is enabled.
- Click Add Route.
Modify or disable a custom route
-
From the virtual network peering connection details, select Routes and then locate the custom route you want to manage.
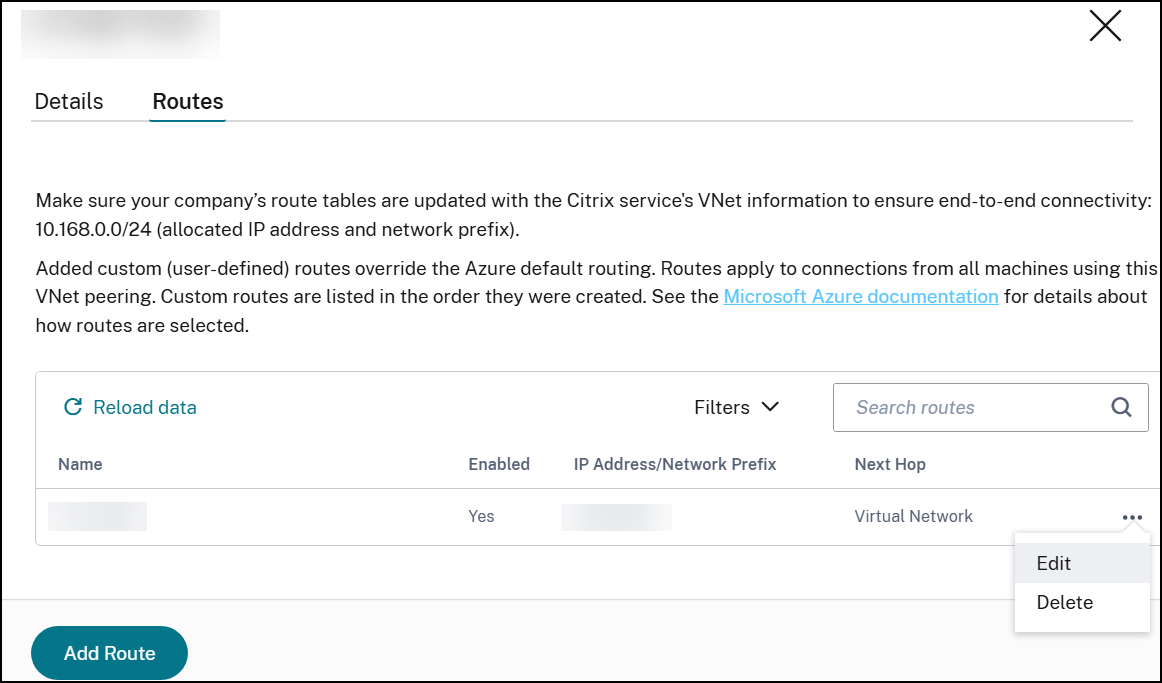
- From the ellipsis menu, select Edit.
- Make any needed changes to the destination IP address and prefix or the next hop type, as needed.
- To enable or disable a custom route in Enable this route? select Yes or No.
- Click Save.
Delete a custom route
- From the virtual network peering connection details, select Routes and then locate the custom route you want to manage.
- From the ellipsis menu, select Delete.
- Select Deleting a route may disrupt active sessions to acknowledge the impact of deleting the custom route.
- Click Delete Route.
Delete an Azure VNet peering connection
Before you can delete an Azure VNet peer, remove any catalogs associated with it. See Delete a catalog for more information on deleting catalogs.
- From Quick Deploy > Microsoft Azure, expand Network connections on the right.
- Select the connection you want to delete.
- From the connection details, click Delete Connection.
Azure VPN gateway
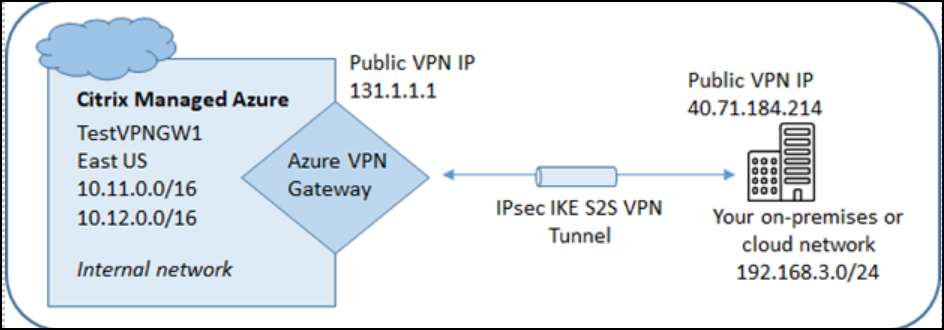
An Azure VPN gateway can be used to provide direct communication between your Citrix-managed Azure VDAs and your on-premises network, without the need of additional hop through a peered Azure virtual network. The secure connectivity uses the industry-standard protocols Internet Protocol Security (IPsec) and Internet Key Exchange (IKE).
During the connection creation process:
- Provide information that Citrix uses to create the gateway and connection.
- Citrix creates a site-to-site route-based Azure VPN gateway. The VPN gateway forms a direct Internet Protocol Security (IPsec) tunnel between the Citrix-managed Azure subscription and your VPN’s host device.
- After Citrix creates the Azure VPN gateway and connection, update your VPN’s configuration, firewall rules, and route tables. For this process, use a public IP address that Citrix provides, and a pre-shared key (PSK) that you provided for creating the connection.
You do not need your own Azure subscription to create this type of connection.
Azure VPN gateway connection requirements and preparation
- To learn about Azure VPN Gateway, see the Microsoft article What is VPN Gateway?
- Review the requirements for all network connections.
-
You must have a configured VPN. The virtual network must be able to send and receive traffic through the VPN gateway. A virtual network can’t be associated with more than one virtual network gateway. The configured VPN must have:
-
An IPsec device that has a public IP address. To learn about validated VPN devices, see the Microsoft article About VPN devices.
-
Additional prerequisites might be required based on your VPN configuration. Read the Create an Azure VPN Gateway connection section entirely before beginning to determine requirements from your VPN appliance.
-
Azure VPN gateway custom routes
To enhance the security posture of your environment, you might want to route all outbound traffic from the VDA through a security appliance. Custom routes override default system routes for directing traffic between virtual machines in your networks and the Internet.
When you add custom routes to a connection, those routes apply to all machines that use that connection.
To use custom routes:
- You must have an existing virtual network gateway or a network appliance in your Citrix DaaS Flex environment.
- When you add custom routes, you must update your company’s route tables with the destination VPN information to ensure end-to-end connectivity.
- Custom routes are displayed on the Connection > Routes tab in the order they are entered. This display order does not affect the order in which routes are selected.
Before using custom routes, review the Microsoft article Virtual network traffic routing to learn about using custom routes, next hop types, and how Azure selects routes for outbound traffic.
You can add custom routes when you create an Azure VPN gateway connection or to existing connections in your service environment.
Create an Azure VPN Gateway connection
Review the entire section before beginning the process to ensure all prerequisites are met.
- From the Quick Deploy > Microsoft Azure dashboard, expand Network connections on the right.
- Click Add network Connection.
- Click Azure VPN Gateway.
- Review the information on the Add VPN Connection page, and then click Start Configuring VPN.
-
On Add a VPN page, provide the following information.
- Name your connection: A name for the connection.
- VPN IP address: The public-facing IP address of the VPN appliance in your network.
- Allowed networks: One or more address ranges that the Citrix service is allowed to access on your network. Usually, this address range contains the resources that your users need to access, such as file servers. To add more than one range, click Add more IP addresses and enter a value. Repeat as needed.
- Pre-shared key: A value that is used by both ends of the VPN for authentication (similar to a password). You decide what this value is. Be sure to note the value. You’ll need it later when you configure your VPN with the connection information.
- Performance and throughput: The bandwidth level to use when your users access resources on your network. Not all choices support Border Gateway Protocol (BGP). In those cases, the BGP settings fields aren’t available.
- Region: Azure region where Citrix deploys VDAs when you create catalogs that use this connection. You cannot change this selection after you create the connection. If you decide later to use a different region, you must create or use another connection that specifies the desired region.
-
VDA subnet: The address range where Citrix VDAs and Cloud Connectors reside when you create a catalog that uses this connection. After you enter an IP address and select a network mask, the address range is displayed, plus how many addresses that the range supports.
- Although this address range is maintained in the Citrix-managed Azure subscription, it functions as if it is an extension of your network. The IP range must not overlap any addresses that you use in your on-premises or other cloud networks. If addresses overlap, the connection might not be created successfully. Also, an overlapping address might negatively impact site administration tasks.
- The VDA subnet range must be different from the gateway subnet address.
- You cannot change this value after you create the connection. To use a different value, create another connection.
-
Gateway subnet: The address range where the Azure VPN gateway resides when you create a catalog that uses this connection.
- The IP range must not overlap any addresses that you use in your on-premises or other cloud networks. If addresses overlap, the connection might not be created successfully. Also, an overlapping address might negatively impact site administration tasks.
- The gateway subnet range must be different from the VDA subnet address.
- You cannot change this value after you create the connection. To use a different value, create another connection.
-
Routes: Indicate whether you want to add custom routes to the connection. If you want to add custom routes, provide the following information:
- Type a friendly name for the custom route.
- Enter the destination IP address and network prefix. The network prefix must be between 16 and 24.
- Select a next hop type for where you want traffic to be routed. If you select Virtual appliance, enter the internal IP address of the appliance. For more information about next hop types, see the Microsoft article Custom routes.
- To add more than one route, click Add route and enter the requested information.
-
DNS servers: Enter addresses for your DNS servers, and indicate the preferred server. Although you can change the DNS server entries later, keep in mind that changing them can potentially cause connectivity issues for the machines in catalogs that use this connection.
- To add more than two DNS server addresses, click Add alternate DNS and then enter the requested information.
- Click Create VPN connection.
After Citrix creates the connection, it is listed under Network Connections > Azure VPN Gateway in the Quick Deploy dashboard. The connection card contains a public IP address.
-
Use this address (and the pre-shared key you specified when creating the connection) to configure your VPN and firewalls. If you forgot your pre-shared key, you can change it on the connection’s Details page. You’ll need the new key to configure your end of the VPN gateway.
For example, allow exceptions in your firewall for the VDA and gateway subnet IP address ranges you configured.
- Update your company’s route tables with the Azure VPN gateway connection information to ensure end-to-end connectivity.
- If you configured custom routes, make the appropriate updates for them, too.
- When both ends of the connection are successfully configured, the connection’s entry in *Network Connections > Azure VPN Gateway indicates Ready to use.
View an Azure VPN Gateway connection
- From the Quick Deploy dashboard, expand Network connections on the right.
-
Select the connection you want to display.
The Details tab displays:
- The number of catalogs, machines, images, and bastions that use this connection. It also contains most of the information you configured for this connection.
The Routes tab lists custom route information for the connection.
Manage custom routes for an Azure VPN gateway connection
In an existing Azure VPN gateway connection, you can add, modify, disable, and delete custom routes.
Important:
Modifying, disabling, or deleting custom routes changes the traffic flow of the connection, and might disrupt active user sessions.
- From the Azure Quick Deploy dashboard, expand Network Connections on the right.
- Select the connection you want to display.
Add a custom route
- From the connection’s Routes tab, click Add Route.
- Enter a friendly name, the destination IP address and prefix, and the next hop type you want to use. If you select Virtual Appliance as the next hop type, enter the internal IP address of the appliance.
- Indicate whether you want to enable the custom route. By default, the custom route is enabled.
- Click Add Route.
Modify or enable or disable a custom route
- From the connection’s Routes tab, locate the custom route you want to manage.
- From the ellipsis menu, select Edit.
- Change the destination IP address and prefix, or the next hop type, as needed.
- Indicate whether you want to enable the route.
- Click Save.
Delete a custom route
- From the connection’s Routes tab, locate the custom route you want to manage.
- From the ellipsis menu, select Delete.
- Select Deleting a route may disrupt active sessions to acknowledge the impact of deleting the custom route.
- Click Delete Route.
Reset or delete an Azure VPN gateway connection
Important:
Resetting a connection causes the current connection to be lost, and both ends must reestablish it. A reset disrupts active user sessions. Before you can delete a connection, delete any catalogs that use it. See Delete a catalog.
To reset or delete a connection:
- From the Azure Quick Deploy dashboard, expand Network connections on the right.
- Select the connection you want to reset or delete.
-
From the connection’s Details tab:
- Click Reset Connection, to reset the connection.
- Click Delete Connection, to delete the connection.
- If prompted, confirm the action.
Create a public static IP address
If you want all machines VDAs on a connection to use a single outbound public static IP address (gateway) to the Internet, enable a NAT gateway. You can enable a NAT gateway for connections to catalogs that are domain-joined or non-domain-joined.
To enable a NAT gateway for a connection:
- From the Azure Quick Deploy dashboard, expand *Network connections** on the right.
- Under Network Connections, select a connection under Citrix Managed or Azure VNet Peerings.
- In the connection details card, click Enable NAT Gateway.
- In the Enable NAT Gateway page, move the slider to Yes and configure an idle time.
- Click Confirm Changes.
When you enable a NAT gateway:
- Azure assigns a public static IP address to the gateway automatically. (You cannot specify this address.) All VDAs in all catalogs that use this connection use that address for outbound connectivity.
- You can specify an idle timeout value. That value indicates the number of minutes that an open outbound connection through the NAT gateway can remain idle before the connection is closed.
- You must allow the public static IP address in your firewall.
You can go back to the connection details card to enable or disable the NAT gateway and change the timeout value.
Azure Virtual WAN Peering
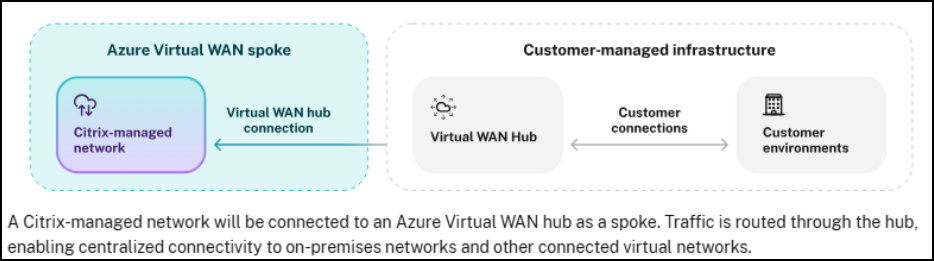
An Azure Virtual WAN spoke connection provides direct network connectivity between the Citrix-managed Azure virtual network and your corporate network by connecting the Citrix-managed network as a spoke to an Azure Virtual Hub that you control. When both your corporate network and the Citrix-managed network are connected to the same Virtual Hub, Citrix infrastructure can reach your on-premises and Azure-hosted resources without requiring a separate peered Azure subscription.
Use this connection type when your organization already uses Azure Virtual WAN for centralized routing across multiple sites, and you want to extend that hub to cover Citrix DaaS Flex VDA traffic.
Note:
Create a Virtual WAN spoke connection before creating a catalog that uses it.
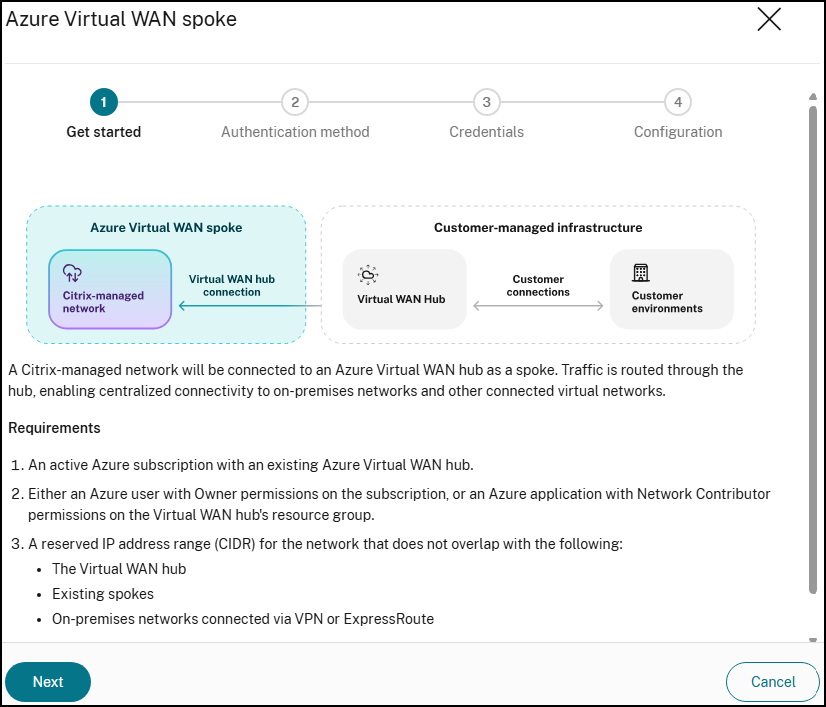
Requirements for configuring an Azure Virtual WAN spoke connection
Before creating the connection, ensure the following conditions are met:
- An Azure subscription containing an existing Azure Virtual WAN and Virtual Hub of type Standard. The Basic tier does not support the VNet connections required for this setup.
-
The Virtual Hub Resource ID, resource group, and hub name, available from the hub’s Properties page in the Azure portal.
- One of the following:
- An Azure admin account with Owner permissions on the Virtual Hub resource group (to authenticate through the Citrix UI), or
- A service principal (app registration) with the Network Contributor role on the Virtual Hub resource group (for automation or least-privilege access).
-
An IP address block for Citrix to use for its managed spoke network (for example, 10.200.0.0/24). This range must not overlap with your Virtual Hub address space, or any other network connected to the hub.
-
The IP addresses of one or more DNS servers that can resolve your domain name from within Azure.
-
Your Citrix customer ID, visible in the Citrix Cloud portal under Identity and Access Management.
- Confirmation that your Citrix DaaS Flex subscription is active. If unsure, contact your Citrix account team.
Create an Azure Virtual WAN spoke connection
- From the Quick Deploy > Microsoft Azure dashboard, expand Network connections on the right.
- Click Add network Connection.
-
Select Azure Virtual WAN spoke as the connection type. Click Next.
-
Select an authentication method.
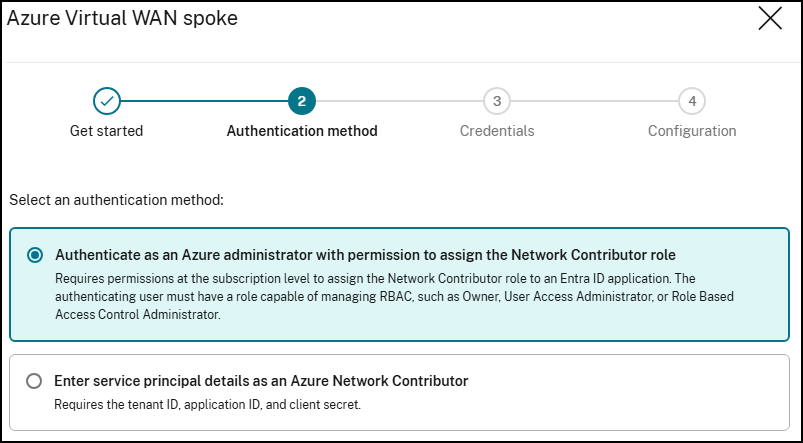
-
Authenticate as an Azure administrator: The wizard redirects you to the Azure login page. Sign in with an account that has Owner permissions on the Virtual Hub resource group.
- Select single-tenant or multi-tenant. Single-tenant is used when the account is in the same Entra tenant as the hub’s subscription. Otherwise, use multi-tenant where the subscription tenant ID can be specified.
-
Enter service principal details as an Azure Network Contributor: Enter the Tenant ID, Application (client) ID, and Client secret for a service principal that has the Network Contributor role on the Virtual Hub resource group.
To create a service principal with the correct permissions:
- In the Azure portal, go to Microsoft Entra ID > App registrations > New registration.
- After registering, go to Certificates & secrets and create a new client secret. Record the value as it is shown only once.
- Navigate to the Virtual Hub resource group, open Access control (IAM), and assign the Network Contributor role to the app registration.
-
Authenticate as an Azure administrator: The wizard redirects you to the Azure login page. Sign in with an account that has Owner permissions on the Virtual Hub resource group.
-
On the Configuration page, provide the following:
Field Value Network connection name A name for this connection Azure subscription The subscription containing your Virtual Hub Resource group The resource group containing your Virtual Hub Azure Virtual WAN hub Select your hub. Must be in a region supported by the Citrix managed subscription IP address range (CIDR) The address range for the Citrix managed spoke network (for example, 10.200.0.0/24). Must not overlap with the hub or any connected spoke DNS servers IP addresses of DNS servers that can resolve your domain name Custom routes Optional. Add a route with destination 0.0.0.0/0 and next hop type Internet to allow Citrix machines to reach the internet for software downloads Route propagation Set to Enabled to share spoke routes with the hub and connected networks Note:
You can’t change the Advanced settings (Internet security, route propagation) in Citrix Cloud after the connection is created.
- Click Add. The connection appears under Network connections with status as Provisioning. When the status changes to Ready to use, the connection is available for catalog creation.
View an Azure Virtual WAN spoke connection
-
From Quick Deploy > Microsoft Azure, expand Network connections on the right and select the Virtual WAN spoke connection you want to view. Details include:
- The number of catalogs, machines, images, and bastions using this connection.
- The region, Citrix-managed subscription, and customer Virtual WAN hub details.
- The allocated IP address range and number of available addresses.
- DNS server configuration.
- Custom routes configured for the connection.
Manage IPv4 address ranges for an Azure Virtual WAN spoke connection
After creating an Azure Virtual WAN spoke connection, you can expand the allocated network space by adding more IPv4 address ranges to the Citrix-managed spoke virtual network. This capability is useful when your existing address range is running low on available IP addresses or when you need to support additional Flex workloads.
Before adding, modifying, or deleting IPv4 address ranges, ensure the following conditions are met:
- Each address range must be unique within the address space and must not overlap other subnet address ranges in the virtual network.
- Each address range must use Classless Inter-Domain Routing (CIDR) notation. For example,
172.18.0.0/21.
Notes:
- After adding new IPv4 address ranges, ensure that the corresponding subnets are permitted on your firewalls, routers, and advertised routes. Otherwise, Flex resources using the new ranges will not have end-to-end network connectivity.
- Before editing an address range, ensure that no existing Flex resources, such as machines or catalogs, are using that subnet. A connection must retain at least one IPv4 address range at all times.
- Citrix recommends adding new IPv4 address space only when the existing ones are close to exhaustion. This reduces the chances of IP addresses being allocated from different IP address spaces.
- For Edit and Delete operations, the IPv4 address space must be free (no VDAs, Connectors, Bastions, or Image builders) before the operation is allowed.
- Azure performs DHCP allocation randomly. The IP address for Flex resources can come from any of the configured IP ranges.
Add an IPv4 address range
- In Citrix DaaS, go to Quick Deploy > Microsoft Azure > Network Connections > Virtual WAN Spoke and select your Azure Virtual WAN spoke connection.
-
In the Allocated Network Space section, click the edit icon next to IPv4 Address Ranges.
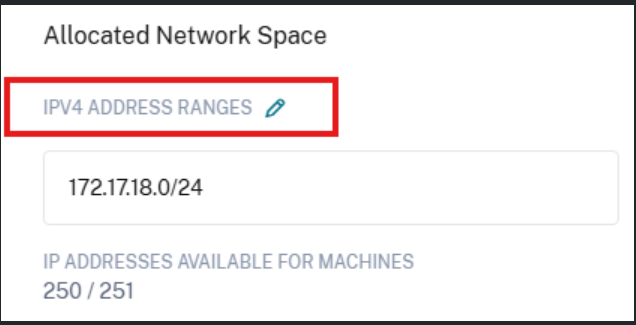
-
In the IPv4 address ranges panel, click Add IPv4 address.
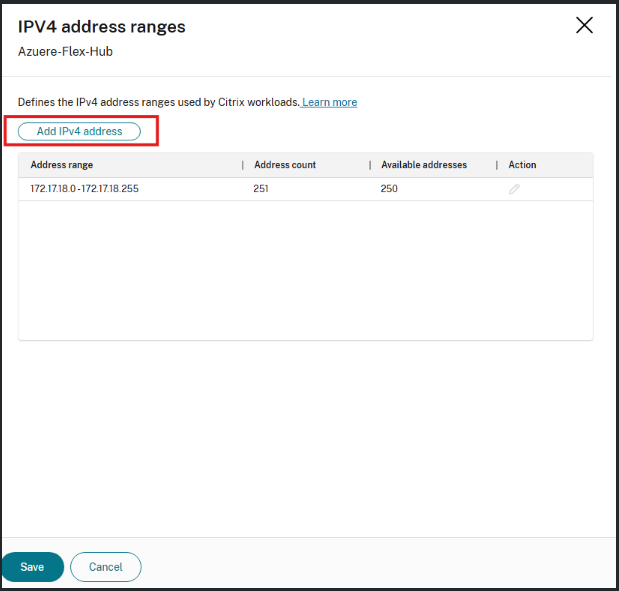
-
In the dialog, enter the IP address and prefix length in CIDR notation. As you type, a preview of the resulting address range and the number of available machine addresses is displayed.
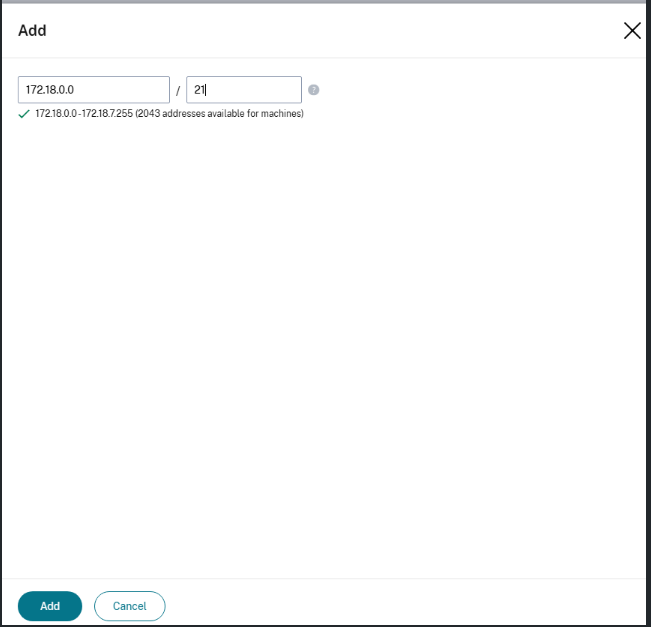
- Click Add.
-
Review the updated list of address ranges and then click Save.

The new address range is immediately available for use by Flex workloads in the connection.
Edit an IPv4 address range
- In Citrix DaaS, go to Quick Deploy > Microsoft Azure > Network Connections > Virtual WAN Spoke and select your Azure Virtual WAN spoke connection.
- In the Allocated Network Space section, click the edit icon next to IPv4 Address Ranges.
- In the IPv4 address ranges panel, click the edit icon in the Action column for the range you want to modify.
- Update the IP address or prefix length as needed. The preview confirms the resulting range and available addresses.
- Click Save to apply the change.
Delete an IPv4 address range
Before deleting an address range, ensure that no existing Flex resources, such as machines or catalogs, are using that subnet. A connection must retain at least one IPv4 address range at all times.
- In Citrix DaaS, go to Quick Deploy > Microsoft Azure > Network Connections > Virtual WAN Spoke and select your Azure Virtual WAN spoke connection.
- In the Allocated Network Space section, click the edit icon next to IPv4 Address Ranges.
- In the IPv4 address ranges panel, locate the address range you want to remove and click the delete icon in the Action column.
- Click Save to apply the change.
Note:
Before deleting an address range, ensure that no existing Flex resources, such as machines or catalogs, are using that subnet. A connection must retain at least one IPv4 address range at all times.
Delete an Azure Virtual WAN spoke connection
Note:
- Removing a Virtual WAN spoke connection deletes the Citrix managed network spoke from your Virtual Hub. Any catalogs that depend on this connection lose network connectivity to your corporate resources. Delete all associated catalogs before removing the connection. You cannot delete a network connection if it is attached to a catalog.
- Removing the Flex hub connection does not delete your other Azure Virtual Hub or Virtual WAN. It only removes the Citrix managed network spoke. Your existing VNet connections to the hub are not affected.
- From Quick Deploy > Microsoft Azure, expand Network connections on the right.
- Locate and select the Virtual WAN spoke connection you want to remove.
- Click Delete Connection at the bottom of the page. If this option is unavailable, delete the attached catalog first.
- Select your authentication method.
-
Select I understand that deleting a network connection cannot be undone, then click Delete.
The connection status changes to Deleting. When the connection is removed from the list, the Citrix managed network spoke has been detached from your Virtual Hub.
Troubleshooting
Problem: Software fails to download during catalog machine setup.
Symptom: Machines get stuck during provisioning. Logs show a script or download failing.
Cause: Citrix machines cannot reach the internet to download required setup files.
Resolution: Ensure the Custom routes field during connection setup includes a route with destination prefix 0.0.0.0/0 and next hop type Internet. If this was omitted, delete the connection and re-create it with the route included.
Problem: The connection shows VWanConnectionFailed status.
Symptom: After completing the wizard, the connection status shows VWanConnectionFailed.
Cause: Azure rejected the request to attach the Citrix managed network to the hub. Common causes: The address range overlaps with another network already connected to the hub, or the credentials provided do not have sufficient permissions.
Resolution: Check the ErrorMessage field in the connection status for the specific error text. For address overlap, choose a different non-overlapping CIDR block and re-create the connection. For permissions, ensure the Azure account or service principal has at minimum the Network Contributor role on the Virtual Hub resource group.
Problem: The connection shows RouteTableFailed or NatGatewayFailed status.
Symptom: The connection status is neither Ready to use nor VWanConnectionFailed.
Important: In both cases, the hub spoke connection itself succeeded. You can still proceed with catalog creation. The route table or NAT gateway configuration can be retried independently without re-creating the connection. A NAT gateway is automatically created when you create a catalog for this connection.
Resolution: If the issue persists, contact Citrix Support and provide the Citrix-TransactionId so the team can locate the relevant service logs.
Problem: The connection is stuck on Provisioning for more than 10 minutes.
Symptom: The connection status has not changed from Provisioning after 10 or more minutes.
Cause: A background provisioning job might have crashed or timed out.
Resolution: Note the Citrix-TransactionId and contact the support team. Once investigated, the request can be resubmitted.
DNS servers
If using virtual network peering, virtual wan peering or a VPN Gateway, one or more valid DNS server entries that can resolve public and private domain names must be added for you to create connections or catalogs.
-
DNS entries are validated when you create your connection. If the DNS entry cannot resolve public and private domain names, the create operation fails.
Note:
The default (Azure-provided) DNS server cannot be used with a virtual network peering or Azure VPN Gateway connection.
- If you already have DNS server entries under Custom, verify that the entries can resolve public and private domain IP names.
- If you do not have any DNS servers that can resolve domain names, Citrix recommends adding an Azure-provided DNS server that has those capabilities.
-
Click Network Connections to edit DNS server entries, select the connection you would like to edit, and then select Edit DNS servers.
- If you change any DNS server entries, the VMs continue to use the old DNS server entries until the VM is rebooted.
Note:
Changing DNS server addresses can potentially cause connectivity issues for machines in catalogs that use that connection.