-
-
-
-
-
XenServer 6.5 Upgrade for SD-WAN Standard Edition Appliances
-
SD-WAN Standard Edition Virtual Appliance (VPX) in Hypervisor on HyperV 2012 R2 and 2016
-
Install SD-WAN SE Virtual Appliances (VPX) in Linux-KVM Platform
-
Deploy Citrix SD-WAN Standard Edition Instance on Azure - Release Version 10.2 and above
-
SD-WAN Standard Edition Virtual Appliance (VPX) High Availability support for AWS
-
Deploy a Citrix SD-WAN VPX instance on a Citrix ADC SDX appliance
-
This content has been machine translated dynamically.
Dieser Inhalt ist eine maschinelle Übersetzung, die dynamisch erstellt wurde. (Haftungsausschluss)
Cet article a été traduit automatiquement de manière dynamique. (Clause de non responsabilité)
Este artículo lo ha traducido una máquina de forma dinámica. (Aviso legal)
此内容已经过机器动态翻译。 放弃
このコンテンツは動的に機械翻訳されています。免責事項
이 콘텐츠는 동적으로 기계 번역되었습니다. 책임 부인
Este texto foi traduzido automaticamente. (Aviso legal)
Questo contenuto è stato tradotto dinamicamente con traduzione automatica.(Esclusione di responsabilità))
This article has been machine translated.
Dieser Artikel wurde maschinell übersetzt. (Haftungsausschluss)
Ce article a été traduit automatiquement. (Clause de non responsabilité)
Este artículo ha sido traducido automáticamente. (Aviso legal)
この記事は機械翻訳されています.免責事項
이 기사는 기계 번역되었습니다.책임 부인
Este artigo foi traduzido automaticamente.(Aviso legal)
这篇文章已经过机器翻译.放弃
Questo articolo è stato tradotto automaticamente.(Esclusione di responsabilità))
Translation failed!
Rack Mounting the Appliance
Most appliances can be installed in standard server racks that conform to the EIA-310-D specification. The appliances ship with a set of rails, which you must install before you mount the appliance. The only tools that you need for installing an appliance are a Phillips screwdriver and a flathead screwdriver.
Citrix SD-WAN 4000/4100/5100 appliances require two rack units.
Each appliance ships with a mounting rail kit that contains two rail assemblies, one for the left side and the other for the right side of the appliance, and screws to attach the rails. An assembly consists of an inner rail and a rack rail. The supplied rail kit is 28 inches long (38 inches extended). Contact your Citrix sales representative to order a 23 inch (33 inches extended) rail kit.
To mount the appliance, you must first install the rails and then install the appliance in the rack.
Perform the following tasks to mount the appliance:
- Remove the inner rails from the rail assembly.
- Attach the inner rails to the appliance.
- Install the rack rails on the rack.
- Install the appliance in the rack.
Note
The same rail kit is used for both square-hole and round-hole racks. See figure 4 for specific instructions for threaded, round-hole racks.
If you are installing the appliance as the only unit in the rack, mount it at the bottom. If the rack contains other units, make sure that the heaviest unit is at the bottom. If the rack has stabilizing devices available, install them before mounting the appliance.
To remove the inner rails from the rail assembly
- Place the rail assembly on a flat surface.
- Slide out the inner rail toward the front of the assembly.
- Depress the latch until the inner rail comes all the way out of the rail assembly.
- Repeat steps 1 through 3 to remove the second inner rail.
To attach the inner rails to the appliance
- Position the right inner rail behind the handle on the right side of the appliance.
- Align the holes on the rail with the corresponding holes on the side of the appliance.
- Attach the rail to the appliance with the provided screws: 5 per side.
To install the rack rails on the rack
- If you have a round-hole, threaded rack, skip to step 3.
- Install square nut retainers into the front post and back post of the rack as shown in the following figures. Before inserting a screw, be sure to align the square nut with the correct hole for your appliance. The three holes are not evenly spaced.
Figure 2. Installing Retainers into the Front Rack Posts
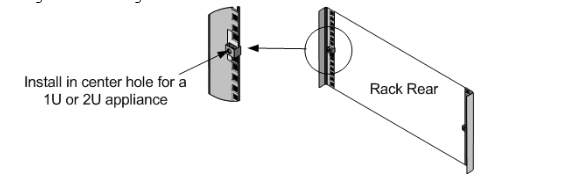
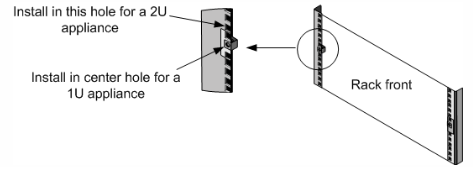 Figure 3. Installing Retainers into the Rear Rack Posts
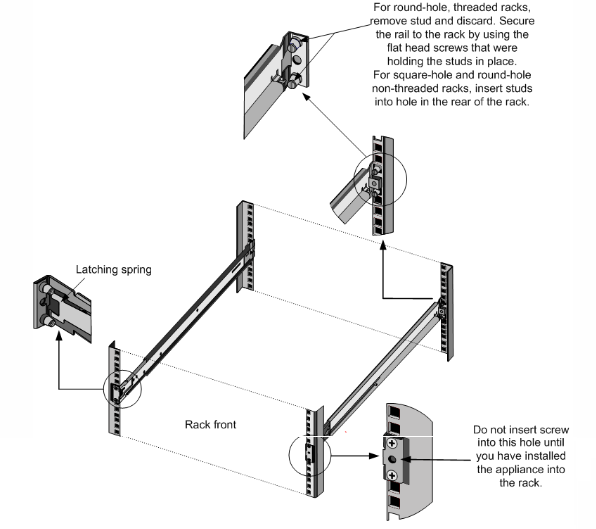
- Install the adjustable rail assembly into the rack as shown in the following figures. Use a screw to lock the rear rail flange into the rack. With the screw securing the rail in place, you can optionally remove the latching spring.
Figure 4. Installing the Rail Assembly to the Rack
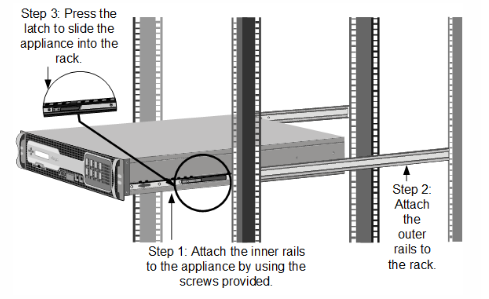
To install the appliance in the rack
- Align the inner rails, attached to the appliance, with the rack rails.
- Slide the appliance into the rack rails, keeping the pressure even on both sides.
- Verify that the appliance is locked in place by pulling it all the way out from the rack.
Figure 5. Rack Mounting the Appliance
Share
Share
This Preview product documentation is Cloud Software Group Confidential.
You agree to hold this documentation confidential pursuant to the terms of your Cloud Software Group Beta/Tech Preview Agreement.
The development, release and timing of any features or functionality described in the Preview documentation remains at our sole discretion and are subject to change without notice or consultation.
The documentation is for informational purposes only and is not a commitment, promise or legal obligation to deliver any material, code or functionality and should not be relied upon in making Cloud Software Group product purchase decisions.
If you do not agree, select I DO NOT AGREE to exit.