Manage MCN Configuration
The next step is to name and save the new configuration, seen also as a configuration package. This step is optional at this point in the configuration, but recommended. The configuration package is saved to your workspace on the local appliance. You then log out of the Management Web Interface and continue the configuration process later. However, if you log out, you should reopen the saved configuration when you resume. Instructions for opening a saved configuration are provided below.
Warning
If the Console session times out or you log out of the Management Web Interface before saving your configuration, any unsaved configuration changes are lost. You should log back into the system, and repeat the configuration procedure from the beginning. For that reason, it is recommended that you save the configuration package often, or at key points in the configuration. Tip:
As an extra precaution, it is recommended that you use Save As, rather than Save, to avoid overwriting the wrong configuration package.
-
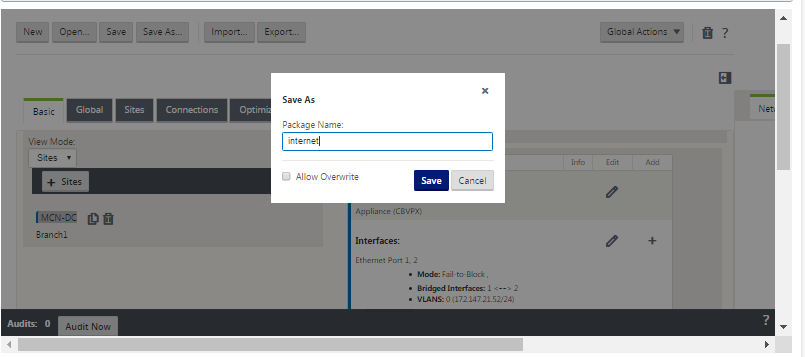
Click Save As (at the top of the Configuration Editor middle pane). The Save As dialog box opens.
-
Type the configuration package name.
Note
If you are saving the configuration to an existing configuration package, be sure to select Allow Overwrite before saving.
-
Click Save.
Note
After saving the configuration file, you can log out of the Management Web Interface and continue the configuration process later. However, if you log out, you should reopen the saved configuration when you resume. Instructions are provided in the section, Loading a Saved Configuration Package into the Configuration Editor.
You have now completed the MCN site configuration, and created a new SD-WAN configuration package. You are now ready to add and configure the branch sites. Instructions are provided in setup Branch Sites](/en-us/citrix-sd-wan/10-2/configuration/setup-branch-nodes.html).
Export backup copy of the configuration package
In addition to saving the configuration-in-progress to your appliance workspace, is recommended that you also periodically back up the configuration to your local PC.
To export the current configuration package to your PC, do the following:
-
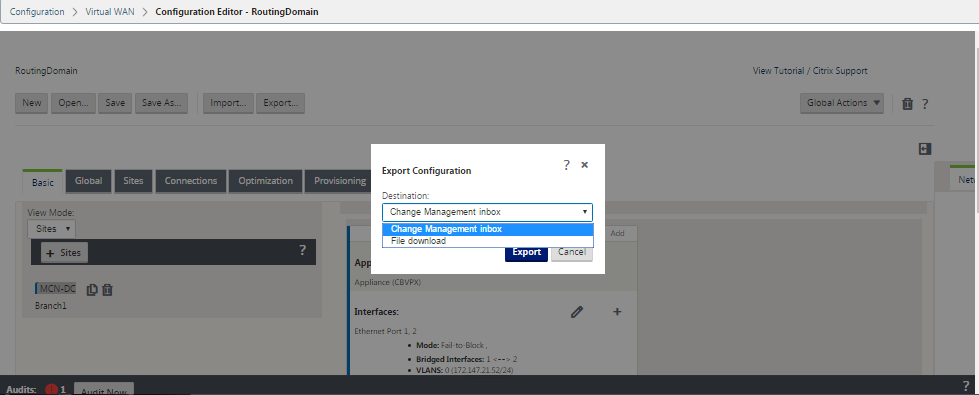
Click Export. This displays the Export Configuration dialog box.
-
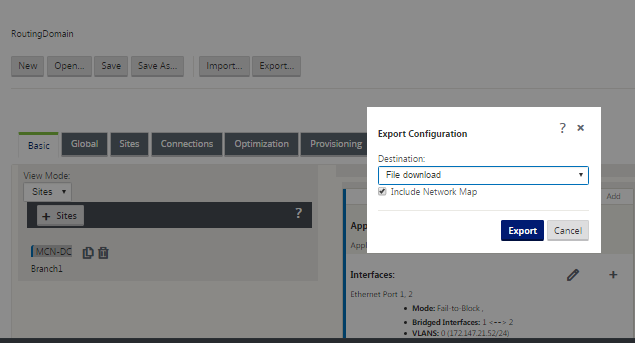
Select File Download from the Destination: drop down menu. This reveals the Include Network Map option, which is selected by default.
-
Accept the default, and click Export. This includes the Network Map information in the configuration package, and opens a file browser for specifying the name and location for saving the configuration.
-
Navigate to the save location on your PC and click Save. This saves the configuration package to your PC.
Note
To recover a backed-up configuration package, you can use an Import operation to import the package from your PC and load it into the Configuration Editor. You can then save the imported package to your Management Web Interface workspace for future use.
Import backed up configuration package
Sometimes, you might want to revert to an earlier version of a Configuration Package. If you have saved a copy of the earlier version to your local PC, you can import it back into the Configuration Editor, and then open it for editing. If this is not an initial deployment, you can also import an existing Configuration Package from the global Change Management inbox on the current MCN. Instructions for both of these procedures are provided below.
To import a Configuration Package, do the following:
-
Open the Configuration Editor.
-
In the Configuration Editor menu bar, click Import.
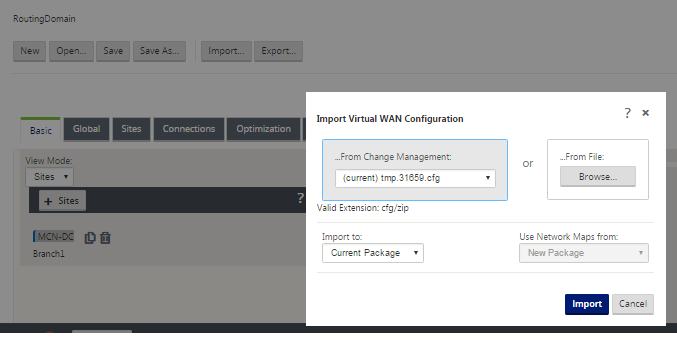
The Import Virtual WAN Configuration dialog box appears.
-
Select the location from which to import the package.
- To import a Configuration Package from Change Management: Select the package from the From Change Management drop-down menu (top left corner).
- To import a Configuration Package from your local PC: Click Browse to open a file browser on your local PC. Select the file and click OK.
-
Select the import destination (if applicable). If a Configuration Package is already open in the Configuration Editor, then the Import to: drop down menu will be available.
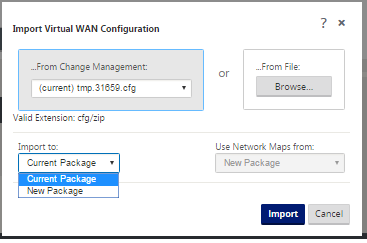
Select one of the following options:
Current Package – Select this to replace the contents of the currently opened Configuration Package with the contents of the imported package, and retain the name of the opened package. However, the contents of the saved version of the current package is not overwritten until you explicitly save the changed package. If you use Save As to save the package, select Allow Overwrite to enable overwriting of the previous version.
- New Package – Select this to open a new, blank Configuration Package, and populate it with the contents of the imported package. The new package automatically takes the same name as the imported package.
-
Specify which network maps to include (if applicable). If a Configuration Package is already open in the Configuration Editor, then the Use Network Maps From: drop down menu is available.
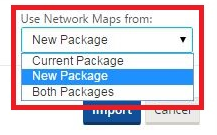
Select one of the following options:
-
Current Package – This retains the network maps currently configured in the package now available in the Configuration Editor, and discards any network maps from the imported package.
-
New Package – This replaces the network maps currently configured in the currently open package with the network maps (if any) from the imported package.
-
Both Packages – This includes all network maps from both the current and the imported package.
-
-
Click Import. The imported file is loaded into the Configuration Editor, according to your specifications.
Note
If a package of the same name exists in your workspace, then the Name Conflict dialog box displays.
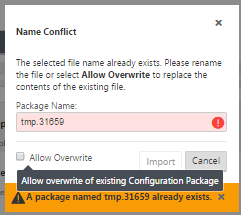
To specify the name to use for the imported package, do one of the following:
-
Type a different name in the Package Name field to rename the new package and enable the Import button. The imported package is loaded into the Configuration Editor with the specified name. The package name is saved to your workspace now, but the package contents are saved to your workspace until you explicitly save the package.
-
Select Allow Overwrite to confirm that you want to retain the existing name and enable overwriting of the contents of the saved package. However, the contents of the saved version of the current package are not overwritten until you explicitly save the changed package.
-
This also enables the Import button in the Name Conflict dialog box. Click Import to complete the import operation.
Load saved configuration package
To resume work on a saved configuration package, you must first open the package and load it into the Configuration Editor.
To load a saved configuration package, do the following:
-
Log back into the Management Web Interface, and navigate to the Configuration Editor. This opens the Configuration Editor main page for a new session.
If you have logged back into the Management Web Interface, the Configuration Editor initially opens for a new session, with no configuration package loaded. You can start a new configuration (New), open an existing saved configuration (Open), or import (Import) and then open (Open) a configuration previously backed up to your local PC.
-
Click Open. The Open Configuration Package dialog box appears.
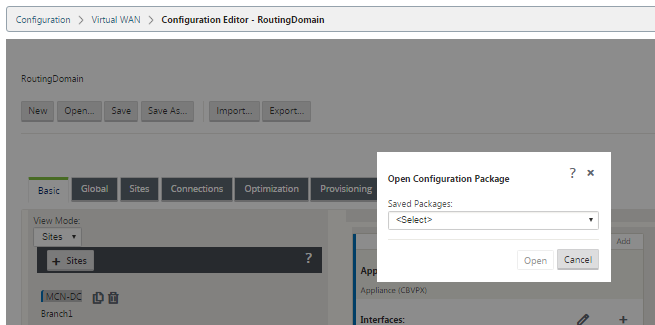
-
Select the package to open from the Saved Packages drop down menu.
Note
If you have opened the Configuration Editor, it might take a few seconds or a minute or two for the Saved Packages menu to be populated, depending on the number of configurations you have saved to your workspace. If so, in the interim, the Saved Packages menu field might display the message No saved packages. If this occurs, click Cancel to close the dialog box, wait a few moments, and click Open again to reopen the dialog box.
-
Click Open.
Note
This opens the specified Configuration Package and loads it into the Configuration Editor for editing, only. This does not stage or activates the selected configuration to the local appliance.
Rename sites
If you change the name of the MCN site in the configuration editor, you have to apply the configuration with the renamed site to the MCN and SD-WAN network. Depending on the MCN role and whether high availability is enabled or disabled, the following scenarios are applicable for SD-WAN network configuration when renaming sites.
- MCN
- MCN with high availability
- GEO
- GEO with high availability
- RCN
- RCN with high availability
Renaming MCN site
After you rename the MCN, you have to load the new configuration with the renamed site.
To upload new configuration for renamed site:
-
From the MCN, stage network with the new configuration.
-
Download the staging configuration package for the renamed MCN.
-
Navigate to the Local Change Management page of the MCN.
- Upload the package downloaded earlier.
- Click Next after processing is completed.
- Click Activate.
Note
After step 3 (c) is complete, the change management process automatically activates the staged software for appliances (nodes) in the network.
Renaming MCN site with high availability
After renaming the MCN for which high availability is enabled, you have to load the new configuration.
- From the MCN, stage network with new configuration.
- Download the staging configuration package for both the active and high availability MCN appliances with new name.
- Disable service on the standby MCN appliance.
- Navigate to the Local Change Management page of the active MCN.
- Upload the package downloaded earlier.
- Click Next when processing is complete.
- Click Activate.
- Repeat steps i, ii, iii, iv for the high availability disabled standby MCN appliance.
- Enable service on the standby MCN appliance.
Note
After step 4 (c) is complete, the change management process automatically activates the staged software for appliances in the network.
Renaming GEO site
To upload new configuration for a renamed GEO site:
- From the MCN, stage network with new configuration containing the renamed GEO site.
- From the MCN, download the staging configuration package for the renamed GEO site.
- On the MCN, select Activate Staged for network. This deactivates the renamed site and the site becomes unavailable.
-
Navigate to the Local Change Management page on the GEO site.
-
Upload the package downloaded earlier.
-
Click Next when processing the package is complete.
-
Click Activate.
-
Renaming GEO site with high availability
To upload new configuration with a renamed GEO site enabled with high availability:
-
From the MCN, stage network with new configuration containing the renamed the GEO site.
-
From the MCN, download the staging configuration package for both the active and high availability appliances with the renamed GEO site.
-
On the MCN, select Activate Staged for the network. This disables the renamed site and the site becomes unavailable.
-
Navigate to the active GEO appliance.
- Go to the Local Change Management page.
- Upload the package downloaded earlier.
- Click Next when processing the package is complete.
- Click Activate.
- Repeat steps a,b,c, and d for the standby appliance.
Renaming RCN site
To upload new configuration with renamed RCN site:
-
From the MCN, stage network with new configuration containing the renamed RCN site.
-
From the MCN, download the staging package for the renamed RCN site.
-
On the MCN, select Activate Staged for network. This disables the renamed RCN site and the region site becomes unavailable at the MCN. The RCN site and branches in the region communicate with each other, however until step 4 is complete the region cannot communicate with the MCN (unless there is a GEO RCN that is not renamed).
-
Navigate to the RCN’s Local Change Management page:
- Upload the package downloaded earlier.
- Click Next when the package processing complete.
- Click Activate.
Note
The branches in the region take sometime to become available since the region staging does not occur until after step 4 (c) is completed. The RCN’s change management process manages the region staging.
Renaming RCN site with high availability
To upload new configuration with renamed RCN site enabled with high availability.
-
From the MCN, stage network with new configuration containing the renamed RCN site.
-
From the MCN, download the staging package for both the active and high availability appliances with renamed RCN site. This disables the renamed RCN site and the region site becomes unavailable at the MCN. The RCN site and branches in the region communicate with each other, however until step 4 is complete the region cannot communicate with the MCN (unless there is a GEO RCN that is not renamed).
-
On the MCN, select Activate Staged for network.
-
Disable service on the standby RCN appliance.
-
Navigate to the active RCN’s Local Change Management page:
- Upload the package downloaded earlier.
- Click Next when processing the package is complete.
- Click Activate.
- Repeat steps a,b,and c for the disabled standby RCN appliance.
-
Enable service on the standby RCN appliance.
Renaming GEO RCN site
To upload new configuration with renamed GEO RCN site:
-
From the MCN, stage network with new configuration with renamed GEO RCN site.
-
From the MCN, download the staging package for the renamed GEO RCN site.
-
On the MCN, select Activate Staged for network. This disables the renamed site and the site becomes unavailable. If the primary RCN is online, the region remains connected to the network when renaming GEO RCN site.
-
Navigate to the GEO RCN’s Local Change Management page:
- Upload the package downloaded earlier.
- Click Next when processing the package is complete.
- Click Activate.
Renaming GEO RCN site with high availability
-
From the MCN, stage network with new configuration with renamed GEO RCN site.
-
From the MCN, download the staging package for both the active and high availability appliance for the renamed GEO RCN site.
-
On the MCN, select Activate Staged for network. This disables the renamed site and the site becomes unavailable. If the primary RCN is online, the region remains connected to the network when renaming GEO RCN site.
-
Navigate to the active GEO RCN’s Local Change Management page:
- Upload the package downloaded earlier.
- Click Next when processing the package is complete.
- Click Activate.
- Repeat steps a, band c for the standby appliance.