-
Configuration guide for Citrix Virtual Apps and Desktops workloads
-
In-band and backup management
-
Citrix SD-WAN Orchestrator on-premises configuration on Citrix SD-WAN appliance
-
-
This content has been machine translated dynamically.
Dieser Inhalt ist eine maschinelle Übersetzung, die dynamisch erstellt wurde. (Haftungsausschluss)
Cet article a été traduit automatiquement de manière dynamique. (Clause de non responsabilité)
Este artículo lo ha traducido una máquina de forma dinámica. (Aviso legal)
此内容已经过机器动态翻译。 放弃
このコンテンツは動的に機械翻訳されています。免責事項
이 콘텐츠는 동적으로 기계 번역되었습니다. 책임 부인
Este texto foi traduzido automaticamente. (Aviso legal)
Questo contenuto è stato tradotto dinamicamente con traduzione automatica.(Esclusione di responsabilità))
This article has been machine translated.
Dieser Artikel wurde maschinell übersetzt. (Haftungsausschluss)
Ce article a été traduit automatiquement. (Clause de non responsabilité)
Este artículo ha sido traducido automáticamente. (Aviso legal)
この記事は機械翻訳されています.免責事項
이 기사는 기계 번역되었습니다.책임 부인
Este artigo foi traduzido automaticamente.(Aviso legal)
这篇文章已经过机器翻译.放弃
Questo articolo è stato tradotto automaticamente.(Esclusione di responsabilità))
Translation failed!
In-band and backup management
In-band management
Citrix SD-WAN allows you to manage the SD-WAN appliance in two ways, out-of-band management and in-band management. Out-of-band management allows you to create a management IP using a port reserved for management, which carries management traffic only. In-band management allows you to use the SD-WAN data ports for management. It carries both data and management traffic, without having to configure an addition management path.
In-band management allows virtual IP addresses to connect to management services such as web UI and SSH. You can enable In-band management on multiple trusted interfaces that are enabled to be used for IP services. You can access the web UI and SSH using the management IP and in-band virtual IPs.
To enable in-band management on a virtual IP:
- In the configuration editor navigate to Sites > Virtual IP Addresses.
-
Select Inband Mgmt for the virtual IPs for which you want to enable in-band management.
Note:
Ensure that the interface security type is Trusted and Identity is enabled.
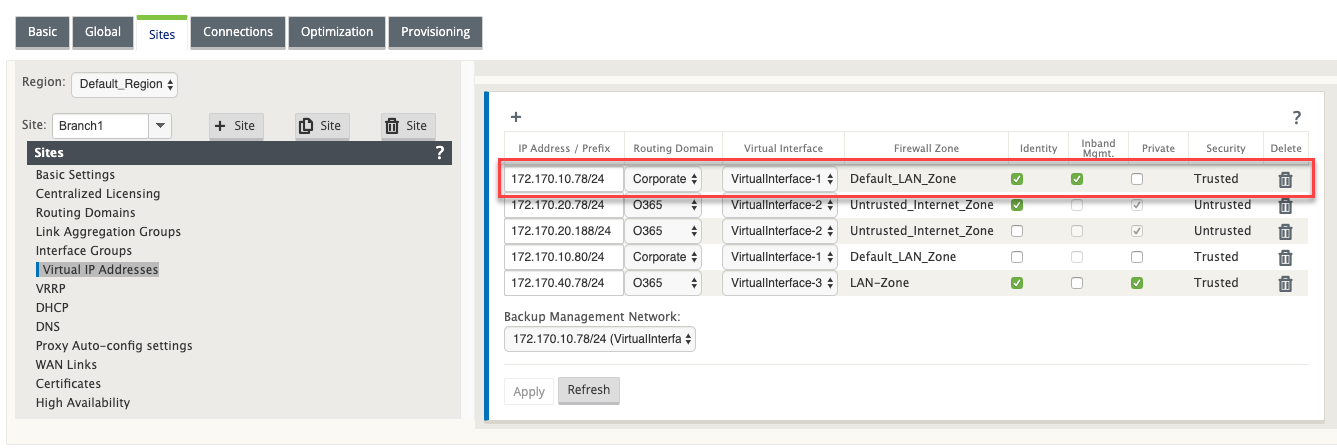
- Click Apply
For detailed procedure on configuring virtual IP address, see How to configure virtual IP.
Monitoring in-band management
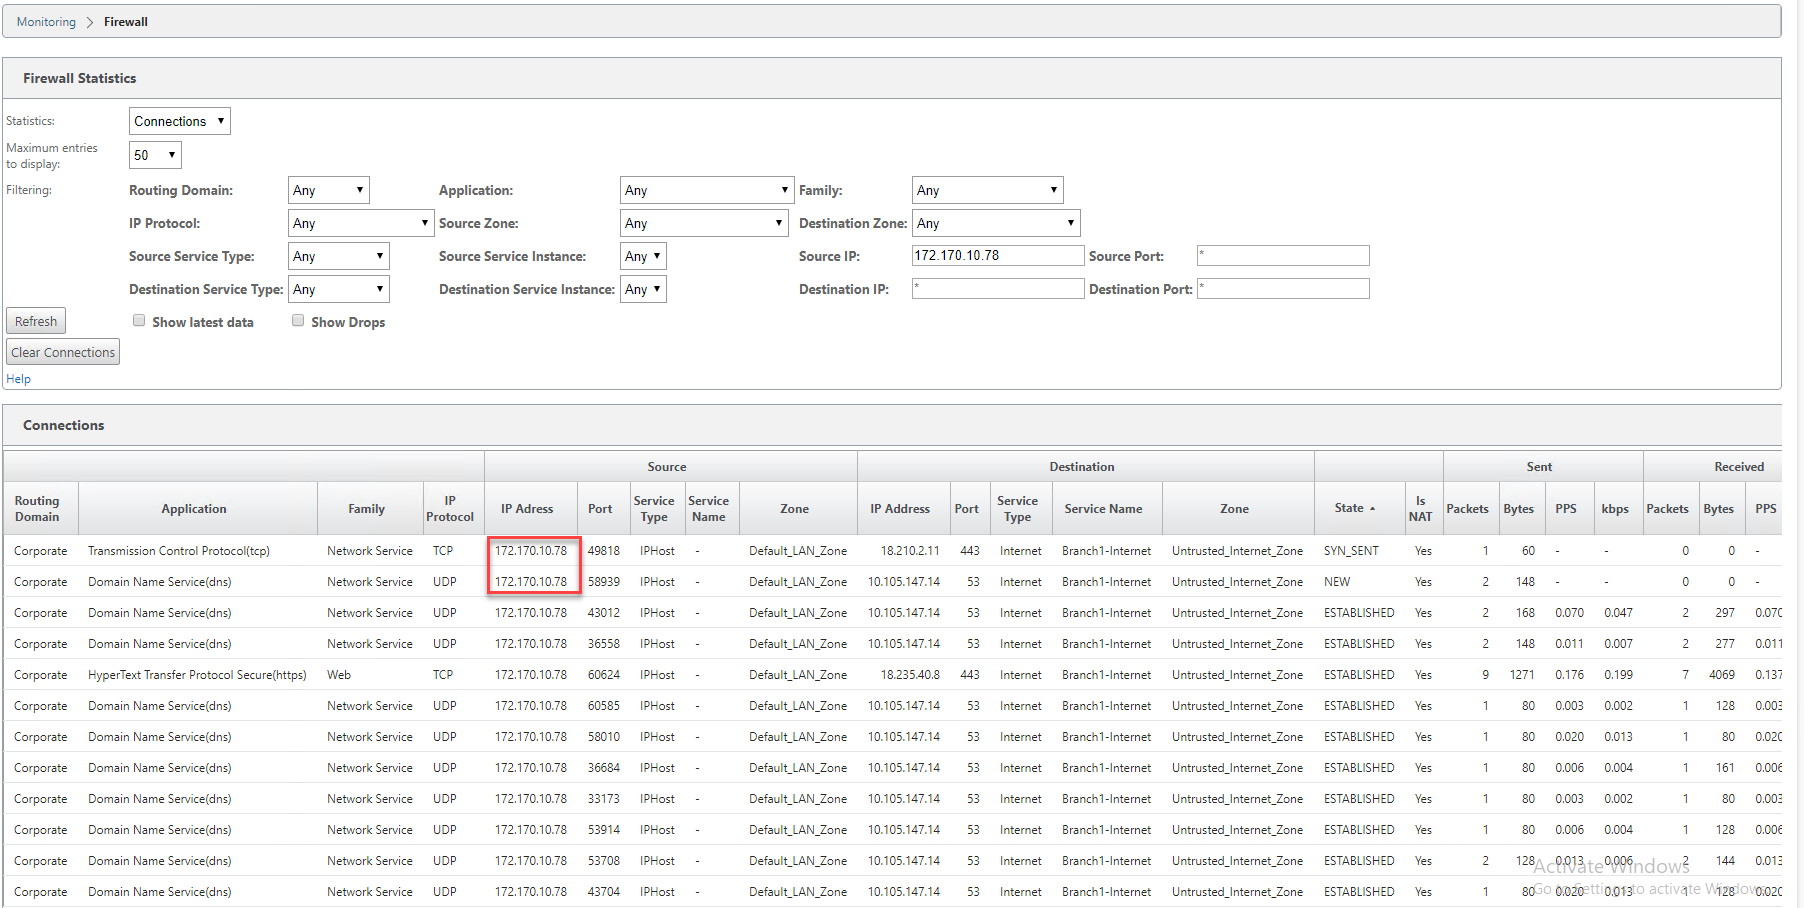
In the preceding example, we have enabled in-band management on 172.170.10.78 virtual IP. You can use this IP to access the web UI and SSH.
In the web UI navigate to Monitoring > Firewall. You can see SSH and web UI accessed using the virtual IP on port 22 and 443 respectively in the Destination IP address column.

In-band provisioning
The need to deploy SD-WAN appliances in simpler environments like home or small branches has increased significantly. Configuring separate management access for simpler deployments is an added overhead. Zero-touch deployment (ZTD) along with in-band management feature enables provisioning and configuration management via designated data ports. ZTD is now supported on the designated data ports and there is no need to use a separate management port for ZTD. Citrix SD-WAN also allows to fail over management traffic seamlessly to the management port when the data port goes down and vice versa.
An appliance in factory shipped state, that supports in-band provisioning, can be provisioned by simply connecting the data or management port to the internet. The appliances that support in-band provisioning have specific ports for LAN and WAN. The appliance in factory reset state has a default configuration that allows to establish a connection with the zero-touch deployment service. The LAN port acts as the DHCP server and assigns a dynamic IP to the WAN port that acts as a DHCP client. The WAN links monitor the Quad 9 DNS service to determine WAN connectivity.
Note
In-band provisioning is applicable to SD-WAN 110 SE and SD-WAN VPX platforms only.
Once the IP address is obtained and a connection is established with the zero-touch deployment service the configuration packages are downloaded and installed on the appliance. For information on zero-touch deployment through SD-WAN Center, see Zero Touch Deployment. For information on zero-touch deployment through SD-WAN Orchestrator see, Zero Touch Deployment.
Note: For day-0 provisioning of SD-WAN appliances through the data ports, the appliance software version should be SD-WAN 11.1.0 or higher.
The default configuration of an appliance in factory reset state includes the following configurations:
- DHCP Server on LAN port
- DHCP client on WAN port
- QUAD9 configuration for DNS
- Default LAN IP is 192.168.0.1
- Grace License of 35 days.
Once the appliance is provisioned, the default configuration is disabled and is overridden by the configuration received from the zero-touch deployment service. If an appliance license or grace license expiries, the default configuration is activated, to ensure that the appliance remains connected to the zero-touch deployment service and receives licenses managed via zero-touch deployment.
Fallback Configuration
Fallback configuration ensures that the appliance remains connected to the zero-touch deployment service if there is link failure, configuration mismatch, or software mismatch. Fallback configuration is enabled by default on the appliances that have a default configuration profile. You can also edit the fallback configuration as per your existing LAN network settings.
Note: After the initial appliance provisioning, ensure that the fallback configuration is enabled for zero-touch deployment service connectivity.
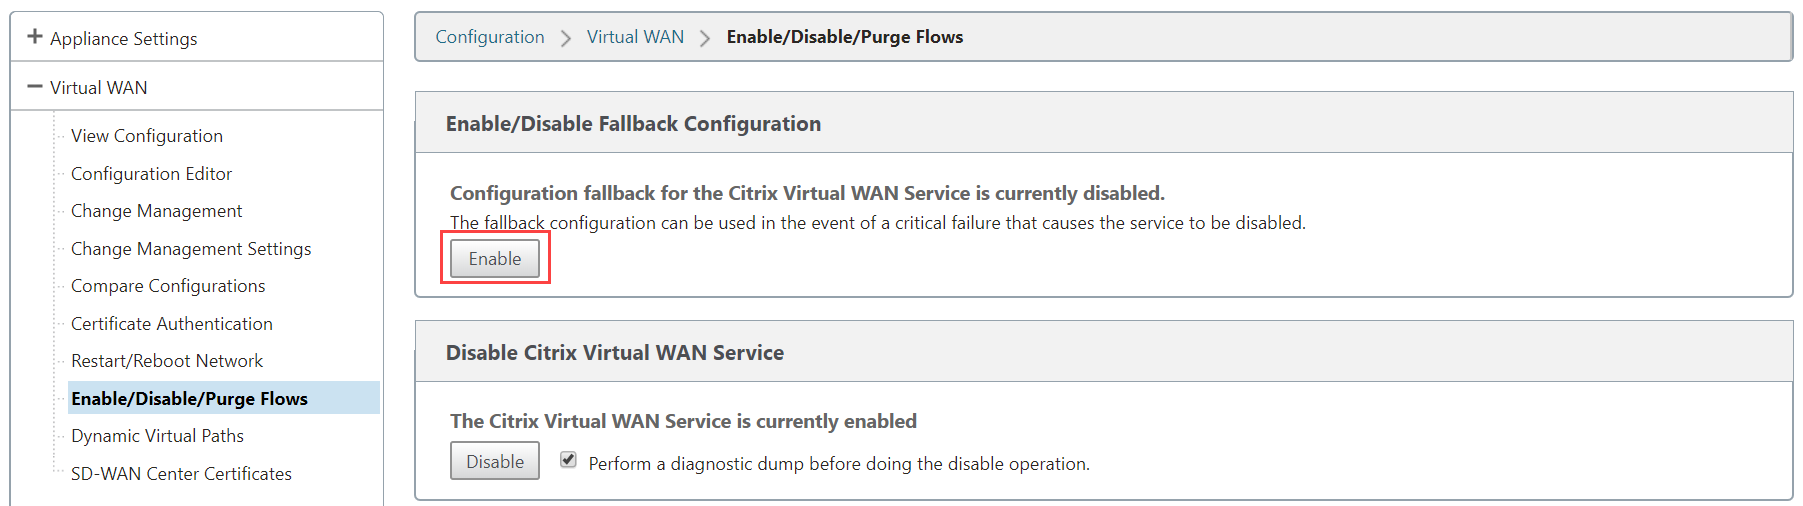
If the fall back configuration is disabled, you can enable it by navigating to Configuration > Virtual WAN > Enable /Disable/Purge Flows > Enable/Disable Fallback Configuration and clicking Enable.
To customize the fallback configuration as per your LAN network:
- Navigate to Configuration > Appliance Settings > Fallback Configuration.
-
Edit values for the following LAN settings as per your network requirements. This is the minimum configuration required to establish a connection with the zero-touch deployment service.
- VLAN ID: The VLAN ID to which the LAN port must be grouped.
- IP Address: The virtual IP address assigned to the LAN port.
- DHCP Enabled: Enables the LAN port as the DHCP server. The DHCP server assigns dynamic IP addresses to the clients on the LAN port.
- DHCP Start and DHCP End: The range of IP addresses which DHCP uses to dynamically assign an IP to the clients on the LAN port.
- DNS Server: The IP address of the primary DNS server.
- Alt DNS Server: The IP address of the secondary DNS server.
- Internet Access: Permit internet access to all LAN clients without other filtering.
The following table provides the details of pre-designated WAN and LAN ports for fallback configuration on different platforms:
Platform WAN Ports LAN Ports 110 1/2 1/1 110-LTE 1/2, LTE-1 1/1 210 1/4, 1/5 1/3 210-LTE 1/4, 1/5, LTE-1 1/3 VPX 2 1 410 1/4, 1/5, 1/6 1/3 (FTB) 1100 1/4, 1/5, 1/6 1/3 (FTB) 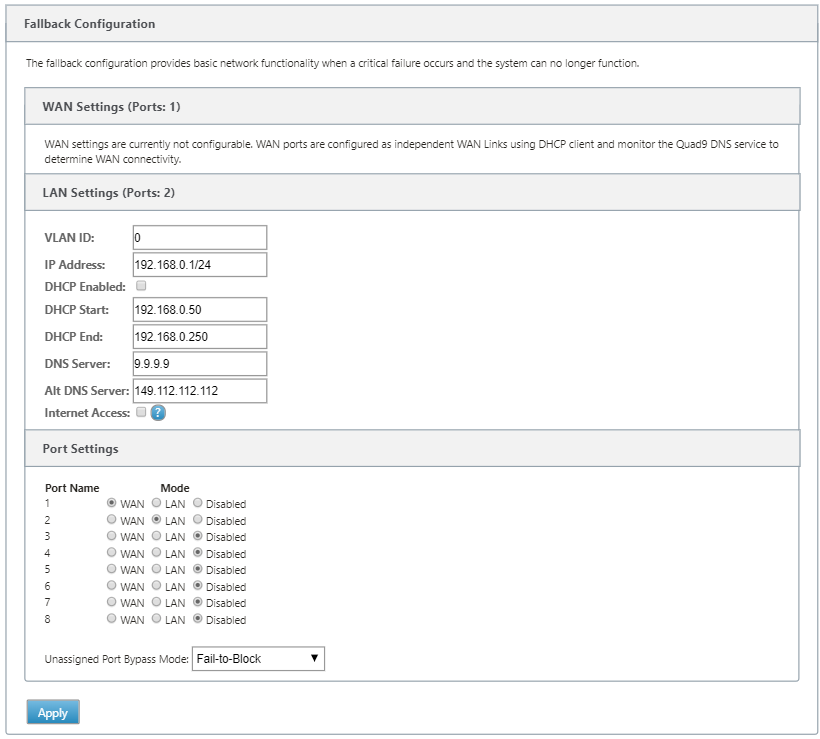
- Configure the mode for each port. The port can either be LAN port or WAN port or can be disabled. The ports displayed depend on the appliance model. Also, set the port bypass mode to Fail-to-Block or Fail-to-wire.
To reset the fallback configuration to default configuration at any time, click Reset.

Configurable Management or Data port
In-band management allows the data ports to carry both data and management traffic, eliminating the need for a dedicated management port. This leaves the management port unused on the low end appliances, which already have low port density. Citrix SD-WAN allows you to configure the management port to operate as either a data port or a management port.
Note
You can convert the management port to data port only on the following platforms.
- Citrix SD-WAN 110 SE/LTE
- Citrix SD-WAN 210 SE/LTE
On the configuration editor, use the management port in your configuration. After the configuration is activated, the management port is converted to a data port.
Note
You can configure a management port only when in-band management is enabled on other trusted interfaces on the appliance.
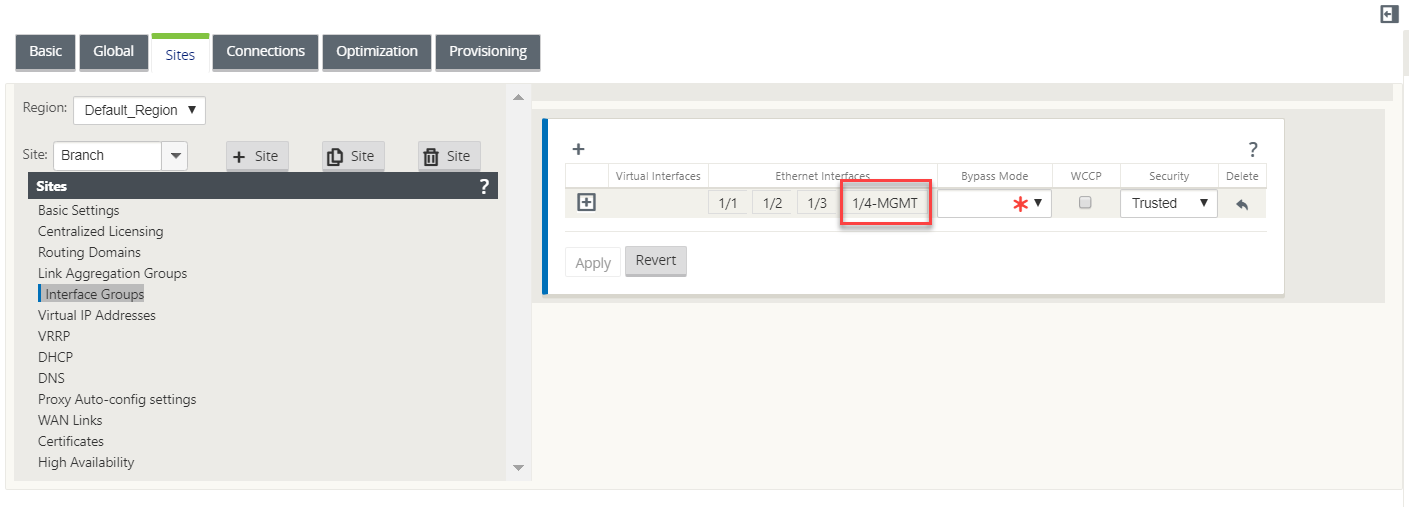
To configure a management interface, in the configuration editor navigate to Sites, select a site and click Interface Groups. The MGMT interface is available to be configured. For more information on configuring interface groups, see How to configure interface groups.
To reconfigure the management port to perform management functionality, remove the configuration. Create a configuration without using the management port and activate it.
Backup management network
You can configure a virtual IP address as a back-up management network. It is used as the management IP address if the management port is not configured with a default gateway.
Note
If a site has internet service configured with a single routing domain, a trusted interface with identity enabled is selected as the backup management network by default.
To select a virtual IP as a backup management network:
-
In the configuration editor navigate to Sites > Virtual IP Addresses.
-
Select a virtual IP address as a backup management network.

-
Select the DNS Proxy to which all DNS requests over the in-band and backup management plane is forwarded to.
Note
DNS proxy can be selected only when both In-band Management and Backup Management Network are enabled for a virtual IP.
-
Click Apply.
For detailed procedure on configuring virtual IP address, see How to configure virtual IP address
Monitoring backup management
In the preceding example, we have selected 172.170.10.78 virtual IP as the backup management network. If the management IP address is not configured with a default gateway, you can use this IP to access the web UI and SSH.
In the web UI navigate to Monitoring > Firewall. You can see this virtual IP address as the source IP address for SSH and web UI access.
Share
Share
This Preview product documentation is Cloud Software Group Confidential.
You agree to hold this documentation confidential pursuant to the terms of your Cloud Software Group Beta/Tech Preview Agreement.
The development, release and timing of any features or functionality described in the Preview documentation remains at our sole discretion and are subject to change without notice or consultation.
The documentation is for informational purposes only and is not a commitment, promise or legal obligation to deliver any material, code or functionality and should not be relied upon in making Cloud Software Group product purchase decisions.
If you do not agree, select I DO NOT AGREE to exit.