Azure
The procedure to deploy zero touch deployment process for cloud instances is slightly different from appliance deployment for zero touch service.
Update the configuration to add a new remote site with a ZTD capable SD-WAN cloud device using SD-WAN Center network configuration
If the SD-WAN configuration was not built using the SD-WAN Center Network Configuration, import the active configuration from the MCN and begin modifying the configuration using SD- WAN Center. For Zero Touch Deployment capability, the SD-WAN Administrator must build the configuration using SD-WAN Center. The following procedure should be used to add a new cloud node targeted for zero touch deployment.
-
Design the new site for SD-WAN cloud deployment by first outlining the details of the new site (i.e. VPX size, Interface Groups usage, Virtual IP Addresses, WAN Link(s) with bandwidth and their respective Gateways).
Note
-
Cloud deployed SD-WAN instances must be deployed in Edge/Gateway mode.
-
The template for the cloud instance is limited to three interfaces; Management, LAN, and WAN (in that order).
-
The available Azure cloud templates for SD-WAN VPX are currently hard-set to obtain the 10.9.4.106 IP for the WAN, 10.9.3.106 IP for the LAN, and 10.9.0.16 IP for the Management address. The SD-WAN configuration for the Azure node targeted for Zero Touch must match this layout.
-
The Azure site name in the configuration must be all lowercase with no special characters (e.g. ztdazure).
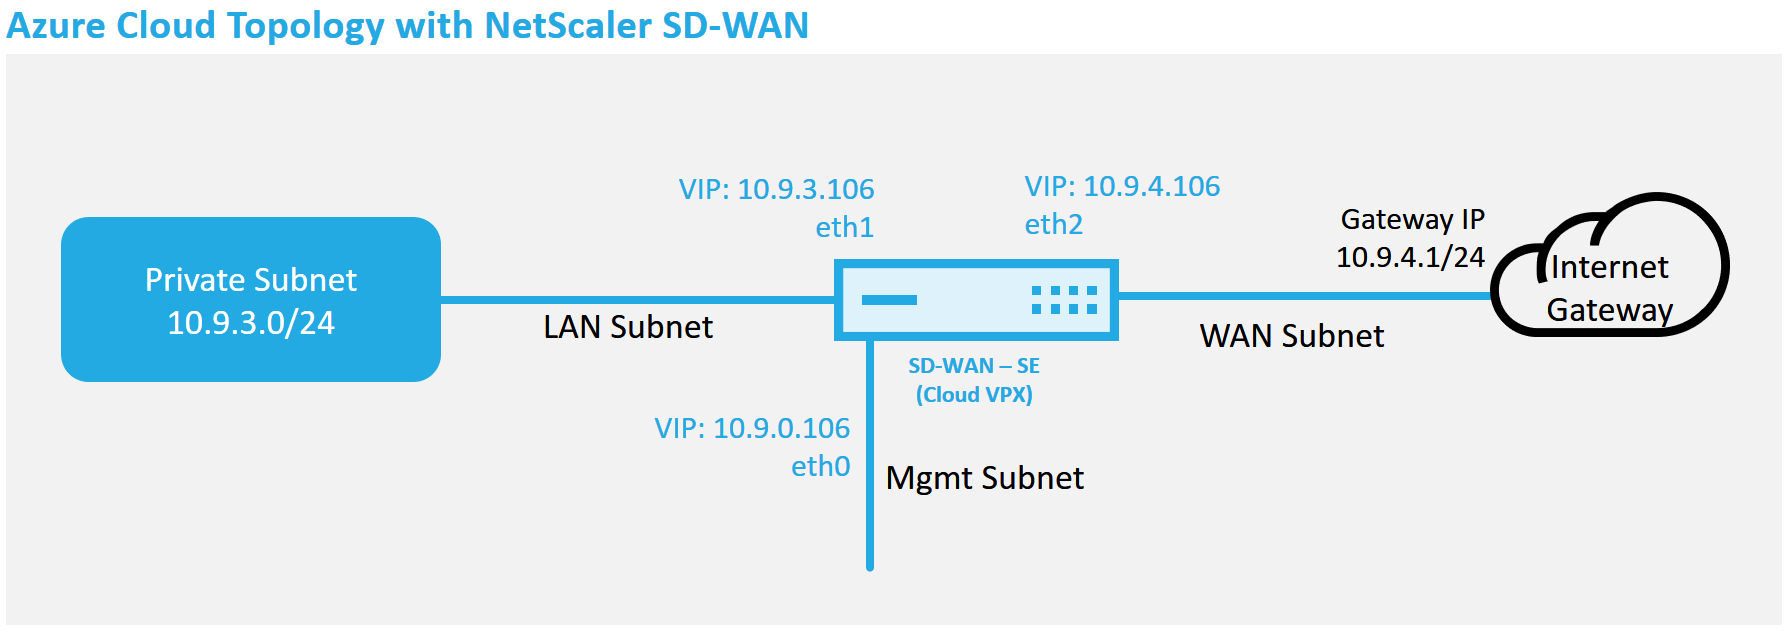
This is an example deployment of a SD-WAN cloud deployed site, the Citrix SD-WAN device is deployed as the edge device servicing a single Internet WAN link in this cloud network. Remote sites will be able to leverage multiple distinct Internet WAN links connecting into this same Internet Gateway for the cloud, providing resiliency and aggregated bandwidth connectivity from any SD-WAN deploy site to the cloud infrastructure. This provides cost effective and highly reliable connectivity to the cloud.
-
-
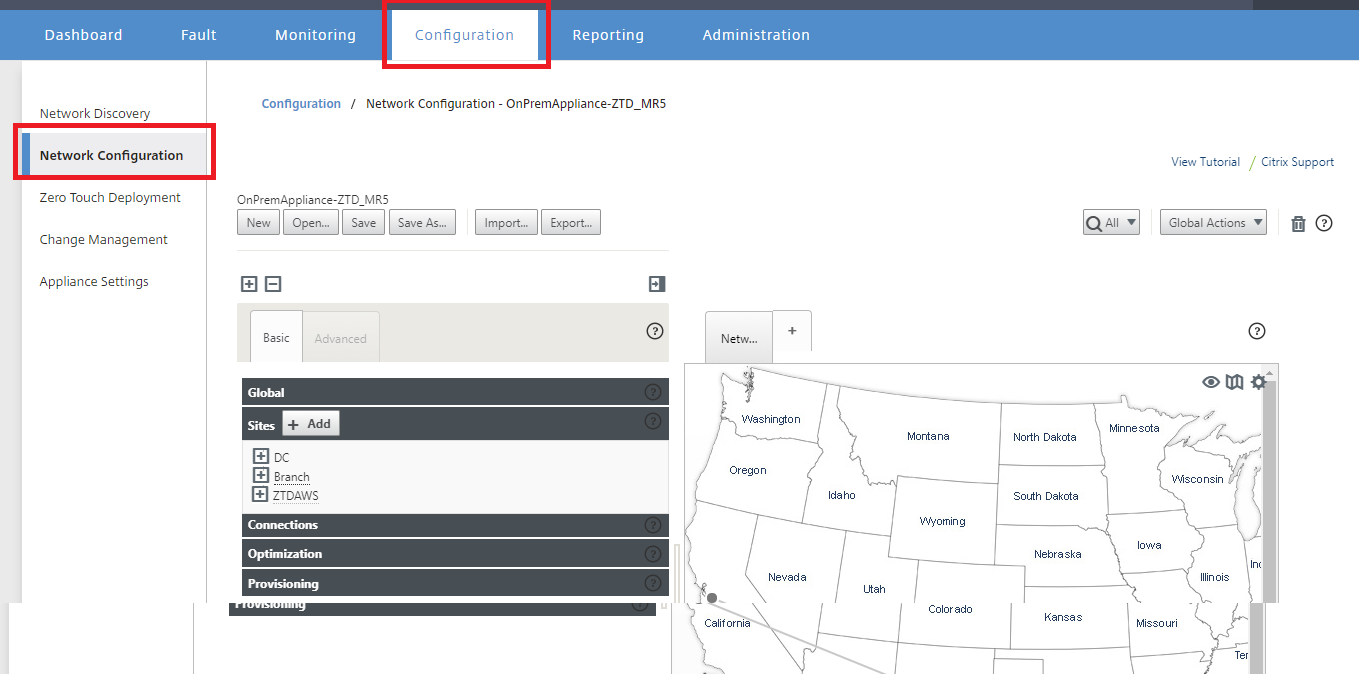
Open the SD-WAN Center web management interface and navigate to the Configuration > Network Configuration page.
-
Make sure a working configuration is already in place, or import the configuration from the MCN.
-
Navigate to the Basic tab to create a new site.
-
Open the Sites tile to display the currently configured sites.
-
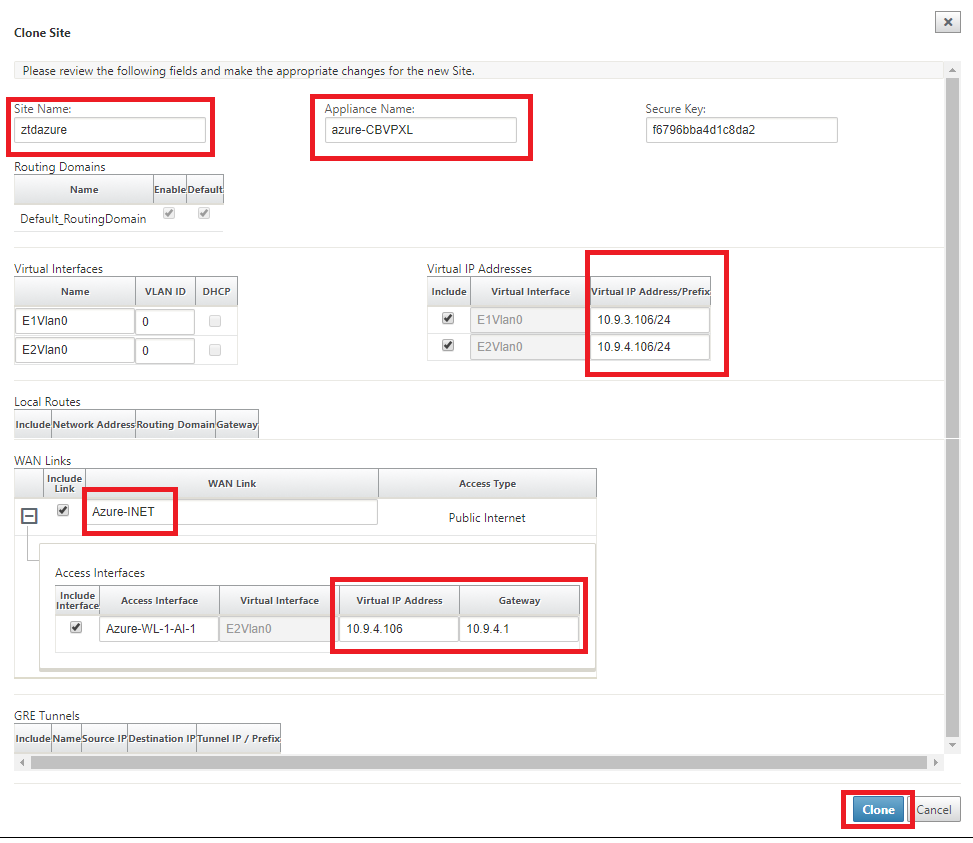
Quickly built the configuration for the new cloud site by utilizing the clone feature of any existing site, or manually build a new site.

-
Populate all the required fields from the topology designed earlier for this new cloud site.
Keep in mind that the template available for Azure cloud ZTD deployments is currently hard-set to obtain the 10.9.4.106 IP for the WAN, 10.9.3.106 IP for the LAN, and 10.9.0.16 IP for the Management address. If the configuration is not set to match the expected VIP address for each interface, then the device will not be able to properly establish ARP to the cloud environment gateways and IP connectivity to the Virtual Path of the MCN.
It is import that the site name be compliant with what Azure expects. The site name must be in all lower case, at least 6 characters, with no special characters, it must confirm to the following regular expression ^[a-z][a-z0-9-]{1,61}[a-z0-9]$.
-
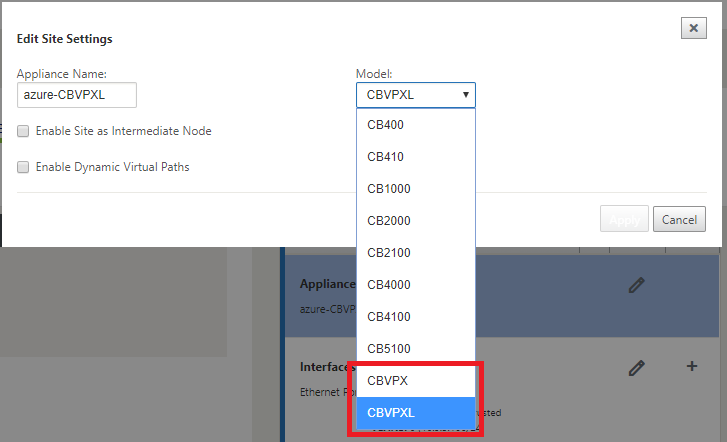
After cloning a new site, navigate to the site’s Basic Settings, and verify that the Model of SD-WAN is correctly selected which would support the zero touch service.
-
Save the new configuration on SD-WAN Center, and use the export to the Change Management inbox option to push the configuration using Change Management.
-
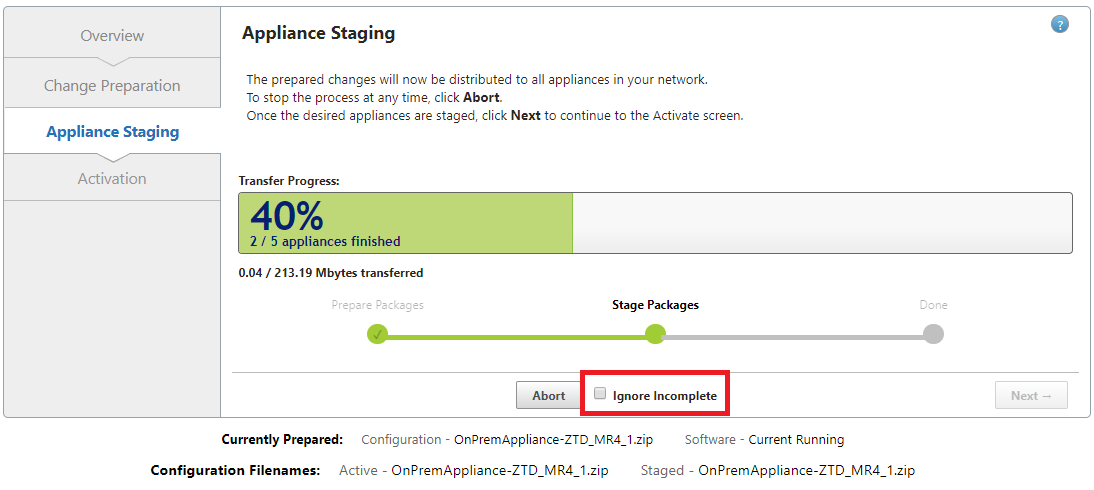
Follow the Change Management procedure to properly stage the new configuration, which makes the existing SD-WAN devices aware of the new site to be deployed via zero touch, you will need to utilize the Ignore Incomplete option to skip attempting to push the configuration to the new site that still needs to go through the ZTD workflow.
Navigate to the SD-WAN Center’s Zero Touch Deployment page, and with the new active configuration running, the new site will be available for SD-WAN Center Provision and Deploy Azure (Step 1 of 2)
-
In the Zero Touch Deployment page, login with your Citrix account credentials. Under the Deploy New Site tab, select the running network configuration file.
-
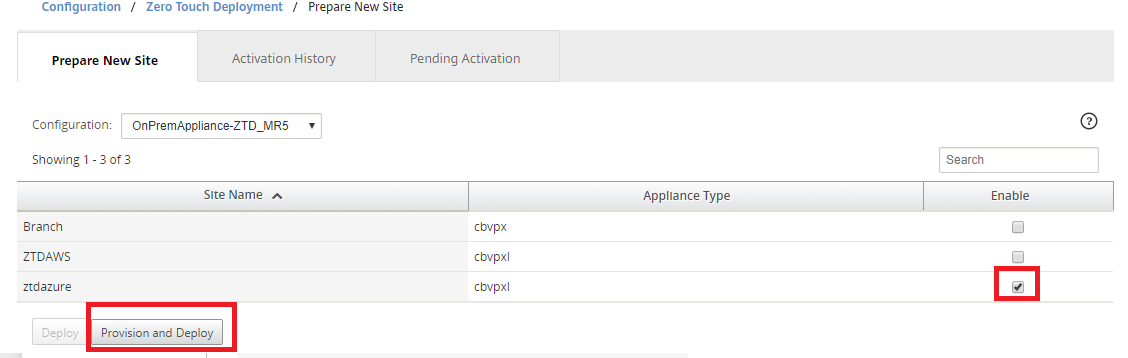
After the running configuration file is selected, the list of all the branch sites with ZTD capable Citrix SD-WAN devices will be displayed.

-
Select the target cloud site you want to deploy using the Zero Touch service, click Enable, and then Provision and Deploy.
-
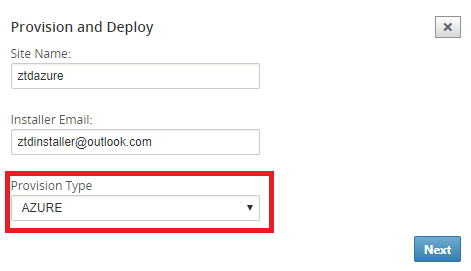
A pop-up window will appear, where the Citrix SD-WAN Admin can initiate the deployment for Zero Touch. Validate that the site name complys with the requirements on Azure (lowercase with no special characters). Populate an email address where the activation URL can be delivered, and select Azure as the Provision Type for the desired Cloud, before clicking Next.
-
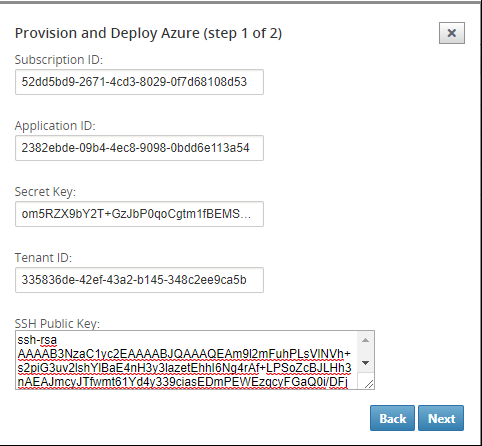
After clicking Next, the Provision and Deploy Azure (step 1of 2) window will require input of obtained from the Azure account.
Copy and paste each required field after obtaining the information from your Azure account. The steps below outline how to obtain the required Subscription ID, Application ID, Secret Key, and Tenant ID from your Azure account, then proceed by clicking Next.
-
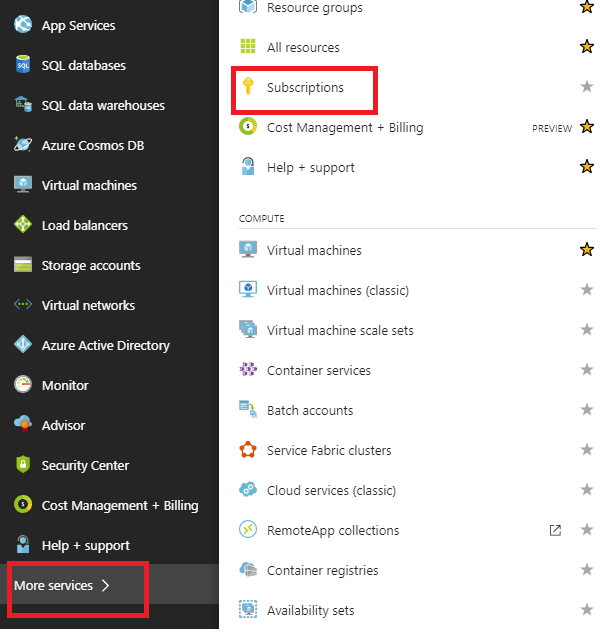
On the Azure account, we can identify the required Subscription ID by navigating to “More Services” and select Subscriptions.

-
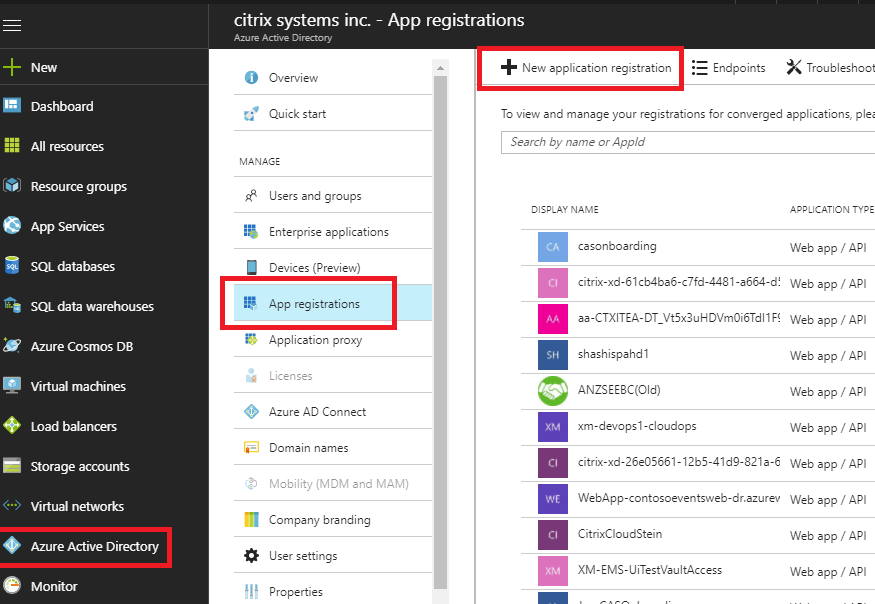
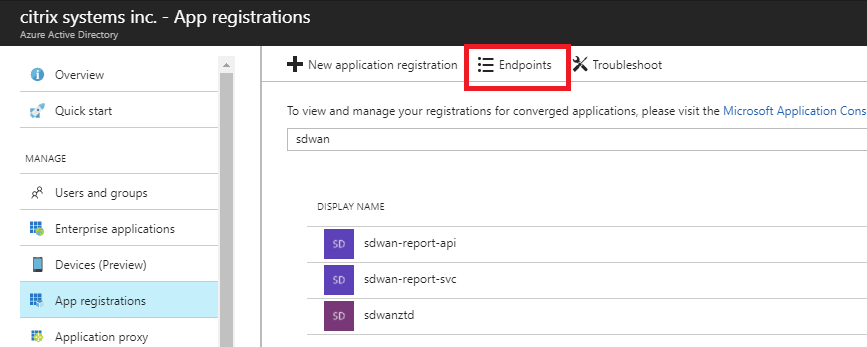
To identify the required *Application ID, navigate to Azure Active Directory, Application registrations, and click New application registration.
-
In the app registration create menu, enter a Name and a Sign-on URL (this can be any URL, the only requirement is that it must be valid), then click Create.

-
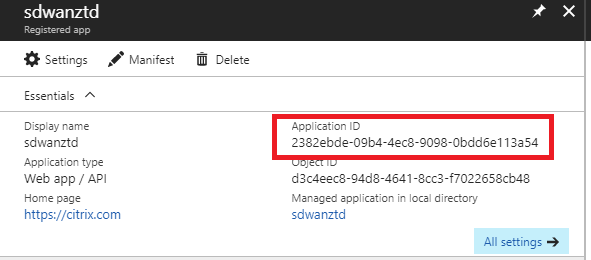
Search for and open the newly created Registered App, and note the Application ID.
-
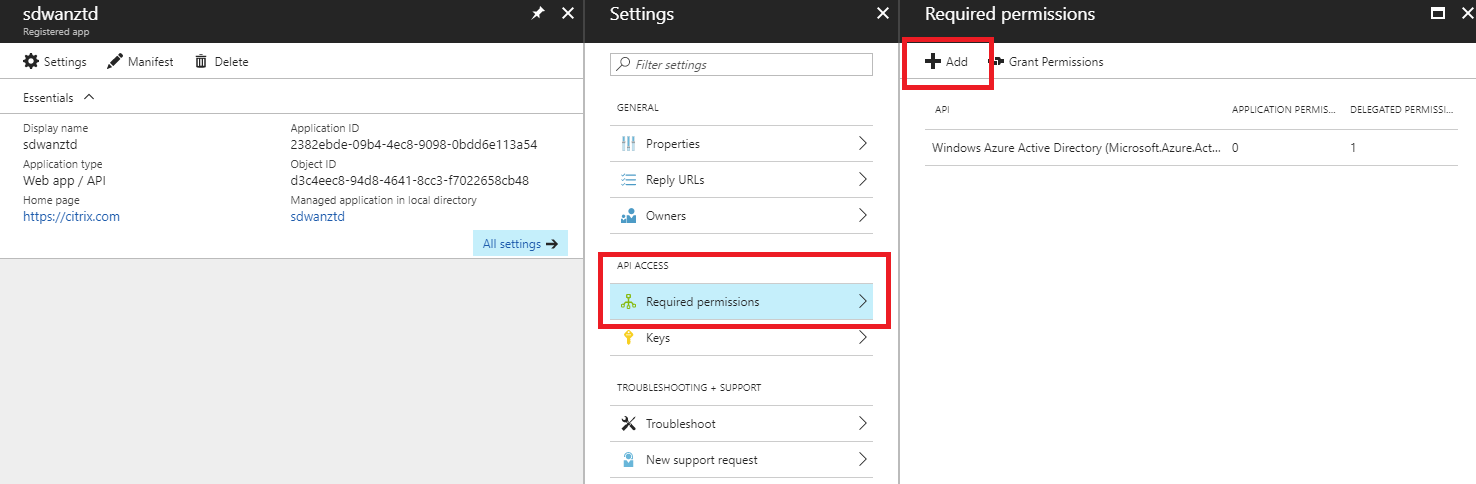
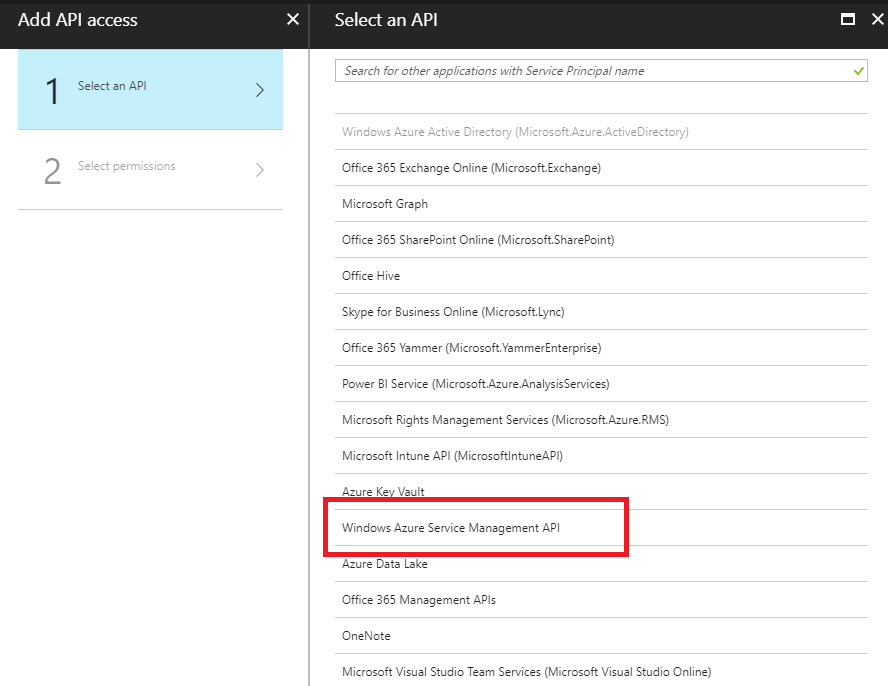
Again open the newly created Registration App, and to identify the required Security Key, under API Access, select Required permissions, to allow a third party to provision and instance. Then select Add.
-
When adding the Required permissions, Select an API, then highlight Windows Azure Service Management API.
-
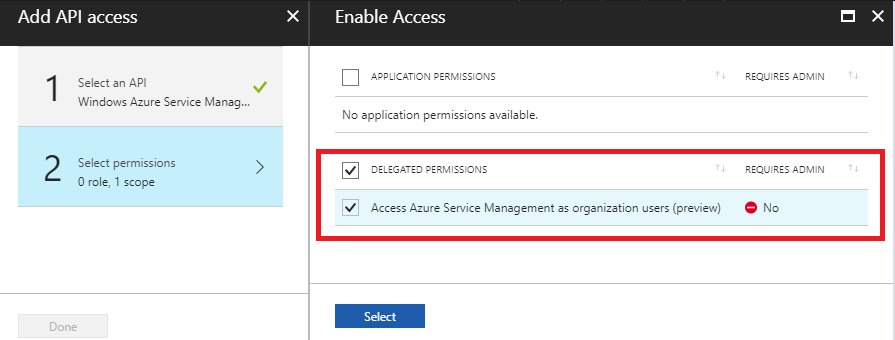
Enable Delegate Permissions to provision instances, then click Select and Done.
-
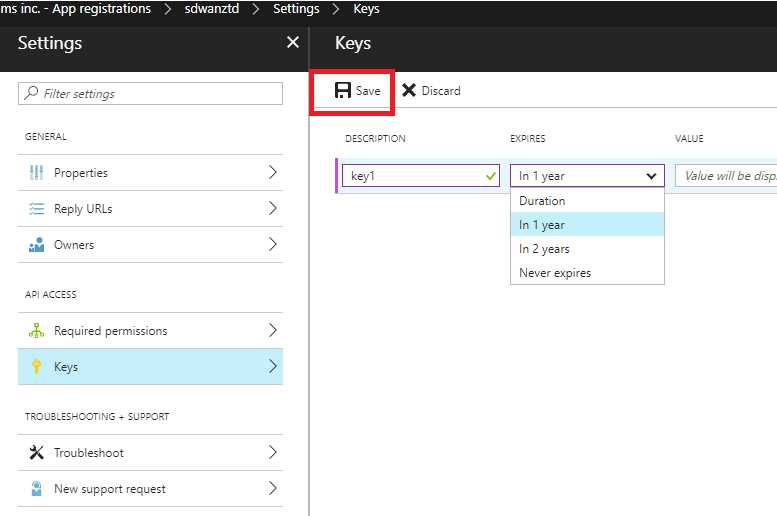
For this Registered App, under API Access, select Keys, and create a secret key description and the desired duration for the key to be valid. Then click Save which will produce a secret key (the key is only required for the provisioning process, it can be deleted after the instance is made available).
-
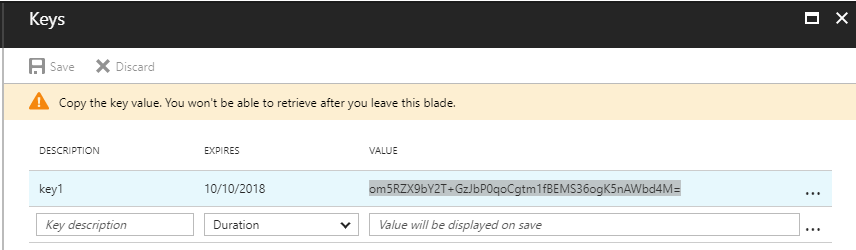
Copy and save the secret key (note you will not be able to retrieve this later).
-
To identify the required Tenant ID, navigate back to the App registration pane, and select Endpoints.
-
Copy the Federation Metadata Document, to identify your Tenant ID (note the Tenant ID is 36-character string located between the
online.com/and the/federationin the URL).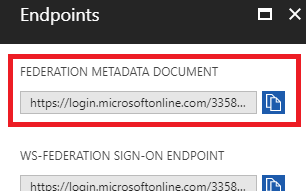
-
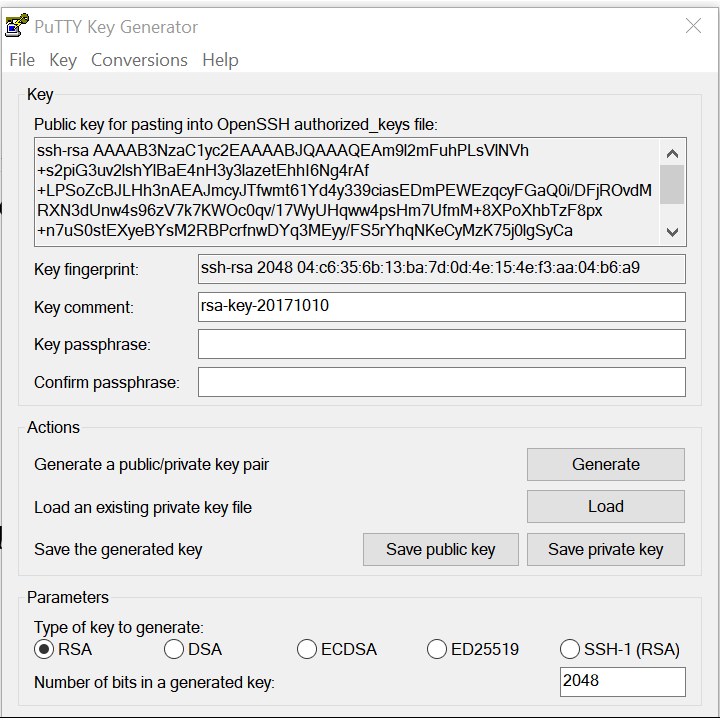
The last item required is the SSH Public Key. This can be created using Putty Key Generator or ssh-keygen and will be utilized for authentication, eliminating the need for passwords to log in. The SSH public key can be copied (including the heading ssh-rsa and trailing rsa-key strings). This public key will be shared through SD-WAN Center input to the Citrix Zero Touch Deployment Service.
-
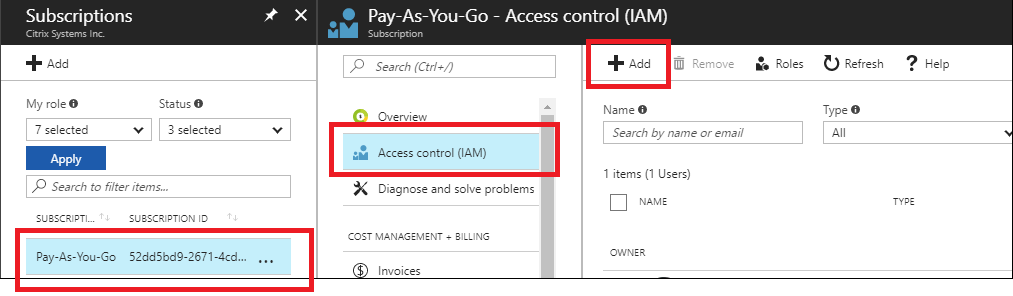
Additional steps are required to assign the application a role. Navigate back to More Services, then Subscriptions.
-
Select the active subscription, then Access control (AIM), next click Add.
-
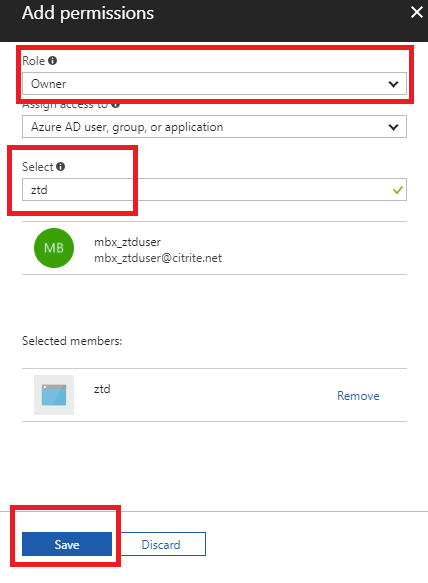
In the add permissions pane, select Owner role, assign access to Azure AD user, group, or application and search for the registered app in the Select field to allow the Zero Touch Deployment Cloud Service to create and configure the instance on the Azure subscription. Once the app is identified, select it and make sure it populates as a Selected member before clicking Save.
-
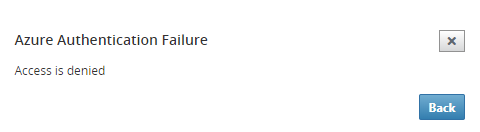
After collecting the required inputs and entering them into SD-WAN Center, click Next. If the inputs are not correct, you will encounter an authentication failure.
-
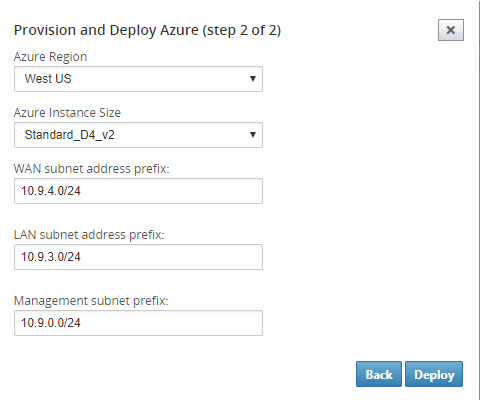
SD-WAN center provision and deploy Azure (Step 2 of 2)
-
Once the Azure authentication is successful, populate the appropriate fields to select the desired Azure Region, and the appropriate Instance Size, then click Deploy.
-
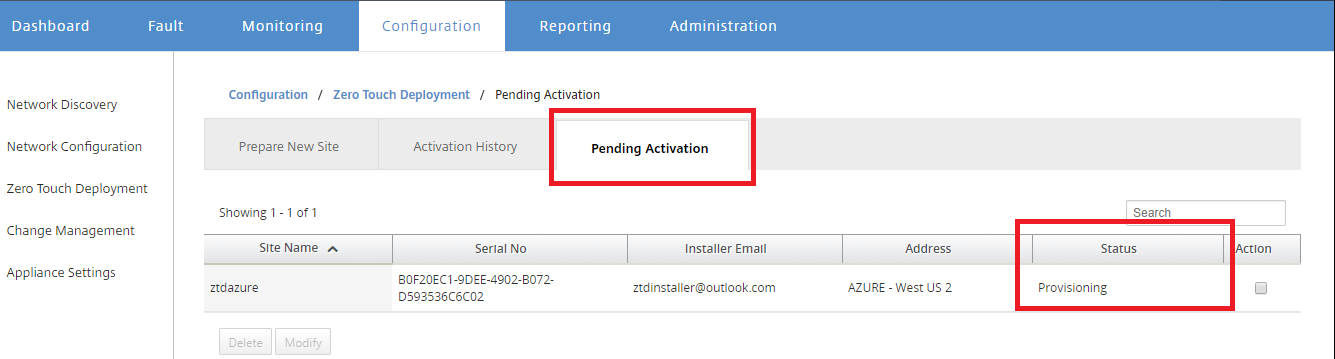
Navigating to the Pending Activation tab in SD-WAN Center, will help track the current status of the deployment.
-
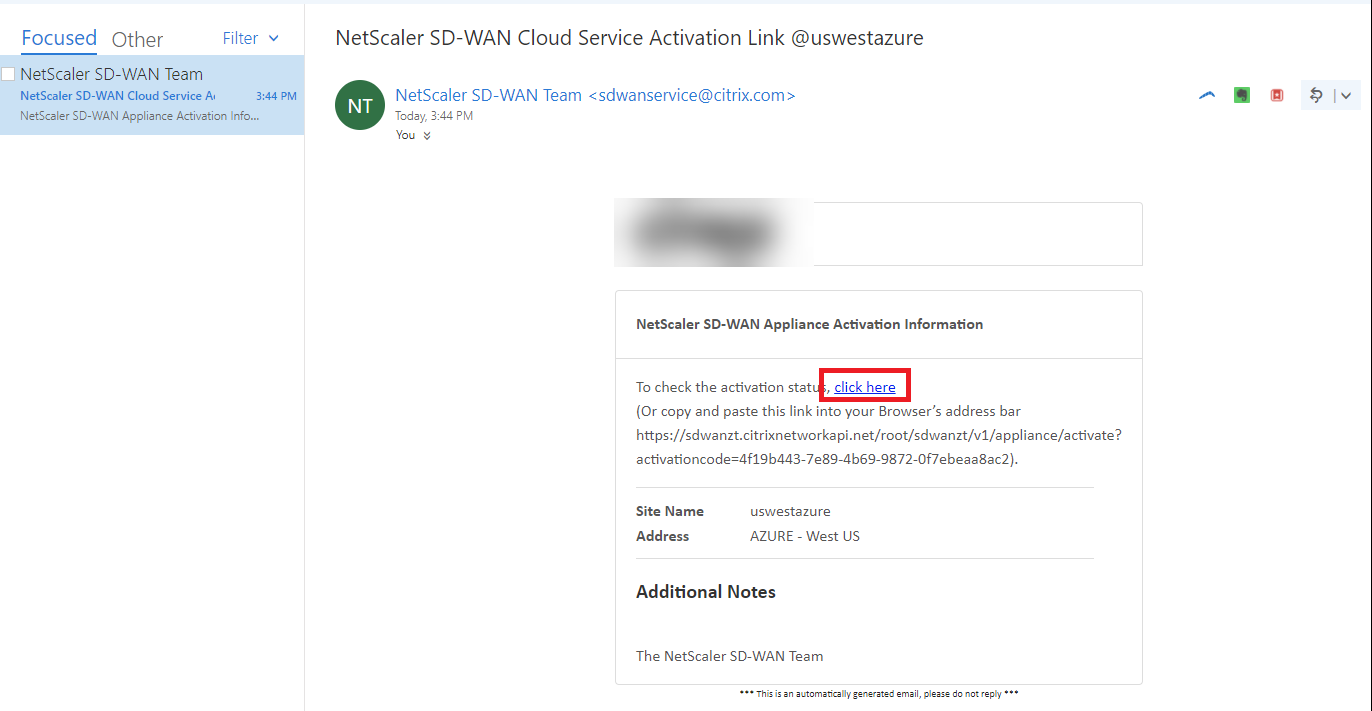
An email with an activation code will be delivered to the email address inputted in step 1, obtain the email and open the activation URL to trigger the process and check the activation status.
-
An email with an activation URL will be delivered to the email address inputted in step 1. Obtain the email and open the activation URL to trigger the process and check the activation status.
-
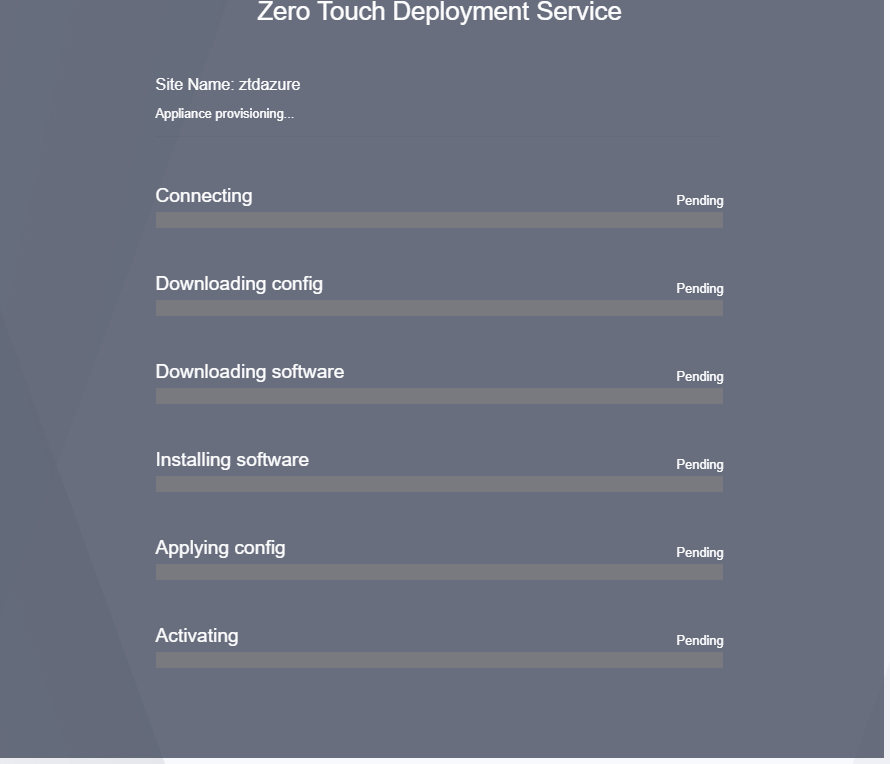
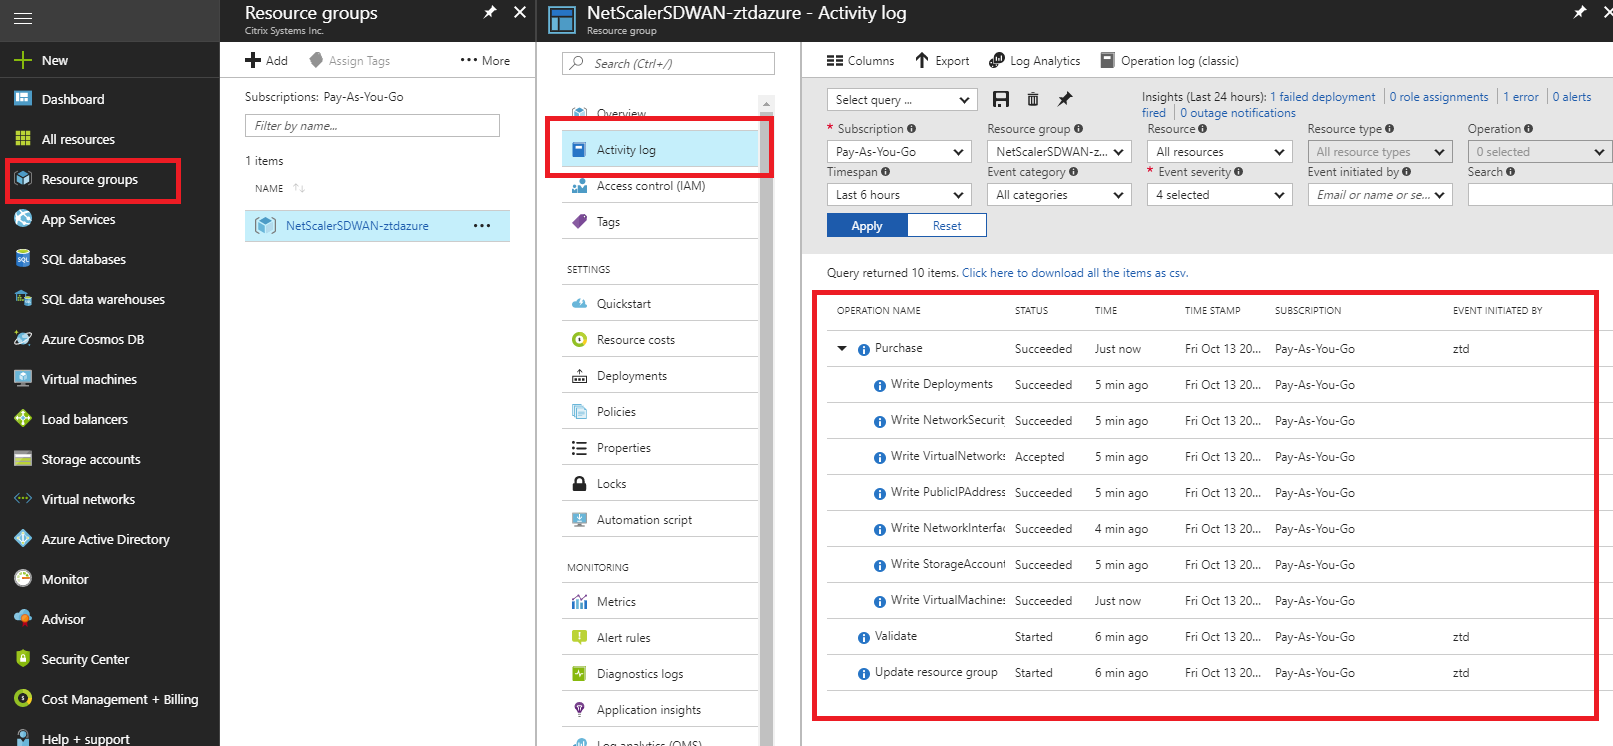
It will take a few minutes for the instance to be provisioned by the SD-WAN Cloud Service. You can monitor the activity on the Azure portal, under Activity log for the Resource Group which is automatically created. Any issues or errors with the provisioning will be populated here, as well as replicated to SD-WAN Center in the Activation Status.
-
In the Azure portal, the successfully launched instance will be available under Virtual Machines. To obtain the assigned public IP, navigate to the Overview for the instance.
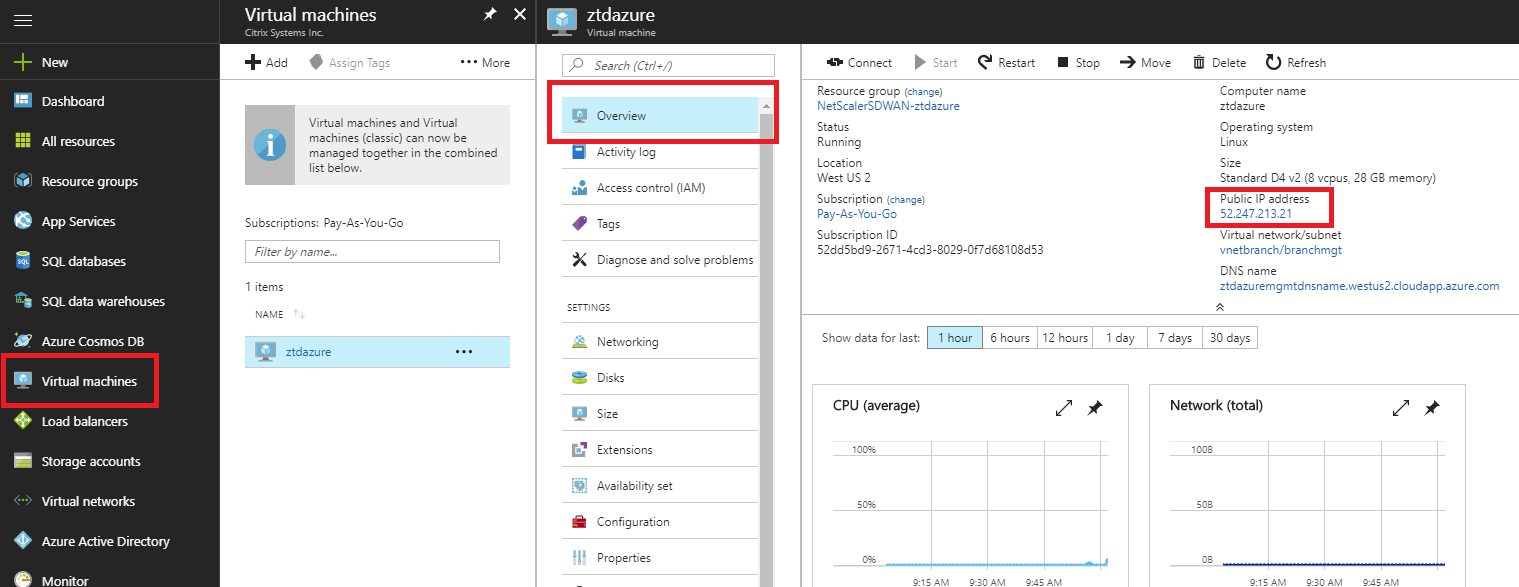
-
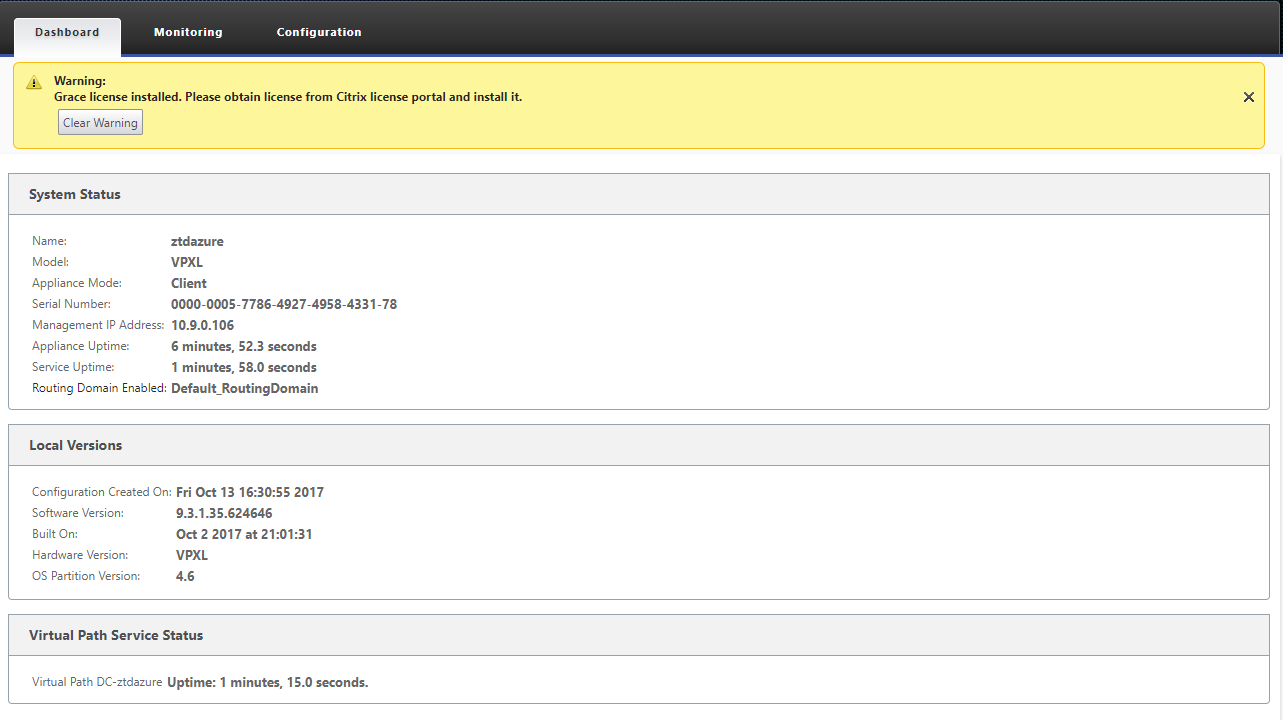
After the VM is in a running state, give it a minute before the service will reach out and start the process of downloading the configuration, software and license.

-
After each of the SD-WAN Cloud service steps are automatically complicated, log in to the SD-WAN instances web interface using the public IP obtained from the Azure portal.
-
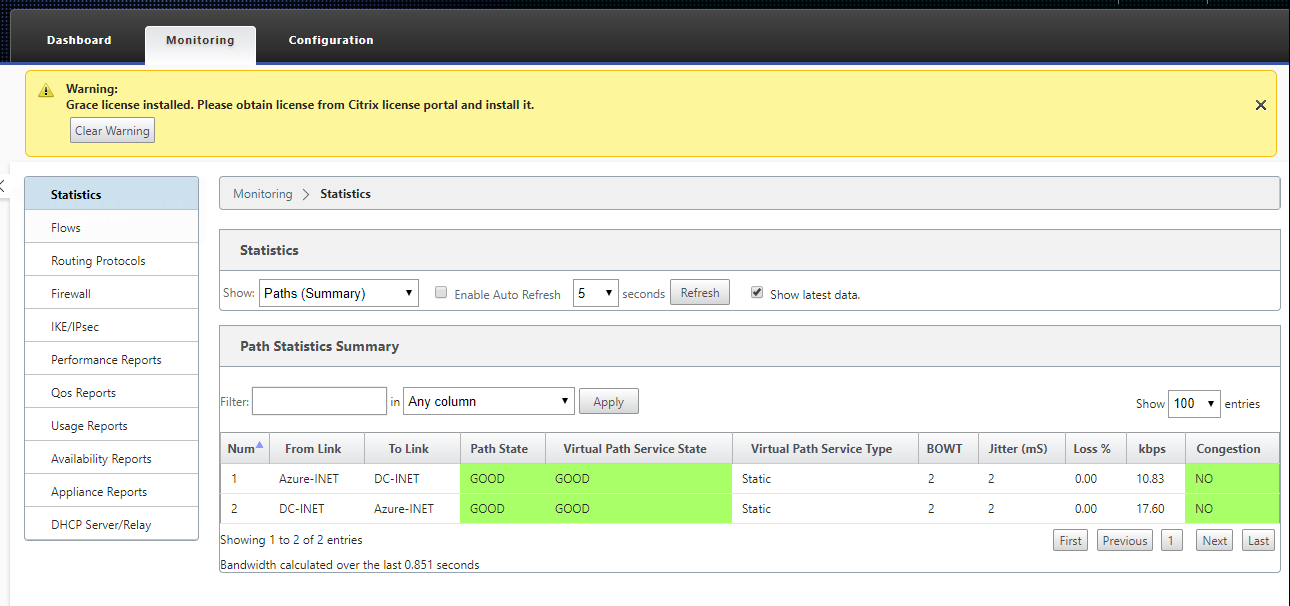
The Citrix SD-WAN Monitoring Statistics page will identify successful connectivity from the MCN to the SD-WAN instance in Azure.
-
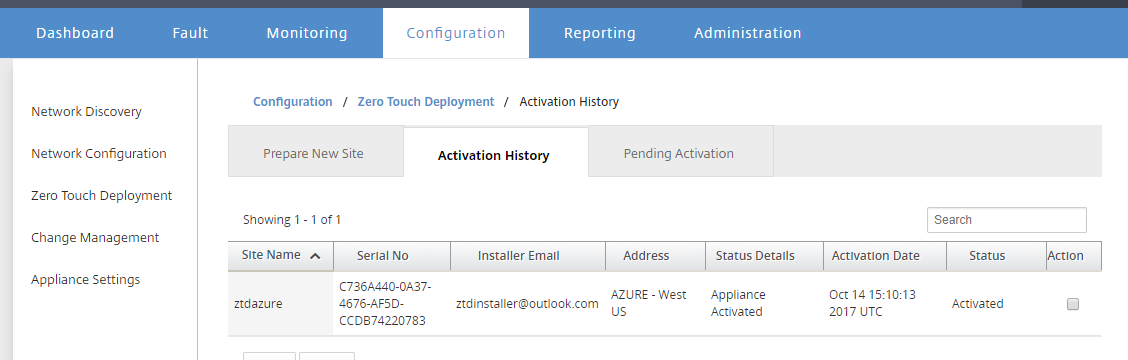
Furthermore, the successful (or unsuccessful) provisioning attempt will be logged in the SD-WAN Center’s Activation History page.