This content has been machine translated dynamically.
Dieser Inhalt ist eine maschinelle Übersetzung, die dynamisch erstellt wurde. (Haftungsausschluss)
Cet article a été traduit automatiquement de manière dynamique. (Clause de non responsabilité)
Este artículo lo ha traducido una máquina de forma dinámica. (Aviso legal)
此内容已经过机器动态翻译。 放弃
このコンテンツは動的に機械翻訳されています。免責事項
이 콘텐츠는 동적으로 기계 번역되었습니다. 책임 부인
Este texto foi traduzido automaticamente. (Aviso legal)
Questo contenuto è stato tradotto dinamicamente con traduzione automatica.(Esclusione di responsabilità))
This article has been machine translated.
Dieser Artikel wurde maschinell übersetzt. (Haftungsausschluss)
Ce article a été traduit automatiquement. (Clause de non responsabilité)
Este artículo ha sido traducido automáticamente. (Aviso legal)
この記事は機械翻訳されています.免責事項
이 기사는 기계 번역되었습니다.책임 부인
Este artigo foi traduzido automaticamente.(Aviso legal)
这篇文章已经过机器翻译.放弃
Questo articolo è stato tradotto automaticamente.(Esclusione di responsabilità))
Translation failed!
BGP
The SD-WAN BGP routing functionality enables you to:
- Configure the autonomous system (AS) number of a neighbor or other peer router (iBGP or eBGP).
- Create BGP policies to be applied selectively to a set of networks on a per-neighbour basis, in either direction (import or export). An SD-WAN appliance supports eight policies per site, with up to eight network objects (or eight networks) associated with a policy.
- For each policy, users can configure multiple community strings, AS-PATH-PREPEND, MED attribute. Users can configure up to 10 attributes for each policy.
Note
Only local preference and the IGP metric for path selection and manipulation is allowed.
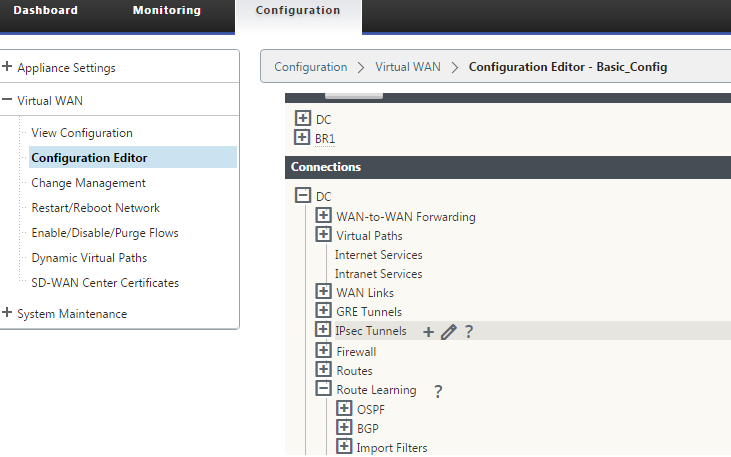
Configuring Policies
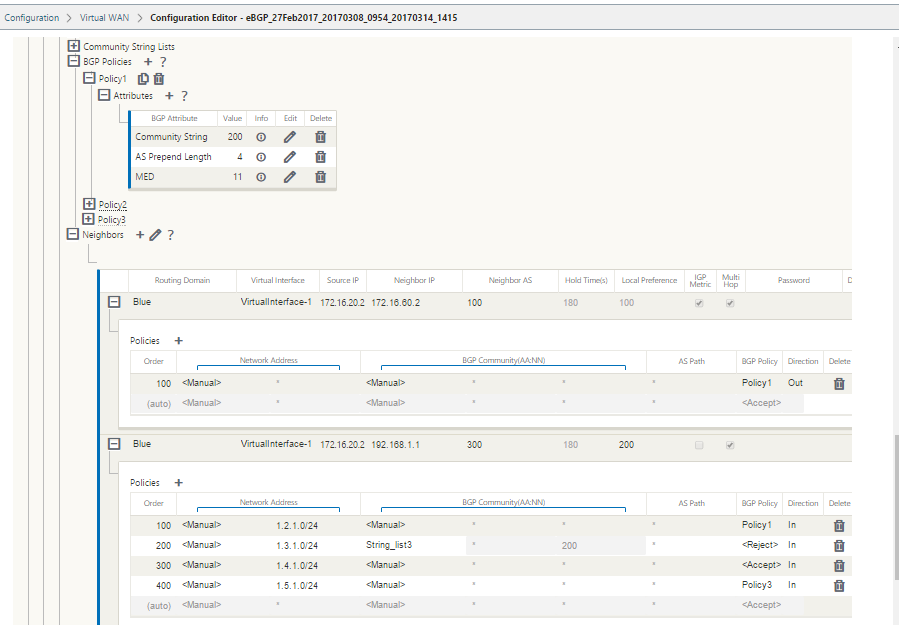
In the SD-WAN web management interface, the configuration editor has a new section, BGP policy, under Route Learning > BGP. In this section, users can add BGP attributes that constitute a policy. Adding community strings, prepending AS paths prepend, and configuring MED are supported.
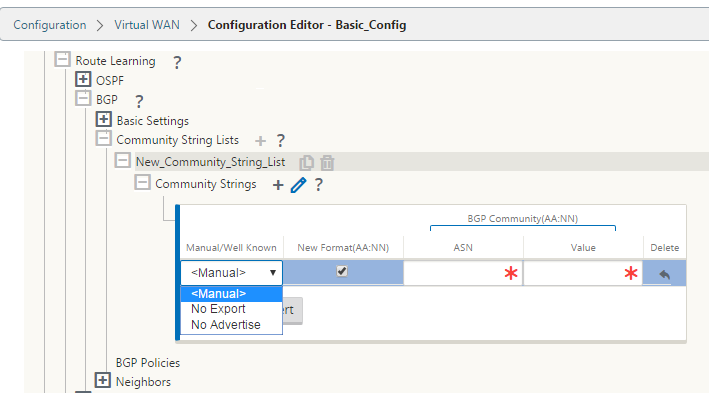
You can manually configure each community string or select no advertise or no export community string from a drop-down menu. For manual configuration, you can enter an AS number and community. You can select Insert/Remove to tag the routes or remove the community from the routes.
You can configure the number of times you want to prepend the local AS to the AS Path before advertising outside the local network. You can configure MED for matching routes.
To configure BGP policy:
-
In the NetScaler SD-WAN web management interface, go to Configuration > Virtual WAN > Configuration Editor. Open an existing configuration package. Go to Sites > DC or Branch settings.
-
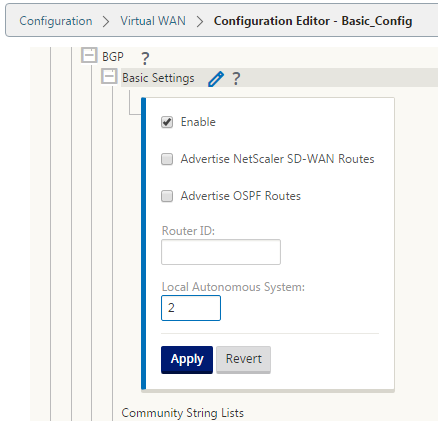
Expand BGP and click Enable under Basic Settings. Enter Router ID and Local Autonomous System value and click Apply.
-
Click + sign next to the Community String Lists. Configure each community string manually or by selecting no advertise or no export community string from the drop-down menu. For manual configuration, you can enter an AS number and community. You can select Insert/Remove tag the routes with the community string or remove the community string from the routes received from the peers.
-
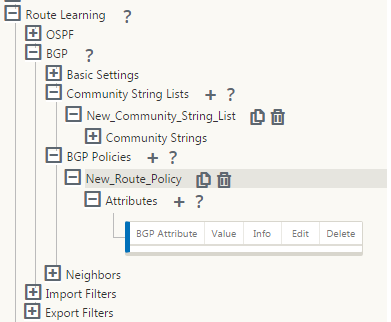
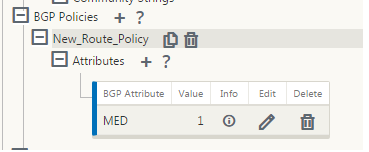
Configure BGP policy by expanding BGP Policies. Add BGP attributes to the New Route Policy.
-
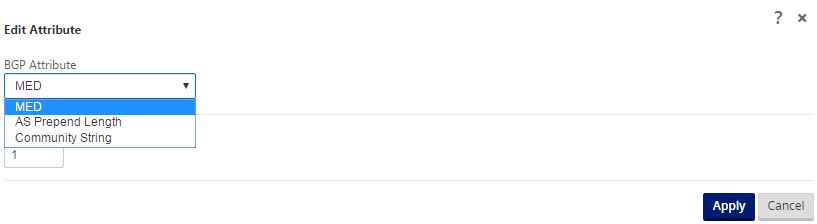
Click the + sign next to Attributes to edit BGP attributes. The Edit Attributes window is displayed. Select the desired BGP attribute from the drop-down menu. Enter the desired value for MED, AS Prepend Length, or Community String as per your selection. Click Apply.
Note
Any policy can have only one occurrence of an attribute and cannot take multiple occurrences of the same attribute. You cannot have 2 MED or 2 AS Path Prepend. It can have either MED/AS-PATH Prepend/Community String or a combination.
Configuring Neighbors
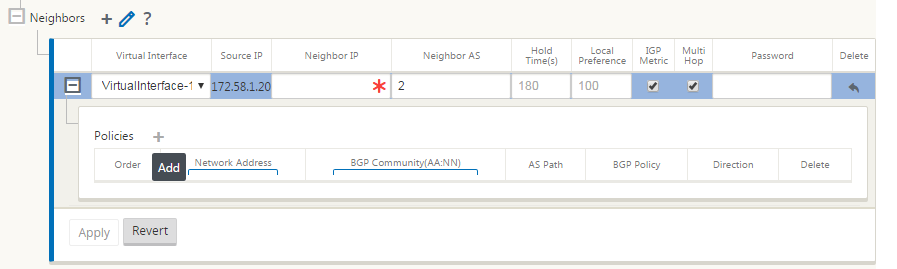
To configure eBGP, an extra column to the existing BGP neighbors section is added to configure the neighbor AS number. The existing configurations are pre-populated to this field with the local AS number when you import the previous configuration using the SD-WAN 9.2 configuration editor.
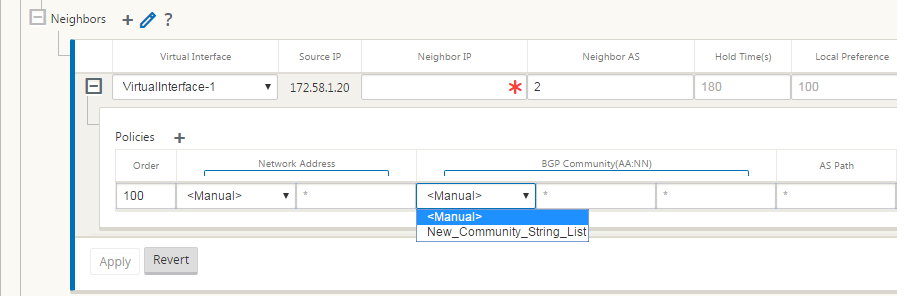
The neighbor configuration also has an optional advanced section (expandable row) where you can add Policies for each neighbor.
Configuring Advanced Neighbors
With this option, you can add network objects and add a configured BGP policy for that network object. This is similar to creating a route map and ACL to match certain routes and configuring BGP attributes for that neighbor. You can specify the direction to indicate if this policy is applied for incoming or outgoing routes.
The default policy is to <accept> all routes. Accept and reject policies are defaults and cannot be modified.
You have the ability to match routes based on Network address (destination address), AS Path, Community string and assign a policy and select direction for the policy to be applied.
To configure neighbors:
-
Configure neighbors by clicking Add as shown below.

-
Click the + sign. Select a Virtual Interface. Enter the Neighbor IP address.
-
Add policies. Select Network Address, BGP Community, and AS Path details as desired. Click Apply.
-
Go to Monitoring > Routing Protocols > Dynamic Routing Protocols to monitor the configured BGP policies and neighbors for the DC or Branch site appliance.
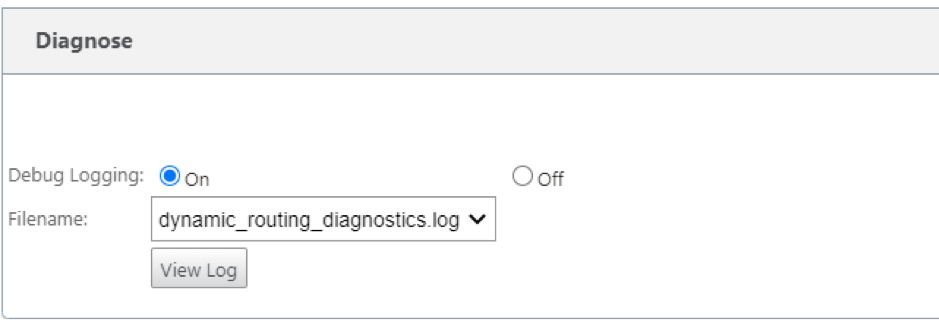
You can enable debug logging and to view log files for routing from the Monitor > Routing Protocol page. The logs for the routing daemon are split into separate log files. The standard routing information is stored in dynamic_routing.log while dynamic routing issues are captured in dynamic_routing_diagnostics.log which can be viewed from monitoring of routing protocols.
BGP Soft Reconfiguration
Routing policies for BGP peer include configurations such as route-map, distribute-list, prefix-list, and filter-list that might impact inbound or outbound routing table updates. When there is a change in the routing policy, the BGP session must be cleared, or reset, for the new policy to take effect.
Clearing a BGP session using a hard reset invalidates the cache and results in negative impact on the operation of the networks as the information in the cache becomes unavailable.
The BGP Soft Reset Enhancement feature provides automatic support for dynamic soft reset of inbound BGP routing table updates that are not dependent upon stored routing table update information.
Troubleshooting
To view the BGP parameters, navigate to Monitoring > Routing Protocols > select BGP State from the View field.
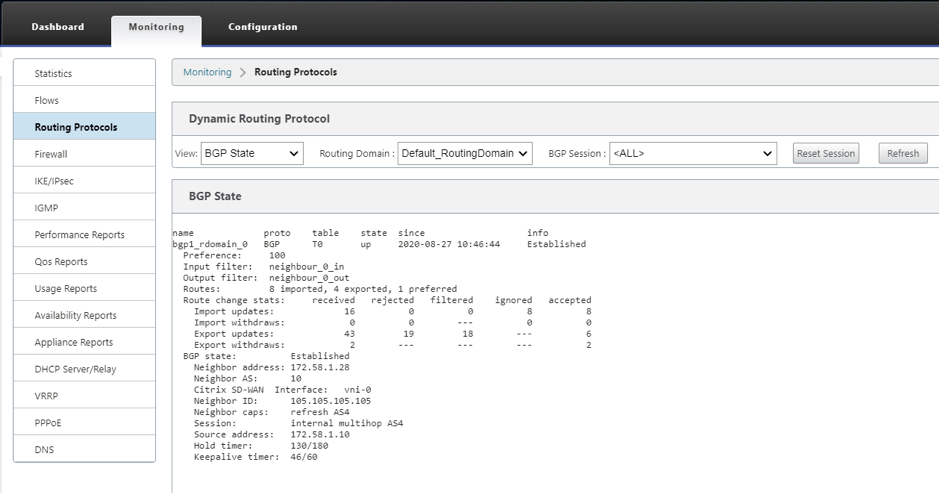
You can observe theDynamic routing logs to see if there is any issue with BGP Convergence.
Share
Share
This Preview product documentation is Cloud Software Group Confidential.
You agree to hold this documentation confidential pursuant to the terms of your Cloud Software Group Beta/Tech Preview Agreement.
The development, release and timing of any features or functionality described in the Preview documentation remains at our sole discretion and are subject to change without notice or consultation.
The documentation is for informational purposes only and is not a commitment, promise or legal obligation to deliver any material, code or functionality and should not be relied upon in making Cloud Software Group product purchase decisions.
If you do not agree, select I DO NOT AGREE to exit.