Citrix SD-WAN integration with AWS Transit Gateway
Amazon Web Service (AWS) Transit Gateway service enables customers to connect their Amazon Virtual Private Clouds (VPCs) and their on-premises networks to a single gateway. As the number of workloads running on AWS grows, you can scale your networks across multiple accounts and Amazon VPCs to keep up with the growth.
You can now connect pairs of Amazon VPCs using peering. However, managing point-to-point connectivity across many Amazon VPCs, without the ability to centrally manage the connectivity policies, can be operationally costly and cumbersome. For on-premises connectivity, you need to attach your AWS VPN to each individual Amazon VPC. This solution can be time consuming to build and hard to manage when the number of VPCs grows into the hundreds.
With AWS Transit Gateway, you only have to create and manage a single connection from the central gateway into each Amazon VPC, on-premises data center, or remote office across your network. The Transit Gateway acts as a hub that controls how traffic is routed among all the connected networks which act like spokes. This hub and spoke model significantly simplifies management and reduces operational costs because each network only has to connect to the Transit Gateway and not to every other network. Any new VPC is connected to the Transit Gateway and automatically available to every other network that is connected to the Transit Gateway. This ease of connectivity makes it easy to scale your network as you grow.
As enterprises migrate an increasing number of applications, services, and infrastructure to the cloud, they are rapidly deploying SD-WAN to realize the benefits of broadband connectivity and to directly connect branch site users to cloud resources. There are many challenges with the complexities of building and managing global private networks using internet transport services to connect geographically distributed locations and users with proximity-based cloud resources. The AWS Transit Gateway Network Manager changes this paradigm. Now, Citrix SD-WAN customers who use AWS can use Citrix SD-WAN with AWS transit gateway by integrating Citrix SD-WAN branch appliance AWS Transit Gateway to deliver the highest quality of experience for users with the ability to reach out to all VPCs connected to the Transit Gateway.
The following are the steps to integrate Citrix SD-WAN with AWS Transit Gateway:
-
Create the AWS Transit Gateway.
-
Attach a VPN to the Transit Gateway (either existing VPN or a new one).
-
Attach VPN to the configured Transit Gateway where the VPN is with SD-WAN site located On-prem or in any cloud (AWS, Azure, or GCP).
-
Establish the Border Gateway Protocol (BGP) peering over the IPsec Tunnel with the AWS Transit Gateway from Citrix SD-WAN to learn the networks (VPCs) attached to Transit Gateway.
Use case
The use case is to reach out to resources deployed within AWS (in any VPC) from the branch environment. Using AWS Transit Gateway allows the traffic to reach to all VPCs connected to the Transit Gateway without dealing with BGP routes. To achieve this, perform the following methods:
-
Establish the IPsec to AWS Transit Gateway from the branch Citrix SD-WAN appliance. In this deployment method you will not get full SD-WAN benefits as the traffic will go over IPsec.
-
Deploy a Citrix SD-WAN appliance within AWS and connect it to your On-prem Citrix SD-WAN appliance via virtual path.
Regardless of which method is chosen, the traffic reaches to the VPCs connected to the Transit Gateway without manually manage the routing within AWS infra.

AWS Transit Gateway configuration
To create the AWS Transit Gateway, navigate to VPC dashboard and go to Transit Gateway section.
-
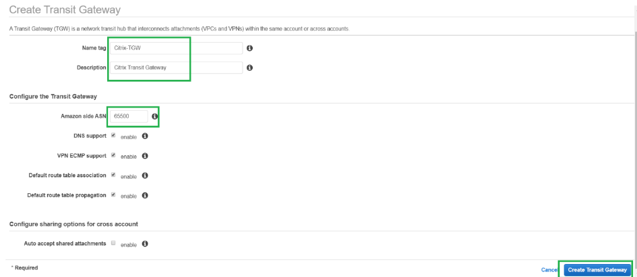
Provide the Transit Gateway Name, Description, and Amazon ASN number as highlighted in the following screenshot and click Create Transit Gateway.
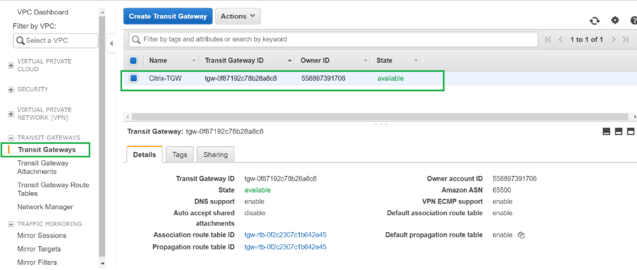
Once the Transit Gateway creation is completed, you can see the status as Available.
-
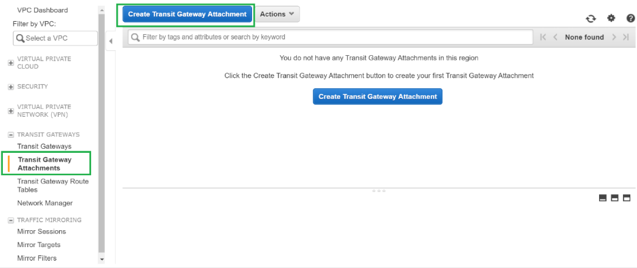
To create the Transit Gateway Attachments, navigate to Transit Gateways > Transit Gateway Attachments and click Create Transit Gateway Attachment.
-
Select the Transit Gateway created from the drop-down list and select attachment type as VPC. Provide the attachment name tag and select the VPC ID that you want to attach to the Transit Gateway created. One of the subnets from the selected VPC will be auto selected. Click Create Attachment to attach VPC to the Transit Gateway.

-
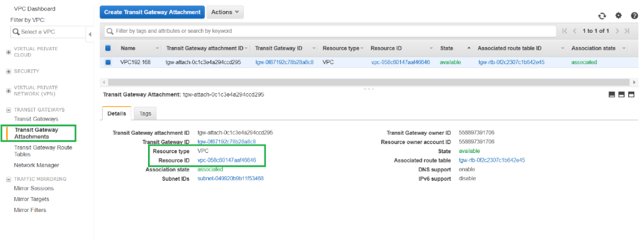
After attaching the VPC to the transit gateway, you can see that the Resource type VPC got associated to the Transit Gateway.
-
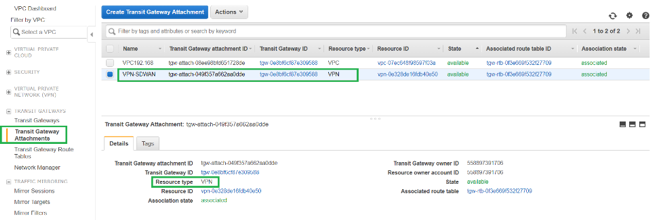
To attach SD-WAN to the Transit Gateway using VPN, select the Transit Gateway ID from the drop-down list and select Attachment type as VPN. Ensure that you select the correct Transit Gateway ID.
Attach a new VPN Customer Gateway by providing the SD-WAN WAN link Public IP address and its BGP ASN Number. Click Create Attachment to attach VPN with Transit Gateway.

-
Once the VPN Attached to the Transit Gateway, you can view the details as shown in the following screenshot:
-
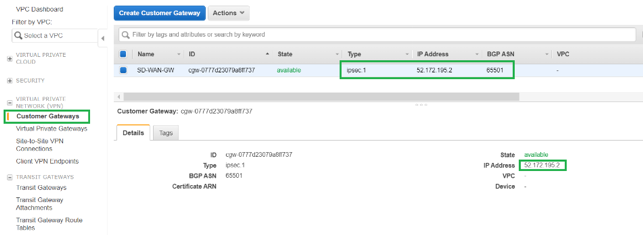
Under Customer Gateways, SD-WAN Customer Gateway and Site-to-Site VPN Connection is created as part of VPN Attachment to Transit Gateway. You can see that the SD-WAN Customer Gateway is created along with the IP address of this Customer Gateway that represents the WAN link Public IP address of SD-WAN.
-
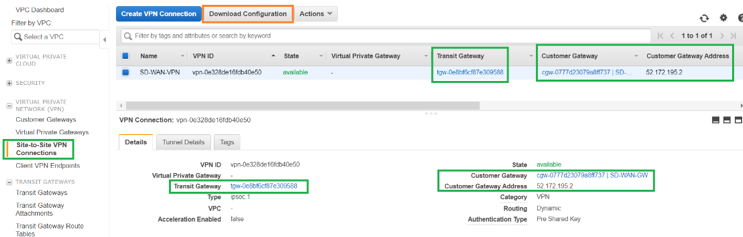
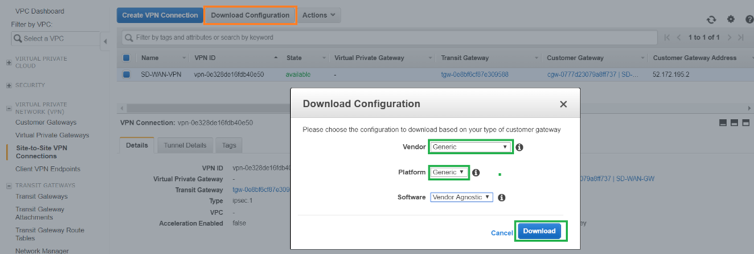
Navigate to Site-to-Site VPN Connections to download SD-WAN Customer Gateway VPN Configuration. This configuration file has two IPsec Tunnel details along with the BGP peer information. Two tunnels are created from SD-WAN to Transit Gateway for redundancy.
You can see that SD-WAN WAN link Public IP address was configured as the Customer Gateway Address.
-
Click Download Configuration and download the VPN configuration file. Select the Vendor, Platform as Generic, and Software as Vendor Agnostic.
The downloaded configuration file contains the following information:
- IKE config
- IPsec configuration for AWS Transit Gateway
- Tunnel interface configuration
- BGP configuration
This information is available for two IPsec tunnels for High Availability (HA). Ensure that you configure both the tunnel end points while configuring this in SD-WAN. See the following screenshot for reference:

Configure Intranet service on SD-WAN
-
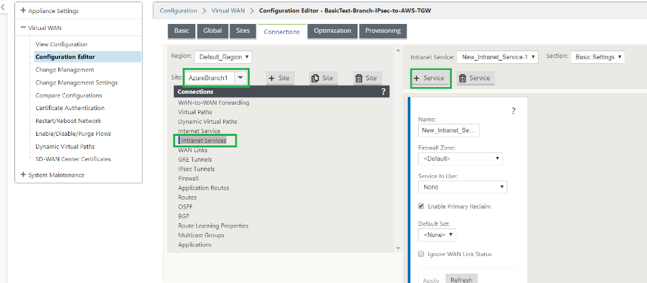
To configure the Intranet service that is used in the IPsec tunnel configuration on SD-WAN, navigate to Configuration Editor > Connections >, select the site from the drop-down list, and select Intranet Service. Click + Service to add a new Intranet service.
-
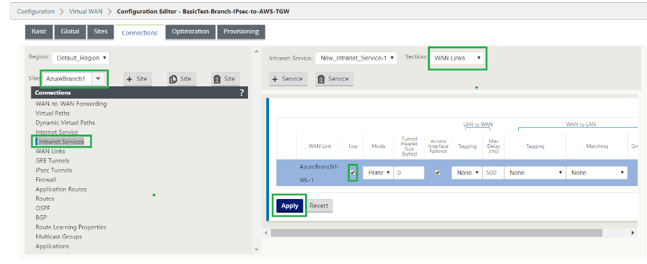
After addition of Intranet service, select the WAN link (Using which you are going to establish the Tunnel towards Transit Gateway) that is used for this service.
-
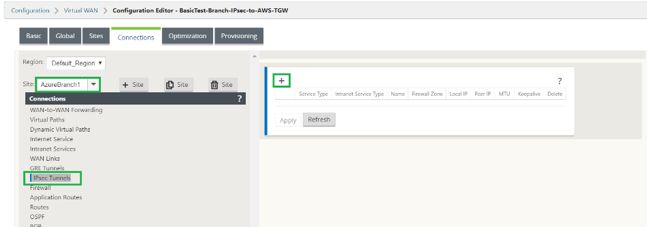
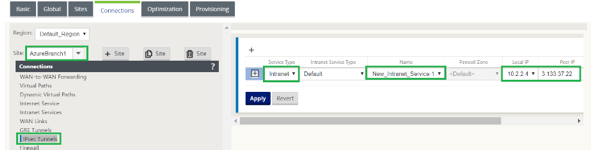
To configure IPsec tunnel towards AWS Transit Gateway, navigate to Configuration Editor > Connections > select the Site from the drop-down list and click IPsec Tunnels. Click + option to add IPsec Tunnel.
-
Select the Service Type as Intranet and select the Intranet service Name that you have added. Select the Local IP address as the WAN Link IP Address and Peer address as Transit Gateway Virtual Private Gateway IP address.
Click Keepalive check box to have the tunnel initiated by SD-WAN immediately after config activation.
-
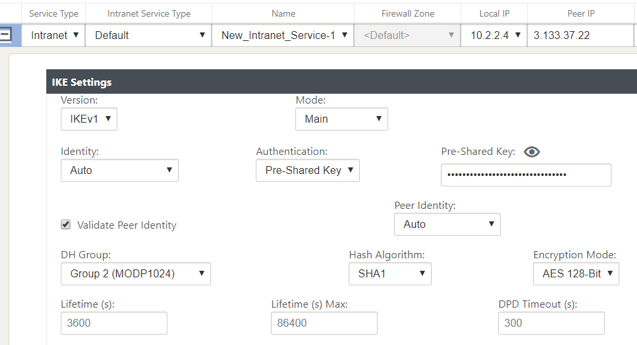
Configure IKE Parameters based on the VPN configuration file that you have downloaded from AWS.
-
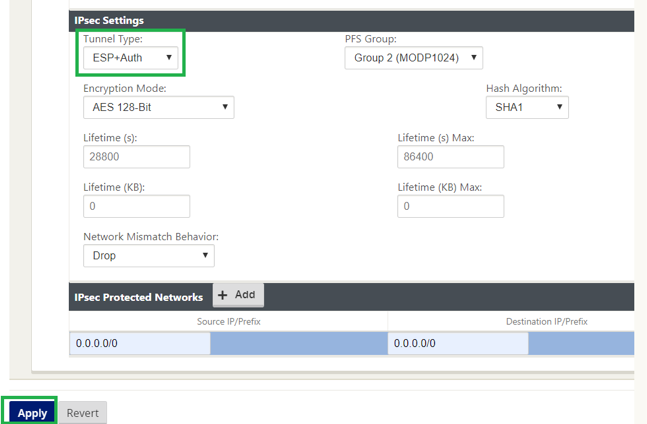
Configure IPsec parameters based on the VPN configuration file that you have downloaded from AWS. Also configure IPsec Protected Networks based on the network that you want to send through the tunnel. You can see that it’s configured to allow any traffic through IPsec Tunnel.
-
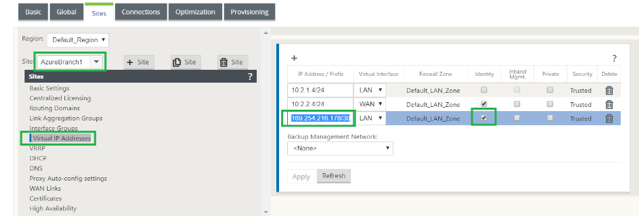
Configure the Customer Gateway inside IP address as one of the Virtual IP addresses on SD-WAN. From the VPN Configuration File downloaded, locate the customer gateway inside IP Address related to Tunnel-1. Configure this customer gateway inside IP Address as one of the Virtual IP addresses on SD-WAN and enable the Identity check box.
-
Add Routes on SD-WAN to reach Virtual Private Gateway of Transit Gateway. From the VPN Configuration File downloaded, locate inside and outside IP address of Virtual Private Gateway related to Tunnel-1. Add routes to inside and outside IP address of Virtual Private Gateway with Service Type as Intranet and select the Intranet service created in the above steps.
-
Configure BGP on SD-WAN. Enable BGP with appropriate ASN Number. From the VPN Configuration File downloaded, locate BGP configuration options related to Tunnel-1. Use these details to add BGP neighbor on SD-WAN.
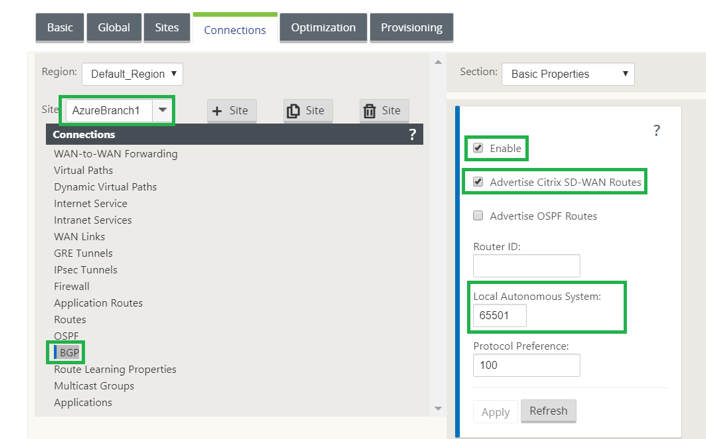
To enable BGP on SD-WAN, navigate to Connections select the site from the drop-down list, then select BGP. Click Enable check box to enable BGP. Click Advertise Citrix SD-WAN Routes check box to advertise SD-WAN routes towards Transit Gateway. Use the Customer Gateway ASN from the BGP configuration options and configure that as Local Autonomous System.
-
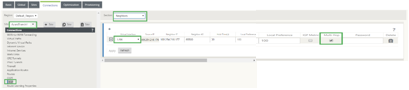
To add BGP Neighbors on SD-WAN, navigate to Connections > select the site from the drop-down list, then select BGP. Click Neighbors section and click + option.
Use Neighbor IP Address and Virtual Private Gateway ASN from the BGP configuration options while adding neighbor. The Source IP must match Customer Gateway inside IP address(Configured as Virtual IP Address on SD-WAN) from the downloaded configuration file from AWS. Add BGP Neighbor with Multi Hop enabled on SD-WAN.
-
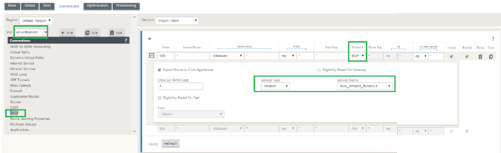
To add Import Filters to import BGP routes onto SD-WAN, navigate to Connections, select the site from the drop-down list, then select BGP and click Import Filters section. Click + option to add an Import filter. Select the Protocol as BGP and match any to import all BGP routes. Select the Service type as Intranet and select the created Intranet service. This is to import BGP routes with service type as Intranet.
Monitoring and Troubleshooting on SD-WAN
-
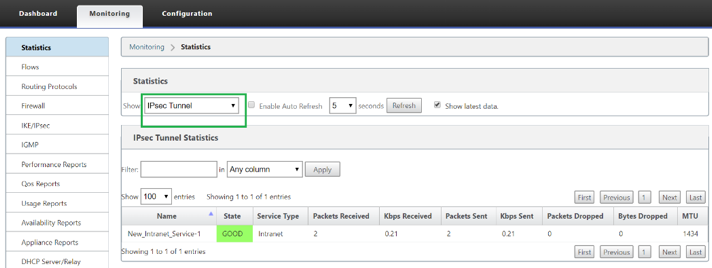
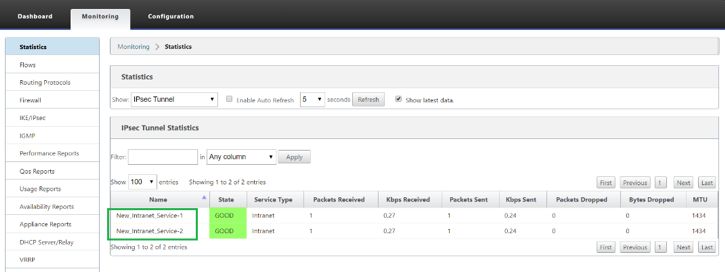
To verify the IPsec Tunnel establishment status on SD-WAN, navigate to Monitoring > Statistics > IPsec Tunnel. In the following screenshot, you can see that the IPsec Tunnel is established from SD-WAN towards AWS Transit Gateway and the state is GOOD. Also, you can monitor the amount of traffic sent and received over this IPsec Tunnel.
-
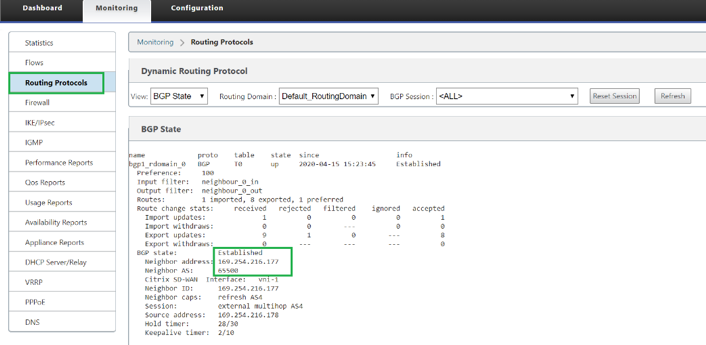
To verify the BGP Peering status on SD-WAN, navigate to Monitoring > Routing Protocols and select BGP State. You can see that the BGP state was reported as Established and the Neighbor IP address and Neighbor ASN are matching AWS BGP neighbor details. With this you can ensure that the BGP peering got established from SD-WAN to AWS transit Gateway through IPsec tunnel.
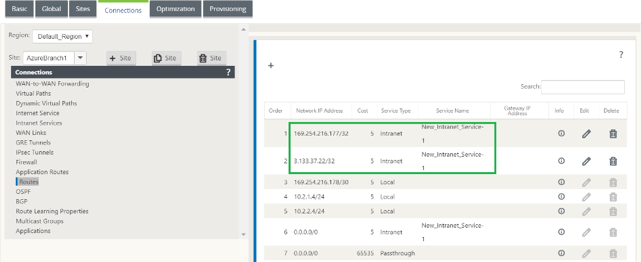
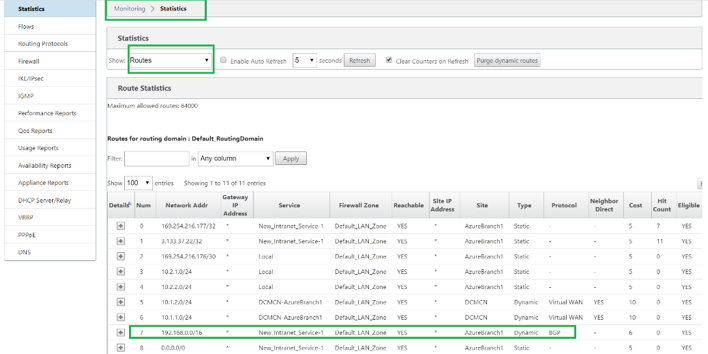
A VPC (192.168.0.0) is attached to AWS Transit Gateway. SD-WAN has learned this VPC network(192.168.0.0) from AWS Transit Gateway through BGP And this route was installed on SD-WAN with service type as Intranet as per the import filter created in above steps.
-
To verify the BGP route installation on SD-WAN, navigate to Monitoring > Statistics > Routes and check for the network 192.168.0.0/16 that got installed as BGP route with service type as Intranet. This means you can learn the networks attached to AWS Transit Gateway and can communicate to those networks through IPsec Tunnel established.
Monitoring and Troubleshooting on AWS
-
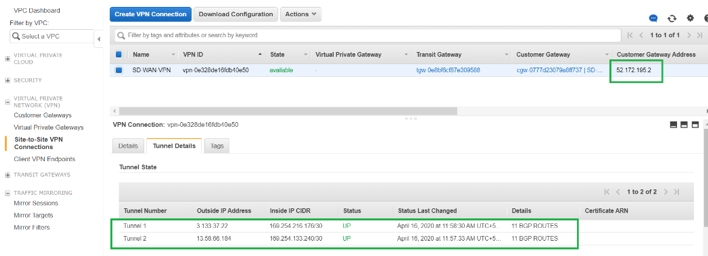
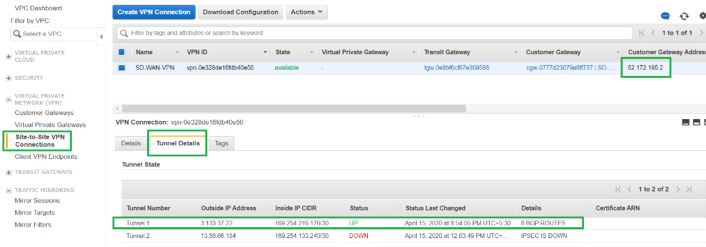
To verify the IPsec Tunnel establishment status on AWS, Navigate to VIRTUAL PRIVATE NETWORK(VPN) > Site-to-Site VPN Connections. In the following screenshot, you can observe that the Customer Gateway Address represents SD-WAN Link Public IP address using which you have established tunnel.
The Tunnel status is shown as UP. Also it can be observed that AWS has learned 8 BGP ROUTES from SD-WAN. This means SD-WAN is able to establish Tunnel with AWS Transit Gateway and also able to exchange routes over BGP.
-
Configure IPsec and BGP details related to the second tunnel based on the downloaded configuration file on SD-WAN.
Status related to both the tunnels can be Monitored on SD-WAN as follows:
-
Status related to both the tunnels can be Monitored on AWS as follows: