This content has been machine translated dynamically.
Dieser Inhalt ist eine maschinelle Übersetzung, die dynamisch erstellt wurde. (Haftungsausschluss)
Cet article a été traduit automatiquement de manière dynamique. (Clause de non responsabilité)
Este artículo lo ha traducido una máquina de forma dinámica. (Aviso legal)
此内容已经过机器动态翻译。 放弃
このコンテンツは動的に機械翻訳されています。免責事項
이 콘텐츠는 동적으로 기계 번역되었습니다. 책임 부인
Este texto foi traduzido automaticamente. (Aviso legal)
Questo contenuto è stato tradotto dinamicamente con traduzione automatica.(Esclusione di responsabilità))
This article has been machine translated.
Dieser Artikel wurde maschinell übersetzt. (Haftungsausschluss)
Ce article a été traduit automatiquement. (Clause de non responsabilité)
Este artículo ha sido traducido automáticamente. (Aviso legal)
この記事は機械翻訳されています.免責事項
이 기사는 기계 번역되었습니다.책임 부인
Este artigo foi traduzido automaticamente.(Aviso legal)
这篇文章已经过机器翻译.放弃
Questo articolo è stato tradotto automaticamente.(Esclusione di responsabilità))
Translation failed!
Configure optimization default service classes
You can configure the WAN optimization default service class settings in the Global tab.
To configure the default set of WAN Optimization Service Classes, do the following:
-
In the Global tab, click WAN Optimization Service Classes.
This opens the Service Classes table, displaying the default set of Service Classes.
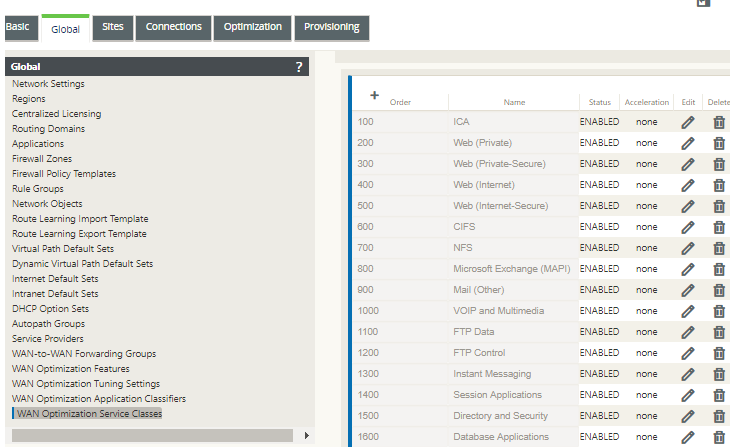
This table is also a configuration form. You can use this form to configure (edit), delete, and add Service Classes to create a customized default set. The modified default Service Classes set and individual Service Class settings you configure are automatically applied as the defaults to any branch site included in the Optimization section tree.
Note
You can also customize the Service Classes set and settings for each specific branch site. For instructions on customizing the Optimization configuration for a branch site, see the section, Configuring Optimization for a Branch Site.
-
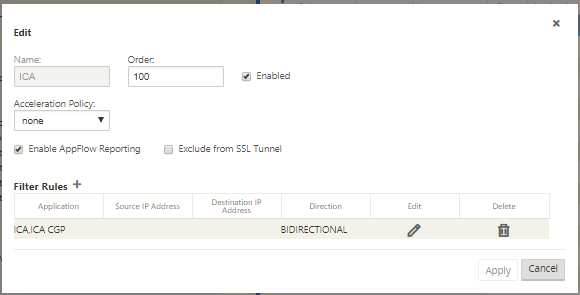
To configure an existing Service Class, click Edit (pencil icon), in the Edit column of that class entry in the Service Classes table.
This opens a pop-up Edit settings form for configuring the selected Service Class
-
Configure the basic settings for the Service Class.
The basic settings are as follows:
-
Enabled – Select this to enable the new Service Class. The class is enabled by default.
-
Acceleration Policy – Select a policy from the Acceleration Policy drop-down menu. The options are:
-
disk – Select this policy to specify the appliance disk as the location for storing the traffic history used for compression. This enables Disk Based Compression (DBC) policy for this Service Class. Generally speaking, a policy of disk is usually the best choice, as the appliance automatically selects disk or memory as the storage location, depending on which is more appropriate for the traffic.
-
none – Select this if you do not want to enable an Acceleration Policy for this Service Class. A policy of none is generally used only for uncompressible encrypted traffic and real-time video.
-
flow control only – Select this policy to disable compression but enable flow-control acceleration. Select this for services that are always encrypted, and for the FTP control channel.
-
memory – Select this policy to specify memory as the location for storing the traffic history used for compression.
-
-
Enable AppFlow Reporting – Select this to enable AppFlow reporting for this Service Class. AppFlow is an industry standard for unlocking application transactional data processed by the network infrastructure. The WAN Optimization AppFlow interface works with any AppFlow collector to generate reports. The collector receives detailed information from the appliance, using the AppFlow open standard (
http://www.appflow.org).For more information on AppFlow, please see the Citrix CloudBridge 7.4 Product documentation available on the citrix documentation portal
http://docs.citrix.com/.Note
To view WAN Optimization AppFlow reports, select the Monitoring tab, and then in the navigation tree (left pane), open the WAN Optimization branch, and select AppFlow. See also, Monitoring Virtual WAN.
-
Exclude from the SSL Tunnel – Select this to exclude traffic associated with the Service Class from SSL Tunneling.
-
-
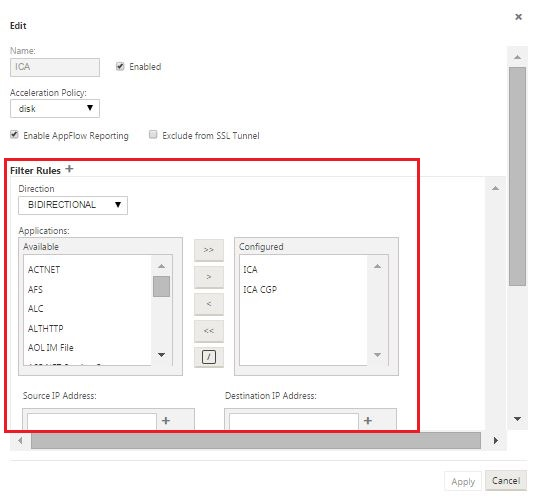
Configure the Filter Rules for the Service Class.
To edit an existing rule, do the following:
-
In the Filter Rules table (bottom of form), click Edit (pencil icon) in the Edit column of the rule you want to edit.
This reveals the Filter Rules settings for the selected Filter Rule.
-
Select the filter direction from the Direction drop-down menu.
Select one of the following options:
-
BIDIRECTIONAL
-
UNIDIRECTIONAL
-
-
Add or remove Applications in the Configured list.
To add an Application to the list: Select it in the Applications list on the left, and then click the Add right-arrow (>) to add the group to the Configured list on the right. To add all of the Applications to the list at once, click the Add All double right-arrow (>>).
To remove an Application from the list: Select it in the Configured list on the right, and then click the Remove left-arrow (<). To remove all of the Applications from the list at once, click the Remove All double left-arrow (<<).
-
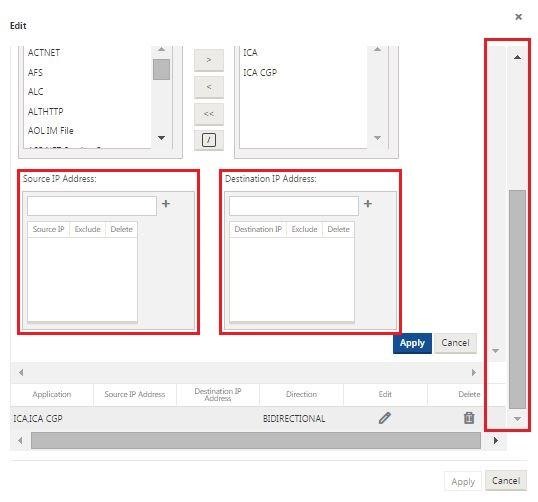
Scroll down to reveal the truncated portion of the form.
The Filter Rules settings section is somewhat long, so you will need to use the scroll bars to reveal the truncated portion of the form.
-
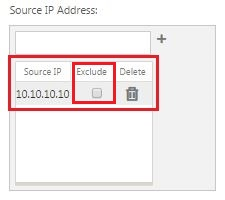
Enter the Source IP Address in the Source IP Address field.
-
Click + to the right of the Source IP Address you just entered.
This adds the specified IP Address to the Source IP Address table.
-
Specify whether to include or exclude the Source IP Address for this Filter Rule.
Select the Exclude checkbox to exclude the specified Source IP Address from this Filter Rule. Deselect the checkbox to include the address.
-
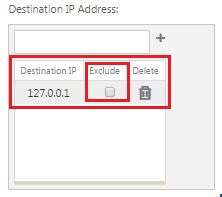
Enter the Destination IP Address in the Destination IP Address field.
-
Click + to the right of the Destination IP Address you just entered.
This adds the specified IP Address to the Source IP Address table.
-
Specify whether to include or exclude the Destination IP Address for this Filter Rule.
Select the Exclude checkbox to exclude the specified Destination IP Address from this Filter Rule. Deselect the checkbox to include the address.
-
Click Apply.
This applies your modifications to the rule and hides the Filter Rules settings section.
-
-
(Optional) Customize the default Service Classes set.
You can add or delete Service Classes to customize the default set, as follows:
-
To remove an Service Class from the set:
Click the trashcan icon in the Delete column of a Service Class entry in the table to remove that entry.
-
To add an Service Class to the set:
-
Click + to the right of the Service Class branch label.
This displays the Add configuration form.
-
Enter the name for the new Service Class in the Name field.
-
Configure the new Service Class.
The steps for configuring a new Service Class are the same as for modifying an existing Service Class. For instructions, see the following steps, earlier in this section:
“3. Configure the basic settings for the Service Class.”
“4. Configure the Filter Rules for the Service Class.”
-
Click Add to add the new Service Class to the default set and dismiss the Add configuration form.
-
-
-
(Optional, recommended) Save the configuration package.
You have now completed the global WAN optimization configuration, and can begin configuring the Optimization sets and settings for the branch sites.
Share
Share
In this article
This Preview product documentation is Cloud Software Group Confidential.
You agree to hold this documentation confidential pursuant to the terms of your Cloud Software Group Beta/Tech Preview Agreement.
The development, release and timing of any features or functionality described in the Preview documentation remains at our sole discretion and are subject to change without notice or consultation.
The documentation is for informational purposes only and is not a commitment, promise or legal obligation to deliver any material, code or functionality and should not be relied upon in making Cloud Software Group product purchase decisions.
If you do not agree, select I DO NOT AGREE to exit.