Check Point firewall integration the on SD-WAN 1100 platform
Citrix SD-WAN supports hosting Check Point Quantum Edge on the SD-WAN 1100 platform.
The Check Point Quantum Edge runs as a virtual machine on the SD-WAN 1100 platform. The firewall virtual machine is integrated in Bridge mode with two data virtual interfaces connected to it. Required traffic can be redirected to the firewall virtual machine by configuring policies on SD-WAN.
Note
From Citrix SD-WAN 11.3.1 onwards, the Check Point VM version 80.20 and above are supported for provisioning VM on new sites.
Benefits
The following are the primary goals or benefits of Check Point integration on the SD-WAN 1100 platform:
-
Branch device consolidation: A single appliance that does both SD-WAN and advanced security
-
Branch office security with on-prem NGFW (Next Generation Firewall) to protect LAN-to-LAN, LAN-to-Internet, and Internet-to-LAN traffic
Configuration steps
The following configurations are needed to integrate the Check Point firewall virtual machine on SD-WAN:
-
Provision the Firewall Virtual Machine
-
Enable traffic redirection to Security Virtual Machine
Note
Firewall virtual machine must be provisioned first before enabling the traffic redirection.
Provisioning Check Point firewall virtual machine
There are two ways to provision the firewall virtual machine:
-
Provisioning through SD-WAN Center
-
Provisioning through SD-WAN appliance GUI
Firewall virtual machine provisioning through SD-WAN Center
Prerequisites
-
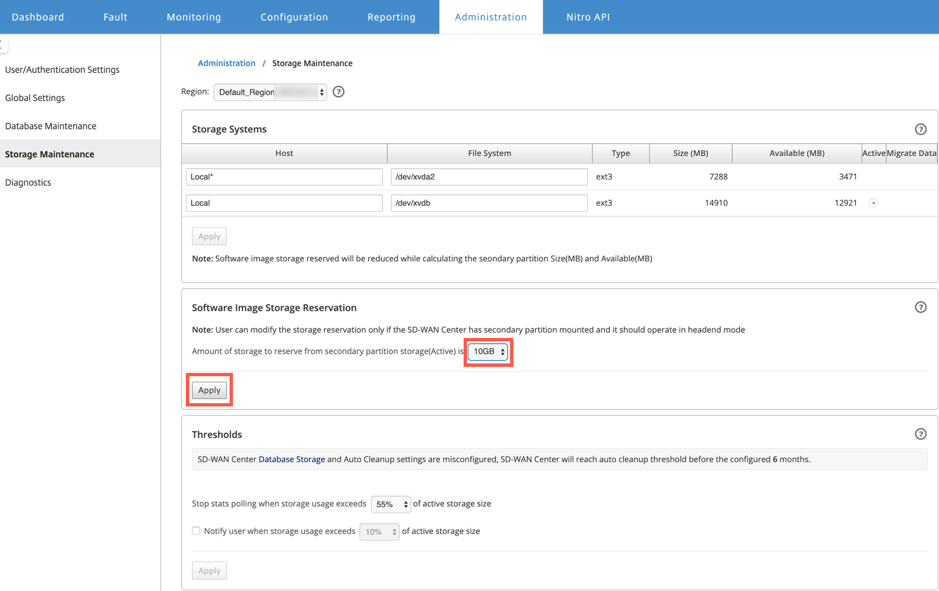
Add the secondary storage to SD-WAN Center to store the Firewall VM image files. For more information, see System requirements and installation.
-
Reserve the storage from the secondary partition for the Firewall VM image files. To configure the storage limit, navigate to Administration > Storage Maintenance.
-
Select the required storage amount from the list.
-
Click Apply.
-
Note
Storage is reserved from the secondary partition which is active if the condition is met.
Perform the following steps for provisioning the firewall virtual machine through SD-WAN Center platform:
-
From Citrix SD-WAN Center GUI, navigate to Configuration > select Hosted Firewall.
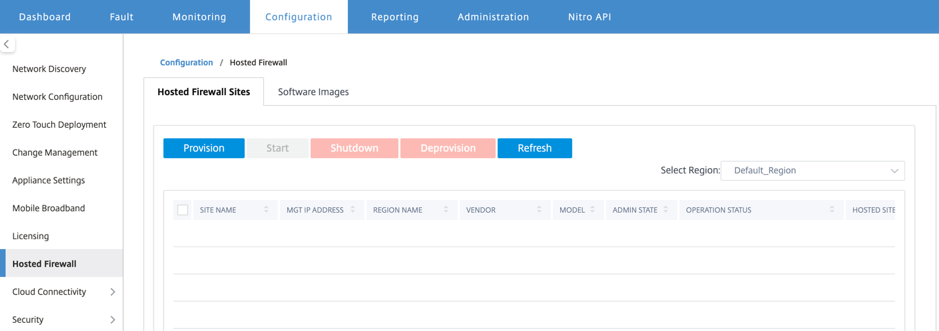
You can select the Region from the drop-down list to view the provisioned site details for that selected region.
-
Upload the software image.
Note
Ensure that you have enough disk space to upload the software image.
Navigate to Configuration > Hosted Firewall > Software Images and click Upload.
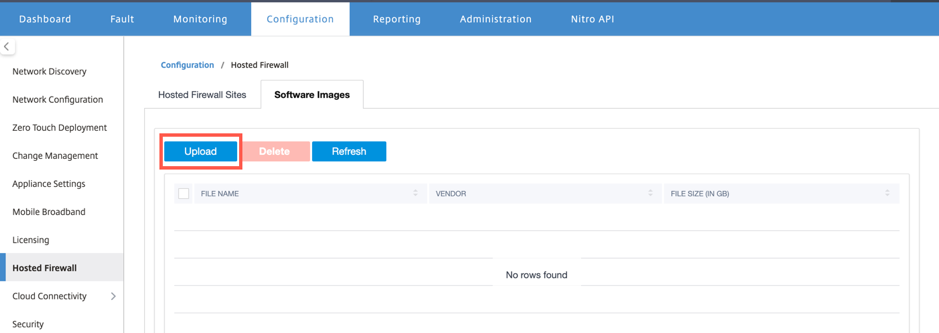
-
Select the Vendor name as Check Point from the drop-down list. Click or drop the software image file in the box to upload.
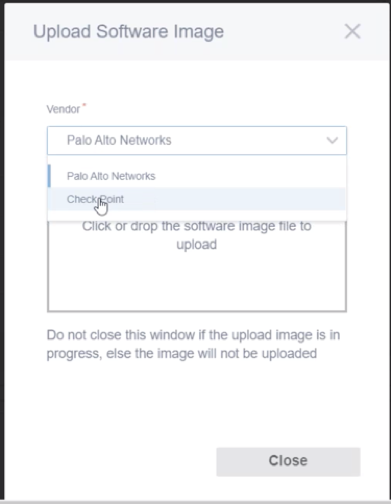
A status bar appears with the ongoing upload process. Do not click Refresh or perform any other action until the image file shows 100% uploaded.
-
Refresh: Click the Refresh option to get the latest image file details.
-
Delete: Click the Delete option to delete any existing image file.
Note
To provision firewall virtual machine on the sites part of non-default region, upload the image file on each of the collector node.
-
-
For provisioning, go back to the Hosted Firewall Sites tab and click Provision.
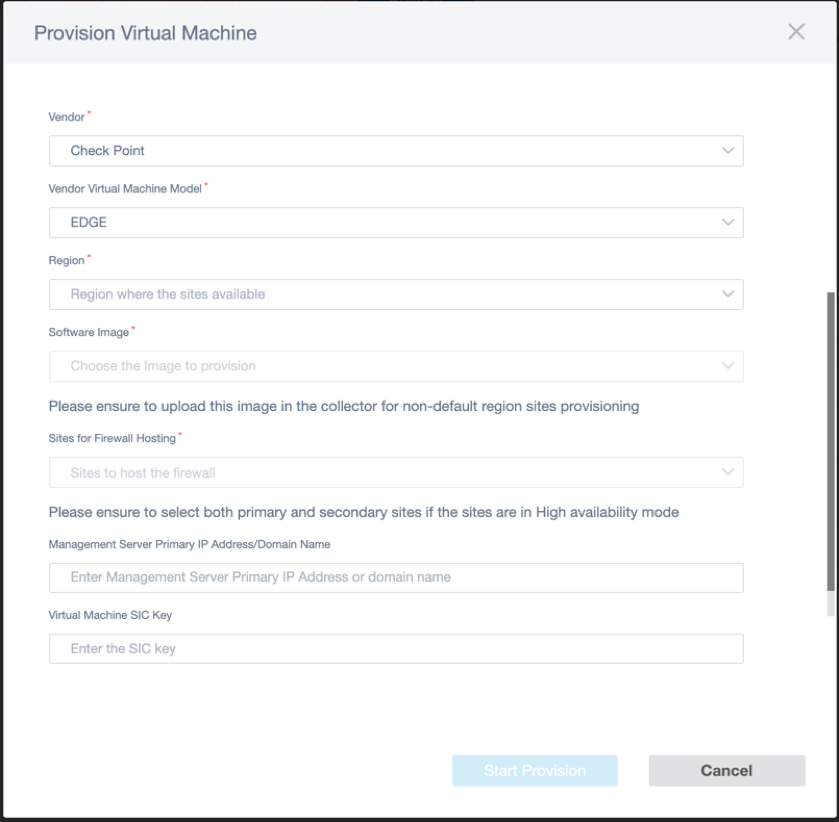
- Vendor: Select the vendor name as Check Point from the drop-down list.
- Vendor Virtual Machine Model: The virtual machine model field is auto filled as Edge.
- Region: Select the region from the list.
- Software Image: Select the Image file to provision.
- Sites for Firewall Hosting: Select sites for the list for firewall hosting. You must select both primary and secondary sites if the sites are in high availability mode.
- Management Server Primary IP Address/Domain Name: Enter the management primary IP address or fully qualified domain name (Optional).
- Virtual Machine SIC Key: Enter the virtual machine Secure Internal Communication (SIC) key. SIC creates trusted connections between Check Point components.
-
Click Start Provision.
-
Click Refresh to get the latest status. After the Check Point virtual machine is completely bootup, it will reflect on the SD-WAN Center UI.
You can Start, Shutdown, and Deprovision the virtual machine as needed.
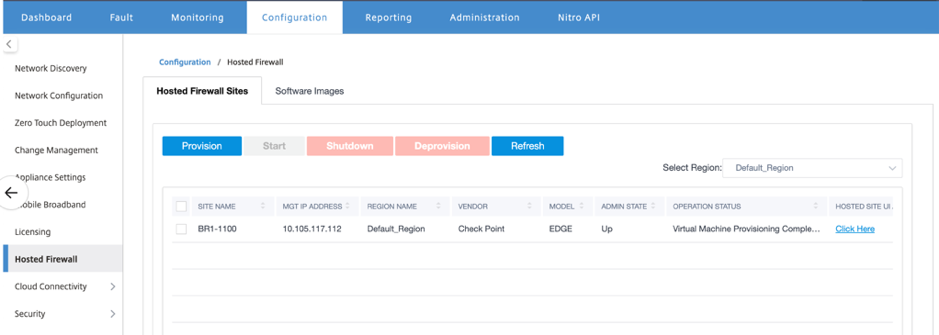
- Site Name: Displays the site name.
- Management IP: Displays the management IP address of the site.
- Region Name: Displays the region name.
- Vendor: Displays the vendor name (Check Point).
- Model: Displays the model - Edge.
- Admin State: State of the vendor virtual machine (Up/Down).
- Operation Status: Displays the last operation status message.
- Hosted Site UI Access: Use the Click Here link to access the Check Point virtual machine GUI.
Firewall virtual machine provisioning through SD-WAN appliance GUI
On SD-WAN platform, provision and boot up the hosted virtual machine. Perform the following steps for provisioning:
-
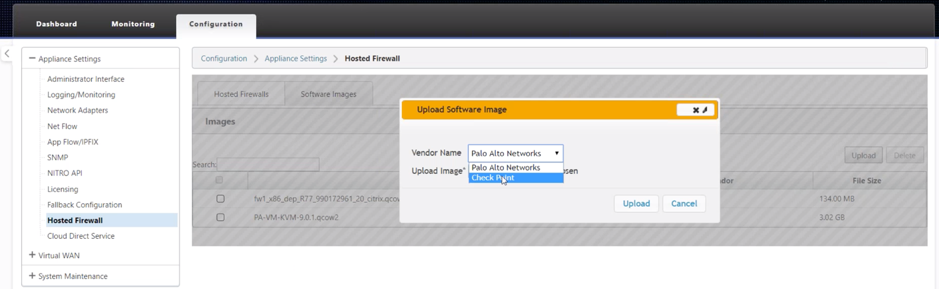
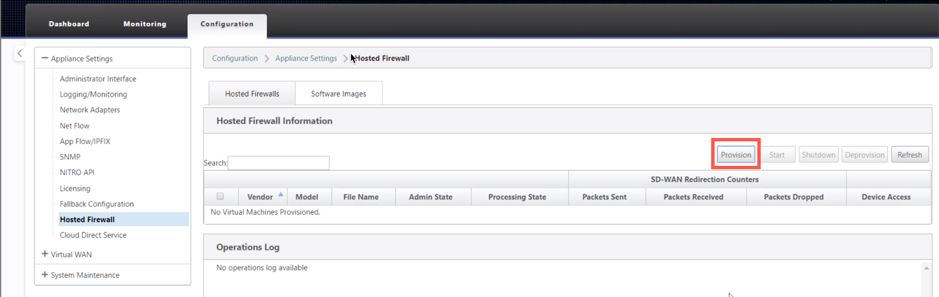
From the Citrix SD-WAN GUI, navigate to Configuration > Appliance Settings > select Hosted Firewall.
-
Upload the software image:
- Select the Software Images tab. Select the Vendor Name as Check Point.
- Choose the software image file.
- Click Upload.
Note
Maximum of two images can be uploaded. Uploading of the Check Point virtual machine image might take longer time depending on the bandwidth availability.
You can see a status bar to track the upload process. The file detail reflects, once the image is uploaded successfully. The image that is used for provisioning cannot be deleted. Do not perform any action or go back to any other page until the image file shows 100% uploaded.
-
For provisioning, select Hosted Firewall tab > click Provision button.
-
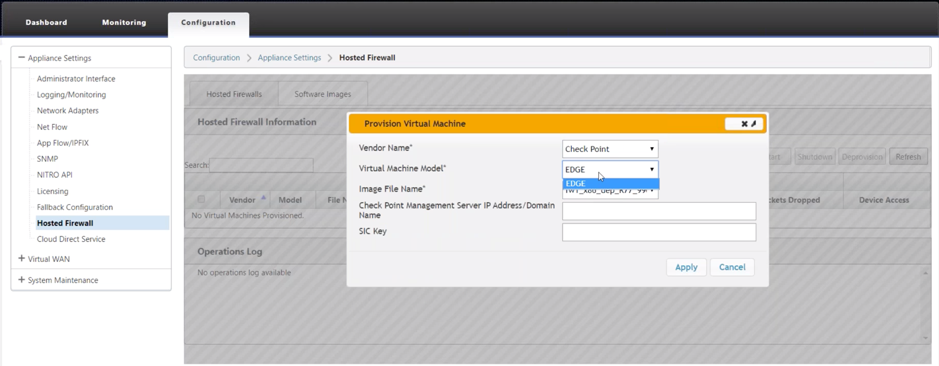
Provide the following details for provisioning.
- Vendor Name: Select the Vendor Name as Check Point.
- Virtual Machine Model: The virtual machine model is auto filled as Edge.
- Image File Name: The image file name is auto-populated.
- Check Point Management Server IP Address/Domain: Provide the check point management server IP address/domain.
- SIC Key: Provide the SIC key (Optional). SIC creates trusted connections between Check Point components. Click Apply.
-
Click Refresh to get the latest status. After the Check Point virtual machine is completely bootup, it will reflect on the SD-WAN UI with the operations Log detail.
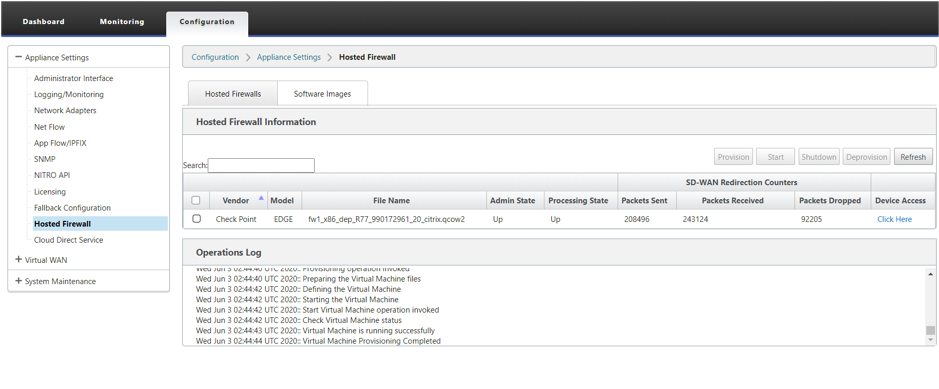
- Admin State: Indicates if the virtual machine is up or down.
- Processing State: Datapath processing state of the virtual machine.
- Packet Sent: Packets sent from SD-WAN to the security virtual machine.
- Packet Received: Packets received by SD-WAN from the security virtual machine.
- Packet Dropped: Packets dropped by SD-WAN (for example, when the security virtual machine is down).
- Device Access: Click the link to get the GUI access to the security virtual machine.
You can Start, Shutdown, and Deprovision the virtual machine as needed. Use Click Here option to access the Check Point virtual machine GUI or use your management IP along with 4100 port (management IP: 4100).
Note
Always use incognito mode to access the Check Point GUI.
Redirect traffic to Edge
Traffic redirection configuration can be done both through the Configuration Editor on MCN or Configuration Editor on SD-WAN Center.
To navigate through Configuration Editor on SD-WAN Center:
-
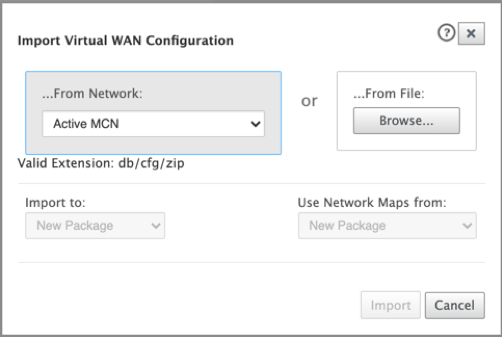
Open Citrix SD-WAN Center UI, navigate to Configuration > Network Configuration Import. Import the virtual WAN configuration from the active MCN and click Import.
Remaining steps are similar as following - the traffic redirection configuration through MCN.
To navigate through Configuration Editor on MCN:
-
Set Connection Match Type to Symmetric under Global > Networking Settings.
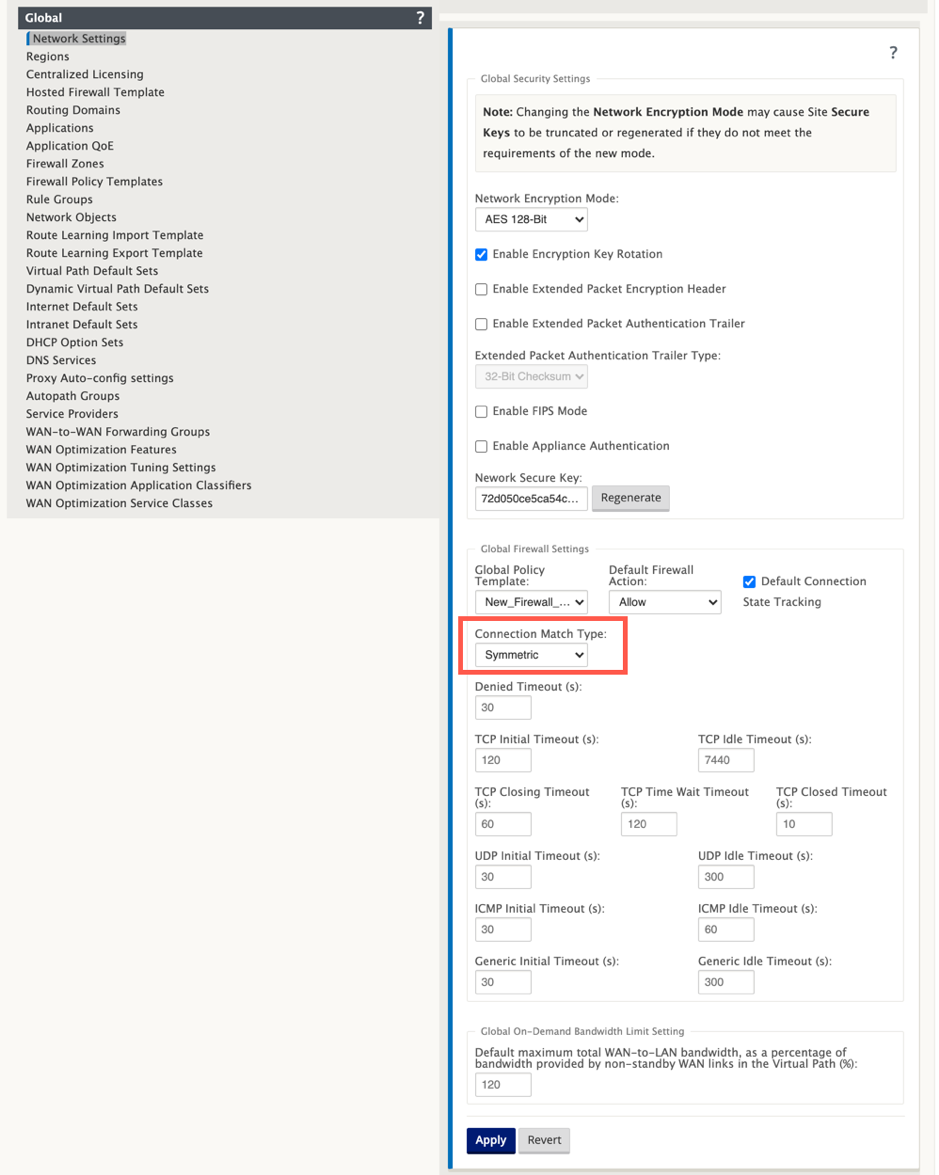
By default, SD-WAN firewall policies are direction specific. The Symmetric match-type match the connections using specified match criteria and apply policy action on both directions.
-
Open Citrix SD-WAN UI, navigate to Configuration > expand Virtual WAN > select Configuration Editor > select Hosted Firewall Template under Global section.
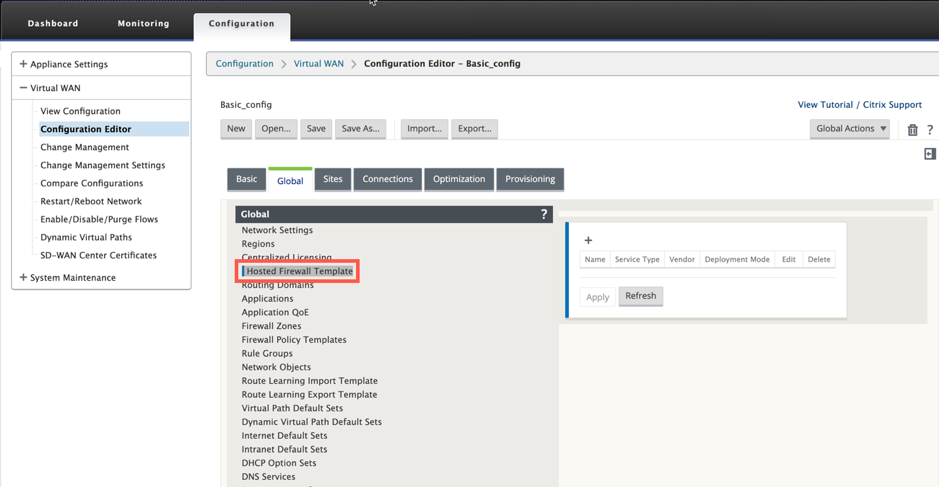
-
Click + and provide the required information available in the following screenshot to add the Hosted Firewall Template. Click Add.
Hosted Firewall Template allows you to configure the traffic redirection to the Firewall virtual machine hosted on the SD-WAN platform. The following are the inputs needed to configure the template:
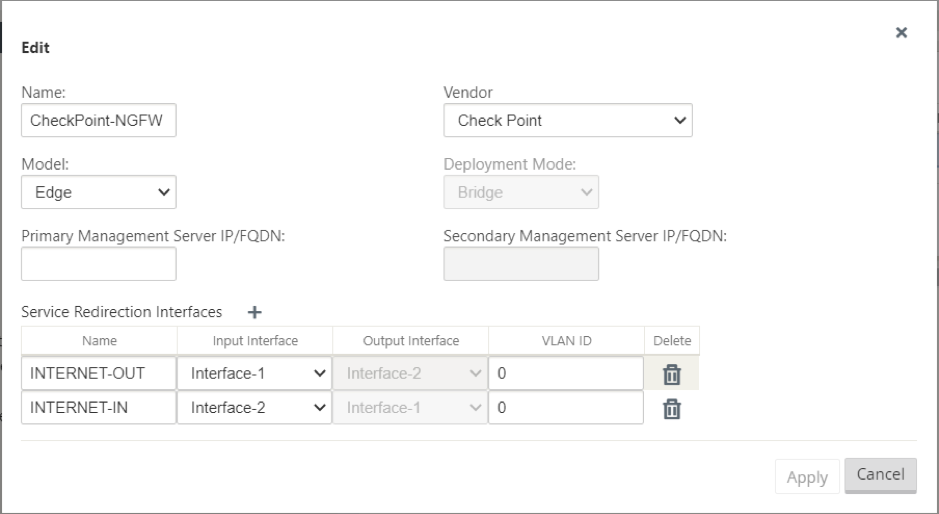
- Name: The name of the hosted firewall template.
- Vendor: The name of the firewall vendor – Check Point.
- Deployment Mode: The Deployment Mode field is auto populated and grayed out. For the Check Point vendor, the deployment mode is Bridge.
- Model: Virtual Machine model of the hosted firewall. Once you selected the vendor as Check Point, the model field is auto filled with Edge.
- Primary Management Server IP/FQDN: Primary management server IP/FQDN.
- Secondary Management Server IP/FQDN: Secondary management server IP/FQDN.
- Service Redirection Interfaces: These are logical interfaces used for traffic redirection between SD-WAN and the hosted firewall.
Note
Redirection input interface has to be selected from the connection initiator direction, output interface is automatically chosen for the response traffic. For Example, if outbound internet traffic is redirected to hosted firewall on Interface-1 then, response traffic is automatically redirected to hosted firewall on Interface-2. Also, there is no need of Interface-2 if there is no internet inbound traffic.
Only two data interfaces are assigned to the Check Point virtual machine.
Note
SD-WAN firewall policies are auto created to Allow the traffic to/from hosted firewall management servers. This avoids redirection of the management traffic that is originated from (or) destined to the hosted firewall.
Traffic redirection to the firewall virtual machine can be done using SD-WAN firewall policies. There are two methods to create the SD-WAN firewall policies - either through firewall policy templates in the Global section or at site level.
Method - 1
-
From Citrix SD-WAN GUI, navigate to Configuration > expand Virtual WAN > Configuration Editor. Select Firewall under Connections.
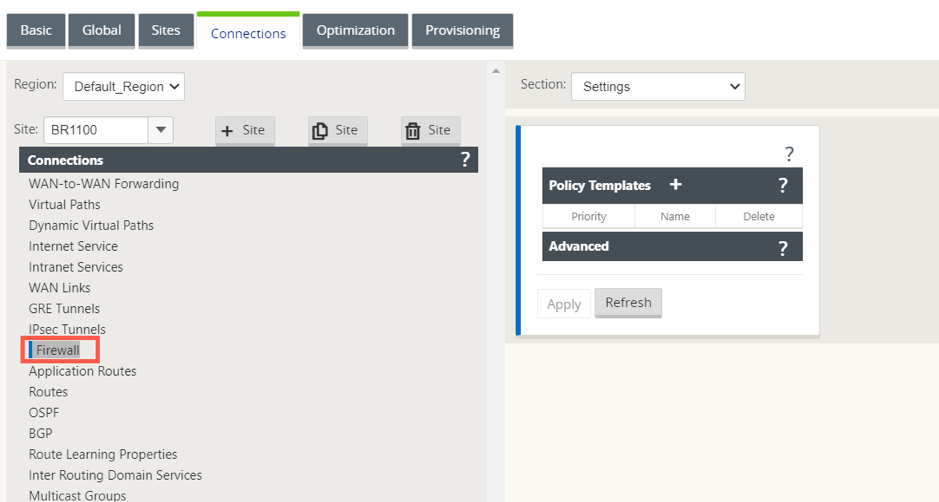
-
Select Policies from the Section drop-down list and click +Add to create a firewall policy.
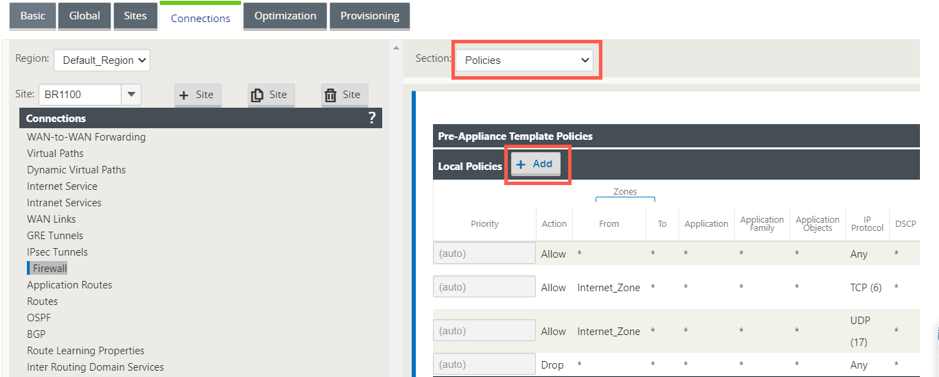
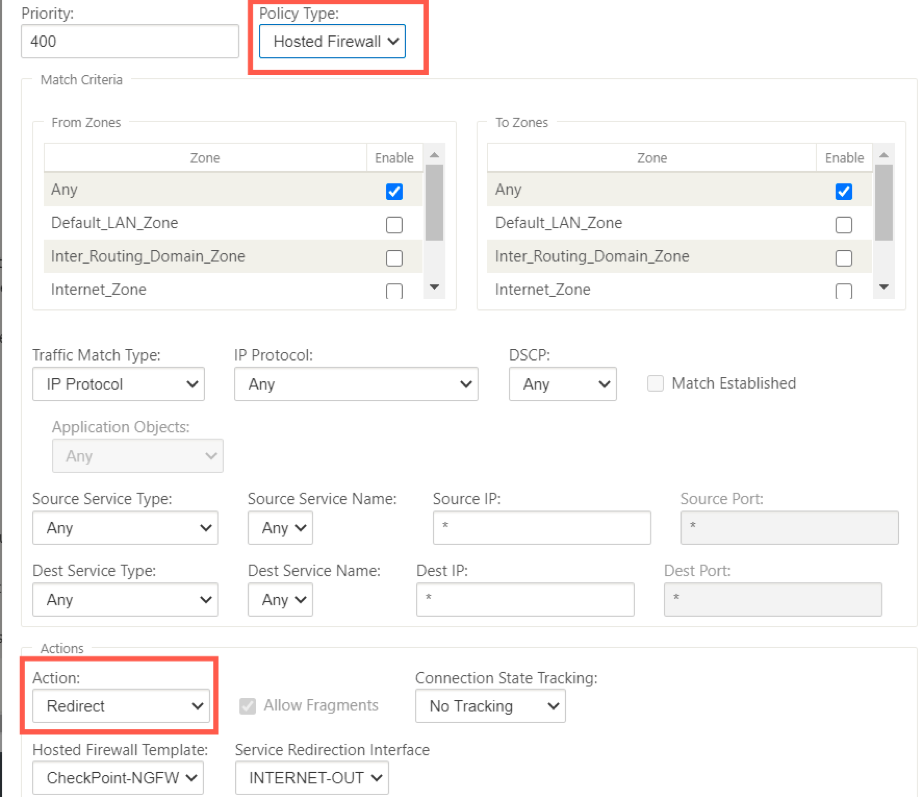
-
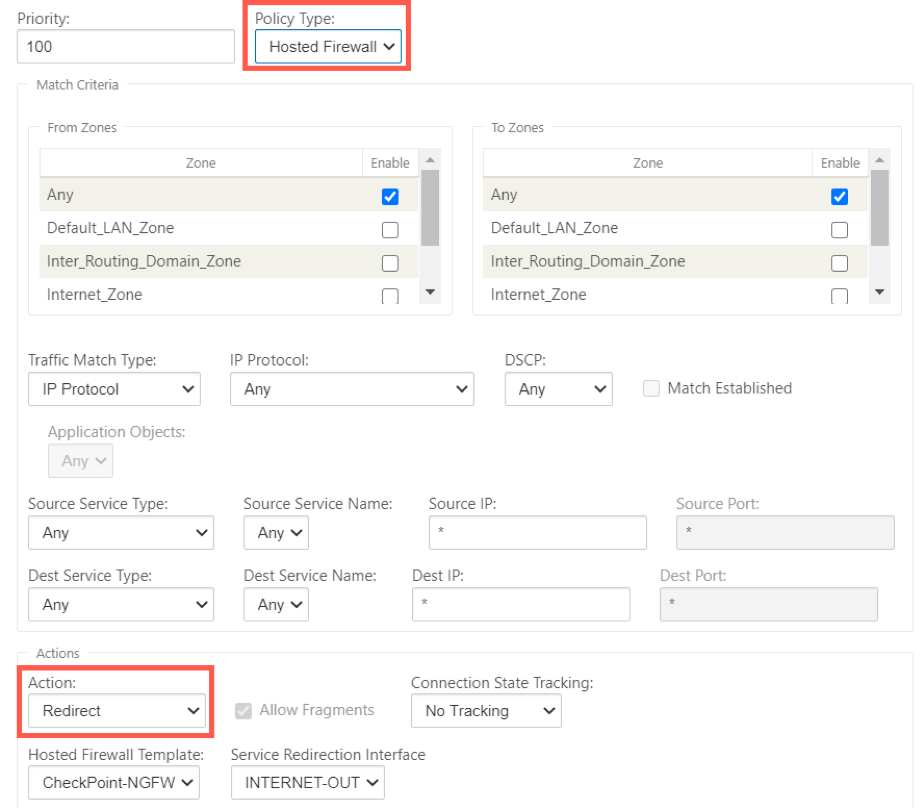
Change the Policy Type to Hosted Firewall. The Action field is auto filled to Redirect. Select the Hosted Firewall Template and the Service Redirection Interface from the drop-down list. Click Add.
Method - 2
-
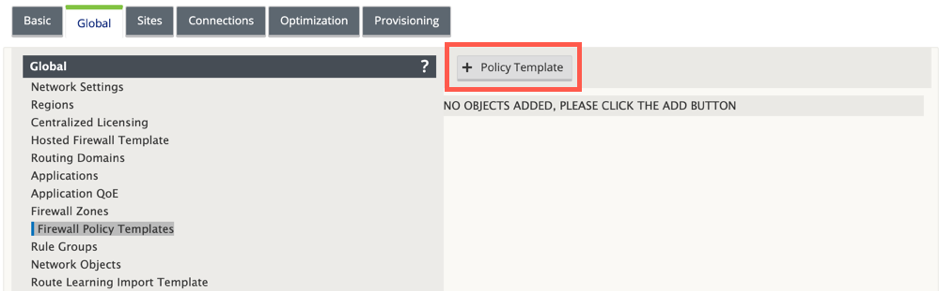
Navigate to the Global tab and select Firewall Policy Templates. Click + Policy Template.
-
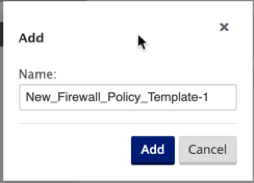
Provide the policy template a name and click Add.
-
Click + Add next to Pre-Appliance Template Policies.
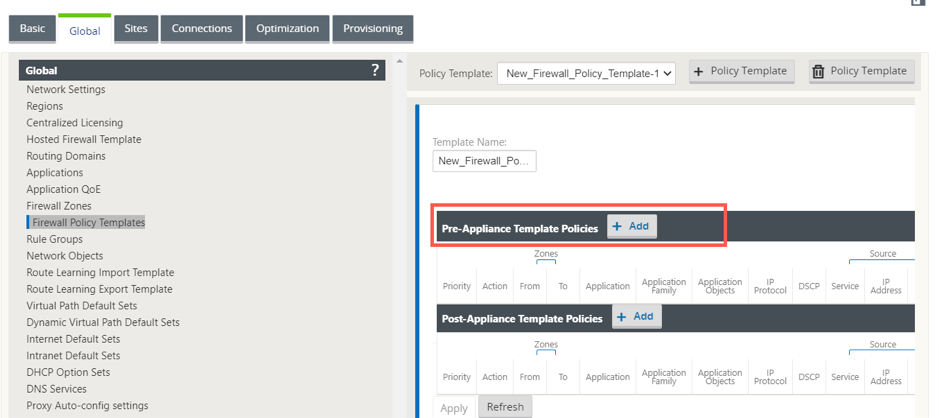
-
Change the Policy Type to Hosted Firewall. The Action field is auto filled to Redirect. Select the Hosted Firewall Template and the Service Redirection Interface from the drop-down list. Click Add.
-
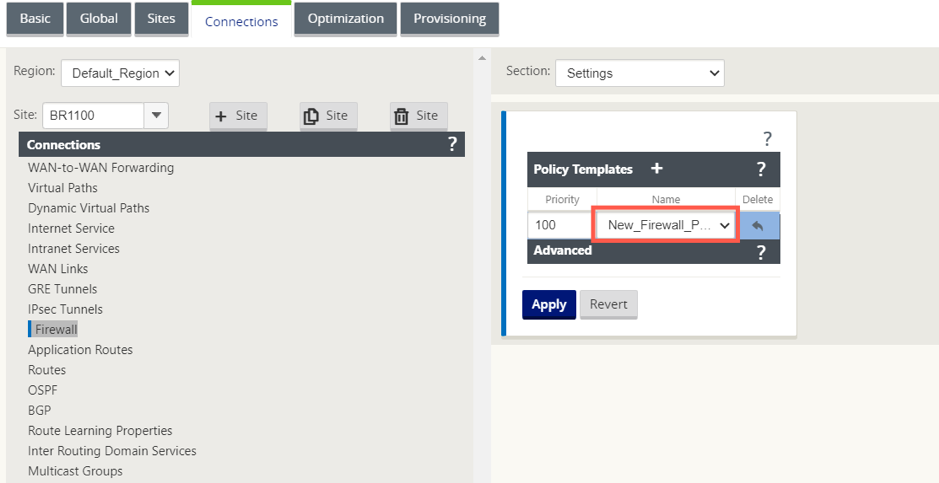
Navigate to the Connections > Firewall, then select the firewall policy (that you have created) under the name field. Click Apply.
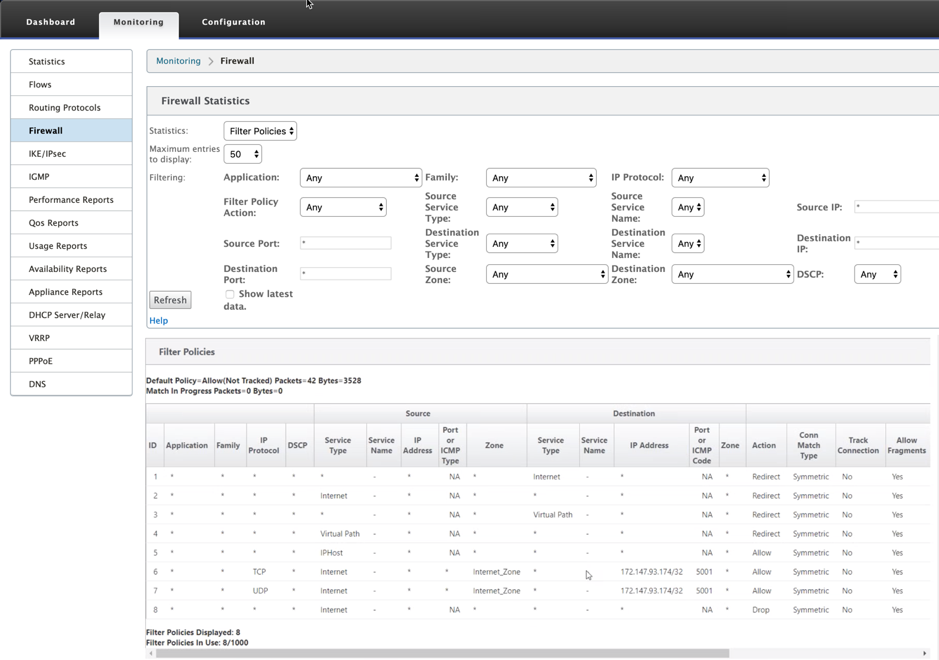
While all the network configuration is up and running mode, you can monitor the connection under Monitoring > Firewall > under Statistics list, select Filter Policies.