In-band and backup management
In-band management
Citrix SD-WAN allows you to manage the SD-WAN appliance in two ways, out-of-band management and in-band management. Out-of-band management allows you to create a management IP using a port reserved for management, which carries management traffic only. In-band management allows you to use the SD-WAN data ports for management. It carries both data and management traffic, without having to configure an addition management path.
In-band management allows virtual IP addresses to connect to management services such as web UI and SSH. You can enable In-band management on multiple trusted interfaces that are enabled to be used for IP services. You can access the web UI and SSH using the management IP and in-band virtual IPs.
From Citrix SD-WAN 11.4.2 release onwards, it is mandatory to configure In-band management on the SD-WAN appliance, to establish connectivity to Citrix SD-WAN Orchestrator service through an In-band management port. Otherwise, the appliance loses connectivity to Citrix SD-WAN Orchestrator service when the management port is not connected and the In-band IP address is also not configured.
Note
- Citrix SD-WAN Center does not support connectivity to the High Availability appliance through in-band management.
- You can configure Service Type as Any only using MCN Configuration Editor. Citrix SD-WAN Orchestrator service does not allow configuring Service Type as Any for destination NAT policies.
- Avoid disabling the service when the only management connectivity is in-band HA. You can get yourself locked out of the appliance if you disable the service.
To enable in-band management on a virtual IP:
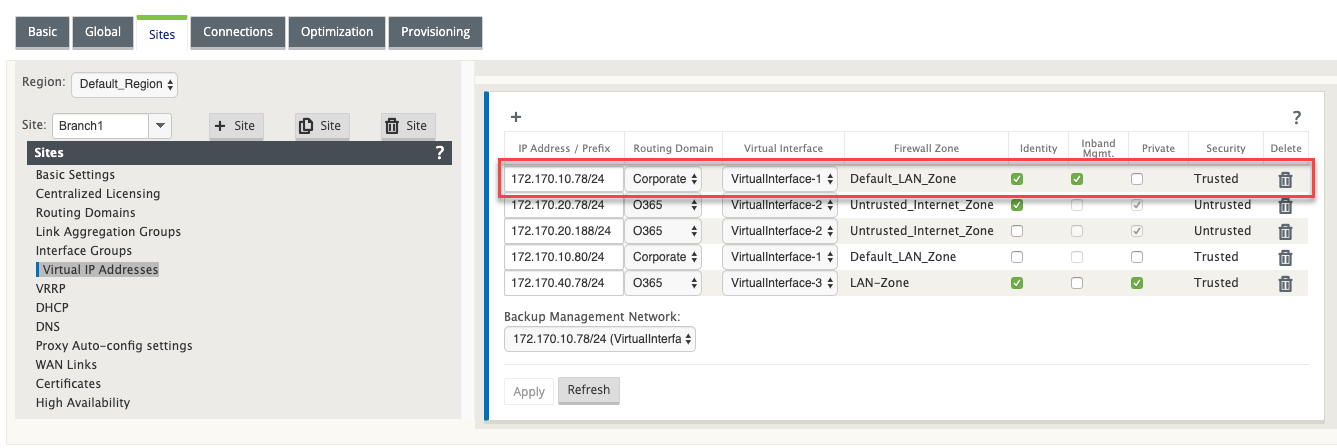
- In the configuration editor navigate to Sites > Virtual IP Addresses.
-
Select Inband Mgmt for the virtual IPs for which you want to enable in-band management.
Note:
Ensure that the interface security type is Trusted and Identity is enabled.
- Click Apply
For detailed procedure on configuring virtual IP address, see How to configure virtual IP.
From Citrix SD-WAN 11.3.1 release onwards, In-band management supports High Availability appliance pairs. The communication between the primary and secondary appliances happen through the virtual interfaces using NAT.
The following ports allow communication with management services on the HA appliances:
- HTTPS
- 443 - Connects to the HA active
- 444 - Redirects to the HA primary
- 445 - Redirects to the HA secondary
- SSH
- 22 - Connects to the HA active
- 23 - Redirects to the HA primary
- 24 - Redirects to the HA secondary
- SNMP
- 161 - Connects to the HA active
- 162 - Redirects to the HA primary
- 163 - Redirects to the HA secondary
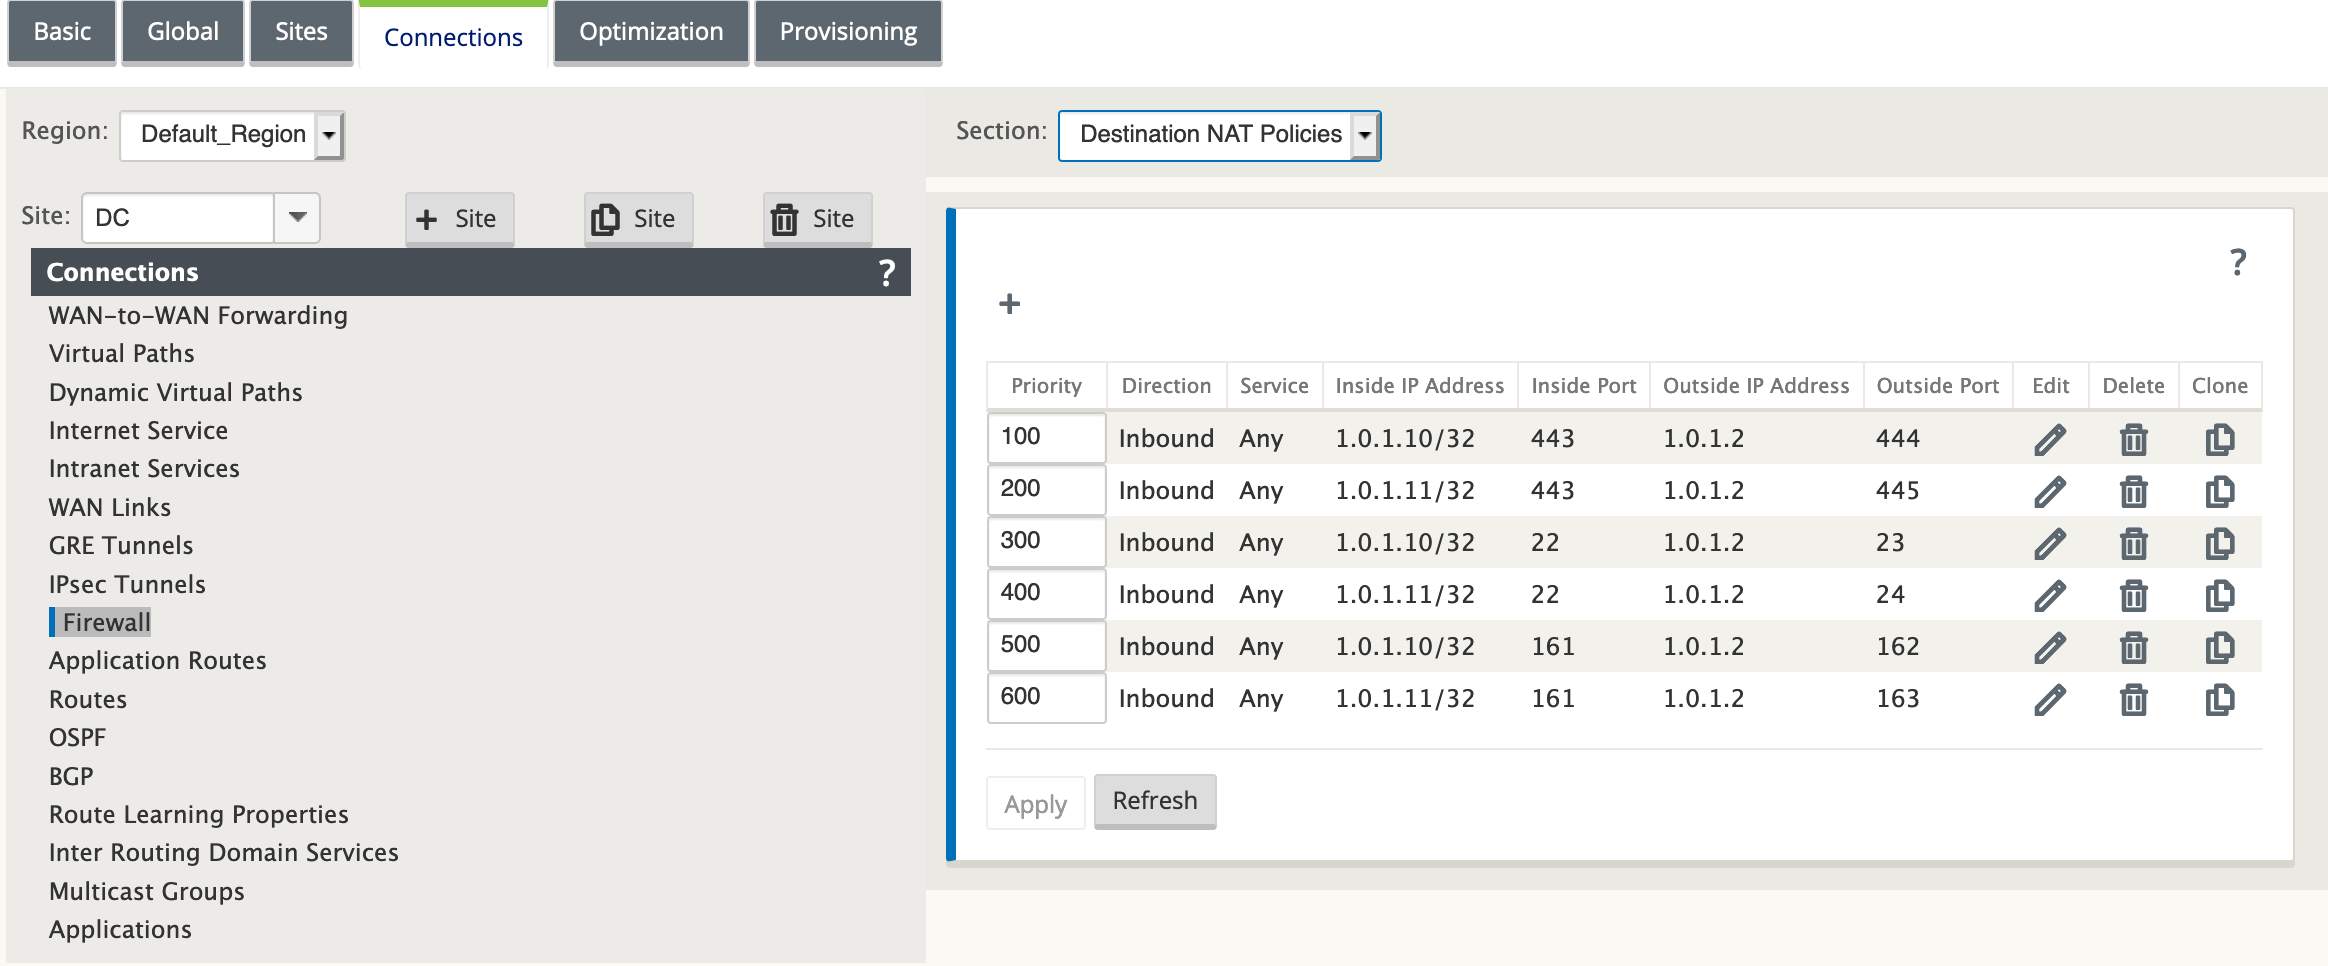
Use destination NAT policies to create IP addresses that allow connectivity to In-band HA without the need to enter a port.
For example, the following in-band IP addresses are used to access the appliances:
- Active appliance - 1.0.1.2
- Primary appliance - 1.0.1.10
- Secondary appliance - 1.0.1.11
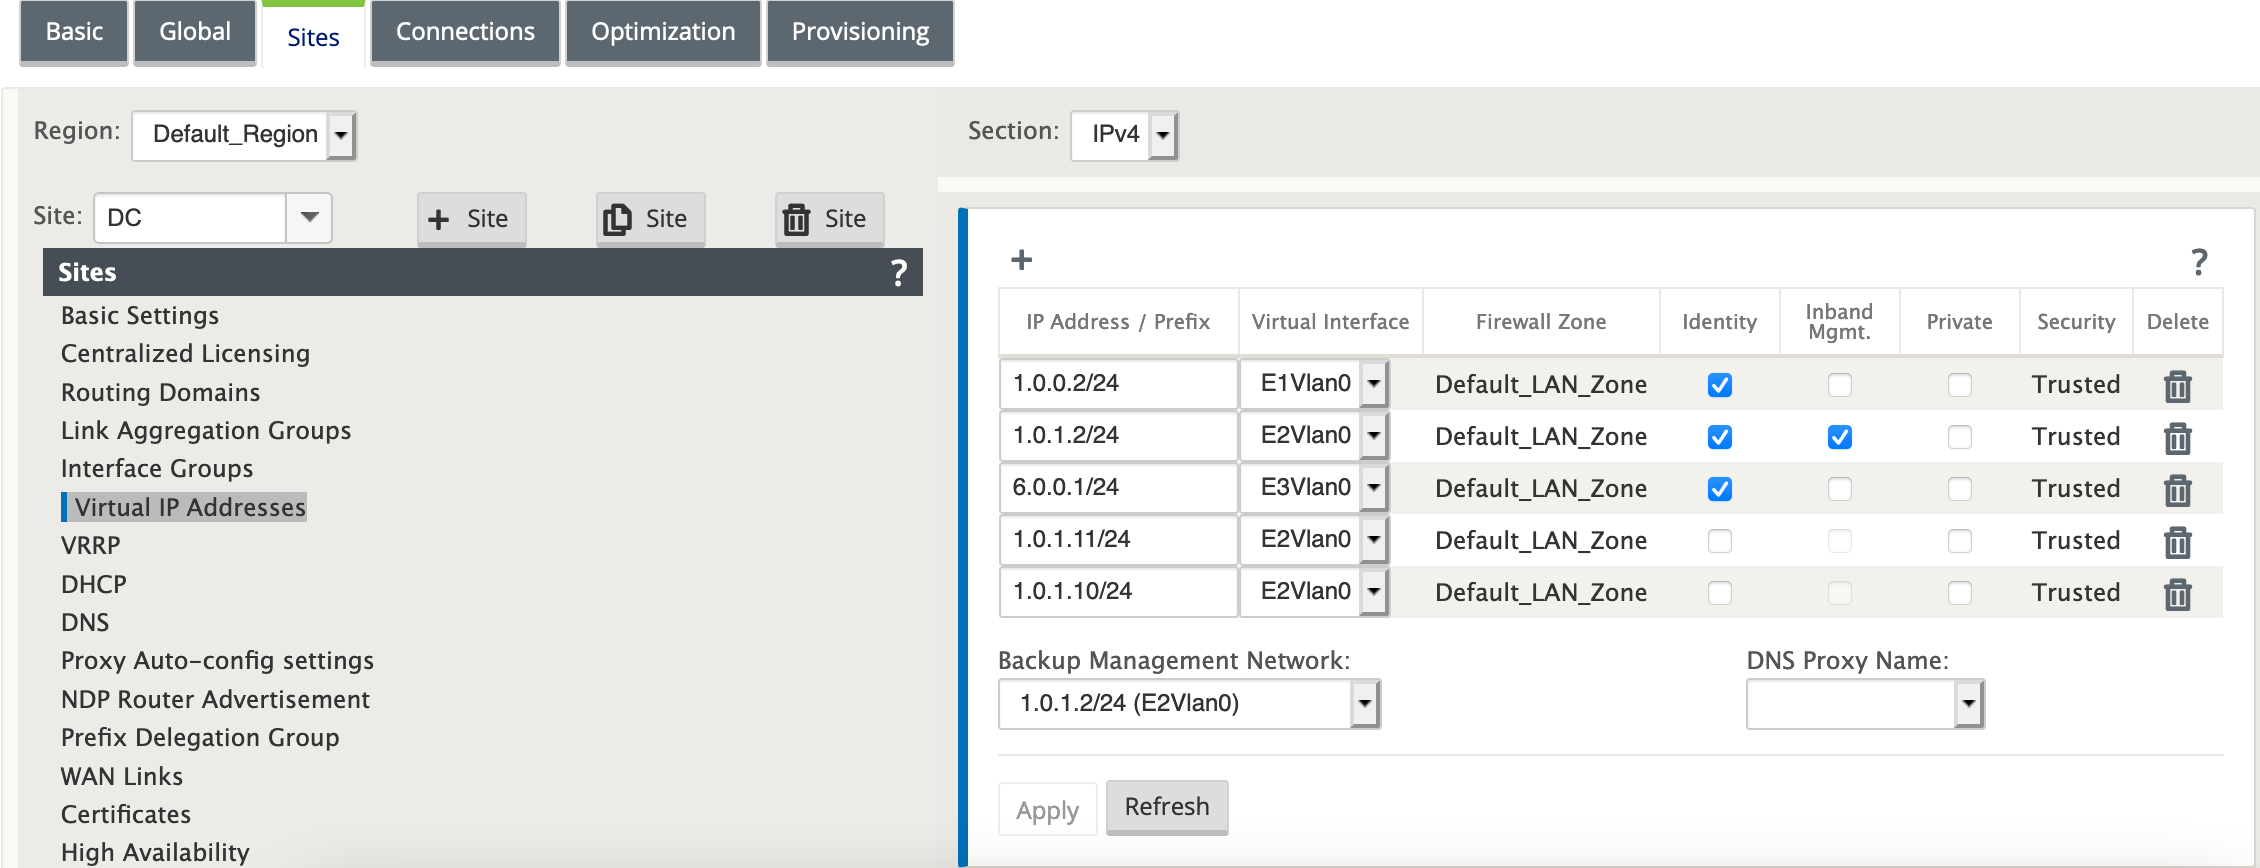
Create two new virtual IP addresses that are in the same network as that of the in-band management virtual IP address. In this example, 1.0.1.2/24 is the in-band management virtual IP addresses and 1.0.1.2/24 is selected as the backup network. 1.0.1.10 and 1.0.1.11 are the new virtual IP addresses that are created. 1.0.1.10 is used to access the primary appliance and 1.0.1.11 is used to access the secondary appliance.
Create destination NAT policies. The six DNAT policies redirect the base ports for services to the appropriate in-band HA port. After applying the configuration, you can access the primary and secondary appliances directly with the internal IP addresses.
Monitoring in-band management
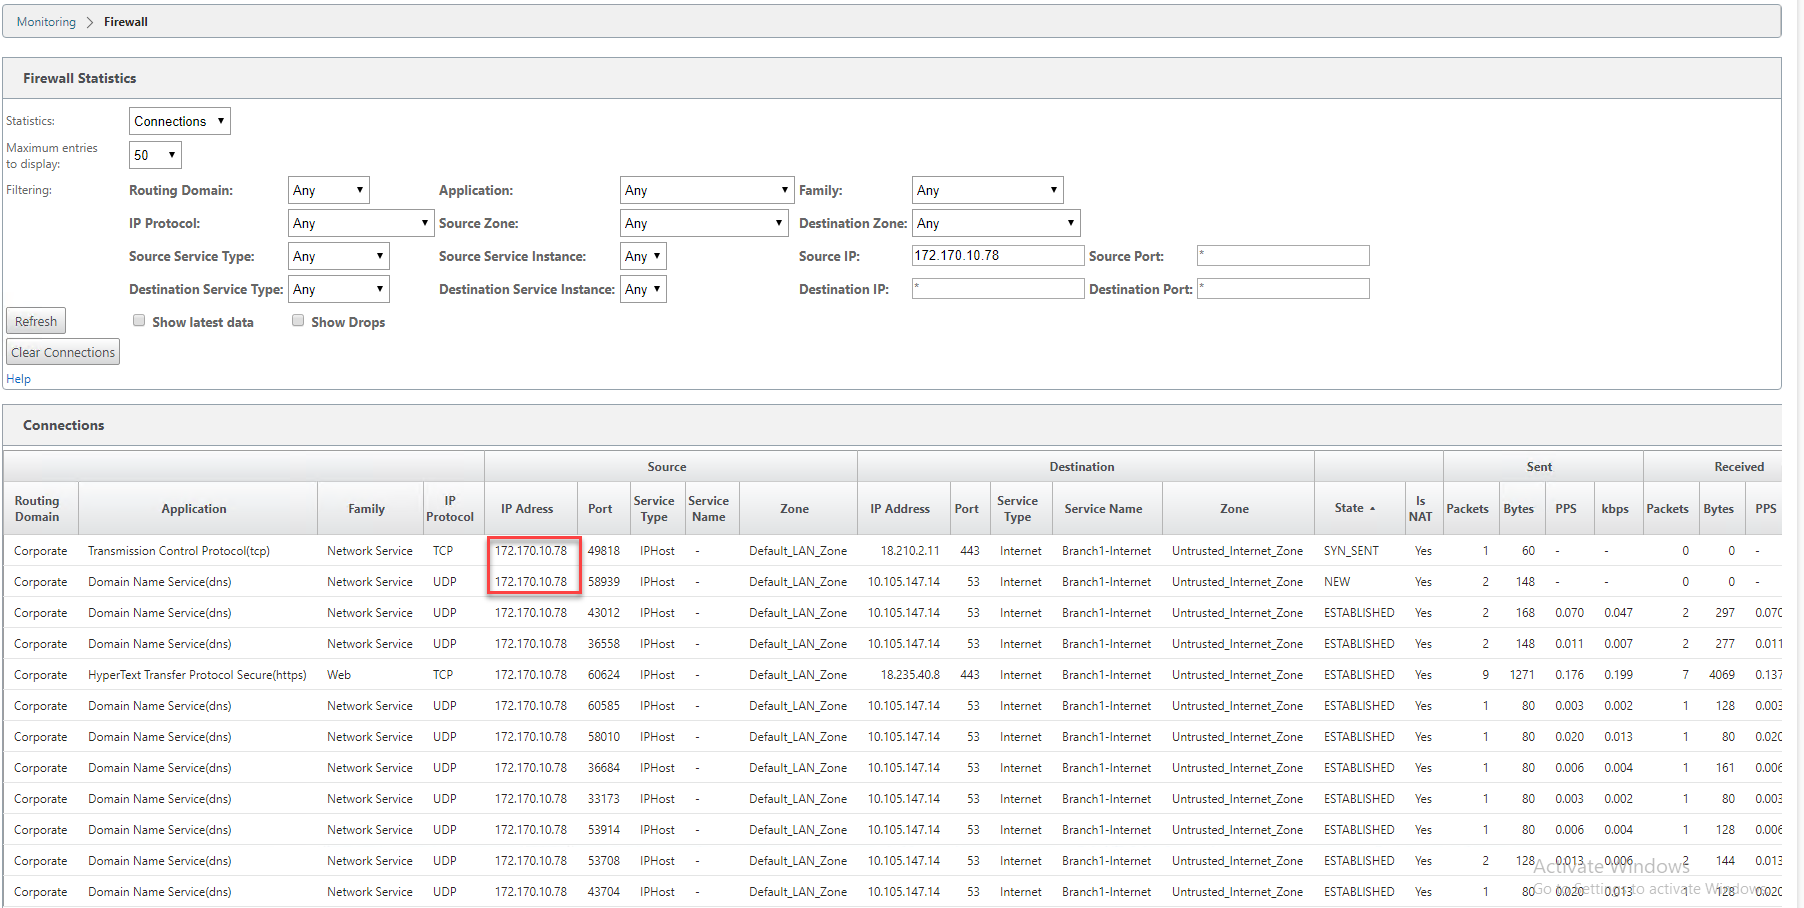
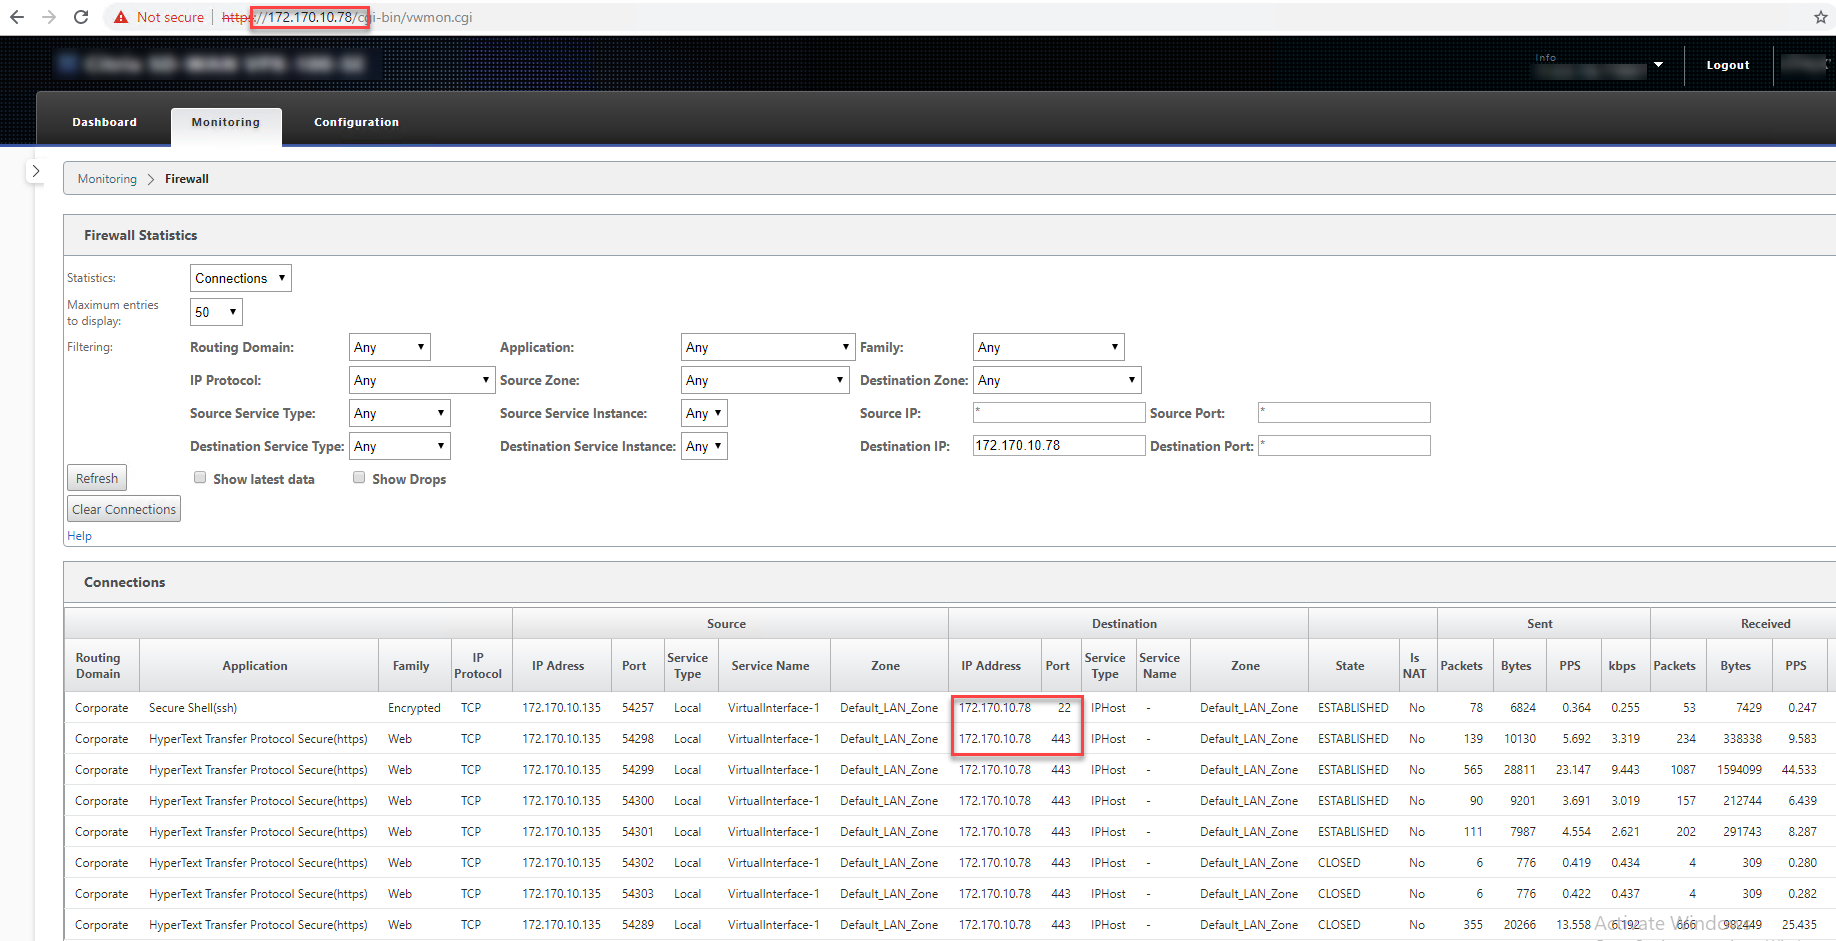
In the preceding example, we have enabled in-band management on 172.170.10.78 virtual IP. You can use this IP to access the web UI and SSH.
In the web UI navigate to Monitoring > Firewall. You can see SSH and web UI accessed using the virtual IP on port 22 and 443 respectively in the Destination IP address column.
Note
In-band management is not supported on the following SD-WAN appliances:
- Citrix SD-WAN 1000 SE / PE
- Citrix SD-WAN 2000 SE / PE
- Citrix SD-WAN 4000 SE
In-band provisioning
The need to deploy SD-WAN appliances in simpler environments like home or small branches has increased significantly. Configuring separate management access for simpler deployments is an added overhead. Zero-touch deployment along with in-band management feature enables provisioning and configuration management via designated data ports. Zero-touch deployment is now supported on the designated data ports and there is no need to use a separate management port for zero-touch deployment. Citrix SD-WAN also allows to fail over management traffic seamlessly to the management port when the data port goes down and vice versa.
An appliance in factory shipped state, that supports in-band provisioning, can be provisioned by simply connecting the data or management port to the internet. The appliances that support in-band provisioning have specific ports for LAN and WAN. The appliance in factory reset state has a default configuration that allows to establish a connection with the zero-touch deployment service. The LAN port acts as the DHCP server and assigns a dynamic IP to the WAN port that acts as a DHCP client. The WAN links monitor the Quad 9 DNS service to determine WAN connectivity.
Note
In-band provisioning is applicable to SD-WAN 110 SE and SD-WAN VPX platforms only.
Once the IP address is obtained and a connection is established with the zero-touch deployment service the configuration packages are downloaded and installed on the appliance. For information on zero-touch deployment through SD-WAN Center, see Zero Touch Deployment. For information on zero-touch deployment through SD-WAN Orchestrator see, Zero Touch Deployment.
Note: For day-0 provisioning of SD-WAN appliances through the data ports, the appliance software version must be SD-WAN 11.1.0 or higher.
The default configuration of an appliance in factory reset state includes the following configurations:
- DHCP Server on LAN port
- DHCP client on WAN port
- QUAD9 configuration for DNS
- Default LAN IP is 192.168.0.1
- Grace License of 35 days.
Once the appliance is provisioned, the default configuration is disabled and is overridden by the configuration received from the zero-touch deployment service. If an appliance license or grace license expiries, the default configuration is activated, to ensure that the appliance remains connected to the zero-touch deployment service and receives licenses managed via zero-touch deployment.
Default/Fallback configuration
Fallback configuration ensures that the appliance remains connected to the zero-touch deployment service if there is link failure, configuration mismatch, or software mismatch. Fallback configuration is enabled by default on the appliances that have a default configuration profile. You can also edit the fallback configuration as per your existing LAN network settings.
Note: After the initial appliance provisioning, ensure that the fallback configuration is enabled for zero-touch deployment service connectivity.
If the fall back configuration is disabled, you can enable it by navigating to Configuration > Appliance Settings > Default/Fallback Config > click Enable.

The following table provides the details of pre-designated WAN and LAN ports for fallback configuration on different platforms:
| Platform | WAN Ports | LAN Ports |
|---|---|---|
| 110 | 1/2 | 1/1 |
| 110-LTE | 1/2, LTE-1 | 1/1 |
| 210 | 1/4, 1/5 | 1/3 |
| 210-LTE | 1/4, 1/5, LTE-1 | 1/3 |
| VPX | 2 | 1 |
| 410 | 1/4, 1/5, 1/6 | 1/3 (FTB) |
| 1100 | 1/4, 1/5, 1/6 | 1/3 (FTB) |
From Citrix SD-WAN 11.3.1 release, the WAN port settings are configurable. WAN ports can be configured as independent WAN Links using DHCP client and monitor the Quad9 DNS service to determine WAN connectivity. You can configure WAN IPs/static IPs for the WAN ports in the absence of DHCP to use In-band management for initial provisioning.
Note
You can only configure the Ethernet ports with the static IPs. The static IPs are not configurable with LTE-1 and LTE-E1 ports. Though you can add the LTE-1 and LTE-E1 port as WAN, the configuration fields remain non-editable.
When you add a WAN port, it gets added under the WAN Settings (Port: 2) section with the DHCP Mode check box selected by default. If the DHCP Mode check box is selected, the IP Address, Gateway IP Address, and the VLAN ID text fields are grayed out. Clear the DHCP Mode check box, if you want to configure the static IP.

By default the WAN Tracking IP Address field is auto filled with the 9.9.9.9. You can change the address as needed.
Note
If you are selecting the Dynamic DNS Servers check box, ensure to add/configure at least one WAN port with the DHCP Mode selected.
To customize the fallback configuration as per your LAN network:
- Navigate to Configuration > Appliance Settings > Default/Fallback Config.
-
Edit values for the following LAN settings as per your network requirements. This is the minimum configuration required to establish a connection with the zero-touch deployment service.
- VLAN ID: The VLAN ID to which the LAN port must be grouped.
- IP Address: The virtual IP address assigned to the LAN port.
- DHCP Enabled: Enables the LAN port as the DHCP server. The DHCP server assigns dynamic IP addresses to the clients on the LAN port.
- DHCP Start and DHCP End: The range of IP addresses which DHCP uses to dynamically assign an IP to the clients on the LAN port.
- DNS Server: The IP address of the primary DNS server.
- Alt DNS Server: The IP address of the secondary DNS server.
- Internet Access: Permit internet access to all LAN clients without other filtering.
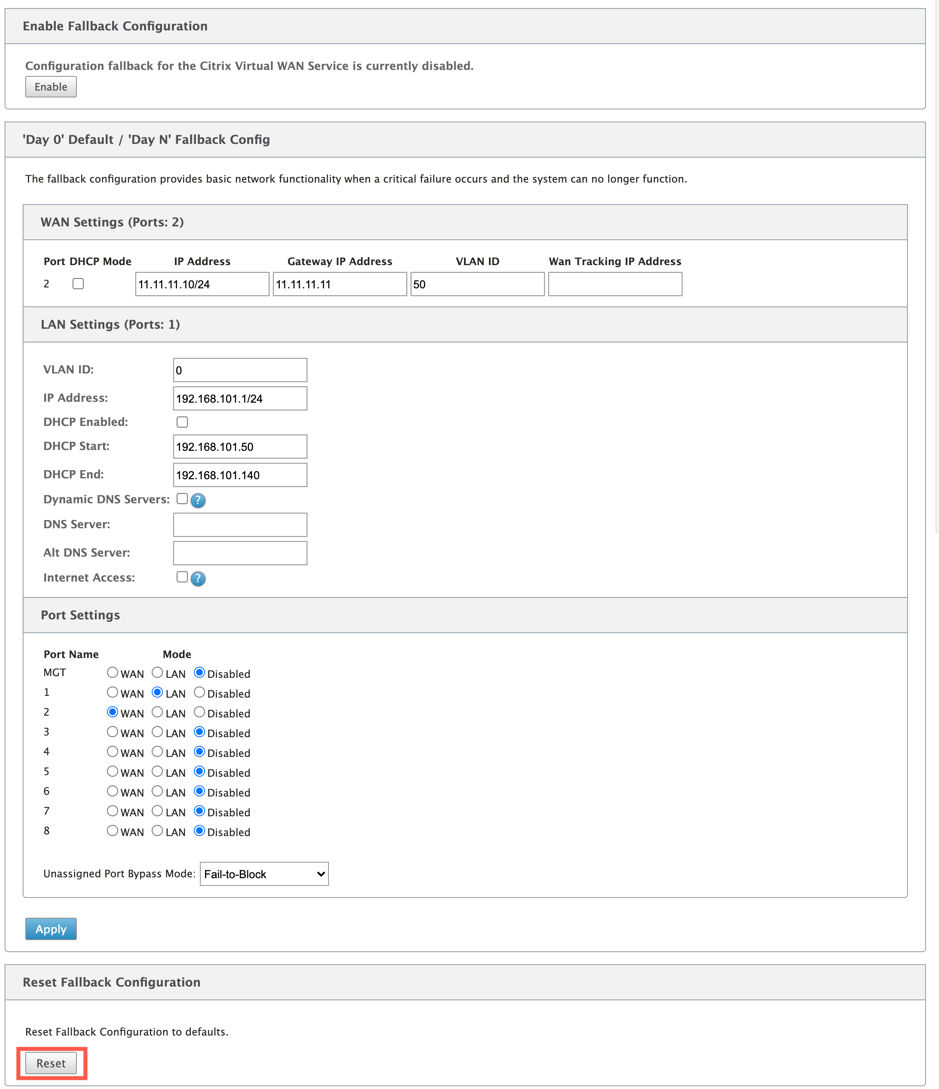
- Configure the mode for each port. The port can either be LAN port or WAN port or can be disabled. The ports displayed depend on the appliance model. Also, set the port bypass mode to Fail-to-Block or Fail-to-wire.
To reset the fallback configuration to default configuration at any time, click Reset.
Note
Fallback configuration is not supported on the following SD-WAN appliances:
- Citrix SD-WAN 1000 SE / PE
- Citrix SD-WAN 2000 SE / PE
- Citrix SD-WAN 4000 SE
Configurable Management or Data port
In-band management allows the data ports to carry both data and management traffic, eliminating the need for a dedicated management port. This leaves the management port unused on the low end appliances, which already have low port density. Citrix SD-WAN allows you to configure the management port to operate as either a data port or a management port.
Note
You can convert the management port to data port only on the following platforms:
- Citrix SD-WAN 110 SE/LTE
- Citrix SD-WAN 210 SE/LTE
On the configuration editor, use the management port in your configuration. After the configuration is activated, the management port is converted to a data port.
Note
You can configure a management port only when in-band management is enabled on other trusted interfaces on the appliance.
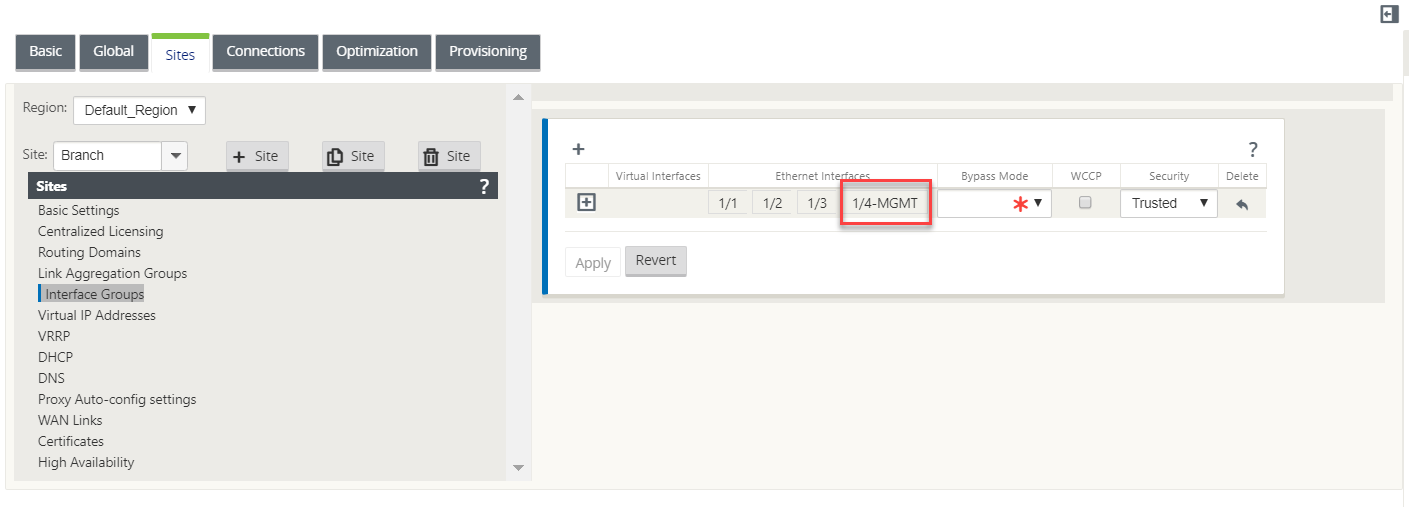
To configure a management interface, in the configuration editor navigate to Sites, select a site and click Interface Groups. The MGMT interface is available to be configured. For more information on configuring interface groups, see How to configure interface groups.
To reconfigure the management port to perform management functionality, remove the configuration. Create a configuration without using the management port and activate it.
Backup management network
You can configure a virtual IP address as a back-up management network. It is used as the management IP address if the management port is not configured with a default gateway.
Note
If a site has an Internet service configured with a single routing domain, a trusted interface with identity enabled is selected as the backup management network by default.
To select a virtual IP as a backup management network:
-
In the configuration editor navigate to Sites > Virtual IP Addresses.
-
Select a virtual IP address as a backup management network.
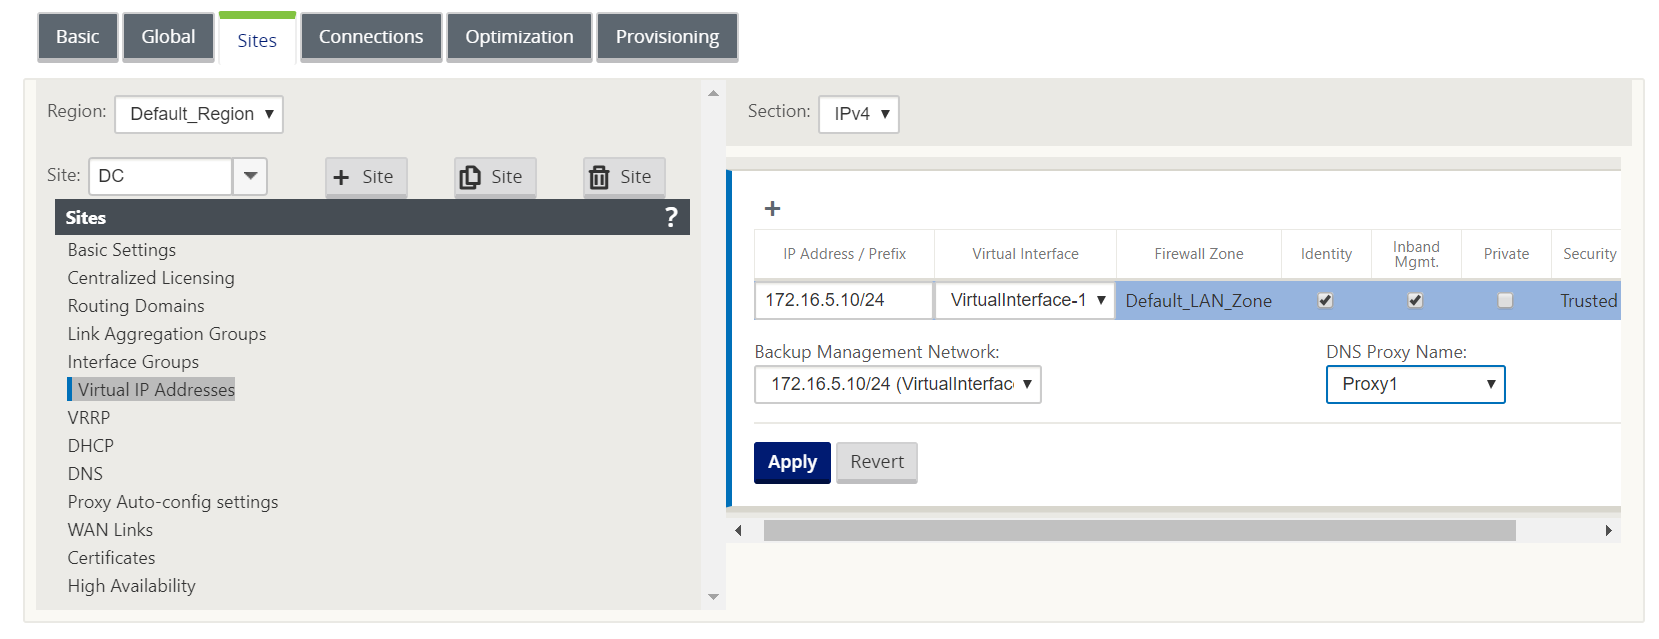
-
Select the DNS Proxy to which all DNS requests over the in-band and backup management plane is forwarded to.
Note
DNS proxy can be selected only when both In-band Management and Backup Management Network are enabled for a virtual IP.
-
Click Apply.
For detailed procedure on configuring virtual IP address, see How to configure virtual IP address
Monitoring backup management
In the preceding example, we have selected 172.170.10.78 virtual IP as the backup management network. If the management IP address is not configured with a default gateway, you can use this IP to access the web UI and SSH.
In the web UI navigate to Monitoring > Firewall. You can see this virtual IP address as the source IP address for SSH and web UI access.