-
Configuration guide for Citrix Virtual Apps and Desktops workloads
-
Citrix SD-WAN Orchestrator on-premises configuration on Citrix SD-WAN appliance
-
-
This content has been machine translated dynamically.
Dieser Inhalt ist eine maschinelle Übersetzung, die dynamisch erstellt wurde. (Haftungsausschluss)
Cet article a été traduit automatiquement de manière dynamique. (Clause de non responsabilité)
Este artículo lo ha traducido una máquina de forma dinámica. (Aviso legal)
此内容已经过机器动态翻译。 放弃
このコンテンツは動的に機械翻訳されています。免責事項
이 콘텐츠는 동적으로 기계 번역되었습니다. 책임 부인
Este texto foi traduzido automaticamente. (Aviso legal)
Questo contenuto è stato tradotto dinamicamente con traduzione automatica.(Esclusione di responsabilità))
This article has been machine translated.
Dieser Artikel wurde maschinell übersetzt. (Haftungsausschluss)
Ce article a été traduit automatiquement. (Clause de non responsabilité)
Este artículo ha sido traducido automáticamente. (Aviso legal)
この記事は機械翻訳されています.免責事項
이 기사는 기계 번역되었습니다.책임 부인
Este artigo foi traduzido automaticamente.(Aviso legal)
这篇文章已经过机器翻译.放弃
Questo articolo è stato tradotto automaticamente.(Esclusione di responsabilità))
Translation failed!
AWS
The following sections describe how to deploy ZTD in an AWS environment.
Deploying in AWS:
With SD-WAN release 9.3, zero touch deployment capabilities have extended to Cloud instances. The procedure to deploy zero touch deployment process four cloud instances is slightly different from appliance deployment for zero touch service.
-
Update the configuration to add a new remote site with a ZTD capable SD-WAN cloud device using SD-WAN Center Network Configuration.
If the SD-WAN configuration was not built using the SD-WAN Center Network Configuration, import the active configuration from the MCN and begin modifying the configuration using SD-WAN Center. For Zero Touch Deployment capability, the SD-WAN Administrator must build the configuration using SD-WAN Center. The following procedure should be used to add a new cloud node targeted for zero touch deployment.
-
Design the new site for SD-WAN cloud deployment by first outlining the details of the new site (i.e. VPX size, Interface Groups usage, Virtual IP Addresses, WAN Link(s) with bandwidth and their respective Gateways).
Note
- Cloud deployed SD-WAN instances must be deployed in Edge/Gateway mode.
- The template for the cloud instance is limited to three interfaces; Management, LAN, and WAN (in that order).
- The available cloud templates for SD-WAN VPX are currently hard-set to obtain the #.#.#.#.11 IP address of the available subnets in the VPC .
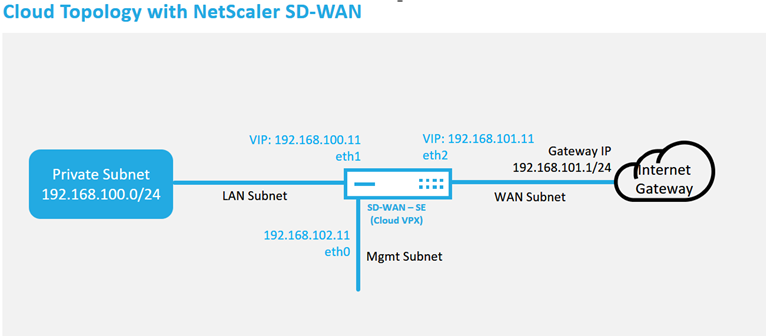
This is an example deployment of a SD-WAN cloud deployed site, the Citrix SD-WAN device is deployed as the edge device servicing a single Internet WAN link in this cloud network. Remote sites will be able to leverage multiple distinct Internet WAN links connecting into this same Internet Gateway for the cloud, providing resiliency and aggregated bandwidth connectivity from any SD-WAN deploy site to the cloud infrastructure. This provides cost effective and highly reliable connectivity to the cloud.
-
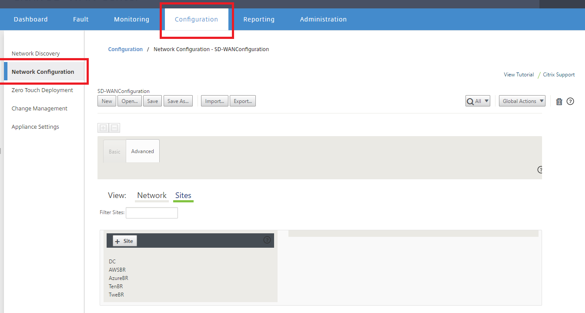
Open the SD-WAN Center web management interface and navigate to the Configuration > Network Configuration page.
-
Make sure a working configuration is already in place, or import the configuration from the MCN.
-
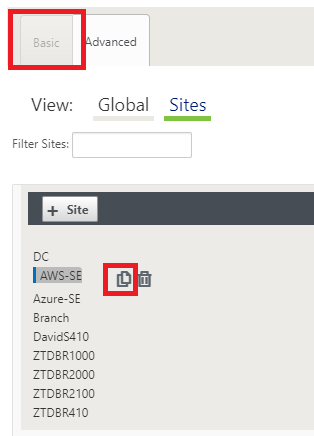
Navigate to the Basic tab to create a new site.
-
Open the Sites tile to display the currently configured sites.
-
Quickly built the configuration for the new cloud site by utilizing the clone feature of any existing site, or manually build a new site.
-
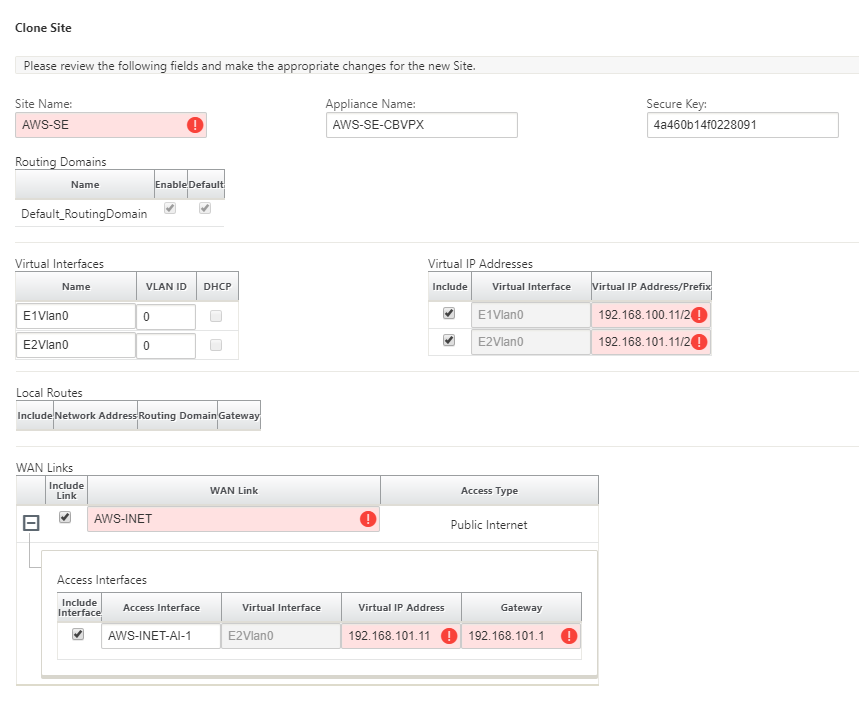
Populate all the required fields from the topology designed earlier for this new cloud site
Keep in mind that the template available for cloud ZTD deployments are hard-set to utilize the #.#.#.11 IP address for the Mgmt, LAN, and WAN subnets. If the configuration is not set to match the expected .11 IP host address for each interface, then the device will not be able to properly establish ARP to the cloud environment gateways and IP connectivity to the Virtual Path of the MCN.
-
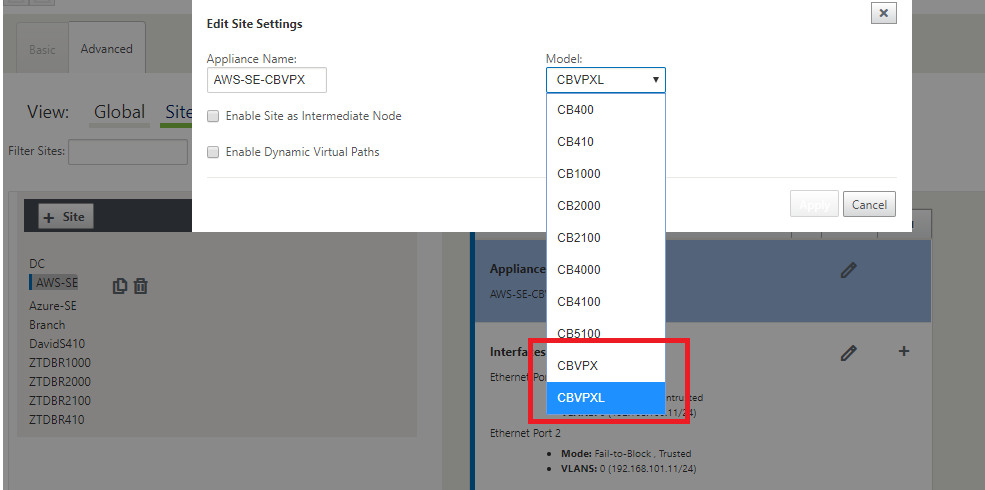
After cloning a new site, navigate to the site’s Basic Settings, and verify that the Model of SD-WAN is correctly selected which would support the zero touch service.
-
Save the new configuration on SD-WAN Center, and use the export to the Change Management inbox option to push the configuration using Change Management.
-
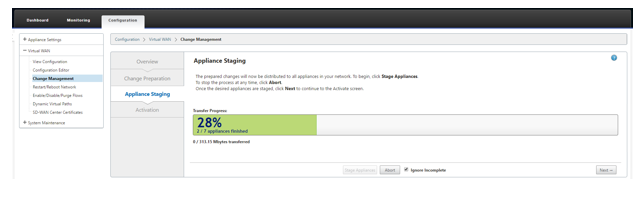
Follow the Change Management procedure to properly stage the new configuration, which makes the existing SD-WAN devices aware of the new site to be deployed via zero touch, you will need to utilize the Ignore Incomplete option to skip attempting to push the configuration to the new site that still needs to go through the ZTD workflow.
-
-
Navigate back to the SD-WAN Center Zero Touch Deployment page, and with the new active configuration running, the new site will be available for deployment.
-
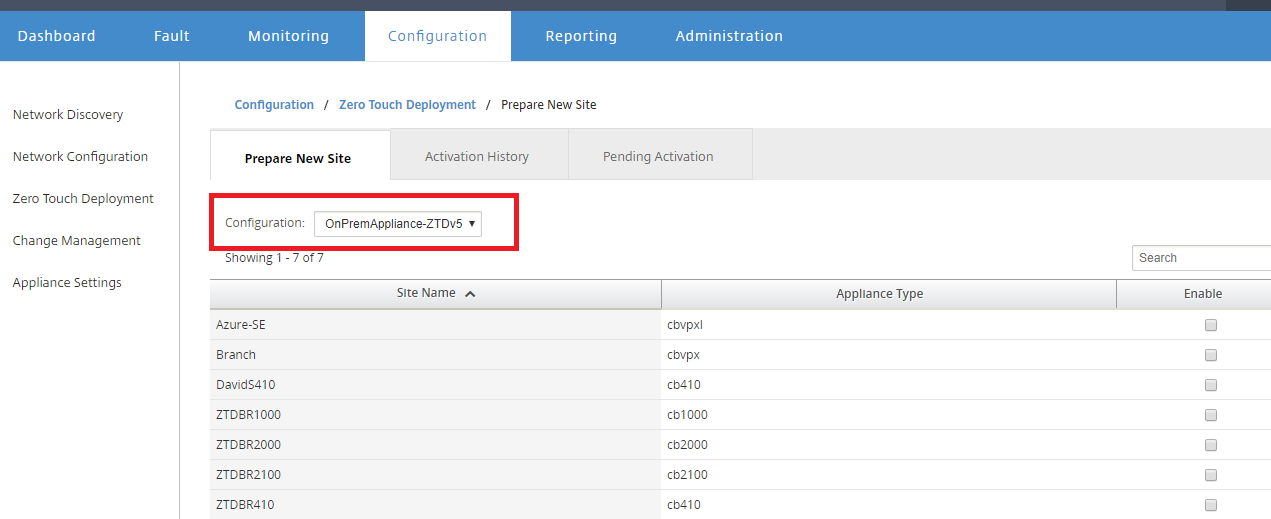
In the Zero Touch Deployment page, under the Deploy New Site tab, select the running network configuration file.
-
After the running configuration file is selected, the list of all the branch sites with undeployed Citrix SD-WAN devices that are supported for zero touch will be displayed.
-
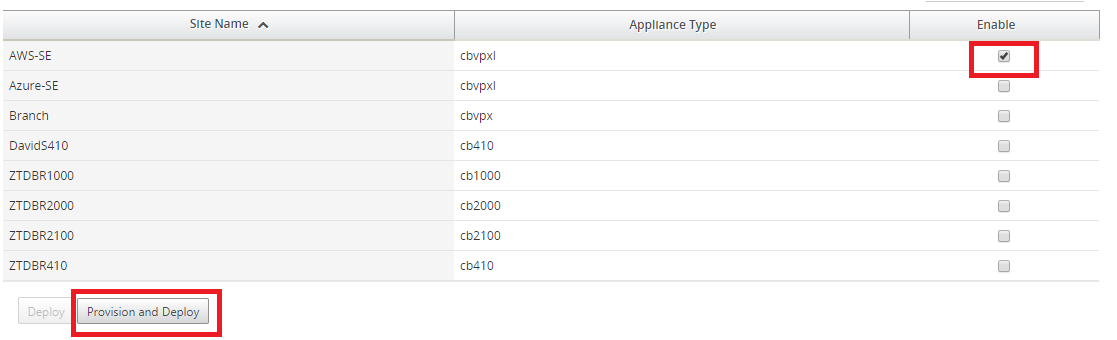
Select the target cloud site you want to deploy using the Zero Touch service, click Enable, and then Provision and Deploy.
-
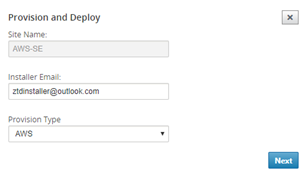
A pop-up window will appear, where the Citrix SD-WAN Admin can initiate the deployment for Zero Touch.
Populate an email address where the activation URL can be delivered, and select the Provision Type for the desired Cloud.
-
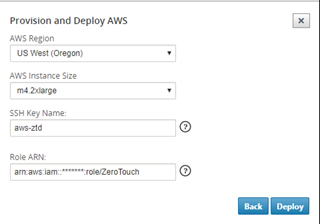
After clicking Next, Select the appropriate Region, Instance size, populate the SSH Key name and Role ARN fields appropriately.
Note
Make use of the help links for guidance on how to setup the SSH Key and Role ARN on the Cloud account. Also make sure the select region matches what is available on the account and that the selected Instance Size matches VPX or VPXL as the selected model in the SD-WAN configuration.
-
Click Deploy, triggering the SD-WAN Center, which was previously registered with the ZTD Cloud Service, to share the configuration of this site to be temporality stored in the ZTD Cloud Service.
-
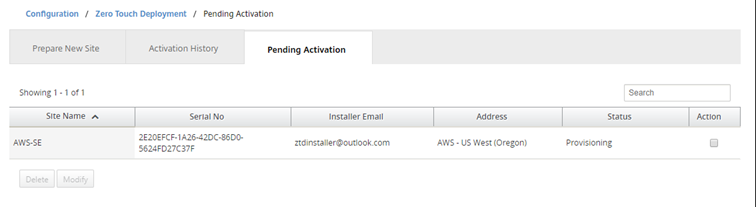
Navigate to the Pending Activation tab to confirm that the site information populated successfully and was put into a provisioning status.
-
-
Initiate the Zero Touch Deployment process as the Cloud Admin.
-
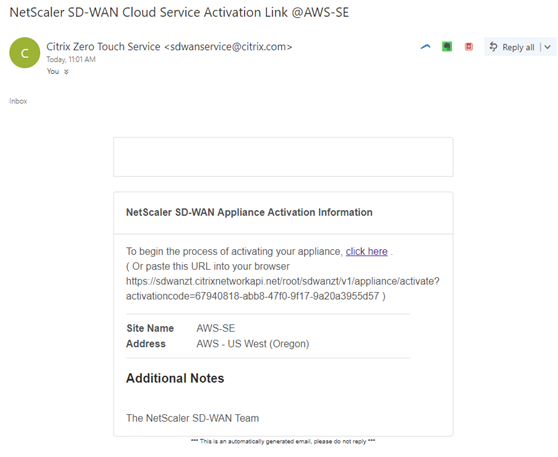
The Installer will need to check the mailbox of the email address the SD-WAN Administrator used when deploying the site.
-
Open the activation URL found in the email in an internet browser window (example;
https://sdwanzt.citrixnetworkapi.net). -
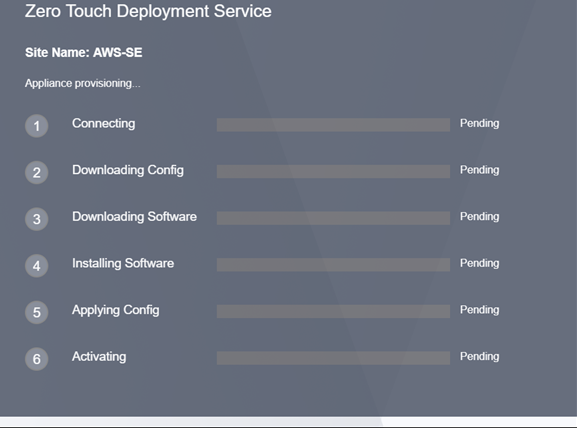
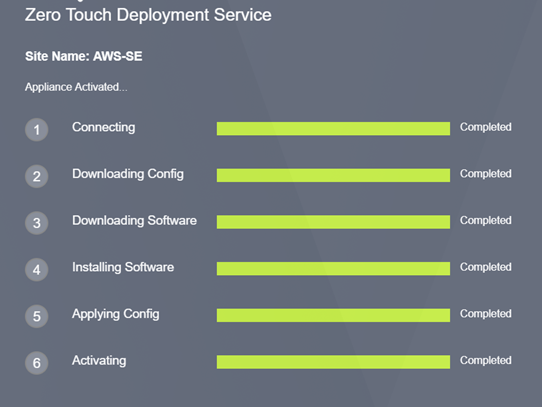
If the SSH Key and Role ARN are properly inputted, the Zero Touch Deployment Service will immediately start provisioning the SD-WAN instance, otherwise connections errors will immediately be displayed.
-
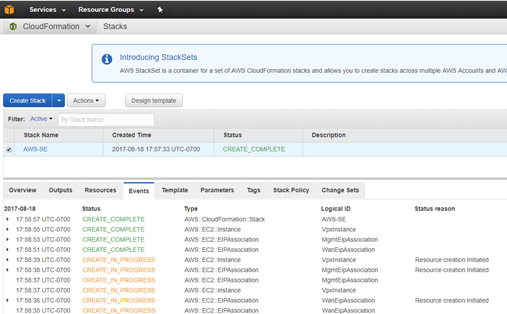
For additional troubleshooting on the AWS console, the Cloud Formation service can be utilized to catch any events that occur during the provisioning process.
-
Allow the provisioning process ~8-10 minutes and activation another ~3-5 minutes to fully complete.
-
With successful connectivity of the SD-WAN cloud instance to the ZTD Cloud Service, the service will automatically perform the following:
-
Download the site-specific Configuration File that was stored earlier by the SD-WAN Center
-
Applying the Configuration to the local instance
-
Download and Install a temporary 10 MB license file
-
Download and Install any software updates if needed
-
Activate the SD-WAN Service
-
-
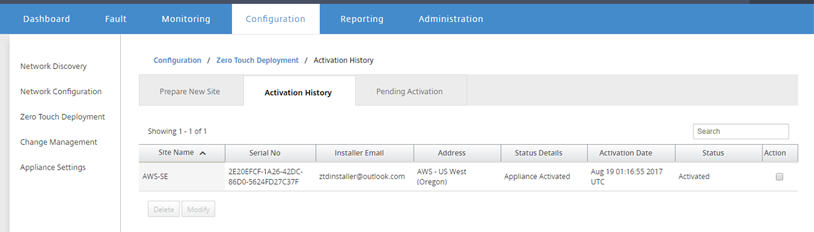
Further confirmation can be done in the SD-WAN Center web management interface; the Zero Touch Deployment menu will display successfully activated appliances in the Activation History tab.
-
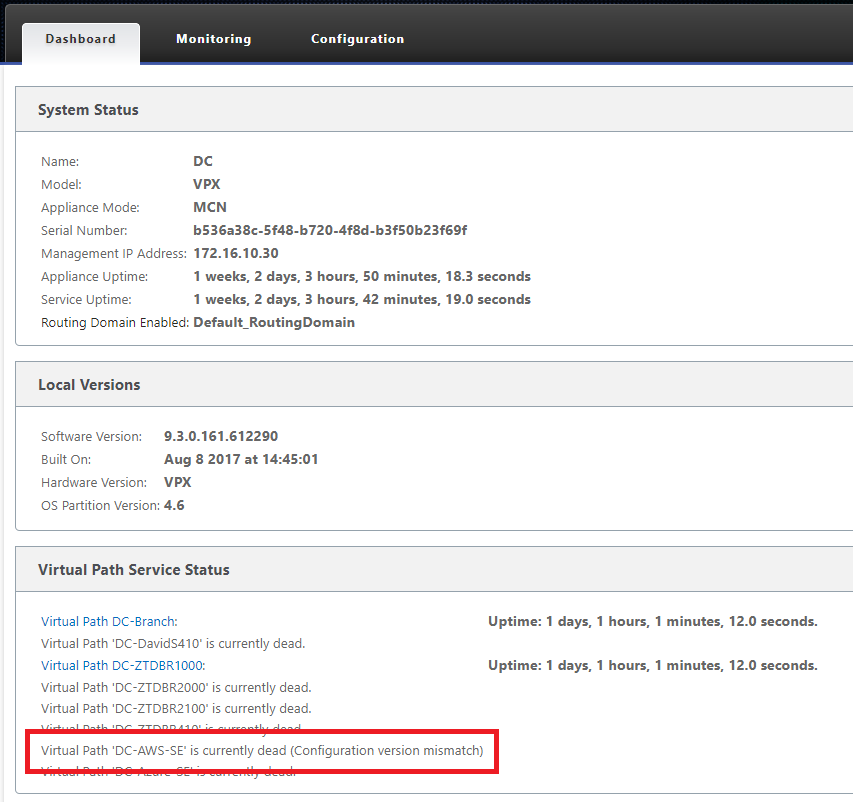
The Virtual Paths may not immediately show in a connected state, this is because the MCN may not trust the configuration handed down from the ZTD Cloud Service, and will report Configuration version mismatch in the MCN Dashboard.
-
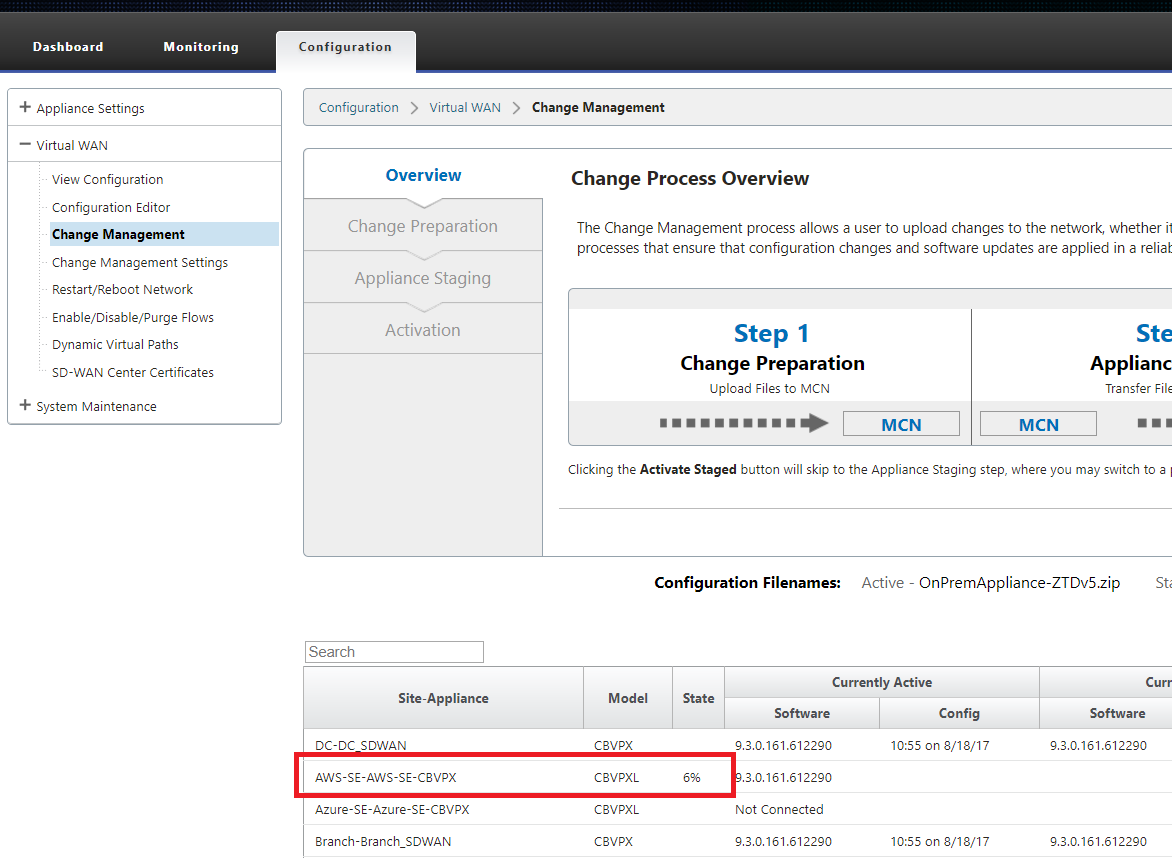
The configuration will automatically be redelivered to the newly installed branch office appliance, the status of this can be monitoring on the MCN > Configuration > Virtual WAN > Change Management page (depending on the connectivity, this process can take several minutes to complete).
-
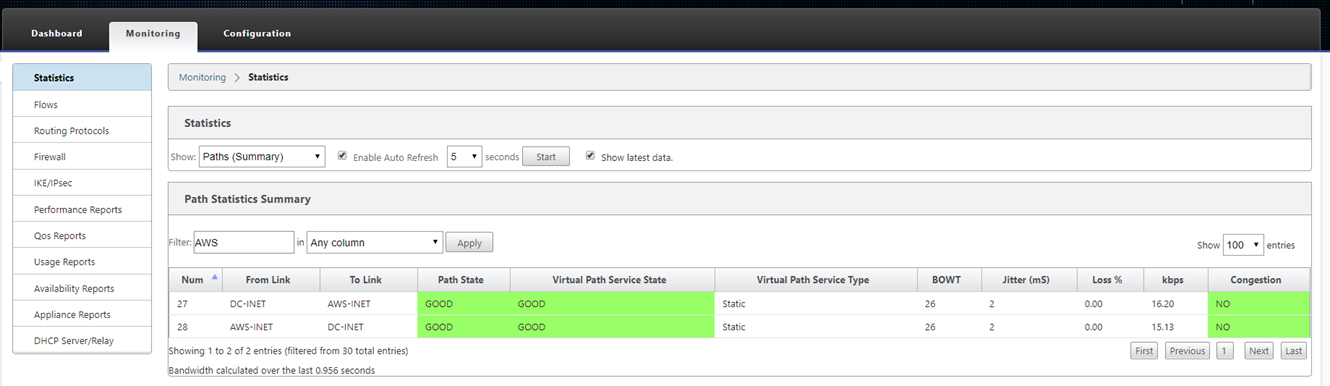
The SD-WAN Administrator can monitor the head-end MCN web management page for the established Virtual Paths of the newly added cloud site.
-
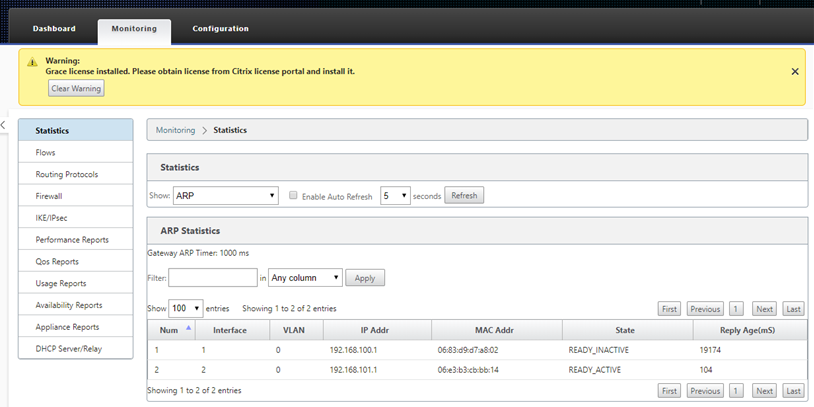
If troubleshooting is required, open the SD-WAN instances user interface using the public IP assigned by the cloud environment during provisioning, and utilize the ARP table in the Monitoring > Statistics page to identify any issues connecting to the expected gateways, or utilize the trace route and packet capture options in diagnostics.
-
Share
Share
In this article
This Preview product documentation is Cloud Software Group Confidential.
You agree to hold this documentation confidential pursuant to the terms of your Cloud Software Group Beta/Tech Preview Agreement.
The development, release and timing of any features or functionality described in the Preview documentation remains at our sole discretion and are subject to change without notice or consultation.
The documentation is for informational purposes only and is not a commitment, promise or legal obligation to deliver any material, code or functionality and should not be relied upon in making Cloud Software Group product purchase decisions.
If you do not agree, select I DO NOT AGREE to exit.