-
Configuration guide for Citrix Virtual Apps and Desktops workloads
-
Citrix SD-WAN Orchestrator on-premises configuration on Citrix SD-WAN appliance
-
-
This content has been machine translated dynamically.
Dieser Inhalt ist eine maschinelle Übersetzung, die dynamisch erstellt wurde. (Haftungsausschluss)
Cet article a été traduit automatiquement de manière dynamique. (Clause de non responsabilité)
Este artículo lo ha traducido una máquina de forma dinámica. (Aviso legal)
此内容已经过机器动态翻译。 放弃
このコンテンツは動的に機械翻訳されています。免責事項
이 콘텐츠는 동적으로 기계 번역되었습니다. 책임 부인
Este texto foi traduzido automaticamente. (Aviso legal)
Questo contenuto è stato tradotto dinamicamente con traduzione automatica.(Esclusione di responsabilità))
This article has been machine translated.
Dieser Artikel wurde maschinell übersetzt. (Haftungsausschluss)
Ce article a été traduit automatiquement. (Clause de non responsabilité)
Este artículo ha sido traducido automáticamente. (Aviso legal)
この記事は機械翻訳されています.免責事項
이 기사는 기계 번역되었습니다.책임 부인
Este artigo foi traduzido automaticamente.(Aviso legal)
这篇文章已经过机器翻译.放弃
Questo articolo è stato tradotto automaticamente.(Esclusione di responsabilità))
Translation failed!
WANOP plug-in GUI commands
The WANOP Client Plug-in GUI appears when you right-click the Citrix Accelerator Plug-in icon and select Manage Acceleration. The GUI’s Basic display appears first. There is also an Advanced display that can be used if desired.
Basic display
On the Basic page, you can set two parameters:
-
The Signaling Addresses field specifies the IP address of each appliance that the plug-in can connect to. Citrix recommends listing only one appliance, but you can create a comma-separated list. This is an ordered list, with the leftmost appliances having precedence over the others. Acceleration is attempted with the leftmost appliance for which a signaling connection can be established. You can use both DNS addresses and IP addresses.
Examples: 10.200.33.200, ws.mycompany.com, ws2.mycompany.com
-
The Data Cache slider adjusts the amount of disk space allocated to the plug-in’s disk-based compression history. More is better.
In addition, there is a button to move to the Advanced display.
Advanced display
The Advanced page contains four tabs: Rules, Connections, Diagnostics, and Certificates.
At the bottom of the display are buttons to enable acceleration, disable acceleration, and return to the Basic page.
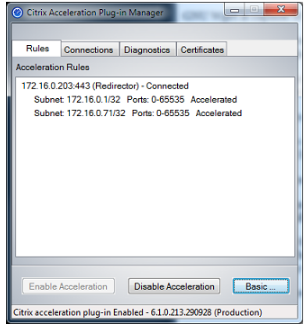
Rules tab
The Rules tab displays an abbreviated list of the acceleration rules downloaded from the appliances. Each list item shows the appliance’s signaling address and port, acceleration mode (redirector or transparent), and connection state, followed by a summary of the appliance’s rules.
Connections tab
The Connections tab lists the number of open connections of different types:
-
Accelerated Connections–The number of open connections between the WANOP Client Plug-in Plug-in and appliances. This number includes one signaling connection per appliance but does not include accelerated CIFS connections. Clicking More opens a window with a brief summary of each connection. (All of the More buttons allow you to copy the information in the window to the clipboard, should you want to share it with Support.)
-
Accelerated CIFS Connections–The number of open, accelerated connections with CIFS (Windows file system) servers. This is usually the same as the number of mounted network file systems. Clicking More displays the same information as with accelerated connections, plus a status field that reports Active if the CIFS connection is running with WANOP Client Plug-in’s special CIFS optimizations.
-
Accelerated MAPI Connections–The number of open, accelerated Outlook/Exchange connections.
-
Accelerated ICA connections–The number of open, accelerated XenApp and XenDesktop connections using the ICA or CGP protocols.
-
Unaccelerated Connections–Open connections that are not being accelerated. You can click More to display a brief description of why the connection was not accelerated. Typically, the reason is that no appliance accelerates the destination address, which is reported as Service policy rule .
-
Opening/Closing Connections–Connections that are not fully open, but are in the process of opening or closing (TCP “half-open” or “half-closed” connections). The More button displays some additional information about these connections.
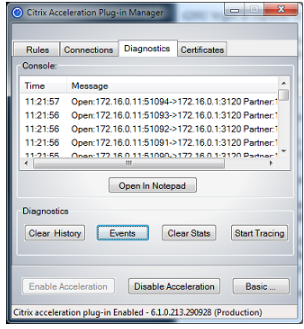
Diagnostics tab
The Diagnostics page reports the number of connections in different categories, and other useful information.
-
Start Tracing/Stop Tracing–If you report a problem, your Citrix representative might ask you to perform a connection trace to help pinpoint problems. This button starts and stops the trace. When you stop tracing, a pop-up window shows the trace files. Send them to your Citrix representative by the means he or she recommends.
-
Clear History–This feature should not be used.
-
Clear Statistics–Pressing this button clears the statistics on the Performance tab.
-
Console–A scrollable window with recent status messages, mostly connection-open and connection-close messages, but also error and miscellaneous status messages.
Certificates tab
On the Certificates tab, you can install security credentials for the optional secure peering feature. The purpose of these security credentials is to enable the appliance to verify whether the plug-in is a trusted client or not.
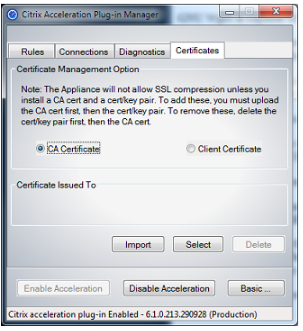
To upload the CA certificate and certificate-key pair:
-
Select CA Certificate Management.
-
Click Import.
-
Upload a CA certificate. The certificate file must use one of the supported file types (.pem, .crt., .cer, or .spc). A dialog box might appear, asking you to Select the certificate store you want to use and presenting you with a list of keywords. Select the first keyword in the list.
-
Select Client Certificate Management.
-
Click Import.
-
Select the format of the certificate-key pair (either PKCS12 or PEM/DER).
-
Click Submit.
Note
In the case of PEM/DER, there are separate upload boxes for certificate and key. If your certificate-key pair is combined in a single file, specify the file twice, once for each box.
Share
Share
In this article
This Preview product documentation is Cloud Software Group Confidential.
You agree to hold this documentation confidential pursuant to the terms of your Cloud Software Group Beta/Tech Preview Agreement.
The development, release and timing of any features or functionality described in the Preview documentation remains at our sole discretion and are subject to change without notice or consultation.
The documentation is for informational purposes only and is not a commitment, promise or legal obligation to deliver any material, code or functionality and should not be relied upon in making Cloud Software Group product purchase decisions.
If you do not agree, select I DO NOT AGREE to exit.