Getting started with a Citrix ADC MPX and VPX SWG appliance
After installing your hardware (MPX) or software (VPX) appliance and performing the initial configuration, you are ready to configure it as a secure web gateway appliance to receive traffic.
Important:
-
OCSP check requires an internet connection to check the validity of certificates. If your appliance is not accessible from the internet by using the NSIP address, add access control lists (ACLs) to perform NAT from the NSIP address to the subnet IP (SNIP) address. The SNIP must be accessible from the Internet. For example,
add ns acl a1 ALLOW -srcIP = <NSIP> -destIP "!=" 10.0.0.0-10.255.255.255 set rnat a1 -natIP <SNIP> apply acls - Specify a DNS name server to resolve domain names. For more information, see Initial configuration.
- Make sure that the date on the appliance is synchronized with the NTP servers. If the date is not synchronized, the appliance cannot effectively verify whether an origin server certificate is an expired one.
To use the Citrix SWG appliance, you must perform the following tasks:
- Add a proxy server in explicit or transparent mode.
- Enable SSL interception.
- Configure an SSL profile.
- Add and bind SSL policies to the proxy server.
- Add and bind a CA certificate-key pair for SSL interception.
Note: A Citrix SWG appliance configured in transparent proxy mode can intercept only HTTP and HTTPS protocols. To bypass any other protocol, such as telnet, you must add the following listen policy on the proxy virtual server.
The virtual server now accepts only HTTP and HTTPS incoming traffic.
set cs vserver transparent-pxy1 PROXY * * -cltTimeout 180 -Listenpolicy "CLIENT.TCP.DSTPORT.EQ(80) || CLIENT.TCP.DSTPORT.EQ(443)"`
You might need to configure the following features, depending on your deployment:
- Authentication Service (recommended) – to authenticate users. Without the Authentication Service, user activity is based on client IP address.
- URL Filtering – to filter URLs by categories, reputation score, and URL lists.
- Analytics – to view user activity, user risk indicators, bandwidth consumption, and transactions break down in Citrix Application Delivery Management (ADM).
Note: SWG implements the majority of typical HTTP and HTTPS standards followed by similar products. This implementation is done with no specific browser in mind and is compatible with most common browsers. SWG has been tested with common browsers and recent versions of Google Chrome, Internet Explorer, and Mozilla Firefox.
Secure web gateway wizard
The SWG wizard provides administrators with a tool for managing the entire SWG deployment by using a web browser. It helps guide the customers to bring up an SWG service quickly and helps simplify the configuration by following a sequence of well-defined steps.
-
Open your web browser and enter the NSIP address that you specified during initial configuration. For more information about initial configuration, see Initial configuration.
-
Type your user name and password.
-
If you have not specified a subnet IP (SNIP) address, the following screen appears.
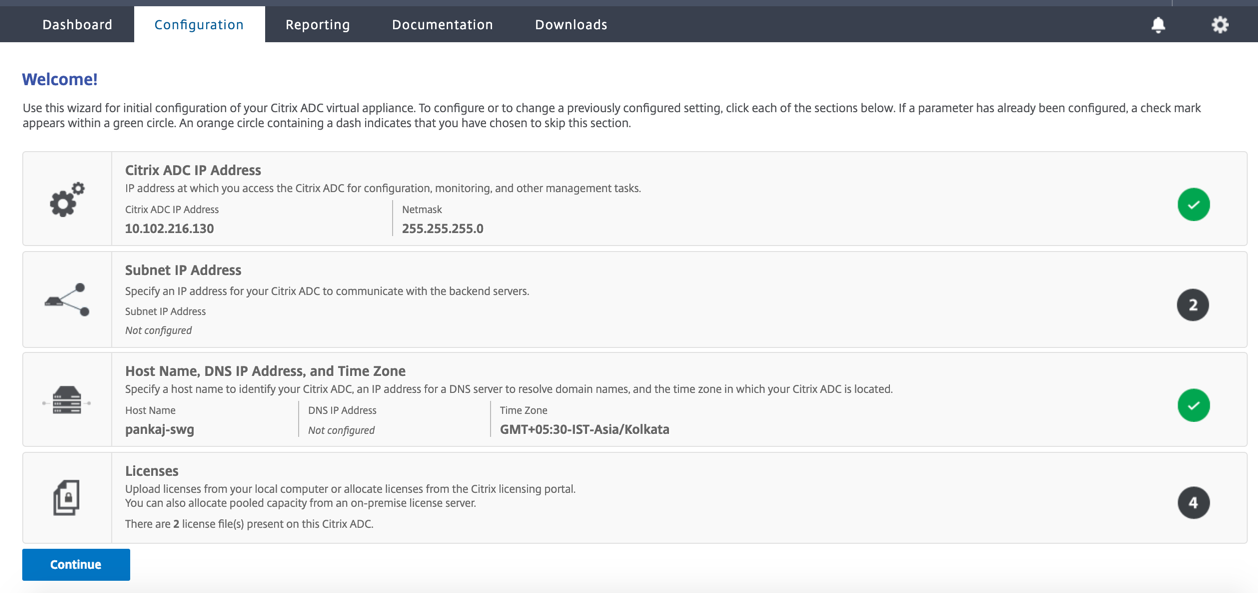
In Subnet IP Address, enter an IP address and subnet mask. The check mark in a green circle indicates that the value is configured.
-
In Host Name, DNS IP Address, and Time Zone, add the IP address of a DNS server to resolve domain names, and specify your time zone.
-
Click Continue.
-
(Optional) You might see an exclamation mark, as follows:

This mark indicates that the feature is not enabled. To enable the feature, right-click the feature and then click Enable Feature.

-
In the navigation pane, click Secure Web Gateway. In Getting Started, click Secure Web Gateway Wizard.

-
Follow the steps in the wizard to configure your deployment.
Add a listen policy to the transparent proxy server
-
Navigate to Secure Web Gateway > Proxy Servers. Select the transparent proxy server and click Edit.
-
Edit Basic Settings, and click More.
-
In Listen priority, enter 1.
-
In Listen Policy Expression, enter the following expression:
(CLIENT.TCP.DSTPORT.EQ(80)||CLIENT.TCP.DSTPORT.EQ(443))This expression assumes standard ports for HTTP and HTTPS traffic. If you have configured different ports, for example 8080 for HTTP or 8443 for HTTPS, modify the expression to reflect those ports.
Limitations
SWG is not supported in a cluster setup, in admin partitions, and on a Citrix ADC FIPS appliance.