-
-
Cloud Connector Standalone Citrix Secure Ticketing Authority (STA) service
-
-
-
-
This content has been machine translated dynamically.
Dieser Inhalt ist eine maschinelle Übersetzung, die dynamisch erstellt wurde. (Haftungsausschluss)
Cet article a été traduit automatiquement de manière dynamique. (Clause de non responsabilité)
Este artículo lo ha traducido una máquina de forma dinámica. (Aviso legal)
此内容已经过机器动态翻译。 放弃
このコンテンツは動的に機械翻訳されています。免責事項
이 콘텐츠는 동적으로 기계 번역되었습니다. 책임 부인
Este texto foi traduzido automaticamente. (Aviso legal)
Questo contenuto è stato tradotto dinamicamente con traduzione automatica.(Esclusione di responsabilità))
This article has been machine translated.
Dieser Artikel wurde maschinell übersetzt. (Haftungsausschluss)
Ce article a été traduit automatiquement. (Clause de non responsabilité)
Este artículo ha sido traducido automáticamente. (Aviso legal)
この記事は機械翻訳されています.免責事項
이 기사는 기계 번역되었습니다.책임 부인
Este artigo foi traduzido automaticamente.(Aviso legal)
这篇文章已经过机器翻译.放弃
Questo articolo è stato tradotto automaticamente.(Esclusione di responsabilità))
Translation failed!
Upgrade procedure
Most of the main product components can be upgraded by running the product installer on the machine containing the component. If one machine contains more than one component (for example, Studio and License Server), all components on that machine are upgraded, if the product media contains newer versions of their software.
To use the installers:
- To run the full product installer’s graphical interface, log on to the machine and then insert the media or mount the ISO drive for the new release. Double-click AutoSelect.
- To use the command-line interface, issue the appropriate command. See Install using the command line.
Upgrade sequence
The following diagram shows the steps in the upgrade sequence. The steps that follow the diagram contain details of each step.
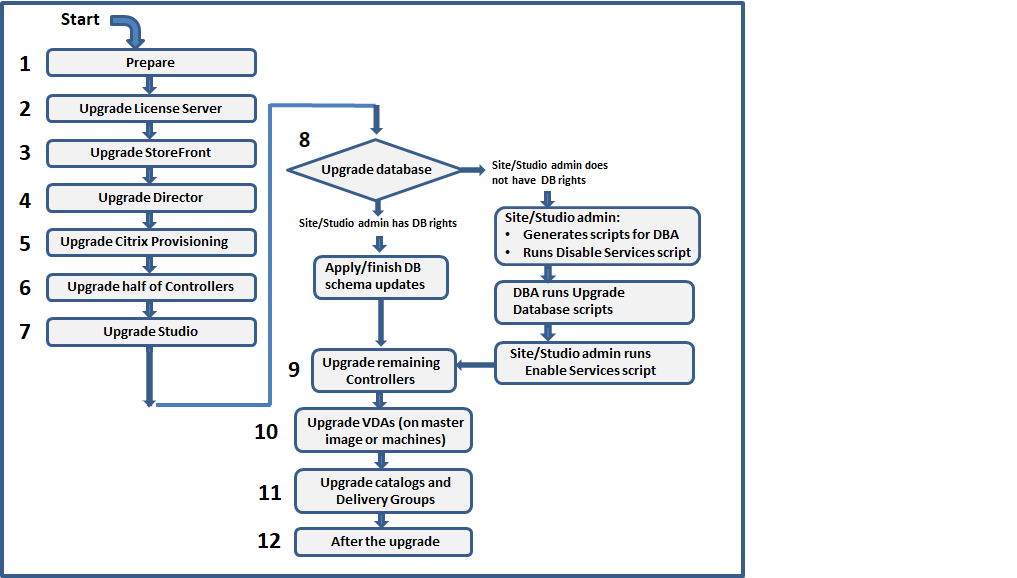
Step 1: Preparation
Before you begin the upgrade, review the prerequisites and complete the pre-upgrade checklist. Preparation tasks include verifying your licensing, backing up your databases, and choosing an installer. For details, see Preparation.
Step 2: Upgrade License Server
If the installation has a new version of the Citrix License Server software, upgrade this component first before any other components.
If you have not yet determined whether your License Server is compatible with the new version, it is essential that you run the installer on the License Server before upgrading any other core components.
Step 3: Upgrade StoreFront™
If the installation media contains a new version of the StoreFront software, run the installer on the machine containing the StoreFront server.
- In the graphical interface, choose Citrix StoreFront from the Extend deployment section.
- From the command line, run
CitrixStoreFront-x64.exe, which is available in the Citrix Virtual Apps and Desktops installation media’sx64folder.
Step 4: Upgrade Director
If the installation media contains a new version of the Director software, run the installer on the machine containing Director.
Step 5: Upgrade Citrix Provisioning
The Citrix Provisioning installation media is available separately from the Citrix Virtual Apps and Desktops installation media. To learn how to install and upgrade Citrix Provisioning server and target device software, see the Citrix Provisioning product documentation.
Step 6: Upgrade half of Delivery Controllers
For example, if your site has four Controllers, run the installer on two of them.
Leaving half of the Controllers active allows users to access the site. VDAs can register with the remaining Controllers. There might be times when the site has reduced capacity because fewer Controllers are available. The upgrade causes only a brief interruption in establishing new client connections during the final database upgrade steps. The upgraded Controllers cannot process requests until the entire site is upgraded.
If your site has only one Controller, it is inoperable during the upgrade.
Preliminary site tests run on the first Controller, before the actual upgrade starts. For details, see Run preliminary site tests.
Note:
Site Manager is upgraded automatically along with Delivery Controllers.
Step 7: Upgrade Web Studio
If you haven’t already upgraded Web Studio (because it was on the same machine as another component), run the installer on the machine containing Studio.
Note:
After you upgrade Web Studio, the version information might not update immediately. You might be prompted to upgrade Web Studio even though it’s already up to date. To address the issue, go to the Web Studio server, open Internet Information Services (IIS) Manager, navigate to Start Page > Sites > Default Web Site, and select Restart in the Manage Website pane.
Step 8: Upgrade database and site
Note:
To avoid failures, you must upgrade all Delivery Controllers and database before performing any of the provisioning and delivery group related tasks such as creating a new machine catalog, deleting a machine catalog, updating a machine in a delivery group, and so on.
After you upgrade the Delivery Controllers, upgrade the database and the site. You can upgrade automatically or manually, depending on your database permissions:
- If you have permission to update the SQL Server database schema, initiate an automatic upgrade.
- If you do not have sufficient permissions, initiate a manual upgrade that uses scripts. Complete the upgrade with the help of your database administrator.
Citrix strongly recommends that you back up the database before upgrading. During a database upgrade, product services are disabled. During that time, Controllers cannot broker new connections for the site, so plan carefully.
For the detailed procedure, see Upgrade the database and site.
Step 9: Upgrade remaining Delivery Controllers
Upgrade the remaining Delivery Controllers. After completing the upgrade, close and reopen Site Manager. Site Manager might then prompt you to perform an additional site upgrade to register the Delivery Controller’s services to the site.
Step 10: Upgrade VDAs
Important:
If you’re upgrading a VDA to version 1912 or later, see Upgrading VDAs to 1912 or later.
Run the product installer on machines containing VDAs.
If you used Machine Creation Services™ and a master image to create machines, go to your host and upgrade the VDA on the master image. You can use any of the available VDA installers.
- For graphic interface guidance, see Install VDAs.
- For command line guidance, see Install using the command line.
If you used Citrix Provisioning to create machines, see the Citrix Provisioning product documentation for guidance about upgrading.
Step 11: Update machine catalogs and Delivery Groups
After you upgrade the VDAs, update the machine catalogs and Delivery Groups that use those machines. Use the following tasks:
- Update catalogs that use machines with upgraded VDAs.
- Upgrade catalogs that use machines with upgraded VDAs.
- Upgrade Delivery Groups that use machines with upgraded VDAs.
Step 12: After the upgrade
Upgrade other components in your deployment. For guidance, see the following product documentation:
- StoreFront
- AppDNA
- Citrix App Layering
- HDX RealTime Optimization Pack
- Profile Management
- Citrix Provisioning
- Session Recording
- Workspace Environment Management
If you need to replace the Microsoft SQL Server Express LocalDB software with a later version, see Replace SQL Server Express LocalDB.
Share
Share
In this article
- Upgrade sequence
- Step 1: Preparation
- Step 2: Upgrade License Server
- Step 3: Upgrade StoreFront™
- Step 4: Upgrade Director
- Step 5: Upgrade Citrix Provisioning
- Step 6: Upgrade half of Delivery Controllers
- Step 7: Upgrade Web Studio
- Step 8: Upgrade database and site
- Step 9: Upgrade remaining Delivery Controllers
- Step 10: Upgrade VDAs
- Step 11: Update machine catalogs and Delivery Groups
- Step 12: After the upgrade
This Preview product documentation is Citrix Confidential.
You agree to hold this documentation confidential pursuant to the terms of your Citrix Beta/Tech Preview Agreement.
The development, release and timing of any features or functionality described in the Preview documentation remains at our sole discretion and are subject to change without notice or consultation.
The documentation is for informational purposes only and is not a commitment, promise or legal obligation to deliver any material, code or functionality and should not be relied upon in making Citrix product purchase decisions.
If you do not agree, select I DO NOT AGREE to exit.