Configuring single sign-on to Citrix Workspace app
Single sign-on using Azure Active Directory
This section explains how to implement single sign-on (SSO) using Azure Active Directory (AAD) as an identity provider with domain joined workloads in hybrid or AAD enrolled endpoints. With this configuration, you can authenticate to Workspace using Windows Hello or FIDO2 on endpoints that are enrolled to AAD.
Note:
If you use Windows Hello, as a standalone authentication, you can achieve single sign-on to Citrix Workspace app. However, you are prompted for your user name and password while accessing published virtual apps or desktops. As a workaround, consider implementing Federated Authentication Service (FAS).
Prerequisites
-
An active Azure Active Directory connection to Citrix Cloud. For more information, see Connect Azure Active Directory to Citrix Cloud.
-
An Azure Active Directory workspace authentication. For more information, see Enable Azure AD authentication for workspaces.
-
Verify if you have configured Azure AD Connect. For more information, see Getting started with Azure AD Connect using express settings.
-
Activate Pass-through authentication on Azure AD Connect. Also, verify if the single sign-on and the Pass-through options work on the Azure portal. For more information, see Azure Active Directory Pass-through Authentication: Quickstart.
Configuration
Do the following steps to configure SSO on your device:
- Install the Citrix Workspace app using the Windows command line with the
includeSSONoption:
CitrixWorkspaceApp.exe /includeSSON
-
Reboot your device.
-
Open the Citrix Workspace app Group Policy Object administrative template by running
gpedit.msc. -
Go to Administrative Templates > Citrix Components > Citrix Workspace > User Authentication > Local user name and password.
-
Select Enable pass-through authentication. Depending on the configuration and security settings, select the Allow pass-through authentication for all ICA® option for pass-through authentication to work.
-
Modify the User Authentication settings in Internet Explorer. To modify the settings:
- Open Internet Properties from the Control panel.
-
Navigate to General Properties > Local Intranet and click Sites.
-
In the Local Intanet window, click Advanced, add trusted sites, add the following trusted sites, and click Close:
https://aadg.windows.net.nsatc.nethttps://autologon.microsoftazuread-sso.comThe name of your tenant, for example: https://xxxtenantxxx.cloud.com
-
Disable extra authentication prompts by disabling the
prompt=loginattribute in your tenant. For more information, see User Prompted for Additional Credentials on Workspace URLs When Using Federated Authentication Providers. You can contact Citrix technical support to disable theprompt=loginattribute in your tenant to successfully configure single sign-on. -
Enable domain pass-through authentication on the Citrix Workspace app client. For more information, see Domain pass-through authentication.
-
Restart the Citrix Workspace app for the changes to take effect.
Single sign-on using Okta and Federated Authentication Service
This section explains how you can implement single sign-on (SSO) using Okta as an identity provider with domain joined device and Federated Authentication Service (FAS). With this configuration, you can authenticate to Workspace using Okta to enable single sign-on and prevent a second logon prompt. For this authentication mechanism to work, you need to use the Citrix Federated Authentication Service with Citrix Cloud. For more information, see Connect Citrix Federated Authentication Service to Citrix Cloud.
Prerequisites
-
Cloud Connector. For more information about installing the Cloud Connector, see Cloud Connector Installation.
-
An Okta agent. For more information about installing an Okta agent, see Install the Okta Active Directory agent. Also, you can cofigure the Okta IWA Web agent to login from a Windows Domain joined device. For more information, see Install and configure the Okta IWA Web agent for Desktop single sign-on
-
An active Azure Active Directory connection to Citrix Cloud. For more information, see Connect Azure Active Directory to Citrix Cloud.
-
Federated Authentication Service. For more information, see Install the Federated Authentication Service.
Configuration
Do the following steps to configure SSO on your device:
Connect Citrix Cloud™ to your Okta organization:
-
Download and install the Okta Active Directory agent. For more information, see Install the Okta Active Directory agent.
-
Sign in to Citrix Cloud at
https://citrix.cloud.com. -
From the Citrix Cloud menu, select Identity and Access Management.
-
Locate Okta and select Connect from the ellipsis menu.
-
In Okta URL, enter your Okta domain.
-
In Okta API Token, enter the API token for your Okta organization.
-
In Client ID and Client Secret, enter the client ID and secret from the OIDC web app integration you created earlier. To copy these values from the Okta console, select Applications and locate your Okta application. Under Client Credentials, use the Copy to Clipboard button for each value.
-
Click Test and Finish. Citrix Cloud verifies your Okta details and tests the connection.
Enable Okta authentication for workspaces:
-
From the Citrix Cloud menu, select Workspace Configuration > Authentication.
-
Select Okta. When prompted, select I understand the impact on the subscriber experience.
-
Click Accept to accept the permissions request.
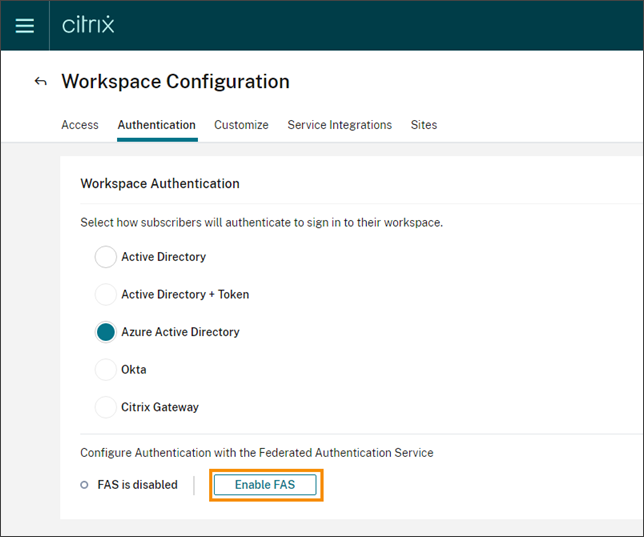
Enable Federated Authentication Service:
-
From the Citrix Cloud menu, select Workspace Configuration and then select Authentication.
-
Click Enable FAS. This change might take up to five minutes to be applied to subscriber sessions.
Afterward, the Federated Authentication Service is active for all virtual app and desktop launches from Citrix Workspace.

When subscribers sign in to their workspace and launch a virtual app or desktop in the same resource location as the FAS server, the app or desktop starts without prompting for credentials.
Note:
If all FAS servers in a resource location are down or in maintenance mode, application launches succeed, but single sign-on isn’t active. Subscribers are prompted for their AD credentials to access each application or desktop.