Cloud Connector Installation
You can install the Cloud Connector software interactively or using the command line.
The installation occurs with the privileges of the user who begins the install. The Cloud Connector requires access to the cloud to:
- Authenticate the user that performs the installation
- Validate the installer’s permissions
- Download and configure the Cloud Connector services
Information to review before installation
Review the System requirements before installation.
Post-deployment guidance
After installation, keep all Cloud Connectors powered on continuously to ensure an always-on connection to Citrix Cloud.
Upgrades
Upgrades are normally automatically managed by Citrix Cloud. To do a manual upgrade, first uninstall the old Cloud Connector before installing the new version. Don’t upgrade a previously installed Cloud Connector with a newer version. Do not upgrade individual components of the Cloud Connector separately.
Renaming machines
After installation, don’t rename the machine hosting the Cloud Connector. If you need to change the server name later on, perform the following tasks:
- Remove the machine from the resource location:
- From the Citrix Cloud menu, select Resource Locations.
- Locate the resource location you want to manage and then select the Cloud Connectors tile.
- Locate the machine you want to manage and then click the ellipsis menu. Select Remove Connector.
- Uninstall the Cloud Connector software.
- Rename the machine.
- Install the latest version of the Cloud Connector software, as described in this article.
Moving machines to a different domain
After installation, don’t move the machine hosting the Cloud Connector into a different domain. If you need to join the machine to a different domain later on, perform the following tasks:
- Remove the machine from the resource location.
- Uninstall the Cloud Connector software.
- Unjoin the machine from its current domain and rejoin the machine to the new domain.
- Install the latest version of the Cloud Connector software, as described in this article.
Considerations for cloned machines
Each machine hosting the Cloud Connector must have a unique SID and connector ID so that Citrix Cloud can communicate reliably with the machines in your resource location. If you intend to host the Cloud Connector on multiple machines in your resource location and you want to use cloned machines, perform the following steps:
- Prepare the machine template according to the requirements for your environment.
- Provision the number of machines that you intend to use as Cloud Connectors.
- Install the Cloud Connector on each machine, either manually or using the silent installation mode.
Installing the Cloud Connector on a machine template (before cloning) isn’t supported. If you clone a machine with the Cloud Connector installed, the Cloud Connector services won’t run and the machine can’t connect to Citrix Cloud.
Considerations for services
The installation steps in this article describe the process for deploying Cloud Connectors, regardless of the service for which they are used.
When deploying Cloud Connectors for Citrix DaaS, verify that the AD domains where the connectors reside are active and are not showing as “unused” in the Citrix Cloud console. If you specify an unused domain during machine catalog setup in Citrix DaaS, an error might occur. For more information, see Add a resource type or activate an unused domain in Citrix Cloud in the Citrix DaaS product documentation.
For additional considerations for other services, consult the service’s documentation.
Default resource locations
If you have no resource locations in your Citrix Cloud account and you install Cloud Connectors in your domain, the resource location that Citrix Cloud creates becomes the default resource location. You can have only one default resource location in your account. If needed, you can create additional resource locations in Citrix Cloud and then select the one you want when you install Cloud Connectors in other domains.
Alternatively, you can first create the resource locations you need in the console, before you install Cloud Connectors in your domains. The Cloud Connector installer prompts you to select the resource location you want during installation.
Interactive installation
You can download and install Cloud Connectors using the graphical installer interface. Before you do this, you must create one or more resource locations in the Citrix Cloud management console to deploy Cloud Connectors on. For more information on resource locations, see Resource locations.
Download the Citrix Cloud Connector™ software
-
Sign in as a Windows administrator to the machine you intend to install Citrix Cloud Connectors on.
-
Visit https://citrix.cloud.com and sign in to your administrator account.
-
In the Citrix Cloud console, navigate to Resource Locations from the main menu.
-
If you do not already have a resource location, click the plus icon (+) or select Add a Resource Location. For more information, see create a resource location.
-
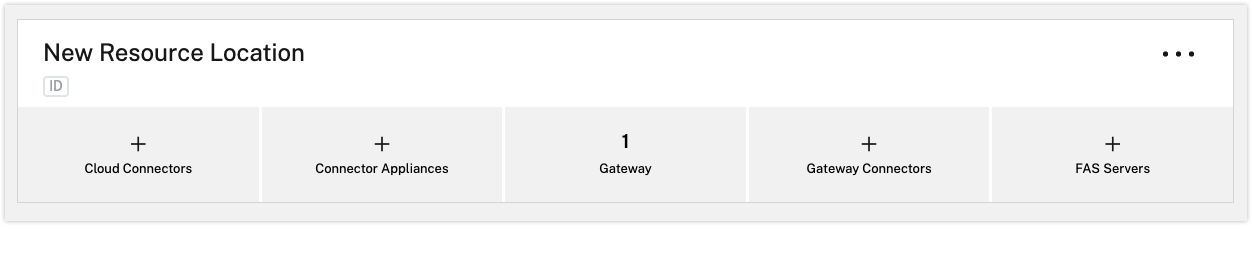
Locate the resource location you want to manage and select + Cloud Connectors.
-
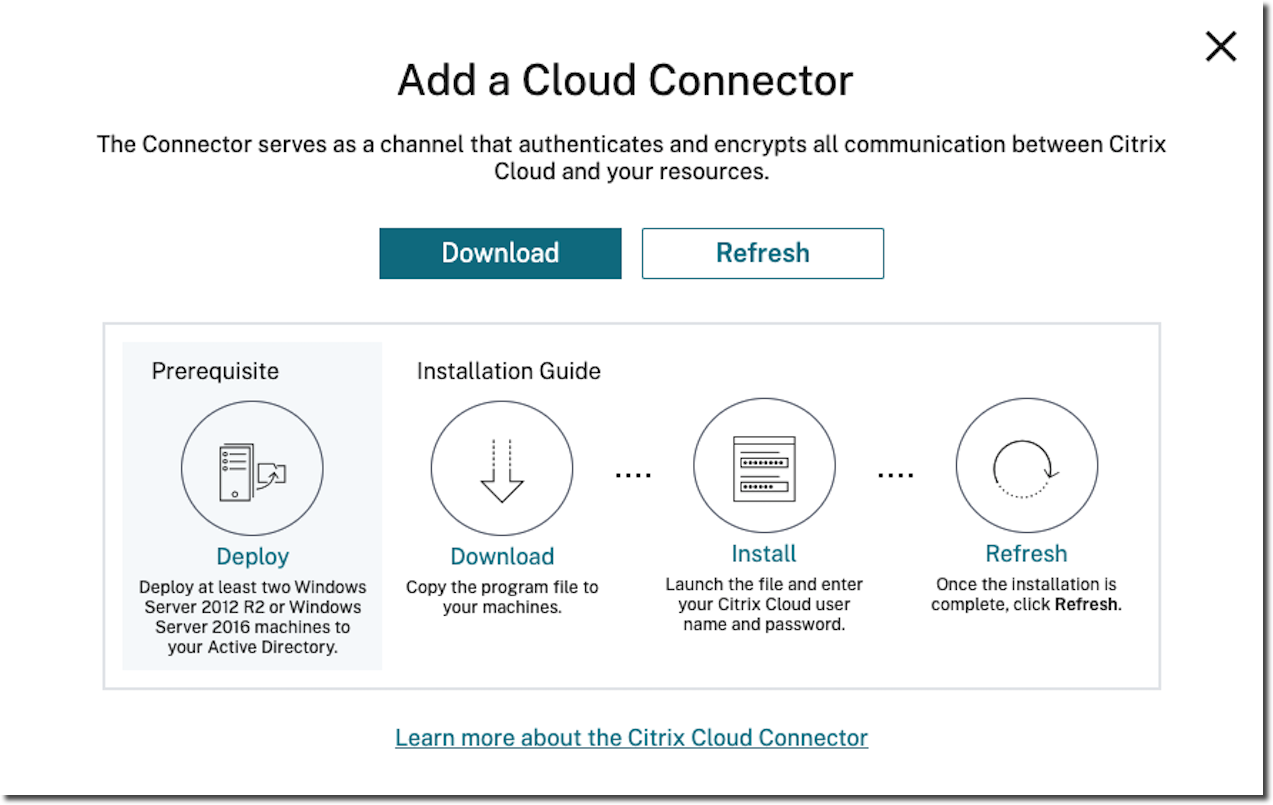
Select Download in the window that opens. Save the cwcconnector.exe file to a local file location on your connector machine.
Install the Citrix Cloud Connector software
Prerequisites
-
Right-click on the
cwcconnector.exeinstaller file and select Run as administrator. The installer performs an initial connectivity check to ensure you can connect to Citrix Cloud before installing the Cloud Connector. -
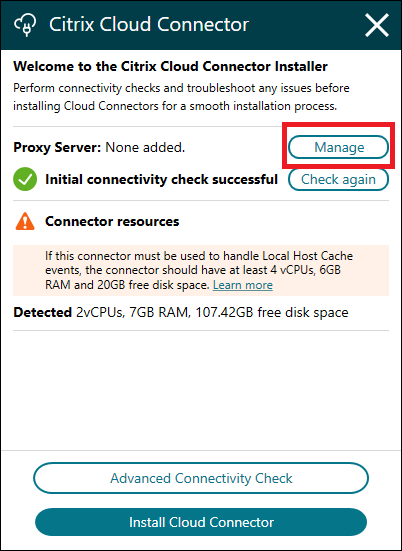
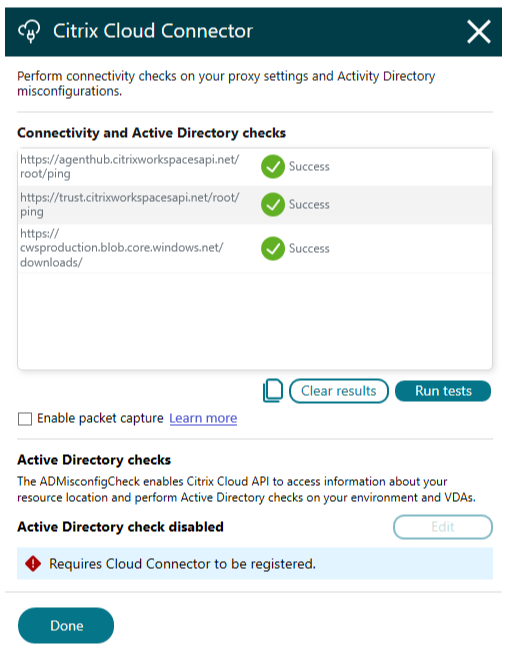
Click Manage to update Proxy Server.
Note:
There is only one proxy server supported due to a limitation in Microsoft WinHTTP. For more information, see AutoProxy Issues in WinHTTP
-
Click Advanced Connectivity Check to run a verbose check to ensure that the basic connectivity requirements for Connector installation are met on the machine.
Initial upgrade and tests
-
After updating the Proxy Server and checking the Advanced Connectivity Check, click Install Cloud Connector.
-
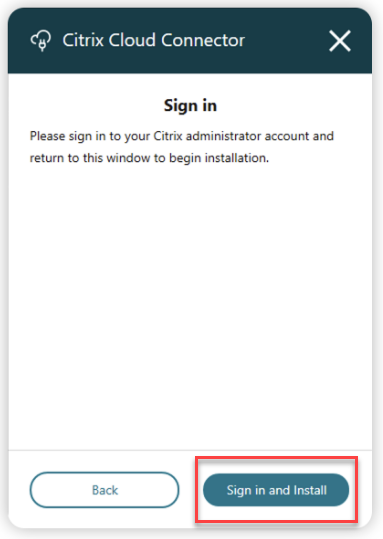
On the Sign-in page, click Sign in and Install
-
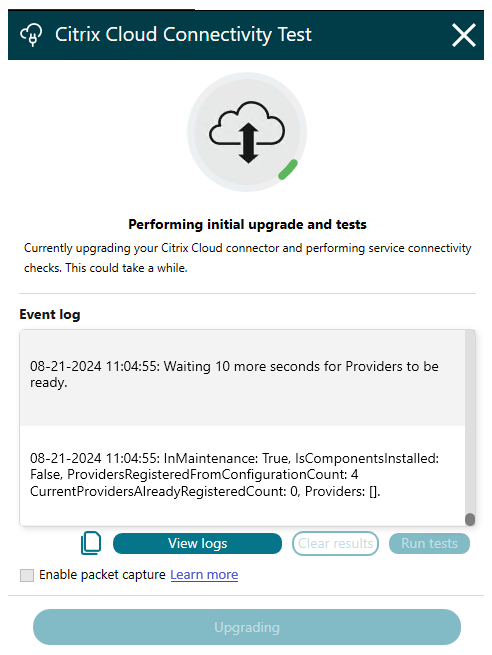
The Citrix Cloud Connectivity Test window appears and the status of the Initial upgrade and tests are displayed along with Event logs.
-
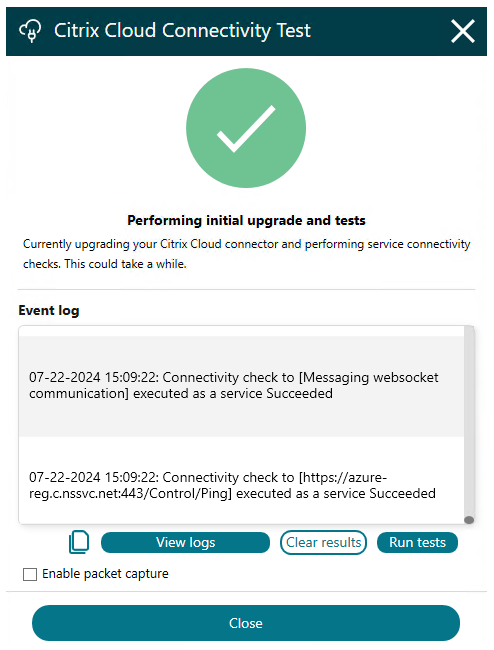
Click View logs to open the directory
(C:\ProgramData\Citrix\WorkspaceCloud\InstallLogs)that includes all connectivity check debug logs. -
Once the Initial upgrade and tests are completed, you’ll see the Citrix Cloud Connectivity Test is Successful as shown in the following image. The connectivity check results are displayed in the Event log box after the first upgrade.
Activate unused domains
If you’re creating resource locations and deploying Cloud Connectors for Citrix DaaS™, verify that the AD domains that you’re using with Citrix DaaS are active and are not considered unused. If you specify an unused domain when setting up machine catalogs in Citrix DaaS, an error could occur.
For more information, see Add a resource type or activate an unused domain in Citrix Cloud in the Citrix DaaS product documentation.
Create additional resource locations
- From the Citrix Cloud management console, click the menu button and select Resource Locations.
- Click + Resource Location and enter a meaningful name.
- Click Save. Citrix Cloud displays a tile for the new resource location.
- Click Cloud Connectors and then click Download to acquire the Cloud Connector software.
- On each prepared machine, install the Cloud Connector software using either the installation wizard or the command-line installation. Citrix Cloud prompts you to select the resource location you want to associate with the Cloud Connector.
Installation with multiple customers and existing resource locations
If you’re an administrator for multiple customer accounts, Citrix Cloud prompts you to select the customer account you want to associate with the Cloud Connector.
If your customer account has multiple resource locations already, Citrix Cloud prompts you to select the resource location you want to associate with the Cloud Connector.
Command-line installation
Silent or automated installation is supported. However, the connector installer is regularly updated and so it is recommended to download the latest installer for each installation. Download a new Cloud Connector installer from the Resource Locations page in the Citrix Cloud console.
Requirements
To use the command line installation with Citrix Cloud, you need to supply the following information:
- The customer ID of the Citrix Cloud account for which you are installing the Cloud Connector. This ID appears at the top of the API Access tab in Identity and Access Management.
- The ID and secret of the secure principal you want to use to install the Cloud Connector. To acquire these values, you must first create a secure principal. The secure principal must be created with “Full Access”. For more information on creating a service principal, see Create a Service Principal. Once you have the ID and secret of the secure principal you can continue with Cloud Connector installation.
- The resource location ID for the resource location that you want to associate with the Cloud Connector. To retrieve this value, select the ID button located beneath the resource location name on the Resource Locations page. If you don’t supply this value, Citrix Cloud uses the ID of the default resource location.
Supported parameters
To ensure the security of the secure principal ID and secret, a JSON configuration file must be provided to the installer. This file must be deleted after the installation has completed. Supported values for the configuration file are:
- customerName Required. The customer ID shown on the API Access page in the Citrix Cloud console (within Identity and Access Management).
- clientId Required. The secure principal ID an administrator can create, located on the API Access page.
- clientSecret Required. The secure principal secret that can be downloaded after the secure principal is created. Located on the API Access page.
- resourceLocationId Recommended. The unique identifier for an existing resource location. Select the ID button to retrieve the resource location ID on the Resource Locations page in the Citrix Cloud console. If no value is specified, Citrix Cloud uses the ID of the first resource location in the account.
- acceptTermsOfService Required. Must be set to true.
Sample configuration file
{
"customerName": "CustomerID",
"clientId": "SecurePrincipalID",
"clientSecret": "ClientSecret",
"resourceLocationId": "ResourceLocationId",
"acceptTermsOfService": "true"
}
<!--NeedCopy-->
Sample command
The following command silently installs the Cloud Connector software using a JSON configuration file:
CWCConnector.exe /q /ParametersFilePath:c:\cwcconnector_install_params.json
<!--NeedCopy-->
Use /q to specify a silent install.
Use Start /Wait CWCConnector.exe /ParametersFilePath:value to examine a potential error code in the case of a failure. You can use the standard mechanism of running echo %ErrorLevel% after the installation completes.
HTTPS Configuration
To allow StoreFront™ and NetScaler Gateway appliances to securely connect to the Cloud Connector and encrypt all data, it is strongly recommended that you enable HTTPS. This requires an SSL certificate.
- The certificate must include the FQDN used to reach the connector as the Common Name or Subject Alternative Name. If you have deployed a load balancer in front of the connector then use the load balancer’s FQDN.
- The certificate can be signed by an enterprise CA or public CA.
- Any StoreFront and gateway servers that connect to the Cloud Connector must trust the certificate.
To enable HTTPS:
-
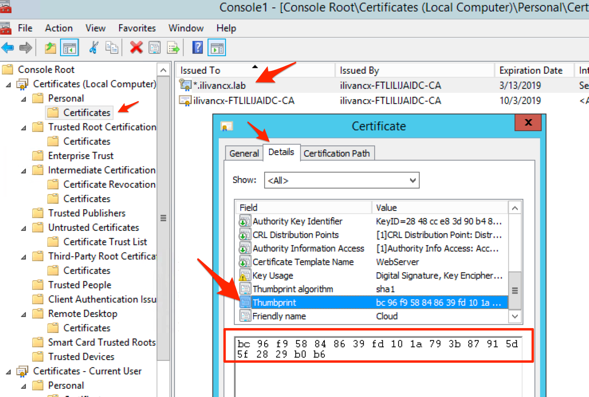
Open the Certificates MMC snap-in.
-
Create or import a suitable certificate in the Personal Certificates store. For more information on managing certificates, see Manage certificates.
-
Open the certificate, go to the Details tab and take a note of the Thumbprint, ignoring any spaces.
-
Determine which IP address to bind the certificate to. Normally you can use IP address of
0.0.0.0to apply to all IPv4 addresses. If IPv6 is enabled then use[::]to apply to all IPv6 addresses. If you only want to apply the change to a specific network adapter then make a note of the IP address of the network adapter. -
In an elevated command prompt run
netsh http add sslcert ipport=<IP address>:<Port number> certhash=<Certificate Hash Number> appid={Any GUID}
<!--NeedCopy-->
You can use any valid GUID for the AppId. It’s purpose is to record which application added the binding. However the binding applies to all applications using that port.
For example:
C:\> netsh http add sslcert ipport=0.0.0.0:443 certhash=BC96F958848639FD101A793B87915D5F2829B0B6 appid={6DE9BEFD-F4CB-4D63-8681-E88012D6F5F1} SSL Certificate successfully added <!--NeedCopy--> -
To disable HTTP, in the registry go to
HKEY_LOCAL_MACHINE\SOFTWARE\Citrix\DesktopServerand create aDWORDwith nameXMLServicesEnableNonSSLand value 0.
Next steps
- Set up the Citrix Cloud Connector update schedule. For information on Citrix Cloud Connector updates and managing update schedules, visit Connector updates.
- If you are using StoreFront, configure StoreFront so it can use the connector to reach DaaS to enumerate and launch resources. If this is the first connector in a new DaaS deployment then create a new resource feed. If this is an additional connector then it is recommended for resiliency that you add all Cloud Connectors to the server list for your existing DaaS resource feed. For more information, see Manage the resources made available in stores.
- If you are using StoreFront with a NetScaler gateway, you can use the connector to reach the Citrix Cloud Secure Ticket Authority (STA). For more information, see Configure Citrix Gateways.
- If this is the first connector on a particular Active Directory domain then you can connect that domain to Citrix Cloud. For more information, see To connect your Active Directory to Citrix Cloud.
Troubleshooting installation issues
This section details some ways of diagnosing and fixing problems you might encounter during installation. For more guidance about troubleshooting installation issues, see the Citrix Cloud Connector Troubleshooting Guide.
Installation logs
You can troubleshoot issues encountered with installation by first consulting the available log files.
Events that occurred during installation are available in the Windows Event Viewer. You can also review Cloud Connector installation logs, which are located at %LOCALAPPDATA%\Temp\CitrixLogs\CloudServicesSetup. Logs are also added to %ProgramData%\Citrix\WorkspaceCloud\InstallLogs after installation.
Exit codes
The following exit codes might be returned depending on the success or failure of the installation process:
- 1603 - An unexpected error occurred
- 2 - A prerequisite check failed
- 0 - Installation completed successfully
Installation error
If you install the Citrix Cloud Connector software by double-clicking the installer, you might receive the following error message:
Can't reach this page.
This error can occur even if you are logged in to the machine as an administrator to install the Citrix Cloud Connector. To avoid this error, run the Citrix Cloud Connector software as an administrator by right-clicking the installer and selecting Run as administrator.
Connectivity failures
To ensure that the Cloud Connector can communicate with Citrix Cloud, confirm that the following Citrix services are in a Started state:
- Citrix Cloud AD Provider
- Citrix Cloud Agent Logger
- Citrix Cloud Agent System
- Citrix Cloud Agent Watchdog
- Citrix Cloud Credential Provider
- Citrix Config Synchronizer Service
- Citrix High Availability Service
- Citrix NetScaler® CloudGateway
- Citrix Remote Broker Provider
- Citrix Remote HCL Server
- Citrix Session Manager Proxy
For more information about these services, see Installed Services.
The Cloud Connector Advanced Connectivity Check Tool can help verify that the Cloud Connector can reach Citrix Cloud and its related services.
For more information, see Cloud Connector Advanced Connectivity Check Tool.
For more information on how to resolve a failed connectivity check, see CTX224133: Cloud Connector Connectivity Check Failed.