Use Manage Licenses in My Account on citrix.com
Note:
Citrix is working to improve the licensing experience in My Account on citrix.com. You can choose Manage Licenses to easily find, allocate, download, modify, return, hide, and unhide licenses.
There are several administration procedures that you can do without using the Citrix Licensing Manager. We recommend that you use the appropriate console whenever possible.
You can also use Manage Licenses at citrix.com. This article describes how to manage licenses on citrix.com.
Introduction to licensing concepts
New licenses
You can display only new licenses by choosing New Licenses in the Filter by menu.
- New licenses are the licenses you purchased from Citrix within the last 30 days.
- The new licenses section displays the top five recent purchases.
- New licenses are indicated with a green bar and the word (New) in green.

- You can Allocate licenses from the landing page only for new licenses. Select the required license and start the allocation process by clicking Allocate licenses.
Expiring term licenses
You can display only expiring licenses by choosing Expiring Licenses in the Filter by menu.
- Expiring licenses are term licenses that are expiring within 90 days.
- Licenses expiring within 0 through 30 days are displayed with a red bar. Licenses expiring within 31 through 90 days are displayed with an orange bar.
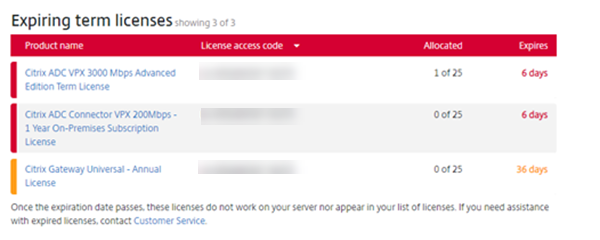
- The Expires column shows the number of days until the license expiry date.
- The Allocated column shows the allocated quantity and total purchased quantity.
- The expiring licenses section shows the 5 most recent purchases.
Glossary
Allocate licenses: When you allocate licenses, you apportion purchased licenses by product and License Server so you can split them among multiple environments or use cases. For example, your organization might own 1,000 licenses for the same product. You might want to use 800 in 1 location and 200 in another location. You can allocate 800 licenses to a License Server in the first location today, and allocate the remaining 200 later to a different License Server.
Asset components: Asset components are the license details.
CSV files: The Excel CSV file provides daily usage information, including the number of licenses in overdraft.
Modify licenses: Choosing to modify licenses, returns the license file and allocates it to another License Server.
Return allocations: When you Return licenses, you put the licenses back in the licensing pool. You can then allocate these licenses in any quantity at any time. After you return a license, remove the old license file from the License Server.
Term licenses: Term licenses are purchased for a specified amount of time and have an expiration date.
To access Manage Licenses on citrix.com
- From a web browser, go to http://www.citrix.com.
- Select Sign In > My Account and type your user ID and password.
- Select Manage Licenses.
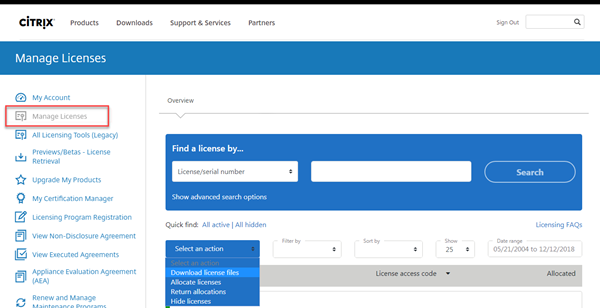
Search for licenses
-
In the Find a license by… menu, choose the search criterion, type the search text, and select Search.
You can select Show advanced search options to further narrow down your search.
Allocate licenses
-
Select the licenses you want to allocate. The landing page displays only new licenses within 30 days and expiring term licenses. You can use the Find a license by… search to find all licenses using one of the search criteria and then the Filter by menu to narrow the display down to specific types of licenses or you can select Quick find: All active to see all licenses.
-
From the Select an action menu, choose Allocate licenses.
-
Enter host name and how many licenses to allocate, and click Create license file.
-
Select Yes, create license file. If you want to make a change before creating the license file, select No, modify the allocation, and make your change. Then select Yes, create license file.
-
Select Download license file, and save the file to a temporary location. Remember the file name and location where you downloaded the file. You need this location.
-
Install the license. See Install licenses.
Download licenses
- Select the licenses you want to download. The landing page displays only new licenses within 30 days and expiring term licenses. You can use the Find a license by… search to find all licenses using one of the search criteria and then the Filter by menu to narrow the display down to specific types of licenses or you can select Quick find: All active to see all licenses.
- From the Select an action menu, choose Download all licenses, and save the file to a temporary location. Remember the file name and location where you downloaded the file. You need this location.
-
At a command prompt, navigate to the folder and type the following command:
lmreread -c @localhost -all
For more information about the lmreread command, see Reread license and options files (lmreread).
Install licenses
- Choose Download license files, and save the file to a directory.
-
At the License Server, copy the license file from the directory where it was saved to the
myfilesdirectory.Ensure that the license file retains the lower case .lic file name extension. Some copy processes don’t recognize a file type for that extension and add a “.txt” file name extension during the copy. You can’t import license files that have the wrong file name extension.
-
C:\Program Files\Citrix\Licensing\MyFileson a 32-bit computer -
C:\Program Files (x86)\Citrix\Licensing\MyFileson a 64-bit computer
-
-
At a command prompt, navigate to:
-
C:\Program Files\Citrix\Licensing\LSon a 32-bit computer -
C:\Program Files (x86)\Citrix\Licensing\LSon a 64-bit computer
And type the following command:
lmreread -c @localhost -all -
For more information about the lmreread command, see Reread license and options files (lmreread).
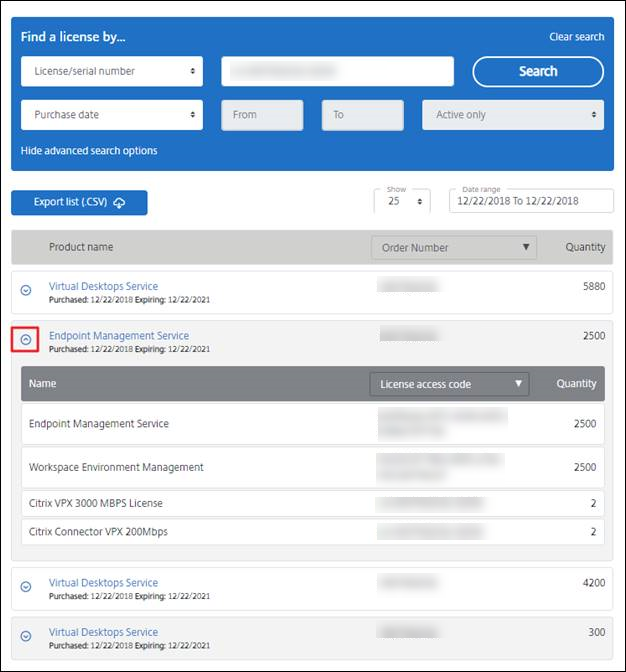
Asset components
Asset components are the To display asset components click View my products at the top of the screen. Choose a license and click the down arrow to expand and view the details. You can toggle between the order number and the license access code view.
Return allocations
Returning allocations puts the licenses back in the licensing pool. These licenses can then be allocated in any quantity at any time. For example, you’re decommissioning a License Server, but you’re not ready to deploy existing licenses elsewhere.
- Select the check box of the licenses you want to return.
- From the Select an action menu, choose Return allocations.
- Select Yes, process return. If you choose this option, you cannot undo it.
Modify licenses - returns and allocates licenses to another License Server
Modifying a license returns a single license file and allows for allocation to another server. For example, you have 5000 licenses installed on license server1. You want to move 1000 licenses to license server2. Modify allocations and then allocate 4000 licenses to license server1 and 1000 licenses to license server2.
- To select a product, click the link, and view the product license details page.
- Select the check box of the allocated license to modify.
- From the Select an action menu, choose Modify allocations.
- Type a new server host address.
- Select Modify license file.
- Select Yes, create license file. If you want to make a change before creating the license file, select No, modify the allocation, and make your change. Then select Yes, create license file.
- Select Download license file, and save the file to a temporary location. Remember the file name and location where you downloaded the file. You need this location.
- Install the license. See Install licenses.
Upgrade license edition
If you are eligible for a version upgrade as a benefit of your maintenance, you can obtain a new license and add it to the License Server.
- At the bottom of the landing page, select Upgrade my licenses.
- Follow the site options and instructions for upgrading your product edition licenses.
- Either download or order new media. An email message provides you with instructions to return to citrix.com to allocate or receive more feature licenses.
- Log on to www.citrix.com to allocate your licenses, generate a license file, download the license file to your License Server, and reread the file.
Hide and unhide licenses
Hiding licenses doesn’t remove them from an account. When you hide licenses, it removes them from view. You might want to hide legacy product licenses. Hiding those licenses increases the visibility of product licenses that you want to view.
- Select the licenses you want to hide.
- From the Select an action menu, choose Hide licenses.
- To unhide licenses, choose Quick find: All hidden and select licenses.
- From the Select an action menu, choose Unhide licenses.
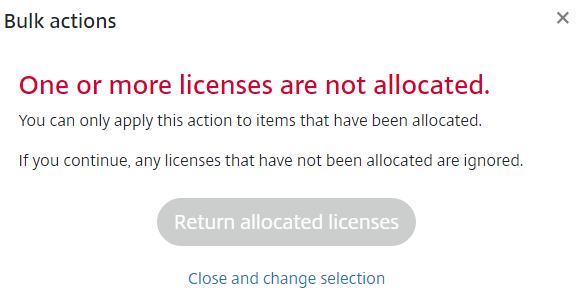
Manage multiple licenses (bulk actions)
You can apply actions to multiple licenses at the same time. Select the check boxes of different licenses and then select and action.
To successfully apply actions to multiple licenses, be aware of these considerations:
-
You can apply certain actions only to licenses with the same attributes. For example, you can only allocate licenses that have the same binding type. An error message appears when you select licenses that are not compatible for the bulk action.
The first license you select is what subsequent selections are compared to for compatibility.
-
If you select licenses that can’t have an action applied to all of them, some actions might be disabled or not displayed, and a message might appear. For example, if you select two licenses, one that has been allocated and one that has not, a message appears. The message states that the action can apply only to allocated licenses.
Filter licenses
Use the Filter by menu to narrow your list to expired licenses, new licenses, available allocations, or trial licenses.
- From the Filter by menu, choose how you want to filter your output.
Create a product license report - Export to Excel (CSV)
Select this option to export your full list of assets and data to Excel.
- Select the licenses you want in the report.
- Choose the Export to Excel (.CSV) link. In the View my product screen, it’s above the list of products. In the Manage my licenses screen, it’s at the bottom of the list.
- Save the file.
In this article
- Introduction to licensing concepts
- Glossary
- To access Manage Licenses on citrix.com
- Search for licenses
- Allocate licenses
- Download licenses
- Install licenses
- Asset components
- Return allocations
- Modify licenses - returns and allocates licenses to another License Server
- Upgrade license edition
- Hide and unhide licenses
- Manage multiple licenses (bulk actions)
- Filter licenses
- Create a product license report - Export to Excel (CSV)