HDX™ webcam video compression
Overview
Users of video conferencing applications running in Linux VDA sessions can now use their webcams with HDX webcam video compression. This feature is enabled by default. We recommend you always use HDX webcam video compression if possible.
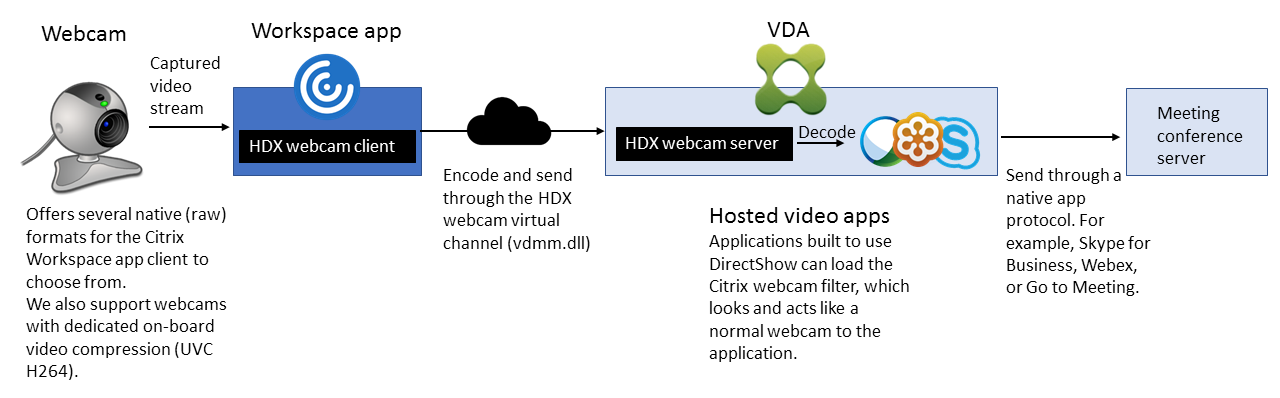
HDX webcam video compression is also called Optimized webcam mode. This type of webcam video compression sends the H.264 video directly to the video conferencing application running in the virtual session. HDX webcam video compression uses the multimedia framework technology that is part of the client operating system to intercept video from capture devices, transcode, and compress it. Manufacturers of capture devices supply the drivers that plug into the OS kernel streaming architecture.
The client handles communication with the webcam. The client then sends the video only to the server that can display it properly. The server doesn’t deal directly with the webcam, but its integration gives you the same experience in your desktop. Workspace app compresses the video to save bandwidth and provide better resiliency on WAN scenarios.
Note:
- This feature supports only H.264 videos from your Citrix Workspace app client.
- The supported webcam resolution ranges between 48x32 and 1920x1080.
- Do not choose Generic USB devices from your Citrix Workspace™ app toolbar when you are using a webcam. Otherwise, unexpected issues might occur.
Supported Linux distributions
- RHEL 8.4/CentOS 8 (2105)
- RHEL 8.3/CentOS 8.3
- RHEL 7.9/CentOS 7.9
- Ubuntu 20.04
- Ubuntu 18.04
- Ubuntu 16.04
- Debian 10
Fully tested webcams
Different webcams offer different frame rates and have different levels of brightness and contrast. Citrix® uses the following webcams for initial feature validation:
- Logitech HD Webcam C270
- Logitech Webcam C930e
- Microsoft-LifeCam-HD3000
Configuration
This feature is enabled by default. To use it, complete the following verification and configuration:
Tip:
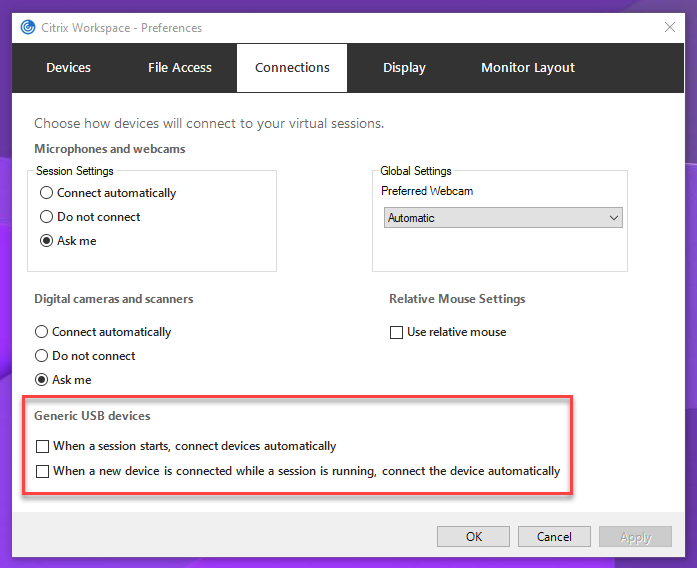
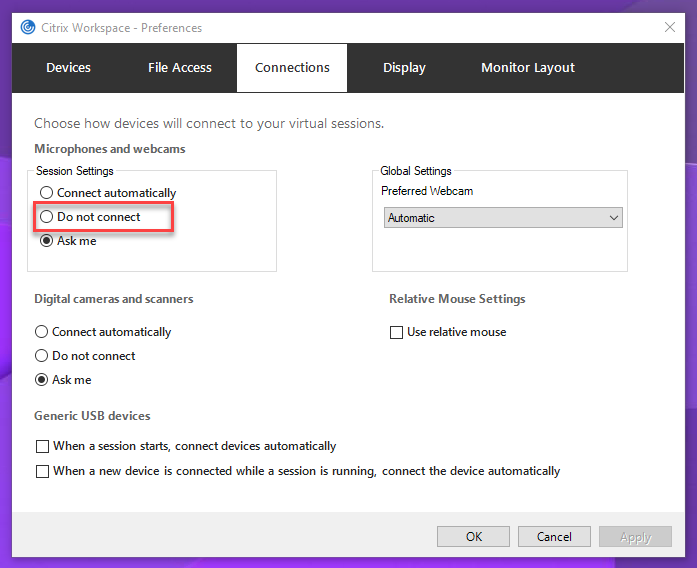
Citrix Workspace app users can override the default setting by choosing the Desktop Viewer Microphones and webcams setting, Do not connect.
-
After your VDA installation completes, verify that your VDA can register with the Delivery Controller™ and the published Linux desktop sessions can be launched successfully using Windows credentials.
-
Ensure that your VDA has Internet access and then run the
sudo /opt/Citrix/VDA/sbin/ctxwcamcfg.shcommand to complete your webcam configurations. If your VDA does not have Internet access, go to step 3.If your VDA is deployed on Debian 10, ensure that it is running on the latest kernel version. Otherwise, run the following commands to update to the latest kernel version:
sudo apt-get update
sudo apt-get dist-upgrade
sudo reboot
<!--NeedCopy-->
The ctxwcamcfg.sh script helps to:
- Install the
FFmpeg,kernel-devel, and Dynamic Kernel Module Support (DKMS) programs on your VDA.-
FFmpegis used for video decoding. -
kernel-develis used to build a virtual webcam kernel module of the corresponding version. - DKMS is used to dynamically manage the virtual webcam kernel module.
Note:
When installing the preceding programs on RHEL and CentOS, the
ctxwcamcfg.shscript installs and enables the following repositories on your VDA:- Extra Packages for Enterprise Linux (EPEL)
- RPM Fusion
-
-
Download the
v4l2loopbackopen source code from https://github.com/umlaeute/v4l2loopback and use DKMS to managev4l2loopback.
v4l2loopbackis a kernel module that allows you to create V4L2 loopback devices. - Run the
sudo service ctxwcamsd restartcommand. The Linux VDA’s webcam service -ctxwcamsd- restarts and loads thev4l2loopbackkernel module for the HDX webcam video compression feature.
- Install the
-
If your VDA does not have Internet access, build the v4l2loopback kernel module on another machine and then copy it to your VDA.
-
Prepare a build machine that has Internet access and has the same kernel version with your VDA. The
uname -rcommand helps to find kernel versions. -
On the build machine, run the
sudo mkdir -p /var/xdlcommand. -
Copy
/var/xdl/configure_*from your VDA to the build machine under/var/xdl/. - On the build machine, run the
sudo /opt/Citrix/VDA/sbin/ctxwcamcfg.shcommand to build the kernel module. If the command runs successfully, it creates a v4l2loopback.ko file under the/var/lib/dkms/v4l2loopback/1.81b8df79107d1fbf392fdcbaa051bd227a9c94c1/$(uname -r)/x86_64/module/path. Ignore errors that might occur when you run the ctxwcamcfg.sh script. - Copy v4l2loopback.ko from the build machine to your VDA and place it under
/opt/Citrix/VDA/lib64/. - On your VDA, run the
sudo service ctxwcamsd restartcommand to restart the webcam service and load the v4l2loopback kernel module. - Make sure to install the FFmpeg program on your VDA before you can use the HDX webcam video compression feature.
-