Console
Use the Citrix Provisioning console to manage components within a provisioning farm. The console can be installed on any machine that can access the farm. For more information, see Using the console.
Starting the Citrix Provisioning™ console
Before starting the console, make sure that the Stream Service is started and running on the Citrix Provisioning server. After the Configuration Wizard runs, the Stream Service starts automatically.
To start the console from the Start menu:
Select All Programs>Citrix>Provisioning Services > Citrix Provisioning Console
The console main window appears.
Common console actions
The following menu options are common to most objects in the console:
New Window From Here:
- To open a new console window, right-click on an object in the tree or in the details pane. Select the New Window from Here menu option.
- A new console window opens. Minimize the window to view and toggle between one or more windows.
Refresh:
- To refresh information in the console, right-click a folder, icon, or object, then select Refresh.
Export List:
- To export table information from the details pane to a text or comma delimited file, select Export from the Action menu.
- Select the location where this file is saved.
- Type or select the file name in the File name textbox.
- Select the file type from and Save as text boxes.
- Click Save to save the file.
Help: Select an object in the console, then select Help from the Action menu to display information about that object.
View Options: To customize a console view:
- Select View, then select either Add/Remove Columns, or Customize.
- If you selected Add/Remove Columns, use the Add and Remove buttons to select which columns to display.
- If you selected Customize select the check box next to each MMC and snap-in view option that displays in the console window.
- Click OK. The console window refreshes to display the selected options.
Performing tasks in the console
The following menu options are common when performing tasks in the console:
- Action menu: Select object-related tasks from the Action menu, including boot, restart, send message, view properties, copy, or paste properties.
- Right-click (context menu): Right-click a managed object to select object-related tasks. For a complete list of tasks, see that object’s management chapter within this guide.
-
Drag and drop: Using the drag feature, you can quickly perform several common console tasks such as:
- Move target devices by dragging them from one device collection, and dropping them on another device collection within the same site.
- Assign a virtual disk to all target devices within a collection by dragging the virtual disk and dropping it on the collection. The virtual disk and the collection must be in the same site. The new virtual disk assignment replaces any previous virtual disk assignments for that collection.
- Add a target device to a view by dragging the device, then dropping it on the view in console’s tree. Drag a provisioning server from one site, then drop it into another site. Note: Any virtual disk assignments that were specific to this server and any store information is lost.
-
Copy and paste: Select an object in the console window, then use the Copy and Paste right-click menu options to quickly copy one or more properties of a virtual disk, provisioning server, or target device, to one or more existing vDisks, provisioning servers, or target devices. To copy the properties of a one object type and paste those properties to multiple objects of the same type:
- In the tree or details pane, right-click the object which has the properties you want to copy, then select Copy. The object-specific Copy dialog appears.
- Place a check in the check box next to each of the object properties you want to copy, then click OK.
- In the console tree, expand the directory where the object exists so that those objects display in either the tree or details pane.
- Right-click on the object in the tree or details pane that you want to paste properties to, then select Paste.
- Views: Create views containing target devices to display only those target devices that you are currently interested in viewing or performing tasks on. Adding target devices to a view provides a quick and easy way to perform a task on members of that view, such as: Boot, Restart, Shutdown, Send message.
Views can be created at the site level or at the farm level. To perform a task on members of a view:
- Right-click on views icon, then select the Create View menu option. The View Properties dialog appears.
- Type the name and a description of the new view in the appropriate text boxes, then select the Members tab.
- To add target devices to this view, click the Add button. The Select Target Devices dialog appears.
- If you are creating the view at the farm level, select the site where the target devices reside. If you are creating the view at the site level, the site information is already populated.
- From the menu, select the device collection where you want to add target devices members.
- Select from the list of target devices that display, then click OK.
- If necessary, continue adding target devices from different device collections within a site.
- Click OK to close the dialog.
For more information on views, see Managing Views.
Configuring the bootstrap from the console
When a Citrix Provisioning server starts a target device, it downloads a boot file using the Citrix Provisioning MBA or PXE-compliant boot ROM. This file must be configured so that it contains the information needed to communicate with the provisioning servers. The Configure Bootstrap dialog is used to define the IP addresses for up to four provisioning servers in the boot file.
Note:
For alternative boot methods, see Using the Manage Boot Devices Utility.
The Configure Bootstrap dialog includes the following tabs:
- General
- Target device IP
- Server lookup
- Options
General tab
| Field | Description |
|---|---|
| Bootstrap file | The currently selected boot file. If you want to select a different boot file to configure, click the Add button or Read Servers from the Database button. |
| IP settings | The IP Address, Subnet Mask, Gateway, and Port for up to four provisioning servers, which performs login processing. |
| Add | Click the Add button to include a new provisioning server to the file. Specify up to four provisioning servers. |
| Edit | Highlight an existing provisioning server from the list, then click the Edit button to edit this server’s IP settings. |
| Remove | Select an existing provisioning server from the list, then click the Remove button to remove this server from the list of available provisioning servers. |
| Move up and move down | Select an existing provisioning server, and click to move up or down in the list of servers. The order in which the servers appear in the list determines the order in which the servers are accessed if a server fails. |
| Read servers from database | To populate the boot file with the Stream Service IP settings already configured in the database, click the Read Servers from Database button. This process clears the list then populates the list with the first four servers found in the database. |
Target device IP tab
| Field | Description |
|---|---|
| Use DHCP to retrieve target device IP | Select this option to retrieve target device IP; default method. |
| Use static target device IP | Selecting this method requires that you identify a primary and secondary DNS and domain. |
Server lookup tab
-
Use DNS: Select this option to use DNS to find the server. The host name displays in the Host name textbox. If this option is selected along with Use DHCP to retrieve Device IP option, configure the DHCP server to provide the DNS server.
Note:
If using high availability, specify up to four provisioning servers for the same Host name on your DNS server.
-
Use static IP: Use the static IP address of the provisioning server from which to boot from. If you select this option, click Add to enter the following server information, then click OK to exit the dialog: IP Address, Subnet Mask, Gateway, Port (default is 6910).
Note:
If using high availability (high availability), enter up to four provisioning servers. If you are not using high availability, only enter one. Use the Move Up and Move Down buttons to sort the servers boot order. The first one listed is the server that the target device attempts to boot from.
Options tab
| Field | Description |
|---|---|
| Verbose mode | Select the Verbose Mode option if you want to monitor the boot process on the target device (optional) or view system messages. |
| Interrupt safe mode | Select Interrupt Safe Mode if you are having trouble with your target device failing early in the boot process. |
| Advanced memory support | This setting enables the bootstrap to support newer Windows OS versions and is enabled by default. Only disable this setting if your target device is hanging or behaving erratically in early boot phase. |
| Network recovery method | This field includes: Restore Network Connections. Selecting this option results in the target device attempting indefinitely to restore its connection to the provisioning server. Reboot to Hard Drive, a hard drive must exist on the target device. Selecting this option instructs the target device to perform a hardware reset to force a reboot after failing to re-establish communications. The user determines the number of seconds to wait before rebooting. Assuming the network connection cannot be established, PXE fails, and the system reboots to the local hard drive. The default number of seconds is 50, to be compatible with high availability configurations. |
| Logging polling timeout | Enter the time, in milliseconds, between retries when polling for provisioning servers. Each server is sent a login request packet in sequence. The first responding server is used. In systems that are not highly available, this time-out simply defines how often to retry the single available provisioning server with the initial login request. This time-out defines how quickly the round-robin routine switches from one server to the next in trying to find an active one. The valid range is from 1,000 milliseconds to 60,000 milliseconds. |
| Login general timeout | Enter the time-out, in milliseconds, for all login associated packets. Do not include the initial login polling time-out. This time-out is longer than the polling time-out. The server needs time to contact all associated servers, some of which are down and requiring retries and time-outs from the server to the other servers. This process determines if they are online or not. The valid range is from 1,000 milliseconds to 60,000 milliseconds. |
Configuring the bootstrap file
-
In the console, select a provisioning server within the Servers folder in the tree, then select Configure bootstrap from the Actions pane or the context menu. The Configure Bootstrap dialog appears.
Select the boot file that was copied to the directory you selected during the Citrix Provisioning server setup. The server returns the list of bootstrap files found under Citrix Provisioning Program Data. As a result, the server must be active for the Configure Bootstrap menu item to appear.
Important:
If a previous version of Citrix Provisioning was installed on this server, you must change the default location from:
C:\\Program Files\\Citrix\\Citrix Provisioningto:
C:\\Documents and Settings\\All Users\\Application Data\\Citrix\\Citrix Provisioning\\TftpbootIf the default is not changed, the bootstrap file cannot be configured from the console and target devices fail to boot. A ‘Missing TFTP’ error message appears.
If you installed the console on a separate machine, select the path of the remote provisioning server (which has boot services installed).
-
The Configuration Wizard writes the list of IP addresses to the database for the server. Selecting Read Servers from the Database gets the first IP and port for the server and populates it into the list. This step is performed when the list is blank, or to replace the whole list with new values. These values are set in the Streaming network cards section of the Configuration Wizard’s Network Communications page. Citrix Provisioning uses the first network card selected.
-
Choose from the following options:
- Optionally select the Verbose Mode option if you want to monitor the boot process on the target device. This option enables system messaging on the target device.
- Select Interrupt Safe Mode if the target device hangs early in the boot process.
- Select the Advanced Memory Support option to enable the bootstrap to support newer Windows OS versions. Advanced Memory Support is enabled by default. Only disable this setting if your target device is hanging or behaving erratically in early boot phase.
-
Select from the following Network Recovery Methods:
- Restore Network Connections - Selecting this option results in the target device attempting, indefinitely, to restore its connection to the Citrix Provisioning server.
- Reboot to Hard Drive - Selecting this option instructs the target device to perform a hardware reset. This process forces a reboot after failing to re-establish communications for a defined number of seconds. The user determines the number of seconds to wait before rebooting. Assuming the network connection cannot be established, PXE fails, and the system reboots to the local hard drive. The default number of seconds is 50. Click the Browse button to search for and select the folder created in Step 1, or enter a full path or UNC name.
Important:
If the partition containing the vDisks is formatted as a FAT file system, a message displays a warning, resulting in suboptimal performance. Citrix® recommends that you use NTFS to format the partition containing the vDisks. Do not change the address in the Port field.
All boot services (PXE, TFTP) must be on the same NIC (IP). But the Stream Service can be on a different NIC. The Stream Service allows you to bind to multiple IPs (NICs).
-
Configure the following:
Login Polling Timeout
Enter the time, in milliseconds, between retries when polling for servers. Each server is sent a login request packet in sequence. The first responding server is used. This time-out simply defines how often to retry the single available server with the initial login request. This time-out defines how quickly the round-robin routine switches from one server to the next, in trying to find an active server. The valid range is from 1,000 milliseconds to 60,000 milliseconds.
Login General Timeout
Enter the time-out, in milliseconds, for all login associated packets. Do not include the initial login polling time-out. The valid range is from 1,000 milliseconds to 60,000 milliseconds.
-
Click OK to save your changes.
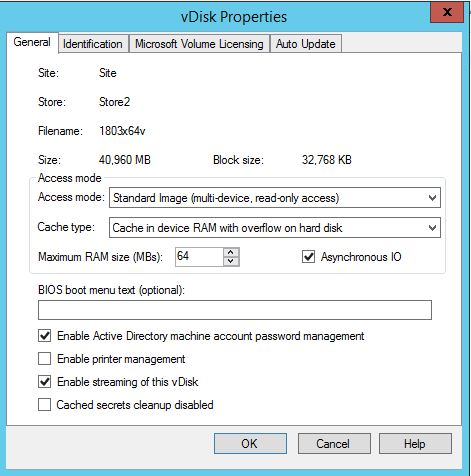
Enable asynchronous I/O using the Citrix Provisioning console
Enable Asynchronous I/O streaming functionality for a virtual disk directly from the provisioning console. In the virtual disk properties screen, select Asynchronous IO.
Tip:
For more information, see Improving performance with asynchronous I/O streaming.