Getting the bootstrap file
A target device initiates the boot process by first loading a bootstrap program. A bootstrap program runs before the operating system is loaded. Citrix Provisioning™ uses a special bootstrap program that initializes the streaming session between the target device and the Citrix Provisioning server. After this session starts, the operating system begins streaming and loads from the vDisk that was initiated.
There are three ways that a target device loads the bootstrap program:
- Over the network, via Preboot eXecution Environment (PXE)
- From a boot device stored on attached media
- From a BIOS Embedded bootstrap (OEM versions only)
After configuring the target device’s BIOS, and booting from the network, the device retrieves a vDisk assignment from the provisioning server. The target device firmware gets the bootstrap file using standard network protocols.
Note:
The device firmware (NIC) must support PXE 0.99j, PXE 2.1or greater.
Network booting a target device
The DHCP service delivers IP configurations to a target device. It can also deliver the bootstrap file location using options 67, and 60 or 66. Consider delivering the bootstrap file location with a DHCP service to reduce the number of services and increase reliability.
Note: The BOOTP service can deliver IP configuration to a target device according to BOOTP tab. It can also deliver the boot program location using optional fields. Use of this service is no longer typical. Use this service only if DHCP does not meet your requirements.
The PXE service delivers the bootstrap file location to a target device according to the PXE Specification Version 2.1. Use the PXE service if a DHCP service exists and cannot be changed. Or, if another PXE service is not configured.
The TFTP service delivers the bootstrap file to a target device on request. Use it if another TFTP service is not available.
The illustrations and steps that follow describe the boot process both with and without the use of PXE.
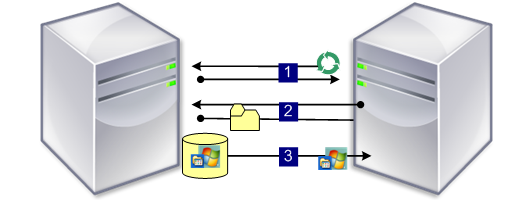
Using DHCP to retrieve IP address and scope options (Without PXE)
- When a target device boots from the network, DHCP sends a request to the provisioning server for an IP address and Scope Option settings (66 and 67). The provisioning server returns the information as requested.
- Using TFTP, a request for the bootstrap file is sent from the target device to the provisioning server. The server downloads the boot file on the target device.
- The target device boots the assigned vDisk image.
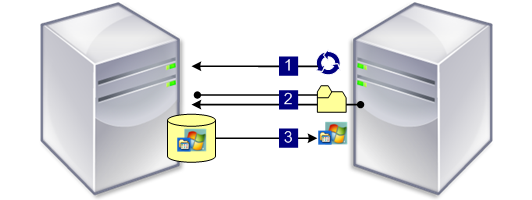
Using DHCP with PXE to retrieve IP address and scope options
- When a target device boots from the network, DHCP sends a request to the provisioning server for an IP address and Scope Option settings (option 60; PXEClient identifier). The server returns the information as requested.
- The target device sends a request to the server for the bootstrap file name and location to the PXE service. The PXE service returns the information to the target device.
- Using TFTP, a request for the bootstrap file is sent from the target device to the server. The Provisioning Server downloads the bootstrap file to the target device and the target device boots.
Booting from an optional boot device
As an alternative to using PXE, the Boot Device Manager (BDM) can create a bootstrap file on a local hard drive, USB flash drive, or ISO image. The bootstrap file is used to boot the target device.
Note: The BIOS Embedded Bootstrap boot method also exists to allow OEMs to embed the bootstrap file on the target device.
Configuring the BIOS-enabled bootstrap
This feature is OEM specific and provides end users with systems preconfigured with Citrix Provisioning, allowing customers to deploy a Citrix Provisioning enabled environment with minimal effort. This feature becomes an alternative to the standard PXE boot method.
As part of this solution, the OEM embeds the bootstrap within the target device’s BIOS at the factory. The OEM also pre-configures the device with product license access codes.
For the BIOS-Embedded Bootstrap feature to work automatically from the factory, the target network must support the following:
- A DHCP server that capable of providing the target device’s IP, subnet, and gateway address. Also, the DHCP service must provide the default DNS server for the client to use.
- A DNS server must be active on the network
- A DNS entry must be defined which points the name <IMAGESERVER1> to each Provisioning Server’s active IP address. This DNS entry is used by the target device to find an active server.
If the target device boots using the BIOS-Embedded Bootstrap, the configuration settings are obtained from the device’s BIOS. These BIOS settings indicate using DHCP with DNS to look up the IP and server information. Or, it lists up to four server static IP addresses in the BIOS.
The first time a target device boots, it reads the product license access code and configuration information from the BIOS. After retrieving this information, it locates the stream service and sends a device registration message to the server. This message contains the necessary information, including information inherited from the device collection template, to add the device to the Citrix Provisioning database.
Configuring the BIOS-Embedded bootstrap settings
The OEM configures the BIOS-embedded bootstrap settings so that the bootstrap works ‘out-of-the-box’. If you need to change settings, use the Configure BIOS Bootstrap feature in the Citrix Provisioning console. Configuration changes are updated automatically the next time the target device boots. However, only those BIOS settings that differ from the new settings are updated.
Note:
The target device must have enough information stored in the BIOS to make initial contact with the Citrix Provisioning server.
General tab
- Right-click on a provisioning server in the console window, then select the Configure Bootstrap menu option. The Configure Bootstrap dialog appears.
- To allow target device BIOS settings to update automatically, on the General tab, check the Automatically update the BIOS on the target device with these settings check box. The next time the target device boots, these settings are automatically applied.
Target device IP
- Select the Target Device IP tab on the Configure BIOS Bootstrap dialog.
- Select from the following methods to use to retrieve target device IP addresses:
- Use DHCP to retrieve target device IP; default method.
- Use static target device IP. Selecting this method requires the identification of primary and secondary DNS and domains.
Server lookup tab
On the Server Lookup tab, select the method that the target device uses to find the provisioning server it boots from:
- Use DNS to find the server. Select this option to find the server using DNS. The host name displays in the Host name textbox. Note: When using DNS, the DNS server must be able to resolve the name with the IP address of the server.
- Use specific servers. Select this option to manually enter provisioning server data. If this information was not previously entered, no data appears. To quickly list all servers in the database, click Read Servers from the Database button. To change or enter new information, click Edit, then manually enter the information in the Server Address dialog. Note: Selecting the Reset to Default button displays a confirmation message. This message indicates that automatic BIOS updates on the target devices are disabled. DNS is used to find the server.
Options tab
-
On the Options tab, select from the network options that follow:
- Select the Verbose mode option if you want to optionally monitor the boot process on the target device. This mode enables system messaging on the target device.
- Select Interrupt safe mode if the target device hangs early in the boot process.
- Select the Advanced Memory Support option to enable the bootstrap to accept newer Windows OS versions (enabled by default). Disable this setting on older XP or Windows Server OS 32 bit versions that do not support PXE. Or, if your target device is hanging or behaving erratically in the early boot phase.
-
Select from the following Network Recovery Methods:
-
Restore network connections. Selecting this option results in the target device attempting indefinitely to restore its connection to the Citrix Provisioning server.
-
Reboot to Hard Drive. Selecting this option instructs the target device to perform a hardware reset to force a reboot after failing to re-establish communications for a defined number of seconds. The user determines the number of seconds to wait before rebooting. Assuming the network connection cannot be established, the target device fails to contact the server, and the system reboots to the local hard drive. The default is 50 seconds.
Note: If the partition containing the vDisks is formatted as a FAT file system, a message displays a warning that the FAT file system might result in suboptimal performance. Citrix® recommends that you use NTFS to format the partition containing the vDisks. Do not change the address in the Port field.
Caution: All boot services must be on the same NIC (IP). But the Stream Service can be on a different NIC. The Stream Service allows you to bind to multiple IPs (NICs).
-
-
Configure the following:
-
Login Polling Timeout. Enter the time, in milliseconds, between retries when polling for servers. Each server is sent a login request packet in sequence. The first responding server is used. This time-out simply defines how often to retry the single available server with the initial login request. This time-out defines how quickly the round-robin routine switches from one server to the next, in trying to find an active server. The valid range is from 1,000 milliseconds to 60,000 milliseconds.
-
Login General Timeout. Enter the time-out, in milliseconds, for all login associated packets. Do not include the initial login polling time-out. The valid range is from 1,000 milliseconds to 60,000 milliseconds.
Click OK to save your changes.