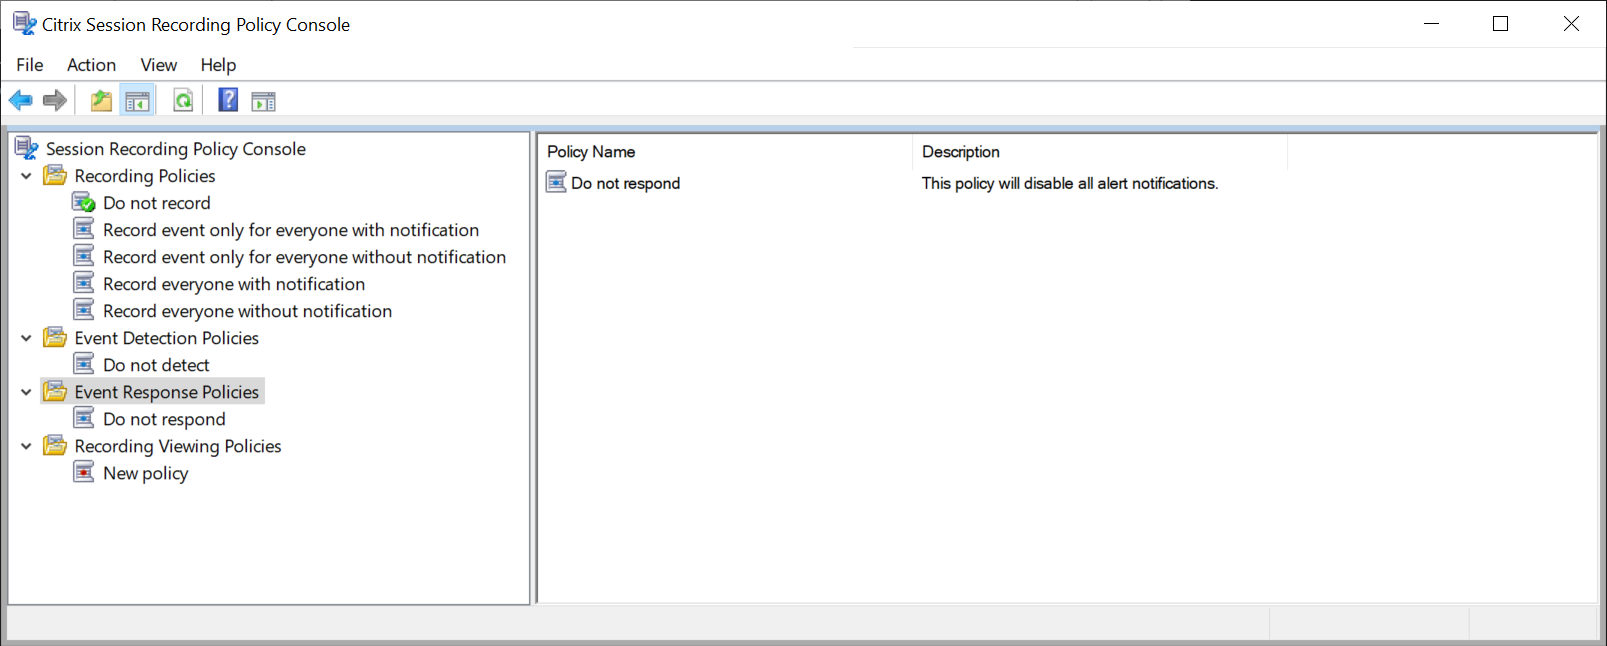
Configure event response policies
This policy setting lets you take the following actions in response to logged events in recorded sessions:
- Send email alerts
- Start screen recording immediately
- Lock session
- Log off session
- Disconnect session
The only system-defined event response policy is Do not respond. You can create custom event response policies as needed. Only one event response policy can be active at a time.
For an example email alert, see the following screen capture:
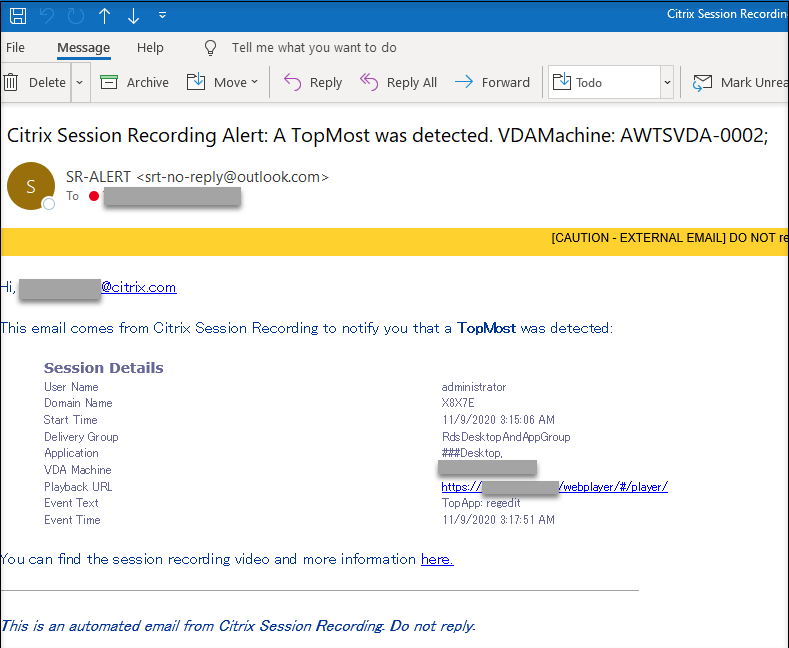
Tip:
Clicking the playback URL opens the playback page of the recorded session in the web player. Clicking here opens the All recordings page in the web player.
System-defined event response policy
Session Recording provides one system-defined event response policy:
- Do not respond. By default, no action is taken in response to logged events in your recordings.
Create a custom event response policy
-
Log on as an authorized policy administrator to the server where the Session Recording policy console is installed.
-
Start the Session Recording policy console. By default, there is no active event response policy.
-
Select Event Response Policies in the left pane. From the menu bar, choose Add New Policy.
-
(Optional) Right-click the new event response policy and rename it.
-
Right-click the new event response policy and select Add Rule.
-
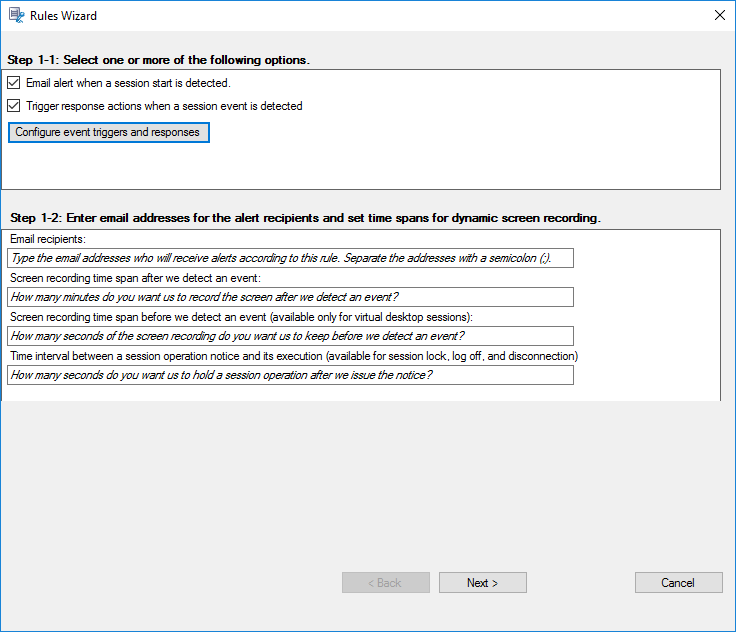
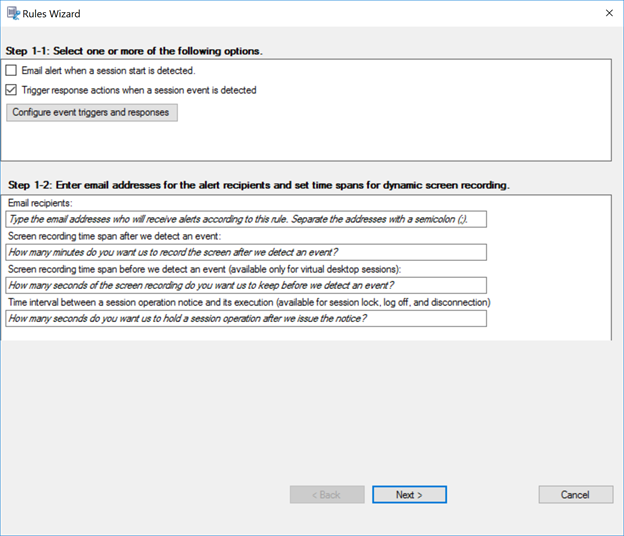
Select Email alert when a session start is detected and Use event triggers to specify how to respond when a session event is detected based on your needs.
-
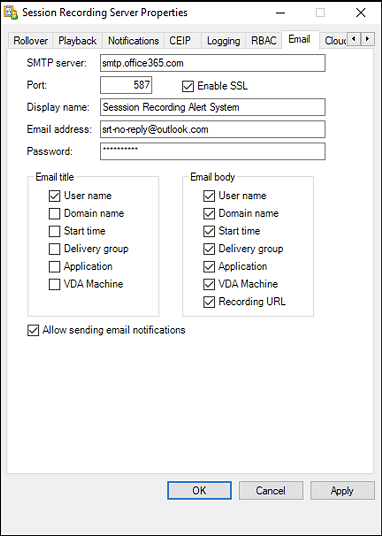
(Optional) Set email recipients and the email sender properties.
-
Type the email addresses for the alert recipients in the Rules wizard.
-
Configure outgoing email settings in the Session Recording Server Properties.
Note:
If you select more than two options in the Email title section, a warning dialog appears, saying that the email subject might be too long. After you select Allow sending email notifications and click Apply, Session Recording sends an email to verify your email settings. If any setting is incorrect, for example, an incorrect password or port, Session Recording returns an error message with the error details.
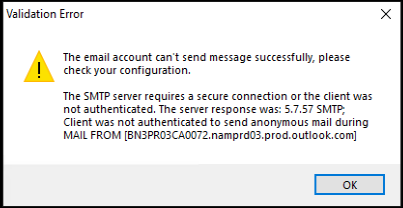
Your email settings need about five minutes to take effect. To have your email settings take effect immediately or fix the issue that emails are not sent according to the settings, restart the Storage Manager (
CitrixSsRecStorageManager) service. Also, restart the Storage Manager service if you upgrade to the current release from Version 2006 and earlier. -
Edit registry for accessing the web player.
To make the playback URLs in your alert emails work as expected, browse to the registry key at
HKEY_LOCAL_MACHINE\SOFTWARE\Citrix\SmartAuditor\Serverand do the following:-
Set the value data of LinkHost to the URL of the domain that you use to access the web player. For example, to access a web player at
https://example.com/webplayer/#/player/, set the value data of LinkHost tohttps://example.com. -
Add a value, EmailThreshold, and set its value data to a number in the range of 1 through 100. The value data determines the maximum number of alert emails that an email sending account sends within a second. This setting helps slow down the number of emails that are being sent and thus reduces the CPU usage. If you leave the value data unspecified or set it to a number out of range, the value data falls back to 25.
Note:
-
Your email server might treat an email sending account as a spam bot and thus prevent it from sending emails. Before an account is allowed to send emails, an email client such as Outlook might request you to verify that the account is used by a human user.
-
There is a limit for sending emails within a given period. For example, when the daily limit is reached, you cannot send emails until the start of the next day. In this case, ensure that the limit is more than the number of sessions being recorded within the period.
-
-
-
(Optional) Configure event triggers and responses.
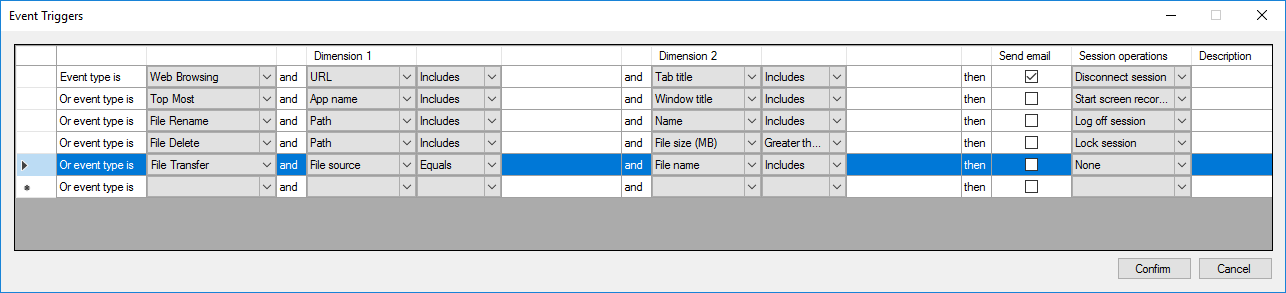
After you select Trigger response actions when a session event is detected, the Configure event triggers and responses button becomes available. Click it to specify logged events that can trigger the following response actions:
- Send email alerts
- Start screen recording immediately
- Lock session
- Log off session
- Disconnect session
Note:
If your system language is German, French, or Spanish, ensure that the horizontal resolution of your machine is equal to or larger than 1,700 pixels. Otherwise, text truncation occurs and thus the columns of the Event Triggers table are not displayed completely.
You must select the event types that the active event detection policy logs. Click Confirm when you are finished.
Select event types from the drop-down list and set event rules through the two dimensions that are combined using the logical AND operator. You can set up to seven event triggers for each policy rule. You can also define your event triggers in the Description column or leave the column empty. Your defined description of an event trigger is provided in the alert emails if you have Send email selected and events of the type are logged. If you have Start screen recording selected, dynamic screen recording automatically starts when certain events occur during an event-only recording. Set the time spans for dynamic screen recording:
- Screen recording time span after a session event is detected: You can configure how many minutes you want to record the screen after events are detected. If you leave the value unspecified, screen recording continues until the recorded sessions end.
- Screen recording time span before a session event is detected: You can configure how many seconds of the screen recording you want to keep before events are detected. This feature is available only for virtual desktop sessions. The value ranges from 1 to 120. Setting the value to any of 1 through 10 makes the value 10 effective. If you leave the value unspecified, the feature does not take effect. The actual length of the screen recording that Session Recording keeps might be a little longer than your configuration.
For a complete list of supported event types, see the following table.
Event type Dimension Option App Start App name Full command line App End App name Top Most App name Windows title Web Browsing URL Tab title Browser name File Create Path File size (MB) File Rename Path Name File Move Source path Destination path File size (MB) File Delete Path File size (MB) CDM USB Drive letter Generic USB Device name Idle idle duration (Hrs) File Transfer File source File size (MB) File name Registry Create Key name Registry Delete Key name Registry Set Value Key name Value name Registry Delete Value Key name Value name Registry Rename Key name User Account Modification User name Unexpected App Exit App name App Not Responding App name New App Installed App name App Uninstalled App name RDP Connection IP address Popup Window Process name Window content Performance Data CPU usage (%) Memory usage (% Net send (MB Net receive (MB) RTT (ms) Clipboard Operation Data type Process name Content -
Click Next to select and edit the rule criteria.
Similar to when creating a custom recording policy, you can choose one or more rule criteria: Users or Groups, Published Applications or Desktop, Delivery Groups or Machines, and IP Address or IP Range. For more information, see the instructions in the Create a custom recording policy section.

Note:
When a session or an event meets more than one rule in a single event response policy, the oldest rule takes effect.
- Follow the wizard to complete the configuration.
- Activate the new event response policy.