This content has been machine translated dynamically.
Dieser Inhalt ist eine maschinelle Übersetzung, die dynamisch erstellt wurde. (Haftungsausschluss)
Cet article a été traduit automatiquement de manière dynamique. (Clause de non responsabilité)
Este artículo lo ha traducido una máquina de forma dinámica. (Aviso legal)
此内容已经过机器动态翻译。 放弃
このコンテンツは動的に機械翻訳されています。免責事項
이 콘텐츠는 동적으로 기계 번역되었습니다. 책임 부인
Este texto foi traduzido automaticamente. (Aviso legal)
Questo contenuto è stato tradotto dinamicamente con traduzione automatica.(Esclusione di responsabilità))
This article has been machine translated.
Dieser Artikel wurde maschinell übersetzt. (Haftungsausschluss)
Ce article a été traduit automatiquement. (Clause de non responsabilité)
Este artículo ha sido traducido automáticamente. (Aviso legal)
この記事は機械翻訳されています.免責事項
이 기사는 기계 번역되었습니다.책임 부인
Este artigo foi traduzido automaticamente.(Aviso legal)
这篇文章已经过机器翻译.放弃
Questo articolo è stato tradotto automaticamente.(Esclusione di responsabilità))
Translation failed!
Configuring Splunk’s HTTP Event Collector
What is HTTP Event Collector
HTTP Event Collector (HEC) is a high-performance REST API data input. It accepts plain text or JSON data sent via HTTP or HTTPS.
Clients must authenticate with a token in order to be able to send data to a HEC input. Multiple tokens can be generated per HEC input if required.
When to Use HTTP Event Collector
HTTP Event Collector (HEC) is the only way to send uberAgent data to Splunk Cloud. But it is useful even with on-premises Splunk Enterprise. HEC forces clients to authenticate before being allowed to send and it can use HTTPS as data transport, which qualifies it for sending data over the internet.
uberAgent natively supports HEC. It can send the data it collects to HEC via HTTP or HTTPS.
Configuring HTTP Event Collector in Splunk Enterprise
Enabling HTTP Event Collector in the UI
To enable HTTP Event Collector (HEC) for uberAgent® follow these steps:
- From the system bar, click Settings > Data Inputs
- On the left side of the page, click HTTP Event Collector
-
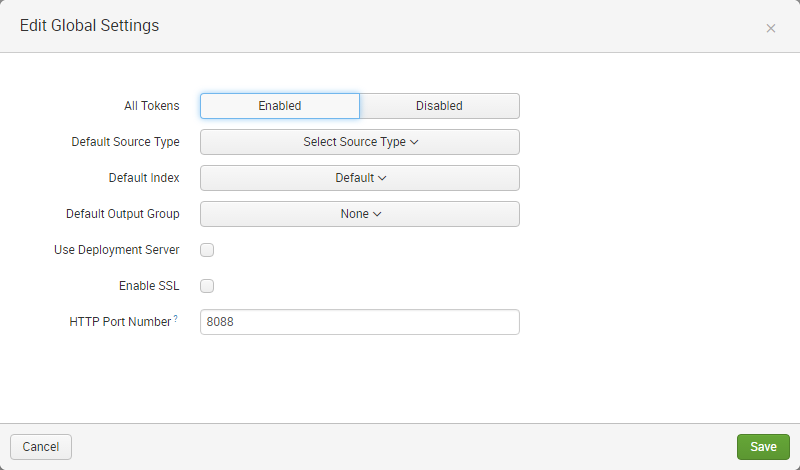
In the upper right corner, click Global Settings. The following dialog comes up:

- In the All Tokens toggle button, select Enabled
-
Optionally change the HEC port or enable SSL/TLS
- Note that Splunk’s default self-signed certificate is not trusted by uberAgent if it is not in the endpoint’s operating system certificate store.
- HTTP Event Collector shares SSL settings with the Splunk management server so check your server.conf for SSL configuration details.
- Click Save
Creating an HTTP Event Collector Token in the UI
To use the HTTP Event Collector, you must configure at least one token. The token is what uberAgent uses when it connects to Event Collector to send data.
To create an HEC token for use with uberAgent follow these steps:
- From the system bar, click Settings > Data Inputs
- On the left side of the page, click HTTP Event Collector
-
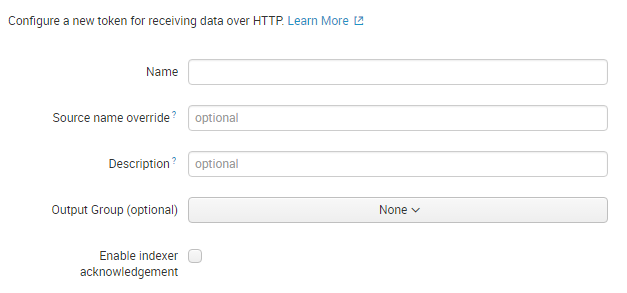
In the upper right corner, click New Token. The following dialog comes up:

-
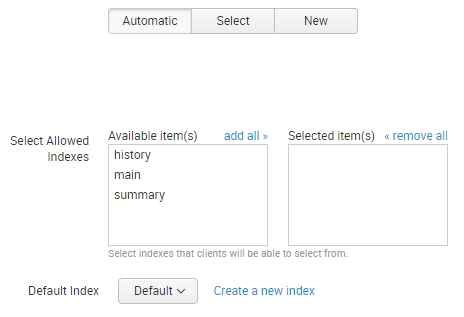
Enter a name (e.g. uberAgent) and click Next. The following dialog comes up:

- Leave everything at the defaults and click Review
- On the next page click Submit
-
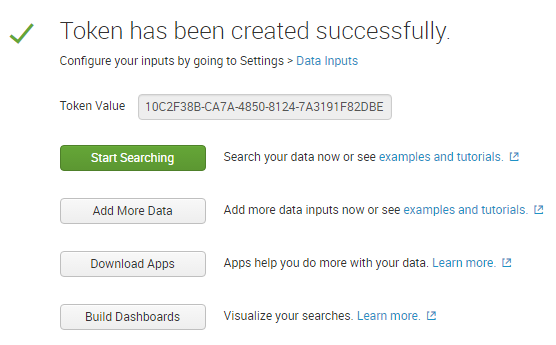
Copy the token value displayed. In the following screenshot that would be: 10C2F38B-CA7A-4850-8124-7A3191F82DBE

HTTP Event Collector Configuration Files
Splunk HTTP Event Collector can be configured through configuration files instead of the UI, which is often required for automation or for configuring settings that are not exposed in the UI. See Splunk’s documentation Set up and use HTTP Event Collector with configuration files for details.
Configuring uberAgent to Send to an HTTP Event Collector Input
To configure uberAgent to send its collected data to HEC the following configuration settings are required:
-
Servers: comma-separated list of URLs starting with http or https, e.g.:
http://server1:8088, https://server2:8088 -
Protocol: must be set to
HTTP(even when sending via HTTPS) - RESTToken: fill in the token created above. The token can optionally be encrypted with the uAEncrypt commandline tool.
Please make sure to review the KB document Reuse of Open HTTP Connections.
Share
Share
This Preview product documentation is Citrix Confidential.
You agree to hold this documentation confidential pursuant to the terms of your Citrix Beta/Tech Preview Agreement.
The development, release and timing of any features or functionality described in the Preview documentation remains at our sole discretion and are subject to change without notice or consultation.
The documentation is for informational purposes only and is not a commitment, promise or legal obligation to deliver any material, code or functionality and should not be relied upon in making Citrix product purchase decisions.
If you do not agree, select I DO NOT AGREE to exit.