-
-
-
-
-
-
Creating a TPM Status Inventory Report
-
Building a Browser Extension Inventory Report (Chrome/Edge/Firefox)
-
Internet Explorer - Distinguish Standalone and Edge IE Mode Starts
This content has been machine translated dynamically.
Dieser Inhalt ist eine maschinelle Übersetzung, die dynamisch erstellt wurde. (Haftungsausschluss)
Cet article a été traduit automatiquement de manière dynamique. (Clause de non responsabilité)
Este artículo lo ha traducido una máquina de forma dinámica. (Aviso legal)
此内容已经过机器动态翻译。 放弃
このコンテンツは動的に機械翻訳されています。免責事項
이 콘텐츠는 동적으로 기계 번역되었습니다. 책임 부인
Este texto foi traduzido automaticamente. (Aviso legal)
Questo contenuto è stato tradotto dinamicamente con traduzione automatica.(Esclusione di responsabilità))
This article has been machine translated.
Dieser Artikel wurde maschinell übersetzt. (Haftungsausschluss)
Ce article a été traduit automatiquement. (Clause de non responsabilité)
Este artículo ha sido traducido automáticamente. (Aviso legal)
この記事は機械翻訳されています.免責事項
이 기사는 기계 번역되었습니다.책임 부인
Este artigo foi traduzido automaticamente.(Aviso legal)
这篇文章已经过机器翻译.放弃
Questo articolo è stato tradotto automaticamente.(Esclusione di responsabilità))
Translation failed!
Creating a TPM Status Inventory Report
This article shows how to collect detailed status and inventory information about each endpoint’s trusted platform module (TPM). The output includes the TPM’s state and version and can easily be used in Splunk reports and dashboards.
There are multiple ways to get TPM information. We chose the command-line tool tpmtool.exe as our data source because its output is more complete than PowerShell’s Get-Tpm cmdlet (which lacks the TPM version).
The scripts listed in this guide are managed in vast limits’ public GitHub repository.
Collecting TPM Information With PowerShell From Tpmtool
Data Source: Tpmtool.exe
When run with the parameter getdeviceinformation, Tpmtool’s output looks as follows
-TPM Present: True
-TPM Version: 2.0
-TPM Manufacturer ID: INTC
-TPM Manufacturer Full Name: Intel
-TPM Manufacturer Version: 302.12.0.0
-PPI Version: 1.3
-Is Initialized: True
-Ready For Storage: True
-Ready For Attestation: True
-Is Capable For Attestation: True
-Clear Needed To Recover: False
-Clear Possible: True
-TPM Has Vulnerable Firmware: False
-PCR7 Binding State: 0
-Maintenance Task Complete: True
-TPM Spec Version: 1.16
-TPM Errata Date: Wednesday, September 21, 2016
-PC Client Version: 1.00
-Is Locked Out: False
<!--NeedCopy-->
Converting Tpmtool’s Output to a Key Value String
We’ll use the following PowerShell script to execute tpmtool and convert its output to the KV string format required by uberAgent custom scripts:
<#
  .SYNOPSIS
  uberAgent script to collect TPM status information.

  .DESCRIPTION
  Runs the command "tpmtool.exe getdeviceinformation" and converts the output to the KV format required by uberAgent custom scripts.
#>

# Run tpmtool
$tpmtoolOutput = @(tpmtool getdeviceinformation)

# We'll store the output fields here
$output = @{}

foreach ($line in $tpmtoolOutput)
{
   # Ignore empty lines
   if (!$line) { continue }

   # Remove the leading dash
   $line = $line -replace "^-", ""

   # Split at the colon
   $kv = $line.Split(":")

   if ($kv.Count -ne 2) { continue }

   # Remove the leading space in the value
   $kv[1] = $kv[1] -replace "^\s+", ""

   # Ignore certain fields
   if ($kv[0] -like "*spec version*" -or $kv[0] -like "*errata date*") { continue }

   # Remove spaces in the key name
   $kv[0] = $kv[0] -replace "\s+", ""

   # Add the field to the output hashtable
   $output.Add($kv[0], "`"$($kv[1])`"")
}

# Write the KV output to the console so uberAgent can pick it up
Write-Output $($output.Keys.ForEach({"$_=$($output.$_)"}) -join ' ')
<!--NeedCopy-->
The script’s output looks like this:
ReadyForAttestation="True" ClearNeededToRecover="False" TPMVersion="2.0" TPMManufacturerVersion="302.12.0.0" IsInitialized="True" ReadyForStorage="True" PPIVersion="1.3" PCR7BindingState="0" TPMManufacturerFullName="Intel" TPMManufacturerID="INTC" IsLockedOut="False" PCClientVersion="1.00" ClearPossible="True" TPMPresent="True" MaintenanceTaskComplete="True" IsCapableForAttestation="True" TPMHasVulnerableFirmware="False"
<!--NeedCopy-->
Configuring uberAgent to Run the Script
Deploy the script to any directory on your endpoints. In this example, we’re storing it in C:\Program Files\vast limits\uberAgent\scripts as Get-TpmtoolAsKv.ps1.
Create a new timer in uberAgent’s configuration. With the settings shown below, the script is executed five minutes after uberAgent is started and then once every 24 hours.
[Timer]
Name              = TPMStatusInventory
Interval          = 86400000
Start delay       = 300000
Persist interval  = true
Script            = powershell.exe -executionpolicy bypass -file "C:\Program Files\vast limits\uberAgent\Scripts\Get-TpmtoolAsKv.ps1"
ScriptContext     = Session0AsSystem
<!--NeedCopy-->
Restart the agent to start collecting data.
Splunk It
Once the data is in Splunk, you can list the incoming event data as follows
index=uberagent sourcetype="uberAgent:Script:TPMStatusInventory"
<!--NeedCopy-->
To generate a report, use a Splunk search like the following:
index=uberagent sourcetype="uberAgent:Script:TPMStatusInventory"
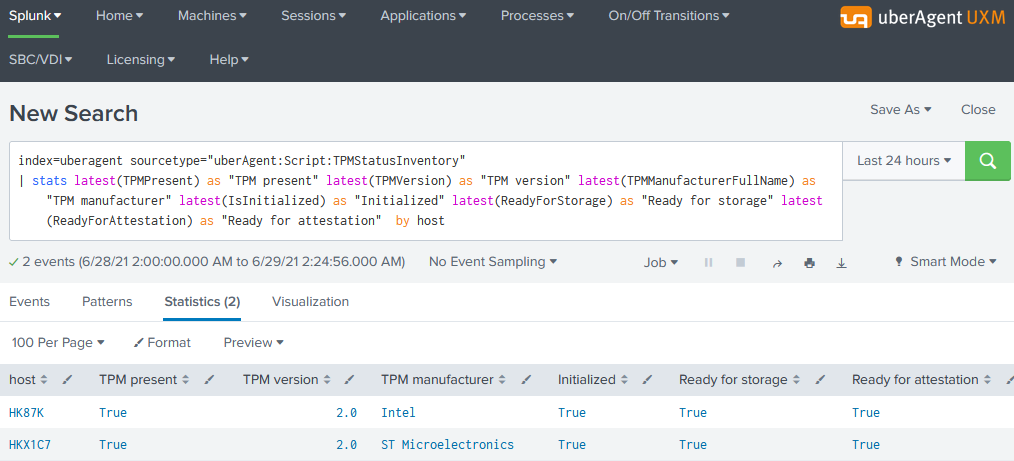
| stats latest(TPMPresent) as "TPM present" latest(TPMVersion) as "TPM version" latest(TPMManufacturerFullName) as "TPM manufacturer" latest(IsInitialized) as "Initialized" latest(ReadyForStorage) as "Ready for storage" latest(ReadyForAttestation) as "Ready for attestation"  by host
<!--NeedCopy-->
The above Splunk search creates a table with the latest TPM status per endpoint (host in Splunk terminology):

Share
Share
This Preview product documentation is Citrix Confidential.
You agree to hold this documentation confidential pursuant to the terms of your Citrix Beta/Tech Preview Agreement.
The development, release and timing of any features or functionality described in the Preview documentation remains at our sole discretion and are subject to change without notice or consultation.
The documentation is for informational purposes only and is not a commitment, promise or legal obligation to deliver any material, code or functionality and should not be relied upon in making Citrix product purchase decisions.
If you do not agree, select I DO NOT AGREE to exit.