Installing Scout Enterprise Management Suite®
Note:
Before you start to install, make sure you have read the topics System requirements and Preparing for installation.
When you run the Scout Enterprise Management Suite installer, we recommend to choose the standard installation scope which includes all features except of the legacy ELIAS. Then install the new web-based ELIAS 18 separately.
Alternatively, choose the user-defined option and select the features to be installed. Here you can still add the legacy ELIAS. For further information on the provided components, see Features of the Scout Enterprise Management Suite.
Notes:
Run the installer from a local hard drive. Do not use a USB stick, CD-R drive or a network drive.
Anti-virus programs can have an impact on the installation. If required, disable the anti-virus program before you perform the installation.
- Run the
ScoutInstaller.exefile as administrator. - Select the installation language. Subsequently, read and accept the license terms.
-
Select the database type you want to use:
- Microsoft SQL Server
For further information, see Database support.
-
Select the type of installation.
- The operating mode Citrix License Server. This model is supported since the Scout version 15 2508 LTSR. After providing the hostname and the port (if needed), this license server will be used for receiving entitlements. You can continue without providing the Citrix License Server or by providing a not-yet reachable/configured one. In this case, Scout will go into a grace period, until a valid license server has been setup. The Citrix License Server can later be (re-) configured in the Scout Board UI at any time.
Notes: To see more information about the Citrix License Server and the licensing process, please follow the following links:
- The operating mode Managed service provider is only relevant for Managed Service Providers (MSPs) who want to offer Scout as a service and have an MSP account on our myelux.com portal.
- The operating mode Enterprise subscription is only relevant for customers that purchased an Enterprise Subscription and have an Enterprise Subscription account on our myelux.com portal.

-
Choose the installation scope. To select individual features for installation or change the installation directory, select
User-defined. For the standard installation, selectStandard. -
Specify the database connection data for your Scout database.
Notes:
Microsoft SQL LocalDB is not supported.
Specify the required data to connect to your Microsoft SQL Server machine:
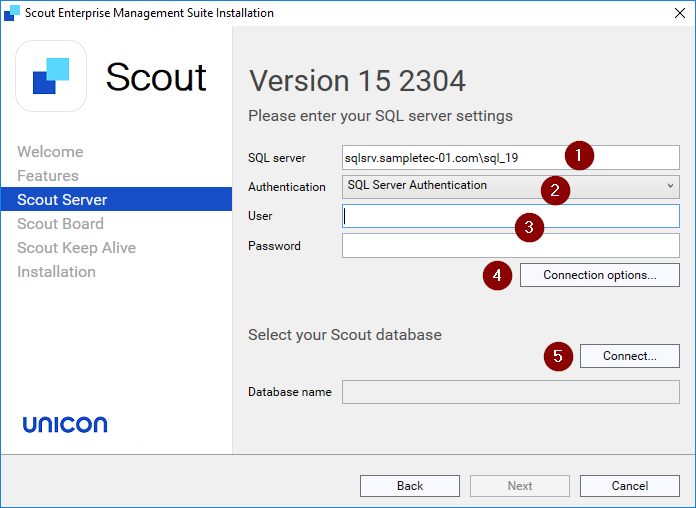
1 <SQL Server machineinstance> Example: sqlsrv.sampletec-01.comsql_192 SQL Server authenticationorWindows authenticationFor further information, see Authentication to SQL Server.3 SQL or Windows username and password for database access 4 SQL Server connection options: For AlwaysOn Cluster: Faster reconnection after fail-over, Use encrypted ODBC connection, and Trust server certificate (enabled by default) 5 Click to connect to the database server. Click Connect…, and then, from the list-field, select your Scout database.
Note:
To show the databases on the specified SQL server, the SQL Server Browser service must be active.
Next to Database name, the selected database will be shown.
Note:
If you choose “Windows Authentication” for the authentication method, all the services that need to connect to the database will be started by the given user and credentials. All other services will be started by the “Local System” user
-
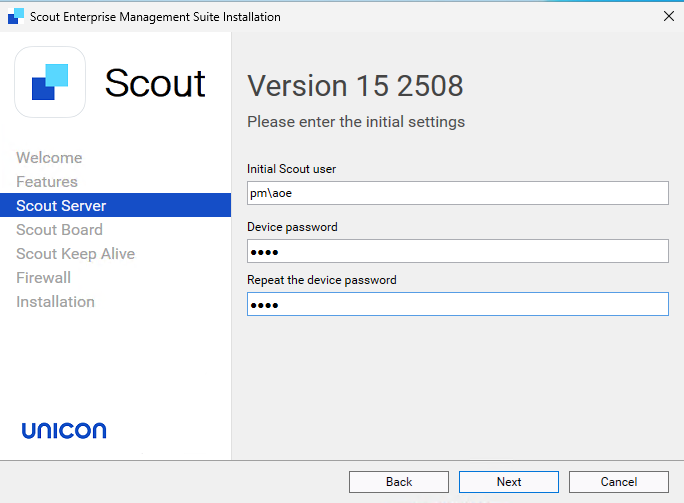
In the dialog for initial settings, provide the initial admin user and the initial device password for eLux® endpoints. The intial admin user can be used to logon to the Scout Board UI.
-
In the next dialog, edit the Scout Board options. (optional component, from Scout 15 2209)
Enter the port number for the Scout Board service, and then the computer name Installing Scout Board in the Scout Board guide.
-
In the next dialog, edit the options for the Scout Keep Alive service database. (optional component, from Scout 15 2209)
Specify the TCP port.
With HTTPS, a secure connection to the interface is used. Specify a valid SSL certificate. Alternatively, let the system create a self-signed certificate, and then continue with the Scout installer.
Note:
Click
 to update the list-field content and select the newly created certificate.
Any certificates available are shown with their assigned friendly names. If there is no friendly name or it is assigned more than once, their serial number is shown.
to update the list-field content and select the newly created certificate.
Any certificates available are shown with their assigned friendly names. If there is no friendly name or it is assigned more than once, their serial number is shown. -
In the firewall dialog, you can see all the ports that need to be activated, in order for Scout, Scout Board and Scout Services to work properly and for the communication with eLux endpoints. These firewall rules can be added automatically by the installer or you can activate them later manually.

-
In the last step, check the overview of all features to be installed.To start the installation process, click Install.
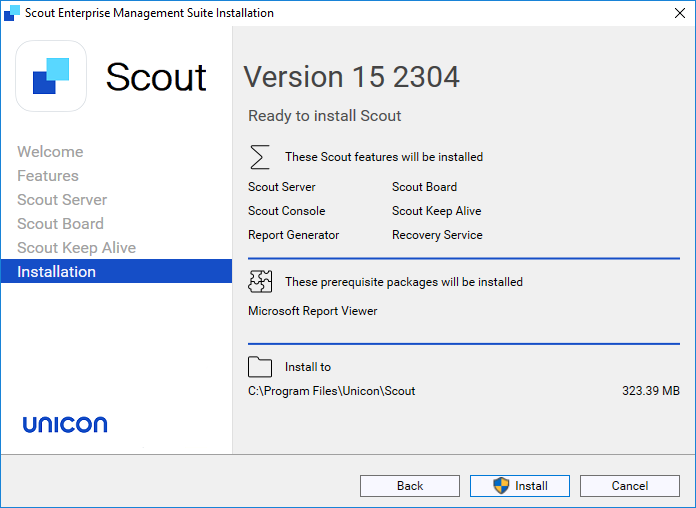
If required software components such as Visual C++ Redistributable or Microsoft Report Viewer are not yet available on the target system, they will be installed by the installer.
Once the installation is completed, you will find shortcuts for the Scout Console and Scout Board on the desktop. In the Scout group of the Windows Apps view, you will find all Scout applications including the Scout Database Connection Editor.