nFactor 拡張性
nFactor 認証フレームワークは、カスタマイズを追加できる柔軟性を提供し、ログオンインターフェイスをより直感的にし、リッチなユーザーエクスペリエンスを実現します。カスタムログインラベル、カスタムログイン認証情報、UI 表示のカスタマイズなどを追加できます。
nFactor を使用すると、各ファクターに独自のログオン画面を持つことができます。各ログオン画面には、以前の要素からの情報や、他の要素では見えない情報を表示できます。たとえば、最後の要素は、ユーザーが指示を読み、[続行] をクリックする情報ページです。
nFactor 以前は、カスタムログインページには制限があり、カスタマイズとサポートが必要でした。tmindex.html を置き換えたり、書き換えルールを適用したりして、その動作の一部を変更することができました。しかし、基盤となる機能を実現することは不可能でした。
このトピックでは、次の nFactor 関連のカスタマイズについて詳しく説明します。
- ログインラベルをカスタマイズする
- UI をカスタマイズして画像を表示する
- NetScaler nFactorログオンフォームのカスタマイズ
仮定
nFactor、シェルコマンド、XML、およびテキストエディタに精通している。
前提条件
- このトピックで説明するカスタマイズは、RFWeb UIテーマ(またはテーマベース)がNetScalerで構成されている場合にのみ可能です。
- 認証ポリシーは、認証、承認、および監査仮想サーバーにバインドする必要があります。バインドしないと、フローが意図したとおりに機能しません。
- nFactor に関連する次のアイテムがあります
- XML スキーマ
- JavaScript
- 認証アクション
- 認証仮想サーバー
- NetScaler バージョン11.1以降
ログオンラベルをカスタマイズする
ログオンラベルをカスタマイズするには、次のものが必要です。
- ログオンページの外観を記述する XML スキーマ。
- レンダリングプロセスの変更に使用される JavaScript を含む script.js ファイル。
注:
script.js ファイルはディレクトリ
/var/netscaler/logon/themes/<custom_theme>/にあります。
機能
JavaScript は XML ファイルを解析し、 <Requirements> タグ内の各項目をレンダリングします。各要素は HTML フォームの 1 行に対応します。たとえば、ログインフィールドは行、パスワードフィールドは別の行、ログオンボタンも行です。新しい行を導入するには、StoreFront SDKを使用してXMLスキーマファイルで新しい行を指定する必要があります。StoreFront SDKでは、XMLスキーマのあるログオンページで<Requirement>タグを使用し、そのタグ上の要素を定義できます。これらの要素により、JavaScript を使用して、必要な HTML 要素が何であれ、その空間に導入することができます。この場合、HTML形式のテキストを含む行が作成されます。
使用できる XML は、次のとおりです。
<Requirement>
<Credential>
<Type>nsg-custom-cred</Type>
<ID>passwd</ID>
</Credential>
<Label>
<Type>nsg-custom-label</Type>
</Label>
</Requirement>
<Requirement>: ログオンページで提供される領域。クレデンシャルはスペースを埋め、他の部分はエンジンを正しい情報にルーティングします。この場合は、nsg-custom-credと入力します。これはプレーンテキストとして定義され、ラベルはその本文に対して定義されます。
要件 XML は JavaScript コードとペアになっており、必要な結果が得られます。
// Custom Label Handler for Self Service Links
CTXS.ExtensionAPI.addCustomAuthLabelHandler({
getLabelTypeName: function () { return "nsg-custom-label"; },
getLabelTypeMarkup: function (requirements) {
return $("< Enter your HTML codes here>");
},
// Instruction to parse the label as if it was a standard type
parseAsType: function () {
return "plain";
}
});
//Custom Credential Handler for Self Service Links
CTXS.ExtensionAPI.addCustomCredentialHandler({
getCredentialTypeName: function () { return "nsg-custom-cred"; },
getCredentialTypeMarkup: function (requirements) {
return $("<div/>");
},
});
重要:
HTML コードを追加するときは、戻り値が HTML タグで始まることを確認してください。
XML の部分はログオンページに何を表示するかを示し、JavaScript コードは実際のテキストを提供します。認証情報ハンドラがスペースを開き、ラベルがスペースを埋めます。これで、すべての認証トラフィックが書き換えや応答側から見えなくなるため、ページのルックアンドフィールを変更できます。 ログインラベルをカスタマイズする設定
-
rfWeb に基づいてテーマを作成してバインドします。
add vpn portaltheme RfWebUI_MOD -basetheme RfWebUI

bind vpn vserver TESTAAA –portaltheme RfWebUI_MOD
テーマに基づいたファイルのパスは、/var/NetScaler/logon/themes/rfwebui_MOD というディレクトリにあります。
-
script.js ファイルの最後に次のスニペットを追加します。
注:
前の行を正しいファイル内に含めなかったり、JavaScript 関数を含めなかったりすると、XML がロードされません。このエラーは、ブラウザの開発者コンソールで「Undefined Type
nsg-custom-cred」というテキストでのみ表示されます 。// Custom Label Handler for Self Service Links CTXS.ExtensionAPI.addCustomAuthLabelHandler({ getLabelTypeName: function () { return "nsg-custom-label"; }, getLabelTypeMarkup: function (requirements) { return $("<a href="https://identity.test.com/identity/faces/register" style="font-size: 16px;" style="text-align: center;">Self Registration</a><br><a href="https://identity.test.com/identity/faces/forgotpassword" style="font-size: 16px;" style="text-align: center;">Forgot Password</a><br><a href="https://identity.test.com/identity/faces/forgotuserlogin" style="font-size: 16px;" style="text-align: center;">Forgot User Login</a>"); }, // Instruction to parse the label as if it was a standard type parseAsType: function () { return "plain"; } }); //Custom Credential Handler for Self Service Links CTXS.ExtensionAPI.addCustomCredentialHandler({ getCredentialTypeName: function () { return "nsg-custom-cred"; }, getCredentialTypeMarkup: function (requirements) { return $("<div/>"); }, });
重要:
HTML コードを追加するときは、戻り値が HTML タグで始まることを確認してください。
この例で使用されるログインスキーマ
<?xml version="1.0" encoding="utf-8"?>
<AuthenticateResponse xmlns="http://citrix.com/authentication/response/1">
<Status>success</Status>
<Result>more-info</Result>
<StateContext/>
<AuthenticationRequirements>
<PostBack>/nf/auth/doAuthentication.do</PostBack>
<CancelPostBack>/Citrix/Authentication/ExplicitForms/CancelAuthenticate</CancelPostBack>
<CancelButtonText>Cancel</CancelButtonText>
<Requirements>
<Requirement>
<Credential>
<ID>login</ID>
<SaveID>Username</SaveID>
<Type>username</Type>
</Credential>
<Label>
<Text>User name</Text>
<Type>plain</Type>
</Label>
<Input>
<AssistiveText>Please supply either domain\username or user@fully.qualified.domain</AssistiveText>
<Text>
<Secret>false</Secret>
<ReadOnly>false</ReadOnly>
<InitialValue></InitialValue>
<Constraint>.+</Constraint>
</Text>
</Input>
</Requirement>
<Requirement>
<Credential>
<ID>passwd</ID>
<SaveID>Password</SaveID>
<Type>password</Type>
</Credential>
<Label>
<Text>Password:</Text>
<Type>plain</Type>
</Label>
<Input>
<Text>
<Secret>true</Secret>
<ReadOnly>false</ReadOnly>
<InitialValue/>
<Constraint>.+</Constraint>
</Text>
</Input>
</Requirement>
<Requirement>
<Credential>
<Type>nsg-custom-cred</Type>
<ID>passwd</ID>
</Credential>
<Label>
<Type>nsg-custom-label</Type>
</Label>
</Requirement>
<Requirement>
<Credential>
<ID>loginBtn</ID>
<Type>none</Type>
</Credential>
<Label>
<Type>none</Type>
</Label>
<Input>
<Button>Please Log On</Button>
</Input>
</Requirement>
</Requirements>
</AuthenticationRequirements>
</AuthenticateResponse>
次のコマンドを実行して、カスタムスキーマを config に読み込みます。
add authentication loginSchema custom -authenticationSchema custom.xml

add authentication loginSchemaPolicy custom -rule true -action custom

bind authentication vserver AAATEST -policy custom -priority 100 -gotoPriorityExpression END
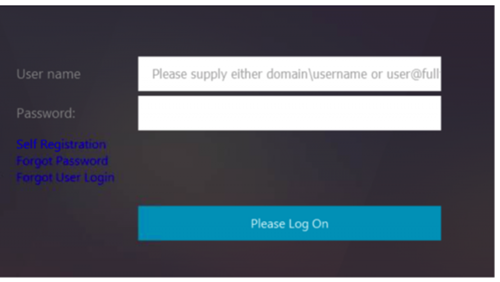
次の図は、この構成でレンダリングされるログインページを示しています。
UI をカスタマイズして画像を表示する
nFactor では、ログインスキーマファイルを使用して表示をカスタマイズできます。組み込みのログインスキーマファイルで提供されるもの以外に、さらにカスタマイズが必要な場合があります。たとえば、UI にハイパーリンクを表示したり、カスタムロジックを記述したりします。これは、ログインスキーマ拡張と対応する JavaScript ファイルで構成される「カスタム認証情報」を使用して実現できます。
ログインスキーマファイルは/nsconfig/loginschema/LoginSchemaディレクトリにあります。
画像を表示するためのUIのカスタマイズについては、「NetScaler-Swivel」統合のデプロイフローを例として使用します。
このフローには 2 つの要因があります。
- 第 1 要素:ユーザーの AD 資格情報を確認します。
- 第 2 要因:グループメンバーシップに基づいてユーザーログオンを要求します。
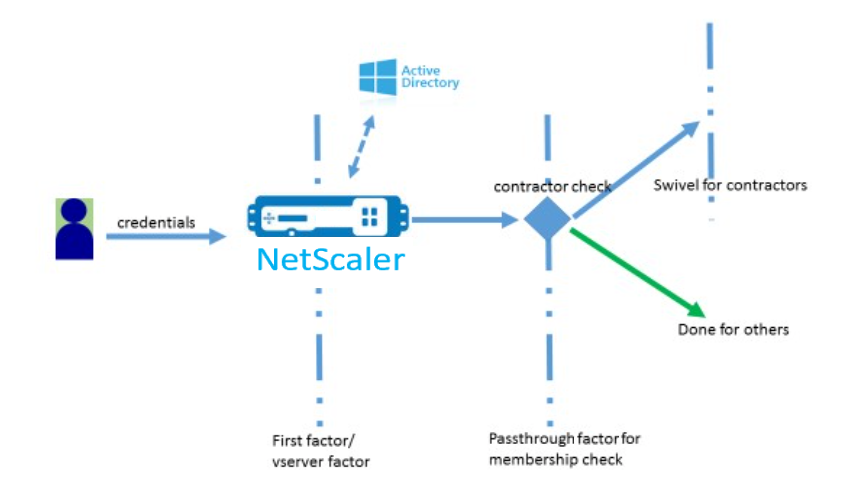
このフローでは、すべてのユーザーが第1の要素を通過します。2番目の要素の前に、一部のユーザーを「旋回」係数から除外できるかどうかを確認する疑似要素があります。ユーザーが「回転」係数を必要とする場合、コードを入力するための画像とテキストボックスが表示されます。
解決策
UI をカスタマイズして画像を表示するソリューションには、次の 2 つの部分があります。
- ログインスキーマ拡張。
- ログインスキーマ拡張を処理するカスタムスクリプト。
ログインスキーマ拡張
フォームのレンダリングを制御するために、カスタム ‘id’/’credential’ がログインスキーマに注入されます。これは、既存のスキーマを再利用し、要件に従って変更することで実現できます。
この例では、テキストフィールド (/nsconfig/loginschema/LoginSchema/OnlyPassword.xml など) が 1 つしかないログインスキーマが考慮されます。 次のスニペットがログインスキーマに追加されます。
<Requirement><Credential><ID>swivel_cred</ID><Type>swivel_cred</Type><Input><Text><Hidden>true</Hidden><InitialValue>${http.req.user.name}</InitialValue></Text></Input></Credential></Requirement>
このスニペットでは、認証情報の「タイプ」として「swivel_cred」が指定されています。これは組み込みの「認証情報」として認識されないため、UI はこのタイプのハンドラを探し、存在する場合はそれを呼び出します。 この認証情報には、NetScalerが動的に入力する式である初期値が送信されます。この例では、スイベルサーバーにユーザー名を通知するために使用されるユーザー名です。常に必要というわけではないかもしれませんし、他のデータで補強することもできます。これらの詳細は、必要に応じて追加する必要があります。
カスタム認証情報を処理する Javascript
UI はカスタム認証情報を検出すると、ハンドラーを探します。すべてのカスタム・ハンドラーは、デフォルトのポータル・テーマ用に /var/netscaler/logon/LogonPoint/custom/script.js に記述されます。
カスタムポータルテーマの場合、script.js はディレクトリ/var/netscaler/logon/themes/<custom_theme>/にあります。
カスタム認証情報のマークアップをレンダリングするために、次のスクリプトが追加されました。
CTXS.ExtensionAPI.addCustomCredentialHandler({
    // The name of the credential, must match the type returned by the server
    getCredentialTypeName: function () { return "swivel_cred"; },
    // Generate HTML for the custom credential
    getCredentialTypeMarkup: function (requirements) {
        var div = $("<div></div>");
        var image = $("<img/>");
        var username = requirements.input.text.initialValue; //Get the secret from the response
        image.attr({
            "style" : "width:200px;height:200px;",
            "id" : "qrcodeimg",
            "<Enter your server URL here>"
        });
        div.append(image);
        return div;
    }
});
このスニペットは、「wivel_cred」のマークアップを処理するためのものです。強調表示された認証情報名は、ログインスキーマ拡張で以前に指定された「タイプ」と一致する必要があります。 マークアップを生成するには、ソースがスイベルサーバーを指すイメージを追加する必要があります。これが完了すると、UI は指定した場所からイメージをロードします。このログインスキーマにもテキストボックスがあるため、UI はそのテキストボックスをレンダリングします。
注:
管理者は、イメージ要素の「スタイル」を変更して、イメージのサイズを変更できます。現在、200x200 ピクセルに設定されています。
UI をカスタマイズして画像を表示するための設定
nFactor の構成は、ボトムアップで構築する方が適切です。これは、前の因子に ‘nextFactor’ を指定しようとすると、後続の因子の名前が必要になるため、最後の因子が先になります。
旋回係数構成:
add loginschema swivel_image –authenticationSchema /nsconfig/loginschema/SwivelImage.xml

add authentication policylabel SwivelFactor –loginSchema swivel_image

bind authentication policylabel SwivelFactor –policy <policy-to-check-swivel-image> -priority 10
注:
この例で使用されているログインスキーマから SwivelImage.xml をダウンロードします。
グループチェック設定の疑似係数:
add authentication policylabel GroupCheckFactor

add authentication policy contractors_auth_policy –rule ‘http.req.user.is_member_of(“contractors”)’ –action NO_AUTHN

add authentication policy not_contractors _auth_policy–rule true –action NO_AUTHN

bind authentication policylabel GroupCheckFactor –policy contractors_auth_policy –pri 10 –nextFactor SwivelFactor

bind authentication policylabel GroupCheckFactor –policy not_contractors_auth_policy –pri 20
Active Directory ログインの第 1 要因:
add ldapAction <>

add authentication policy user_login_auth_policy –rule true –action <>

bind authentication vserver <> -policy user_login_auth_policy –pri 10 –nextFactor GroupCheckFactor
この構成では、暗黙的/疑似的要素の 3 つの要素が指定されています。
この例で使用されるログインスキーマ
次に、スイベル認証情報とテキストボックスを持つスキーマの例を示します。
注:
Web ブラウザ用にデータをコピーする場合、引用符の表示が異なる場合があります。ファイルに保存する前に、メモ帳などのエディターでデータをコピーします。
<?xml version="1.0" encoding="UTF-8"?>
<AuthenticateResponse xmlns="http://citrix.com/authentication/response/1">
<Status>success</Status>
<Result>more-info</Result>
<StateContext></StateContext>
<AuthenticationRequirements>
<PostBack>/nf/auth/doAuthentication.do</PostBack>
<CancelPostBack>/nf/auth/doLogoff.do</CancelPostBack>
<CancelButtonText>Cancel</CancelButtonText>
<Requirements>
<Requirement><Credential><ID>swivel_cred</ID><Type>swivel_cred</Type><Input><Text><Hidden>true</Hidden><InitialValue>${http.req.user.name}</InitialValue></Text></Input></Credential></Requirement>
<Requirement><Credential><ID>passwd</ID><SaveID>ExplicitForms-Password</SaveID><Type>password</Type></Credential><Label><Text>Password:</Text><Type>plain</Type></Label><Input><Text><Secret>true</Secret><ReadOnly>false</ReadOnly><InitialValue></InitialValue><Constraint>.+</Constraint></Text></Input></Requirement>
<Requirement><Credential><Type>none</Type></Credential><Label><Text>Hello ${http.req.user.name}, Please enter passcode from above image.</Text><Type>confirmation</Type></Label><Input /></Requirement>
<Requirement><Credential><ID>saveCredentials</ID><Type>savecredentials</Type></Credential><Label><Text>Remember my password</Text><Type>plain</Type></Label><Input><CheckBox><InitialValue>false</InitialValue></CheckBox></Input></Requirement>
<Requirement><Credential><ID>loginBtn</ID><Type>none</Type></Credential><Label><Type>none</Type></Label><Input><Button>Log On</Button></Input></Requirement>
</Requirements>
</AuthenticationRequirements>
</AuthenticateResponse>
出力
設定が完了すると、次のイメージが表示されます。
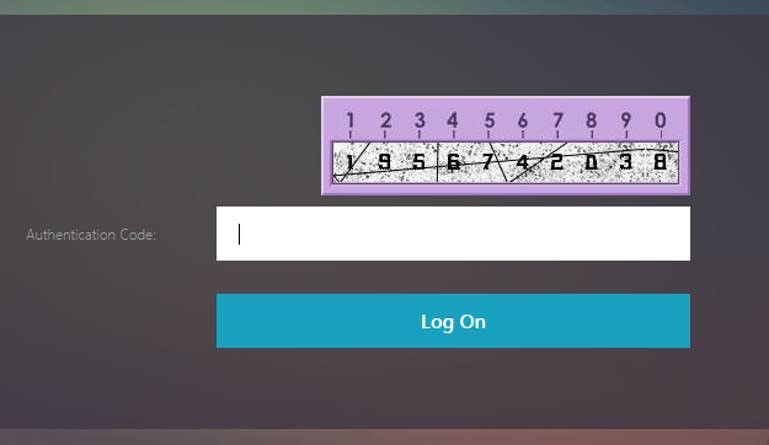
注:
画像の高さと配置は JavaScript で変更できます。
NetScaler nFactorログオンフォームをカスタマイズしてフィールドを表示または非表示にする
NetScaler GatewayのRFWeb UIでは、さまざまなカスタマイズが可能です。この機能を nFactor 認証フレームワークと組み合わせると、既存のワークフローを損なうことなく複雑なフローを構成できます。
この例では、[Logon Type] リストから OAuth と LDAP の 2 つの認証オプションを使用できます。フォームを初めて読み込むと、ユーザー名とパスワードのフィールド (LDAP が先に表示されます) が表示されます。OAuth を選択した場合、OAuth は認証をサードパーティサーバーにオフロードすることを暗示するため、すべてのフィールドが非表示になります。これにより、管理者はユーザーの利便性に応じて直感的なワークフローを構成できます。
注:
- [Logon Type] リストの値は、スクリプトファイルに簡単に変更を加えるだけで変更できます。
- このセクションでは、フローの UI 部分のみについて説明します。認証の実行時の処理については、この記事では説明しません。認証設定については、nFactor のドキュメントを参照することをお勧めします。
nFactor ログオンフォームをカスタマイズする方法
nFactor ログオンフォームのカスタマイズは 2 つの部分に分類できます
- 適切なログインスキーマを UI に送信する
- ログインスキーマとユーザー選択を解釈するハンドラーの作成
正しいログインスキーマを UI に送信する
この例では、単純なクレーム/要件がログインスキーマで送信されます。
このため、SingleAuth.xml ファイルは変更されます。SingleAuth.xml にはNetScalerファームウェアが付属しており、ディレクトリにあります。 /nsconfig/loginschema/LoginSchema
ログインスキーマを送信する手順:
-
SSH 経由でログインし、シェルにドロップします (「shell」と入力します)。
-
SingleAuth.xml を別のファイルにコピーして変更します。
注:
保存先フォルダーは、デフォルトのNetScalerログインスキーマフォルダーとは異なります。
cp /nsconfig/loginschema/LoginSchema/SingleAuth.xml /nsconfig/loginschema/SingleAuthDynamic.xml
-
SingleAuthDynamic.xml に次のクレームを追加します。
<Requirement><Credential><ID>nsg_dropdown</ID><Type>nsg_dropdown</Type></Credential><Label><Text>Logon Type:</Text><Type>plain</Type></Label></Requirement> -
このログインスキーマを送信して最初のフォームをロードするようにNetScalerを構成します。
add loginschema single_auth_dynamic –authenticationSchema SingleAuthDynamic.xml

add loginschemaPolicy single_auth_dynamic –rule true –action single_auth_dynamic

bind authentication vserver aaa_nfactor –policy single_auth_dynamic –pri 10
フォームを読み込み、ユーザーイベントを処理するためのスクリプト変更
管理者がログオンフォームの表示をカスタマイズできるように JavaScript を変更できます。この例では、LDAP が選択されている場合はユーザー名とパスワードのフィールドが表示され、OAuth を選択すると非表示になります。また、管理者はパスワードのみを非表示にすることもできます。
管理者は、「/var/NetScaler/ログオン/ログオンポイント/カスタム」ディレクトリにある「script.js」に次のスニペットを追加する必要があります。
注:
このディレクトリはグローバルディレクトリなので、ポータル・テーマを作成し、
"/var/netscaler/logon/themes/<THEME_NAME>"でそのフォルダー内の「script.js」ファイルを編集します。
CTXS.ExtensionAPI.addCustomCredentialHandler({
    // The name of the credential, must match the type returned by the server
    getCredentialTypeName: function () { return "nsg_dropdown"; },
    // Generate HTML for the custom credential
    getCredentialTypeMarkup: function (requirements) {
        var div = $("<div></div>");
        var select = $("<select name='nsg_dropdown'></select>").attr("id", "nsg_dropdown");

        var rsa = $("<option></option>").attr("selected", "selected").text("LDAP").val("LDAP");
        var OAuthID = $("<option></option>").text("OAuth").val("OAuth");
        select.append(rsa, OAuthID);

        select.change(function(e) {
            var value = $(this).val();
            var ldapPwd = $($(".credentialform").find(".CredentialTypepassword")[0]);
            var ldapUname = $($(".credentialform").find(".CredentialTypeusername"));
            if(value == "OAuth") {
                if (ldapPwd.length)
                        ldapPwd.hide();
                if (ldapUname.length)
                        ldapUname.hide();
            } else if(value == "LDAP") {
                if (ldapPwd.length)
                        ldapPwd.show();
                if (ldapUname.length)
                        ldapUname.show();
            }
        });
       div.append(select);
        return div;
    }
});
エンドユーザーエクスペリエンス
エンドユーザーが初めてログオンページを読み込むと、次の画面が表示されます。
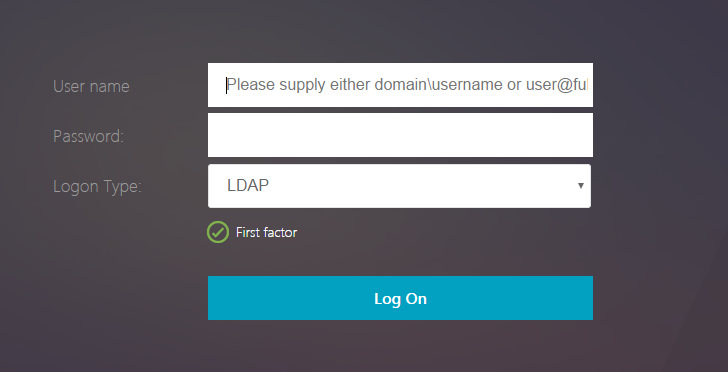
[ ログオンの種類 ]で[ OAuth]が選択されている場合、[ユーザー名]および[パスワード]フィールドは非表示になります。
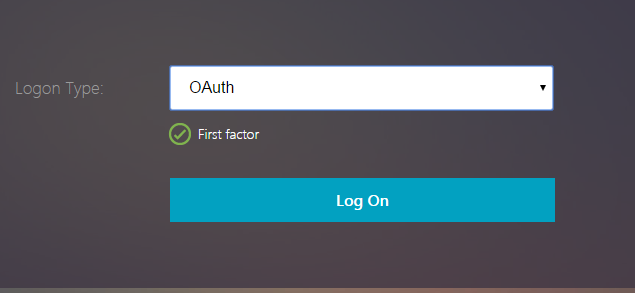
LDAP を選択すると、ユーザー名とパスワードが表示されます。これにより、ユーザーの選択に基づいてログオンページを動的に読み込むことができます。
この例で使用されるログインスキーマ
<?xml version="1.0" encoding="UTF-8"?>
<AuthenticateResponse xmlns="http://citrix.com/authentication/response/1">
<Status>success</Status>
<Result>more-info</Result>
<StateContext></StateContext>
<AuthenticationRequirements>
<PostBack>/nf/auth/doAuthentication.do</PostBack>
<CancelPostBack>/nf/auth/doLogoff.do</CancelPostBack>
<CancelButtonText>Cancel</CancelButtonText>
<Requirements>
<Requirement><Credential><ID>login</ID><SaveID>ExplicitForms-Username</SaveID><Type>username</Type></Credential><Label><Text>User name</Text><Type>plain</Type></Label><Input><AssistiveText>Please supply either domain\username or user@fully.qualified.domain</AssistiveText><Text><Secret>false</Secret><ReadOnly>false</ReadOnly><InitialValue></InitialValue><Constraint>.+</Constraint></Text></Input></Requirement>
<Requirement><Credential><ID>passwd</ID><SaveID>ExplicitForms-Password</SaveID><Type>password</Type></Credential><Label><Text>Password:</Text><Type>plain</Type></Label><Input><Text><Secret>true</Secret><ReadOnly>false</ReadOnly><InitialValue></InitialValue><Constraint>.+</Constraint></Text></Input></Requirement>
<Requirement><Credential><ID>nsg_dropdown</ID><Type>nsg_dropdown</Type></Credential><Label><Text>Logon Type:</Text><Type>plain</Type></Label></Requirement>
<Requirement><Credential><Type>none</Type></Credential><Label><Text>First factor</Text><Type>confirmation</Type></Label><Input /></Requirement>
<Requirement><Credential><ID>saveCredentials</ID><Type>savecredentials</Type></Credential><Label><Text>Remember my password</Text><Type>plain</Type></Label><Input><CheckBox><InitialValue>false</InitialValue></CheckBox></Input></Requirement>
<Requirement><Credential><ID>loginBtn</ID><Type>none</Type></Credential><Label><Type>none</Type></Label><Input><Button>Log On</Button></Input></Requirement>
</Requirements>
</AuthenticationRequirements>
</AuthenticateResponse>
注:
nFactor 関連のさまざまなトピックの詳細については、「 nFactor 認証」を参照してください。