-
-
-
Installing Splunk Universal Forwarder
-
-
-
-
This content has been machine translated dynamically.
Dieser Inhalt ist eine maschinelle Übersetzung, die dynamisch erstellt wurde. (Haftungsausschluss)
Cet article a été traduit automatiquement de manière dynamique. (Clause de non responsabilité)
Este artículo lo ha traducido una máquina de forma dinámica. (Aviso legal)
此内容已经过机器动态翻译。 放弃
このコンテンツは動的に機械翻訳されています。免責事項
이 콘텐츠는 동적으로 기계 번역되었습니다. 책임 부인
Este texto foi traduzido automaticamente. (Aviso legal)
Questo contenuto è stato tradotto dinamicamente con traduzione automatica.(Esclusione di responsabilità))
This article has been machine translated.
Dieser Artikel wurde maschinell übersetzt. (Haftungsausschluss)
Ce article a été traduit automatiquement. (Clause de non responsabilité)
Este artículo ha sido traducido automáticamente. (Aviso legal)
この記事は機械翻訳されています.免責事項
이 기사는 기계 번역되었습니다.책임 부인
Este artigo foi traduzido automaticamente.(Aviso legal)
这篇文章已经过机器翻译.放弃
Questo articolo è stato tradotto automaticamente.(Esclusione di responsabilità))
Translation failed!
Installing Splunk Universal Forwarder
If you have chosen an architecture option where uberAgent interacts with Splunk through Splunk’s Universal Forwarder you need to install Universal Forwarder on every machine along with uberAgent.
The following description shows you how to install and configure Universal Forwarder for uberAgent. In this example, the Splunk server’s FQDN is srv1.hk.test.
Installation
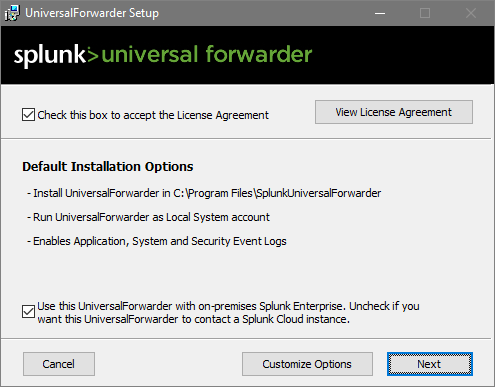
Launch the Universal Forwarder MSI file. Accept the license agreement and click Next.

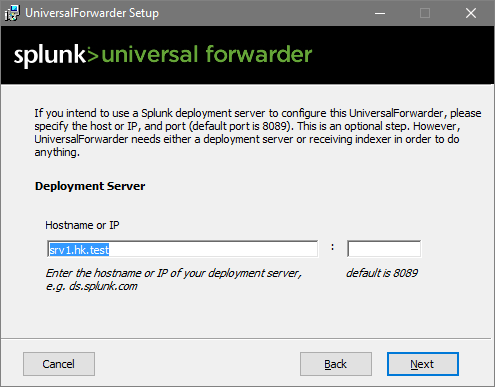
Deployment Server
If you have Splunk Enterprise, you can use Splunk’s Deployment Server functionality to deploy apps. In that case, specify the Splunk server name. You can leave the port empty to use the default. If you have Splunk Free leave both fields empty.

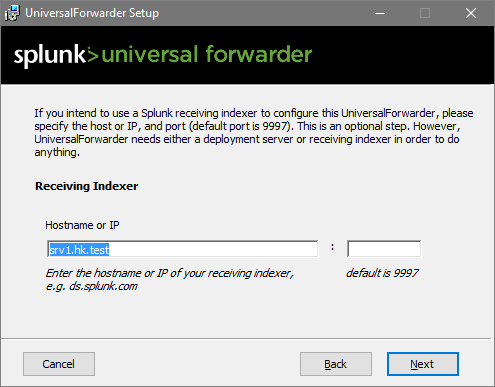
Indexer
Specify the name of your Splunk Indexer. In this simple walkthrough, our Splunk server also acts as an indexer. Again, the port is left at the default value:

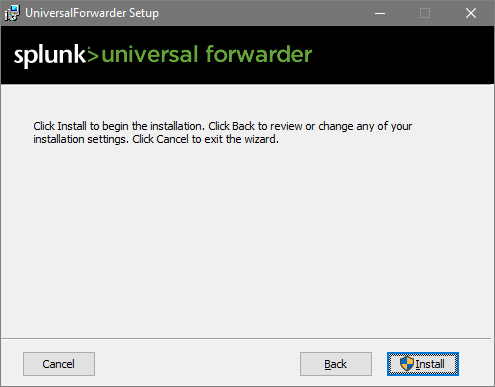
Finished
That’s all!

Configuration
Receive uberAgent® Data via TCP Port
If you want Universal Forwarder to handle all Splunk communications, you need to configure uberAgent to pass its output to Universal Forwarder on the same machine. To do that, open a TCP port uberAgent can send data to by adding the following to $SPLUNK_HOME\etc\system\local\inputs.conf on your Universal Forwarders:
[tcp://127.0.0.1:19500]
connection_host = none
sourcetype = dummy
listenOnIPv6 = no
acceptFrom = 127.0.0.1
<!--NeedCopy-->
Note: $SPLUNK_HOME refers to the base directory of the Splunk (Forwarder) installation, typically C:\Program Files\SplunkUniversalForwarder.
If you are deploying the uberAgent_endpoint app, port 19500 is opened for you automatically (details).
Disable Universal Forwarder Eventlog Data Collection
A default installation of Universal Forwarder sends all data from the Windows Application, Security, and System event logs to Splunk. If you do not need that, edit $SPLUNK_HOME\etc\apps\Splunk_TA_windows\local\inputs.conf so that all stanzas are disabled as in the following example:
[WinEventLog://Application]
disabled = 1

[WinEventLog://Security]
disabled = 1

[WinEventLog://System]
disabled = 1
<!--NeedCopy-->
Unattended (Silent) Installation
You can find all the information required for automating the deployment of Universal Forwarder here.
Preparation for Imaging/Citrix PVS
If you intend to copy the installation via an imaging method or Citrix PVS, you need to remove instance-specific information such as server name and GUID from the Universal Forwarder installation. To do that, follow these steps right before capturing the image:
- Stop the service
SplunkForwarder(but leave the start type atautomatic). - Open an administrative command prompt.
- Run the command:
C:\Program Files\SplunkUniversalForwarder\bin\splunk clone-prep-clear-config. - Prepare the machine for cloning as necessary, but do not reboot.
Share
Share
This Preview product documentation is Citrix Confidential.
You agree to hold this documentation confidential pursuant to the terms of your Citrix Beta/Tech Preview Agreement.
The development, release and timing of any features or functionality described in the Preview documentation remains at our sole discretion and are subject to change without notice or consultation.
The documentation is for informational purposes only and is not a commitment, promise or legal obligation to deliver any material, code or functionality and should not be relied upon in making Citrix product purchase decisions.
If you do not agree, select I DO NOT AGREE to exit.