This content has been machine translated dynamically.
Dieser Inhalt ist eine maschinelle Übersetzung, die dynamisch erstellt wurde. (Haftungsausschluss)
Cet article a été traduit automatiquement de manière dynamique. (Clause de non responsabilité)
Este artículo lo ha traducido una máquina de forma dinámica. (Aviso legal)
此内容已经过机器动态翻译。 放弃
このコンテンツは動的に機械翻訳されています。免責事項
이 콘텐츠는 동적으로 기계 번역되었습니다. 책임 부인
Este texto foi traduzido automaticamente. (Aviso legal)
Questo contenuto è stato tradotto dinamicamente con traduzione automatica.(Esclusione di responsabilità))
This article has been machine translated.
Dieser Artikel wurde maschinell übersetzt. (Haftungsausschluss)
Ce article a été traduit automatiquement. (Clause de non responsabilité)
Este artículo ha sido traducido automáticamente. (Aviso legal)
この記事は機械翻訳されています.免責事項
이 기사는 기계 번역되었습니다.책임 부인
Este artigo foi traduzido automaticamente.(Aviso legal)
这篇文章已经过机器翻译.放弃
Questo articolo è stato tradotto automaticamente.(Esclusione di responsabilità))
Translation failed!
连接电缆
将设备稳固地安装在机架上之后,就可以开始连接电缆了。首先连接以太网电缆和可选的控制台电缆。最后连接电源线。
危险:安装或修复设备之前,请摘下可能会与电源或电线接触的所有珠宝首饰及其他金属物品。同时触摸带电电源或电线以及地面时,金属物品会迅速升温,这可能会导致烧伤、衣服着火或将金属物品熔接在暴露的接线端上。
将设备连接到网络
可以使用以太网电缆将设备连接到网络。所需的电缆类型取决于用于连接到网络的端口类型。在 10/100/1000BASE-T 端口上使用带标准 RJ-45 连接器的 5e 类或 6 类以太网电缆。
将以太网电缆连接到 10/100/1000BASE-T 端口
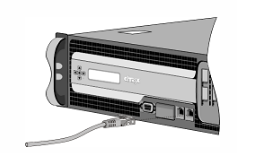
- 将以太网电缆一端的 RJ-45 连接器插入设备前面板上的相应端口中,如下图所示。
- 将另一端的 RJ-45 连接器插入到目标设备中,例如路由器或交换机。
- 确认连接建立后 LED 发出琥珀色光。
图 1. 插入以太网电缆
连接控制台电缆
可以使用控制台电缆将设备连接到可用于配置该设备的计算机或终端。连接控制台电缆之前,请配置该计算机或终端,使其支持 VT100 终端仿真、9600 波特、8 数据位、1 停止位、奇偶校验以及设置为“NONE”(无)的流控制。然后将控制台电缆的一端连接到设备上的 RS232 串行端口,将另一端连接到计算机或终端。
将控制台电缆连接到计算机或终端
- 将电缆末端的 DB-9 连接器插入设备前面板上的控制台端口,如下图所示。
- 将电缆另一端的 RJ-45 连接器插入到计算机或终端的串行端口中。
图 2. 插入控制台电缆

注意
要使用带有 RJ-45 转换器的电缆,请将提供的转换器选件插入到控制台端口中,并连接电缆。
将设备连接到电源
SD-WAN 4000/5000 设备有两个电源,其中一个用作备用。无需使用单独的地线,因为三脚插头可提供接地功能。通过安装一条或两条电源线来启动设备电源。
将设备连接到电源
- 将电源线的一端连接到设备背面板上的电源插口(电源旁边),如下图所示。
- 将电源线的另一端连接到标准 110V/220V 电源插座。
- 重复步骤 1 和 2 以连接第二个电源。
注意
如果一个电源出现故障或只将一根电源线连接到设备,设备将发出高音警报。要静音闹钟,您可以按下设备背面版上的红色小按钮。
This Preview product documentation is Cloud Software Group Confidential.
You agree to hold this documentation confidential pursuant to the terms of your Cloud Software Group Beta/Tech Preview Agreement.
The development, release and timing of any features or functionality described in the Preview documentation remains at our sole discretion and are subject to change without notice or consultation.
The documentation is for informational purposes only and is not a commitment, promise or legal obligation to deliver any material, code or functionality and should not be relied upon in making Cloud Software Group product purchase decisions.
If you do not agree, select I DO NOT AGREE to exit.