导入 Citrix Gateway
Citrix Gateway 管理控制台中配置的远程访问设置必须与 StoreFront 中配置的远程访问设置相同。本文介绍如何导入 Citrix Gateway 虚拟服务器的详细信息,以便正确配置 Citrix Gateway 和 StoreFront 使其能够配合使用。
要求
- 要将多个网关虚拟服务器导出为 ZIP 文件,需要 NetScaler 11.1.51.21 或更高版本。
注意:
Citrix ADC 设备只能导出使用 Citrix Virtual Apps and Desktops 向导创建的网关虚拟服务器。
- DNS 必须能够解析且 StoreFront 必须能够联系 Citrix ADC 设备生成的 ZIP 文件中的 GatewayConfig.json 文件中的所有 STA (Secure Ticket Authority) 服务器 URL。
- Citrix ADC 设备生成的 ZIP 文件中的 GatewayConfig.json 文件必须包含 StoreFront 服务器上的现有 Citrix Receiver for Web 站点的 URL。Citrix ADC 11.1 及更高版本会在生成要导出的 ZIP 文件之前通过联系 StoreFront 服务器并枚举所有现有应用商店和 Citrix Receiver for Web 站点处理好这一点。
-
StoreFront 必须能够将 DNS 中的回调 URL 解析为网关 VPN 虚拟服务器 IP 地址,以便使用导入网关进行的身份验证能够成功。
您使用的回调 URL 和端口组合通常与网关 URL 和端口组合相同,只要 StoreFront 可以解决此 URL。
或
如果您在您的环境中使用不同的外部和内部 DNS 命名空间,回调 URL 和端口组合可能与网关 URL 和端口组合不同。如果您的网关位于 DMZ 中并使用
<example.com>URL,而 StoreFront 位于您的企业专用网络中并使用<example.local>URL,则您可以使用<example.local>回调 URL 指回 DMZ 中网关虚拟服务器。
从 Citrix Gateway 导出配置
-
登录 Citrix ADC。
-
转到“配置”选项卡
-
在“与 Citrix 产品集成”下,单击“XenApp 和 XenDesktop”
-
在右上角,单击“下载文件”。
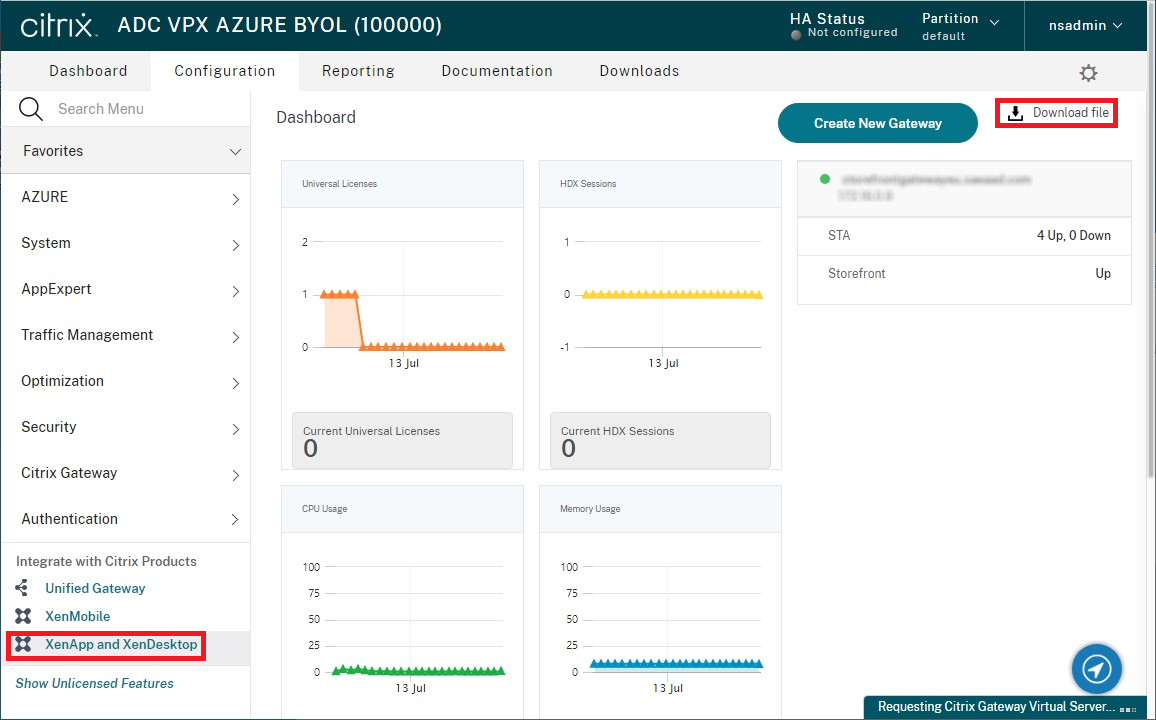
- 选择是要下载所有网关的配置,还是要下载特定网关的配置。
使用控制台导入 Citrix Gateway
可以使用相同的导入文件导入一个或多个 Citrix Gateway 虚拟服务器配置。如果您有来自不同 Citrix ADC 设备的多个网关虚拟服务器,则必须使用多个导入文件。
重要提示:
Citrix 不支持手动编辑从 Citrix Gateway 导出的配置文件。
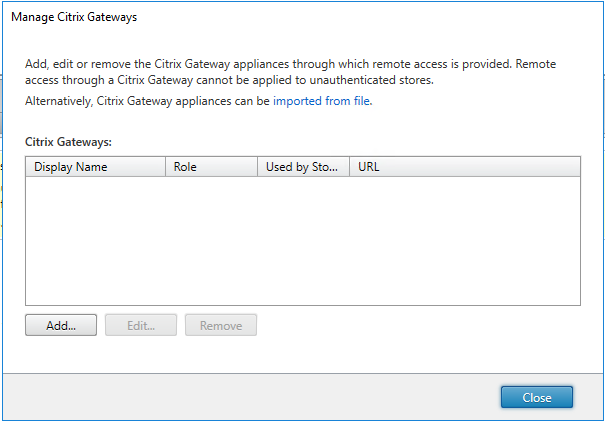
- 在 Citrix StoreFront 管理控制台的左侧窗格中选择应用商店,然后在操作窗格中单击管理 Citrix Gateway。
-
在“管理 Citrix Gateway”屏幕中,单击从文件中导入链接。
-
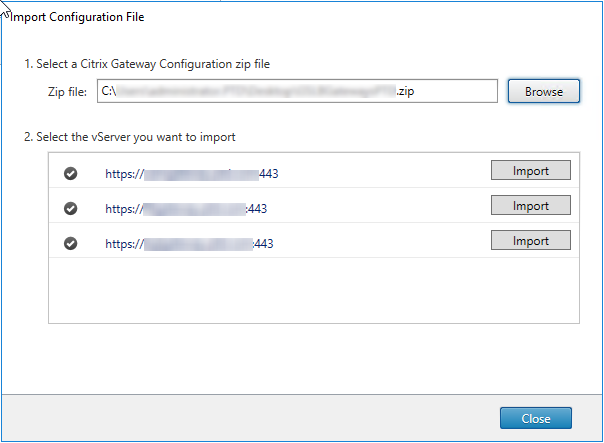
浏览到 Citrix Gateway 虚拟服务器配置文件。
-
将显示所选 ZIP 文件中的网关虚拟服务器列表。请选择您要导入的网关虚拟虚拟服务器并单击导入。如果重复导入某个虚拟服务器,则“导入”按钮将显示为“更新”。如果选择更新,您以后可以选择覆盖网关或创建新网关。
-
查看所选网关的登录类型,如果需要,请指定一个回调 URL。登录类型是在 Citrix Gateway 设备上为 Citrix Workspace 应用程序用户配置的身份验证方法。某些登录类型需要回调 URL(参见表格)。
- 单击验证检查回调 URL 是否有效且是否可从 StoreFront 服务器访问。

控制台中的登录类型 JSON 文件中的 LogonType 需要回调 URL 域 域 否 域和安全令牌 DomainAndRSA 否 安全令牌 RSA 是 智能卡 - 不回退 智能卡 是 智能卡 - 域 SmartCardDomain 是 智能卡 - 域和安全令牌 SmartCardDomainAndRSA 是 智能卡 - 安全令牌 SmartCardRSA 是 智能卡 - SMS 身份验证 SmartCardSMS 是 SMS 身份验证 SMS 是 如果需要回调 URL,StoreFront 将基于在 ZIP 文件中找到的网关 URL 自动填充“回调 URL” 。可以将此更改为指回正确的 Citrix Gateway VIP 的任何有效的 URL。 对于 GSLB 网关,您导入的每个网关都需要唯一的回调 URL。
要使用智能访问或无密码身份验证,需要回调 URL。
-
单击下一步。
-
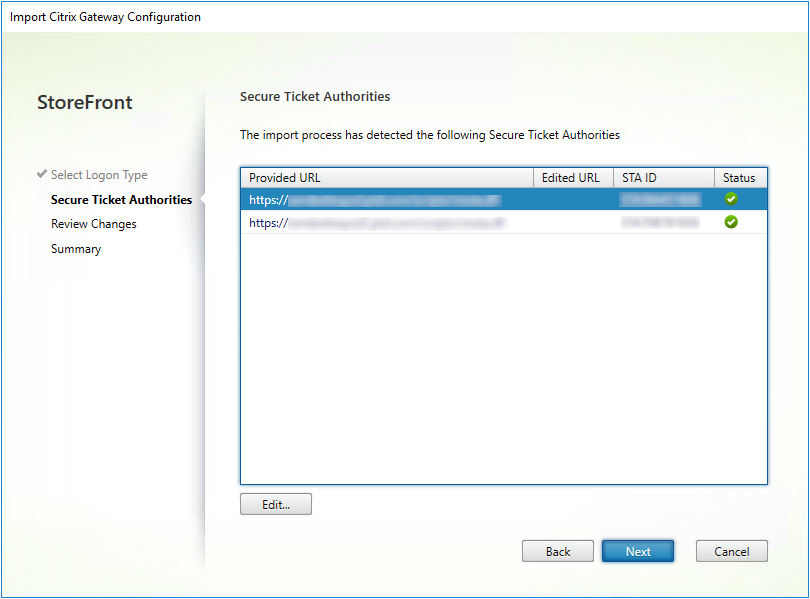
StoreFront 使用 DNS 联系 ZIP 文件中列出的所有 STA (Secure Ticket Authority) 服务器 URL,并验证它们是否是正常运行的 STA 票据记录服务器。如果一个或多个 STA URL 无效,导入将不会继续。
-
单击下一步。
-
查看导入的详细信息。如果已存在具有相同网关 URL 和端口组合(网关 URL:端口)的网关 ,请使用下拉框来选择一个网关将其覆盖,或创建一个新网关。
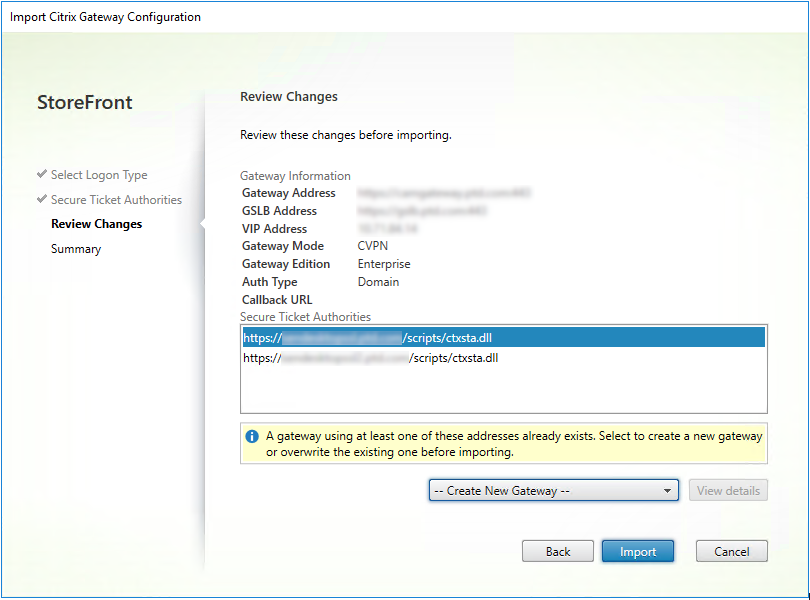
StoreFront 使用“网关 URL:端口”组合来确定您尝试导入的网关是否匹配您可能希望更新的现有网关。如果某个网关具有不同的“网关 URL:端口”组合,StoreFront 会将其视为新网关。此网关设置表显示了可以更新哪些设置。
网关设置 可以更新 网关 URL:端口组合 否 GSLB URL 是 NetScaler 信任证书和指纹 是 回调 URL 是 Receiver for Web 站点 URL 是 网关地址/VIP 是 STA URL 和 STA ID 是 所有登录类型 是 -
单击导入。如果 StoreFront 服务器属于某个服务器组,则会显示一条消息,提醒您将导入的网关设置传播到组中其他服务器。
- 单击完成。
要导入另一个虚拟服务器配置,请重复上面的步骤。
注意:
应用商店的默认网关是 Citrix Workspace 应用程序尝试通过其连接的网关,除非将其配置为使用不同的网关。如果没有为应用商店配置网关,则从 ZIP 文件导入的第一个网关将成为 Citrix Workspace 使用的默认网关。导入后续网关不会更改已为应用商店设置的默认网关。
使用 PowerShell 导入多个 Citrix Gateway
Read-STFNetScalerConfiguration
- 将 ZIP 文件复制到当前登录的 StoreFront 管理员的桌面。
- 将 Citrix Gateway 虚拟服务器配置文件 ZIP 文件的内容读入内存,并使用三个网关的索引值查看该包中所含的这些网关。
$ImportedGateways = Read-STFNetScalerConfiguration -path "$env:USERPROFILE\desktop\GatewayConfig.zip"
<!--NeedCopy-->
使用 Read-STFNetScalerConfiguration cmdlet 查看内存中从 NetScaler ZIP 导入包读入的三个网关对象。
$ImportedGateways.Document.Gateways[0]
$ImportedGateways.Document.Gateways[1]
$ImportedGateways.Document.Gateways[2]

GatewayMode            : CVPN
CallbackUrl            :
GslbAddressUri         : https://gslb.example.com/
AddressUri             : https://emeagateway.example.com/
Address                : https://emeagateway.example.com:443
GslbAddress            : https://gslb.example.com:443
VipAddress             : 10.0.0.1
Stas                   : {STA298854503, STA909374257}
StaLoadBalance         : True
CertificateThumbprints : {F549AFAA29EBF61E8709F2316B3981AD503AF387}
GatewayAuthType        : Domain
GatewayEdition         : Enterprise
ReceiverForWebSites    : {Citrix.StoreFront.Model.Roaming.NetScalerConfiguration.ReceiverForWebSite}

GatewayMode            : CVPN
CallbackUrl            :
GslbAddressUri         : https://gslb.example.com/
AddressUri             : https://emeagateway.example.com/
Address                : https://emeagateway.example.com:444
GslbAddress            : https://gslb.example.com:443
VipAddress             : 10.0.0.2
Stas                   : {STA298854503, STA909374257}
StaLoadBalance         : True
CertificateThumbprints : {F549AFAA29EBF61E8709F2316B3981AD503AF387}
GatewayAuthType        : DomainAndRSA
GatewayEdition         : Enterprise
ReceiverForWebSites    : {Citrix.StoreFront.Model.Roaming.NetScalerConfiguration.ReceiverForWebSite}

GatewayMode            : CVPN
CallbackUrl            : https://emeagateway.example.com:445
GslbAddressUri         : https://gslb.example.com/
AddressUri             : https://emeagateway.example.com/
Address                : https://emeagateway.example.com:445
GslbAddress            : https://gslb.example.com:443
VipAddress             : 10.0.0.2
Stas                   : {STA298854503, STA909374257}
StaLoadBalance         : True
CertificateThumbprints : {F549AFAA29EBF61E8709F2316B3981AD503AF387}
GatewayAuthType        :SmartCard
GatewayEdition         : Enterprise
ReceiverForWebSites    : {Citrix.StoreFront.Model.Roaming.NetScalerConfiguration.ReceiverForWebSite}
<!--NeedCopy-->
未指定 CallbackURL 的 Import-STFNetScalerConfiguration
将 ZIP 文件复制到当前登录的 StoreFront 管理员的桌面。 将 Citrix Gateway 配置 ZIP 导入包的内容读入内存,并使用三个网关的索引值查看该包中所含的这些网关。
$ImportedGateways = Read-STFNetScalerConfiguration -path "$env:USERPROFILE\desktop\GatewayConfig.zip"
<!--NeedCopy-->
使用 Import-STFNetScalerConfiguration cmdlet 并指定所需的网关索引将三个新网关导入 StoreFront。 使用 -Confirm:$False 参数可防止 Powershell GUI 提示您允许导入每个网关。 如果您要谨慎地一次导入一个网关,请删除此项。
Import-STFNetScalerConfiguration -Configuration $ImportedGateways -GatewayIndex 0 -Confirm:$False
Import-STFNetScalerConfiguration -Configuration $ImportedGateways -GatewayIndex 1 -Confirm:$False
Import-STFNetScalerConfiguration -Configuration $ImportedGateways -GatewayIndex 2 -Confirm:$False
<!--NeedCopy-->
指定您自己的 CallbackURL 的 Import-STFNetScalerConfiguration
使用 Import-STFNetScalerConfiguration cmdlet 将三个新网关导入 StoreFront,并使用 -callbackURL 参数指定所选项的回调 URL。
$ImportedGateways = Read-STFNetScalerConfiguration -path "$env:USERPROFILE\desktop\GatewayConfig.zip"

Import-STFNetScalerConfiguration -Configuration $ImportedGateways -GatewayIndex 0 -CallbackUrl "https://emeagatewaycb.example.com:443 -Confirm:$False

Import-STFNetScalerConfiguration -Configuration $ImportedGateways -GatewayIndex 1 -CallbackUrl "https://emeagatewaycb.example.com:444 -Confirm:$False

Import-STFNetScalerConfiguration -Configuration $ImportedGateways -GatewayIndex 2 -CallbackUrl "https://emeagatewaycb.example.com:445 -Confirm:$False
<!--NeedCopy-->
Import-STFNetScalerConfiguration 覆盖导入文件中存储的身份验证方法,并指定您自己的 CallbackURL
使用 Import-STFNetScalerConfiguration cmdlet 将三个新网关导入 StoreFront,并使用 -callbackURL 参数指定所选项的回调 URL。
$ImportedGateways = Read-STFNetScalerConfiguration -path "$env:USERPROFILE\desktop\GatewayConfig.zip"

Import-STFNetScalerConfiguration -Configuration $ImportedGateways -GatewayIndex 0 -LogonType "SmartCard" -CallbackUrl "https://emeagatewaycb.example.com:443" -Confirm:$False

Import-STFNetScalerConfiguration -Configuration $ImportedGateways -GatewayIndex 1 -LogonType "SmartCard" -CallbackUrl "https://emeagatewaycb.example.com:444" -Confirm:$False

Import-STFNetScalerConfiguration -Configuration $ImportedGateways -GatewayIndex 2 -LogonType "SmartCard" -CallbackUrl "https://emeagatewaycb.example.com:445" -Confirm:$False
<!--NeedCopy-->