Session experience
Application launch time
Use the session prelaunch feature to reduce application launch time during normal or high traffic periods, thus providing users with a better experience. The prelaunch feature allows you to create a prelaunch session. Prelaunch session is created when a user logs on to Citrix Workspace app, or at a scheduled time if the user has signed in.
The prelaunch session reduces the launch time of the first application. When the user adds a new account connection to Citrix Workspace app for Windows, session prelaunch doesn’t take effect until the next session. The default application ctxprelaunch.exe is running in the session, but it is not visible to you.
For more information, see session prelaunch and session linger guidance in the Citrix Virtual Apps and Desktops article titled Manage delivery groups.
Session prelaunch is disabled by default. To enable session prelaunch, specify the ENABLEPRELAUNCH=true parameter on the Workspace command line or set the EnablePreLaunch registry key to true. The default setting, null, means that prelaunch is disabled.
Note:
If the client machine has been configured to support Domain Passthrough (SSON) authentication, prelaunch is automatically enabled. If you want to use Domain Pass-through (SSON) without prelaunch, set the EnablePreLaunch registry key value to false.
The registry locations are:
-
HKEY_LOCAL_MACHINE\Software\[Wow6432Node\]Citrix\\Dazzle -
HKEY_CURRENT_USER\Software\Citrix\Dazzle
There are two types of prelaunch:
- Just-in-time prelaunch- prelaunch starts immediately after the user’s credentials are authenticated whether it is a high-traffic period. Typically used for normal traffic periods. A user can trigger just-in-time prelaunch by restarting the Citrix Workspace app.
- Scheduled prelaunch- prelaunch starts at a scheduled time. Scheduled prelaunch starts only when the user device is already running and authenticated. If those two conditions are not met when the scheduled prelaunch time arrives, a session does not launch. To share network and server load, the session launches within a window when it is scheduled. For example, if the scheduled prelaunch is scheduled for 13:45, the session actually launches between 13:15 and 13:45. Typically used for high-traffic periods.
Configuring prelaunch on a Citrix Virtual Apps™ server consists of:
- creating, modifying, or deleting prelaunch applications, and
- updating user policy settings that control the prelaunch application.
You cannot customize the prelaunch feature using the receiver.admx file. However, you can change the prelaunch configuration by modifying registry values. Registry values can be modified during or after Citrix Workspace app for Windows installation.
- The HKEY_LOCAL_MACHINE values are written during client installation.
- The HKEY_CURRENT_USER values enable you to provide different users on the same machine with different settings. Users can change the HKEY_CURRENT_USER values without administrative permission. You can provide your users with scripts to change the values.
HKEY_LOCAL_MACHINE registry values:
For 64-bit Windows operating systems: HKEY_LOCAL_MACHINE\SOFTWARE\Wow6432Node\Citrix\ICA Client\Prelaunch
For 32-bit Windows operating systems: HKEY_LOCAL_MACHINE\SOFTWARE\Citrix\ICA Client\Prelaunch
Name: UserOverride Type: REG_SZ
Values:
0 - Use the HKEY_LOCAL_MACHINE values even if HKEY_CURRENT_USER values are also present.
1 - Use the HKEY_CURRENT_USER values if they exist; otherwise, use the HKEY_LOCAL_MACHINE values.
Name: State Type: REG_SZ
Values:
0 - Disable prelaunch.
1 - Enable just-in-time prelaunch. (Prelaunch starts after the user’s credentials are authenticated.)
2 - Enable scheduled prelaunch. (Prelaunch starts at the time configured for Schedule.)
Name: Schedule Type: REG_SZ
Value:
The time (24-hour format) and days of a week for the scheduled prelaunch entered in the following format:
| HH:MM | M:T:W:TH:F:S:SU where HH and MM are hours and minutes. M:T:W:TH:F:S:SU is the days of the week. For example, to enable scheduled prelaunch on Monday, Wednesday, and Friday at 13:45, set Schedule as Schedule=13:45 | 1:0:1:0:1:0:0. The session actually launches between 13:15 and 13:45. |
HKEY_CURRENT_USER registry values:
HKEY_CURRENT_USER\SOFTWARE\Citrix\ICA Client\Prelaunch
The State and Schedule keys have the same values as for HKEY_LOCAL_MACHINE.
Desktop Viewer
Different enterprises might have different corporate needs. Your requirements for the way users access virtual desktops might vary from user to user and as your corporate needs evolve. The user experience of connecting to virtual desktops and the extent at which the user can configure the connections depend Citrix Workspace app for Windows setup.
Use the desktop viewer when users need to interact with their virtual desktop. The user’s virtual desktop can be a published virtual desktop, or a shared or dedicated desktop. In this access scenario, the Desktop Viewer toolbar functionality allows the user to open a virtual desktop in a window and pan and scale that desktop inside their local desktop. Users can set preferences and work on more than one desktop using multiple Citrix Virtual Apps and Desktops™ and Citrix DaaS connections on the same user device.
Note:
Use Citrix Workspace app to change the screen resolution on their virtual desktops. You can’t change Screen Resolution using the Windows Control Panel.
Keyboard input in Desktop Viewer
In Desktop Viewer sessions, the Windows logo key+L is directed to the local computer.
Ctrl+Alt+Delete opens the security options screen, allowing you to lock the computer, sign out, switch users, or access Task Manager, just like on a local desktop.
Key presses that activate certain Microsoft accessibility features, for example, Sticky Keys, Filter Keys, and Toggle Keys are normally directed to the local computer.
You can access the Desktop Viewer toolbar’s accessibility feature by pressing Ctrl+Alt+Break. Starting with version 2503, in the enhanced Desktop Viewer toolbar, when you press Ctrl+Alt+Break, the toolbar notch is highlighted. Click Enter to open the toolbar options, then use the Tab key to move forward between toolbar buttons and Shift+Tab key to move backward between toolbar buttons. In the old Desktop Viewer toolbar, pressing Ctrl+Alt+Break displays the Desktop Viewer toolbar buttons in a pop-up window.
Ctrl+Esc opens the Start menu on the remote virtual desktop when you are in Fullscreen mode, just as it does on a local Windows computer. This allows you to access the Start menu within your virtual session.
Note:
By default, if the Desktop Viewer is maximized, Alt+Tab switches focus between windows inside the session. If the Desktop Viewer is displayed in a window, Alt+Tab switches focus between windows outside the session.
Hotkey sequences are key combinations designed by Citrix. Hotkey sequences are, for example, the Ctrl+F1 sequence reproduces Ctrl+Alt+Delete, and Shift+F2 switches applications between full-screen and windowed mode.
Note:
You can’t use hotkey sequences with virtual desktops displayed in the Desktop Viewer, that is, with virtual apps and desktops sessions. However, you can use them with published applications, that is, with virtual apps sessions.
Prevent the desktop viewer window from dimming
If you have multiple Desktop Viewer windows, by default the desktops that are not active are dimmed. If users want to view multiple desktops simultaneously, information on them might be unreadable. You can disable the default behavior and prevent the Desktop Viewer window from dimming by editing the Registry editor.
Caution
Editing the registry incorrectly can cause serious problems that might require you to reinstall your Operating system. Citrix cannot guarantee that problems resulting from the incorrect use of the Registry Editor can be solved. Use the Registry Editor at your own risk. Be sure to back up the registry before you edit it
-
On the user device, create a REG_DWORD entry called DisableDimming in one of the following keys, depending on whether you want to prevent dimming for the current user of the device or the device itself. An entry exists if the Desktop Viewer has been used on the device:
HKEY_CURRENT_USER\Software\Citrix\XenDesktop\DesktopViewerHKEY_LOCAL_MACHINE\Software\Citrix\XenDesktop\DesktopViewer
Optionally, instead of controlling dimming, you can define a local policy by creating the same REG_WORD entry in one of the following keys:
HKEY_CURRENT_USER\Software\Policies\Citrix\XenDesktop\DesktopViewerHKEY_LOCAL_MACHINE\Software\Policies\Citrix\XenDesktop\DesktopViewer
Before using these keys, check whether the Citrix Virtual Apps and Desktops and Citrix DaaS™ administrator has set a policy for this feature.
Set the entry to any non-zero value such as 1 or true.
If no entries are specified or the entry is set to 0, the Desktop Viewer window is dimmed. If multiple entries are specified, the following precedence is used. The first entry in this list and its value determine whether the window is dimmed:
- HKEY_CURRENT_USER\Software\Policies\Citrix\…
- HKEY_LOCAL_MACHINE\Software\Policies\Citrix\…
- HKEY_CURRENT_USER\Software\Citrix\…
- HKEY_LOCAL_MACHINE\Software\Citrix\…
Enhanced Desktop Viewer toolbar
Starting with the 2503 version, Citrix Workspace™ app for Windows provides an enhanced Desktop Viewer toolbar.

The enhanced Desktop Viewer toolbar provides the following options:
- Show or hide toolbar: Click this button to show or hide the Desktop Viewer toolbar.
- Switch desktop: Click this button to see the available open desktops. You can switch to another desktop by clicking the desktop that you want to access. The opened desktop shows in the front.
- Ctrl+Alt+Del: Click this button to bring up the task manager on your virtual desktop.
-
Shortcuts: Click this button to see the available shortcuts. The following are the available shortcuts:
- Start menu: Click to access the start menu on the virtual desktop.
- Switch app: Click this button to see the available open apps. You can switch to another app by clicking the app that you want to access.
- Devices: Click this button to access the devices you have connected.
- Preferences: Click this button to access the options in the Preferences section and edit your preferences.
- Connection: Click this button to analyze the connection strength with real-time stats of your connection.
- Multi-monitor: Click this button to navigate to the different options of extending your session across multiple monitors.
-
Minimize: Click the Minimize button to minimize the current virtual desktop session that you are using.
Note:
In the old Desktop Viewer toolbar, the Home option minimized all virtual desktop sessions on the same monitor.
- Fullscreen or Restore: Click the Fullscreen button to expand the desktop session to full screen.Click the Restore button to restore to the window mode. In the old Desktop Viewer toolbar, the corresponding option for Fullscreen or Restore is labeled Fullscreen or Window.
- Disconnect / Sign out: Click this button to sign out or to disconnect from a virtual session.
You can drag the toolbar across the screen and snap it to any edge of the screen. It supports both vertical and horizontal layouts.
Limitation
If you are using Windows Server OS 2019, the new Desktop Viewer toolbar is disabled due to an issue with installing WindowsAppSDK version 1.6.5. For more information, see the Microsoft documentation. As a result, the legacy Desktop Viewer is enabled by default. Admins or users can enable the sideloading policy and install the WindowsAppSDK. After that, enable the new Desktop Viewer toolbar through the registry by setting the REG_DWORD entry called WindowsAppSdkInstalled to 1 at HKEY_LOCAL_MACHINE\Software\Citrix\XenDesktop\DesktopViewer.
Status indicator time-out
You can change the amount of time the status indicator displays when a user is launching a session.
To alter the time-out period, do the following steps:
- Launch the Registry Editor.
- Navigate to the following path:
- On a 64-bit:
HKEY_LOCAL_MACHINE\SOFTWARE\Wow6432Node\Citrix\ICA CLIENT\Engine - On a 32-bit:
HKEY_LOCAL_MACHINE\SOFTWARE\Citrix\ICA CLIENT\Engine\
- On a 64-bit:
- Create a registry key as follows:
- Type: REG_DWORD
- Name:
SI INACTIVE MS - Value: 4, if you want the status indicator to disappear sooner.
When you configure this key, the status indicator might appear and disappear frequently. This behavior is as designed. To suppress the status indicator, do the following:
- Launch the Registry Editor.
- Navigate to the following path:
- On a 64-bit:
HKEY_LOCAL_MACHINE\SOFTWARE\Wow6432Node\Citrix\ICA CLIENT\ - On a 32-bit:
HKEY_LOCAL_MACHINE\SOFTWARE\Citrix\ICA CLIENT\
- On a 64-bit:
-
Create a registry key as follows:
- Type: REG_DWORD
- Name:
NotificationDelay - Value: Any value in millisecond (for example, 120000)
Customization of Desktop Viewer toolbar
Starting with Citrix Workspace app for Windows 2409 version, you can customize the options on the Desktop Viewer toolbar using the Global App Configuration service, Group Policy Editor, or any third-party Endpoint Management software capable of pushing Windows registry keys.
Using GACS
To configure the customization of the Desktop Viewer toolbar through the GACS Admin UI, do the following:
-
Sign in to citrix.cloud.com with your credentials.
Note:
Refer to the Sign Up for Citrix Cloud article for step-by-step instructions to create a Citrix Cloud account.
-
Upon authentication, click the menu button in the top left corner and select Workspace Configuration. The Workspace Configuration screen appears.
-
Click App Configuration > Citrix Workspace app.
-
Select the Windows checkbox.
-
You can now update the settings under Session Experience > Toolbar.

For more information, see the Global App Configuration service documentation.
Using Group Policy Editor
To customize the options on the Desktop Viewer toolbar, do the following:
- Open the Citrix Workspace app GPO administrative template by running
gpedit.msc. -
Under the Computer Configuration node, go to Administrative Templates > Citrix Workspace > Client Engine and select Desktop Viewer Toolbar Options.

- Select the Enabled checkbox.
- Select the required checkboxes from the Options section.
- Click OK.
Connection Strength Indicator on Desktop Viewer toolbar
Starting with version 2409, Citrix Workspace app for Windows now supports the Connection Strength Indicator (CSI) on the Desktop Viewer toolbar. This feature displays a network strength icon that alerts you of network issues. You can click the indicator to view real-time connection statistics for the client and VDA, and copy diagnostic information to share with IT for advanced troubleshooting.
Benefits:
- Immediate feedback: The network strength icon gently nudges users when network issues are detected.
- Enhanced troubleshooting: Real-time stats and diagnostics help users and IT teams quickly identify and resolve connectivity issues.
Prerequisites:
- This feature is only available when a session opened using:
- VDA 2407 or later
- VDA 2402 LTSR CU1 or later
- The Supportability Virtual Channel must be enabled.
This feature is enabled by default. When you open the session, you can see the Connection Details icon on the Desktop Viewer toolbar.
The connection strength indicator on the Desktop Viewer toolbar provides users with immediate feedback on their network connectivity and offers detailed real-time stats for enhanced troubleshooting. This feature aims to improve user experience and reduce the time spent on resolving connectivity issues.
Enhancement to connection strength indicator on Desktop Viewer toolbar:
Starting with version 2503, the Connection Strength Indicator on the Desktop Viewer toolbar is enhanced with the following features:
- Enhanced user experience: Provides a more intuitive and user-friendly interface.
- New stats including Wi-Fi strength: Displays real-time Wi-Fi strength for better connectivity insights.
- Additional details about your device: Includes information such as CPU, memory, and disk utilization.
- Proactive notifications with options to snooze: Alerts users when connection strength drops, with the ability to snooze notifications.
- Recommendations to resolve issues: Offers actionable suggestions to improve connection strength when it drops below good.
- Historic view of the connection strength: The logs downloaded from the CSI provides a 5 minute history of the end user’s connection strengths.

When clicked on Connection details, you can view the following image:

Disable connection strength indicator:
To disable connection strength indicator feature, do the following:
- Open the Citrix Workspace app Group Policy Object administrative template by running
gpedit.msc. - Under the Computer Configuration node, go to Administrative Templates > Citrix Components > Citrix Workspace > Client Engine.
-
Select the Desktop Viewer Toolbar Options policy.
- Select Disabled to disable the Desktop Viewer Toolbar options.
- Select Connection Strength Indicator from the Options section to display the Connection Strength Indicator on the Desktop Viewer toolbar.
Enhanced virtual desktop screen resizing experience
Starting with the 2409 version, Citrix Workspace app for Windows ensures a smooth transition and prevents dark screens and flickers when resizing or stretching your virtual desktop screen. This feature is enabled by default.
Quick access to resources
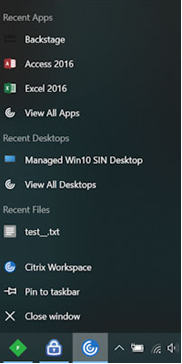
Starting from the 2205 release, you can get quick access to your recently used apps and desktops. Right-click on the Citrix Workspace app icon in the taskbar to view and open the recently used resources from the pop-up menu.
Support to open Citrix Workspace app in maximized mode
Starting from the 2205 release, you can choose to open the Citrix Workspace app in maximized mode. Instead of maximizing the Citrix Workspace app manually every time, you can set the maximise workspace window property in the Global App Configuration Service to enable the Citrix Workspace app to open in the maximized mode by default.
For more information about the Global App Configuration Service, see Getting Started.
Improved reconnection experience after connection lease file expiry
Previously, there was no notification to the end user when the connection lease file and authentication token expired.
Starting from the 2212 release, you are prompted with an error message and a consent dialog box. The consent dialog box appears only when you have resources running in the session. If there are no resources running, only an error dialog box appears. You are signed out without being prompted with the consent dialog box.
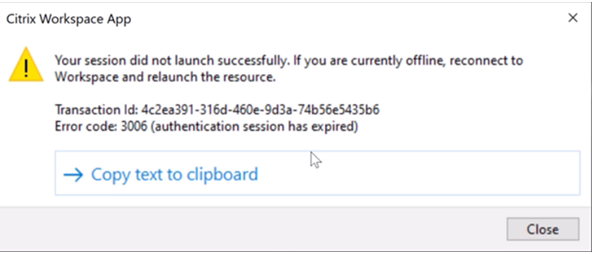
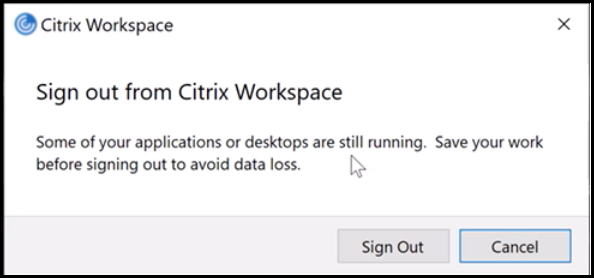
You can click Sign Out to sign out from the current Citrix Workspace app session or click Cancel to continue with the session.
Note:
Save your data before clicking Sign Out.
Disabling the “Exiting Full Screen Mode” tip prompt
Starting with Citrix Workspace app for Windows 2409, you can suppress the “Exiting Full Screen Mode” tip prompt that appears during HDX sessions using the Registry Editor.
You can do it using the Registry Editor.
You can navigate to the following registry entry as an administrator and set the value as suggested:
-
Path:
- On 32‑bit systems:
HKEY_LOCAL_MACHINE\Software\Citrix\Ica Client\Keyboard Mapping\Tips - On 64‑bit systems:
HKEY_LOCAL_MACHINE\Software\WOW6432Node\Citrix\Ica Client\Keyboard\Tips - On end user systems:
HKEY_CURRENT_USER\Software\Citrix\Ica Client\Keyboard Mapping\Tips
- On 32‑bit systems:
- Name:
In full screen mode - Type:
DWORD -
Value: Other than 0

Note:
If the
In full screen modekey value data is0or not configured, the tip is displayed.
You can also select the checkbox in the following prompt, which in turn updates the In full screen mode value to a value other than zero.

Improved virtual apps and desktops reconnection experience
Citrix Workspace 2302 release provides an enhanced user experience while reconnecting to virtual apps and desktops from which you got disconnected.
When Citrix Workspace app attempts to refresh the disconnected Citrix Workspace app or start new virtual apps or desktops as a part of the Workspace Control feature, the following prompt appears:
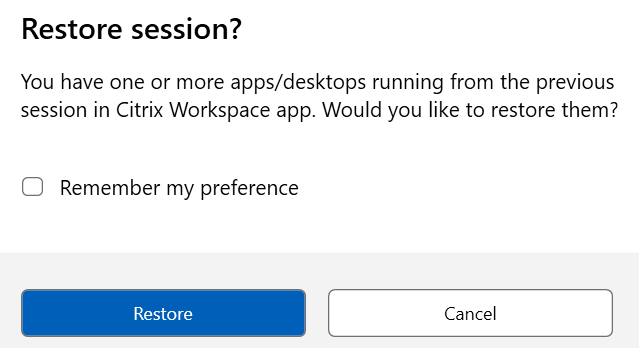
Click Restore to reconnect to open new and disconnected virtual apps and desktops. If you want to start only newly selected apps and desktops, click Cancel.
You can also select Remember my preference to apply the selected preference for the next login. To reset your selected preferences, you must reset Citrix Workspace app.
The preceding new Restore session? prompt appears only if:
- the user tries to start an app belonging to a workspace store,
- admin policies or app config settings are not configured for the Workspace Control feature,
- Workspace Control Reconnect options are set to default on the client.
Note:
Reconnect settings in the Reconnect Options takes precedence over the preferences set in the dialog box. For more information, see Configure reconnect options using Advanced Preferences dialog.
Sustainability initiative from Citrix Workspace app
Note:
- This feature is available for native launches (cloud and on-premises) from the Citrix Workspace app 2309 version onwards.
- It is available for hybrid launches on cloud from the Citrix Workspace app 2403 version onwards.
- Starting from the Citrix Workspace app 2409 version onwards, the same keyword is used for both hybrid and native launches.
- Starting from the Citrix Workspace app 2409 version onwards, the
LogoffOnCloseandPromptMessagekeywords are no longer supported.
When this feature is enabled, a prompt is displayed to sign out from the desktop session when a user closes a virtual desktop. This feature might help conserve energy if there are Windows OS policies that are used to shut down VMs when no users are logged in.
To enable this feature, do the following:
- Navigate to Citrix Studio.
- Click Delivery Groups from the left navigation pane.
- Select the required VDA from the Delivery Group section.
- Click the Edit icon. The Edit Delivery Group page appears.
- Click Desktops from the left navigation pane.
- Select the required VDA where you must add the keywords.
- Click Edit. The Edit Desktop page appears.
- Set the
ICA-LogOffOnClosekeyword totruein the Description field. -
Click OK. The following dialog box appears when you close the virtual desktop.

Customizing the text in the Save Energy screen
You can also customize the text in the Save energy screen.
- Follow steps 1–8 in the preceding section.
- Set the
ICA-PromptMessagekeyword to the required text in the Description field. - Set the
ICA-Titlekeyword to the required text in the Description field. -
Set the
ICA-Iconkeyword totrueorfalse.Note:
The maximum number of characters allowed in the
ICA-PromptMessagekeyword is 200, and in theICA-Titlekeyword is 30.Example:
KEYWORDS:ICA-LogOffOnClose=true ICA-PromptMessage="Do you want to sign out from the session?" ICA-Title="Sign out or disconnect" ICA-Icon=true
<!--NeedCopy-->
The keywords are assigned by default for new desktop machines assigned to the group. For existing desktop machines, you must run the following PowerShell commands for changes to apply:
$dg = Get-BrokerDesktopGroup -Name '<group name>' -Property 'Name','Uid'

$apr = @( Get-BrokerAssignmentPolicyRule -DesktopGroupUid $dg.Uid -Property 'Description' )

Get-BrokerMachine -DesktopGroupUid $dg.Uid -IsAssigned $true | Set-BrokerMachine -Description $apr[0].Description
<!--NeedCopy-->
With this PowerShell script, it’s possible to have multiple assignment policy rules for a single Delivery Group. Using Citrix Studio also, you can configure multiple Assignment policy rules, each with a unique description value, and a possible set of different keywords.
-
Click OK. The following dialog box appears when you close the virtual desktop.

When ICA-Icon=false

Manage workspace control reconnect
Workspace control lets applications follow users as they move between devices. For example, workspace control enables clinicians in hospitals to move from workstation to workstation without having to restart their applications on each device. For Citrix Workspace app, you manage workspace control on client devices using the Global App Config Service, Group Policy or modifying the registry.
Caution:
Editing the registry incorrectly can cause serious problems that might require you to reinstall your operating system. Citrix can’t guarantee that problems resulting from the incorrect use of the Registry Editor can be solved. Use the Registry Editor at your own risk. Be sure to back up the registry before you edit it.
Create WSCReconnectModeUser and modify the existing registry key WSCReconnectMode in the Master Desktop Image or in the Citrix Virtual Apps server. The published desktop can change the behavior of the Citrix Workspace app.
WSCReconnectMode key settings for Citrix Workspace app:
- 0 = do not reconnect to any existing sessions
- 1 = reconnect on application launch
- 2 = reconnect on application refresh
- 3 = reconnect on application launch or refresh
- 4 = reconnect when Citrix Workspace interface opens
- 8 = reconnect on Windows sign-on
- 11 = combination of both 3 and 8
Disable workspace control
To disable workspace control, create the following key:
HKEY_LOCAL_MACHINE\SOFTWARE\Wow6432Node\Citrix\Dazzle (64-bit)
HKEY_LOCAL_MACHINE\SOFTWARE\Citrix\\Dazzle (32-bit)
Name: WSCReconnectModeUser
Type: REG_SZ
Value data: 0
Modify the following key from the default value of 3 to zero
HKEY_LOCAL_MACHINE\SOFTWARE\Wow6432Node\Citrix\Dazzle (64-bit)
HKEY_LOCAL_MACHINE\SOFTWARE\Citrix\Dazzle (32-bit)
Name: WSCReconnectMode
Type: REG_SZ
Value data: 0
Note:
You can also set the WSCReconnectAll key to false if you don’t want to create a key.
Registry keys for 32-bit machines
Registry key: WSCSupported
Value: True
Key path:
-  HKEY_CURRENT_USER\Software\Citrix\Dazzle
-  HKEY_CURRENT_USER\Software\Citrix\Receiver\SR\Store" + primaryStoreID +\Properties
-  HKEY_LOCAL_MACHINE\Software\Policies\Citrix\Dazzle
-  HKEY_LOCAL_MACHINE\Software\Citrix\Dazzle
Registry key: WSCReconnectAll
Value: True
Key path:
- `HKEY_CURRENT_USER\Software\Citrix\Dazzle`
- `HKEY_CURRENT_USER\Software\Citrix\Receiver\SR\Store" + primaryStoreID + \Properties`
- `HKEY_LOCAL_MACHINE\Software\Policies\Citrix\Dazzle`
- `HKEY_LOCAL_MACHINe\Software\Citrix\Dazzle`
Registry key: WSCReconnectMode
Value: 3
Key path:
-  HKEY_CURRENT_USER\Software\Citrix\Dazzle
-  HKEY_CURRENT_USER\Software\Citrix\Receiver\SR\Store" + primaryStoreID +\Properties
-  HKEY_LOCAL_MACHINE\Software\Policies\Citrix\Dazzle
-  HKEY_LOCAL_MACHINE\Software\Citrix\Dazzle
Registry key: WSCReconnectModeUser
Value: The registry isn’t created during installation.
Key path:
- HKEY_CURRENT_USER\Software\Citrix\Dazzle
- HKEY_CURRENT_USER\Software\Citrix\Receiver\SR\Store" + primaryStoreID+\Properties
- HKEY_LOCAL_MACHINE\Software\Policies\Citrix\Dazzle
- HKEY_LOCAL_MACHINE\Software\Citrix\Dazzle
Registry keys for 64-bit machines
Registry key: WSCSupported
Value: True
Key path:
- HKEY_CURRENT_USER\Software\Citrix\Dazzle
- HKEY_CURRENT_USER\Software\Citrix\Receiver\SR\Store" + primaryStoreID +\Properties
- HKEY_LOCAL_MACHINE\Software\Wow6432Node\Policies\Citrix\Dazzle
- HKEY_LOCAL_MACHINE\Software\Wow6432Node\Citrix\Dazzle
Registry key: WSCReconnectAll
Value: True
Key path:
-  HKEY_CURRENT_USER\Software\Citrix\Dazzle
-  HKEY_CURRENT_USER\Software\Citrix\Receiver\SR\Store" + primaryStoreID + \Properties
-  HKEY_LOCAL_MACHINE\Software\Wow6432Node\Policies\Citrix\Dazzle
-  HKEY_LOCAL_MACHINE\Software\Wow6432Node\Citrix\Dazzle
Registry key: WSCReconnectMode
Value: 3
Key path:
-  HKEY_CURRENT_USER\Software\Citrix\Dazzle
-  HKEY_CURRENT_USER\Software\Citrix\Receiver\SR\Store" + primaryStoreID +\Properties
-  HKEY_LOCAL_MACHINE\Software\Wow6432Node\Policies\Citrix\Dazzle
-  HKEY_LOCAL_MACHINE\Software\Wow6432Node\Citrix\Dazzle
Registry key: WSCReconnectModeUser
Value: The registry isn’t created during installation.
Key path:
- HKEY_CURRENT_USER\Software\Citrix\Dazzle
- HKEY_CURRENT_USER\Software\Citrix\Receiver\SR\Store" + primaryStoreID+\Properties
- HKEY_LOCAL_MACHINE\Software\Wow6432Node\Policies\Citrix\Dazzle
- HKEY_LOCAL_MACHINE\Software\Wow6432Node\Citrix\Dazzle
Persistent session in Citrix Workspace app
Starting with the 2503 version, if you enable the Persistent session feature, Citrix Workspace app automatically detects session termination and relaunches the application or desktop without any user intervention when the application or desktop session logs out or disconnects.
This feature ensures uninterrupted application or desktop availability, improving user experience and productivity.
Note:
This feature is supported only on the native Citrix Workspace app.
Persistent ICA Session is not supported for Workstation VDA incase of session roaming.
Administrators can enable this feature through a Group Policy Object (GPO) policy. The policy allows admins to configure a specific application or desktop as a persistent resource and define the number of retries if there is a resource launch failure:
- Default retries: 5
- Retry range: 0–10
Enabling persistent session feature using GPO:
- Open the Citrix Workspace app Group Policy Object administrative template by running gpedit.msc and navigate to the Computer Configuration node.
- Go to Administrative Templates > Citrix Components > Citrix Workspace.
-
Select the Persistent ICA policy.

- Enter the published resource name in the Configured AppName field.
- Enter the Max Launch Retries from the drop-down list.
- Select the Enabled checkbox.
- Click OK and then click Apply.
- Restart Citrix Workspace app for the changes to take effect.
When the Persistent ICA policy is enabled, administrators must disable Citrix Workspace reconnect to existing sessions. Administrators can disable Workspace Control using either the UI or Registry Editor.
To disable Workspace Control by using the UI:
- Go to Advanced Preferences > Shortcut and Reconnect > Reconnect Options.
-
Clear the Enable for Workspace Control Support check box.

To disable Workspace Control by using Registry Editor:
- Open Registry Editor.
- Navigate to one of the following locations:
- 64-bit systems:
Computer\HKEY_LOCAL_MACHINE\SOFTWARE\WOW6432Node\Citrix\Dazzle - 32-bit systems:
HKEY_LOCAL_MACHINE\SOFTWARE\Citrix\Dazzle
- 64-bit systems:
- Create a registry entry with the following values:
- Type:
REG_SZ - Name:
WSCSupported - Value:
False
- Type:
Hybrid launch support using GACS for on-premises stores
Starting with version 2503, Citrix Workspace app for Windows supports management using Global App Configuration Service (GACS) in hybrid launch for on-premises stores. In a hybrid launch scenario, users access Citrix resources through a web browser. When an application or desktop is selected, Citrix StoreFront™ generates an ICA file with the necessary launch instructions. The locally installed Citrix Workspace app then reads the ICA file, and establishes a secure connection to the remote application or desktop.
Key behavior:
- When a user launches a session, in-session settings apply from the next launch.
- If a store is added in the app and later accessed using a browser, settings are retrieved from the client app.
- Only the most recently accessed store applies its settings to the native app.
For example:
If a user first launches a session from one store, the app fetches and applies its GACS policies. Later, if the user switches to another store and launches a session, the app updates and applies the new store’s GACS policies. For more information, see GACS supports hybrid launch.
In this article
- Application launch time
- Desktop Viewer
- Status indicator time-out
- Customization of Desktop Viewer toolbar
- Connection Strength Indicator on Desktop Viewer toolbar
- Enhanced virtual desktop screen resizing experience
- Quick access to resources
- Support to open Citrix Workspace app in maximized mode
- Improved reconnection experience after connection lease file expiry
- Disabling the “Exiting Full Screen Mode” tip prompt
- Improved virtual apps and desktops reconnection experience
- Sustainability initiative from Citrix Workspace app
- Manage workspace control reconnect
- Persistent session in Citrix Workspace app
- Hybrid launch support using GACS for on-premises stores