Create Linux VDAs on Google Cloud Platform (GCP) using Machine Creation Services™ (MCS)
To create Linux VDAs on GCP using MCS, complete the following steps:
Step 1: Create a Linux Virtual Machine (VM) on GCP
Step 2: Create a GCP service account
Step 3: Create a host connection to GCP in Citrix Studio
Step 4: Prepare a Linux VDA master image
Step 5: Create a machine catalog
Step 6: Create a delivery group
Step 1: Create a Linux VM on GCP
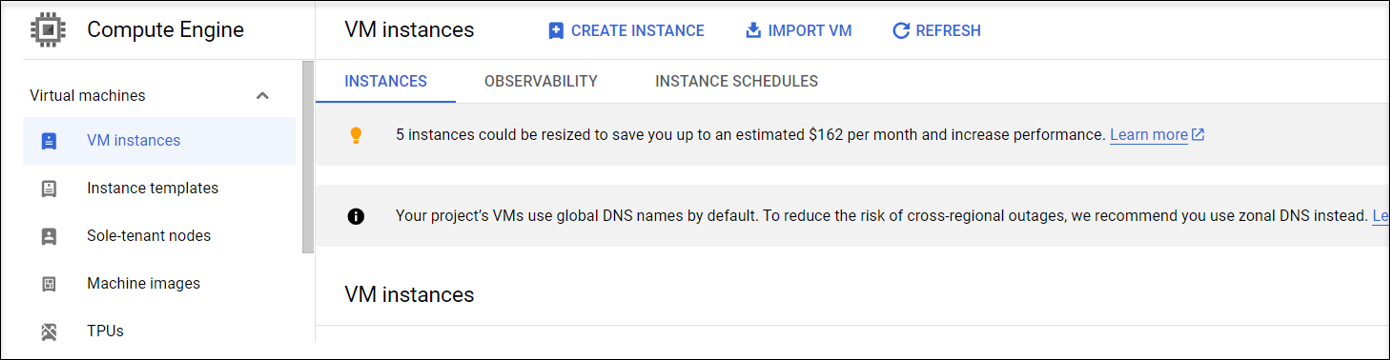
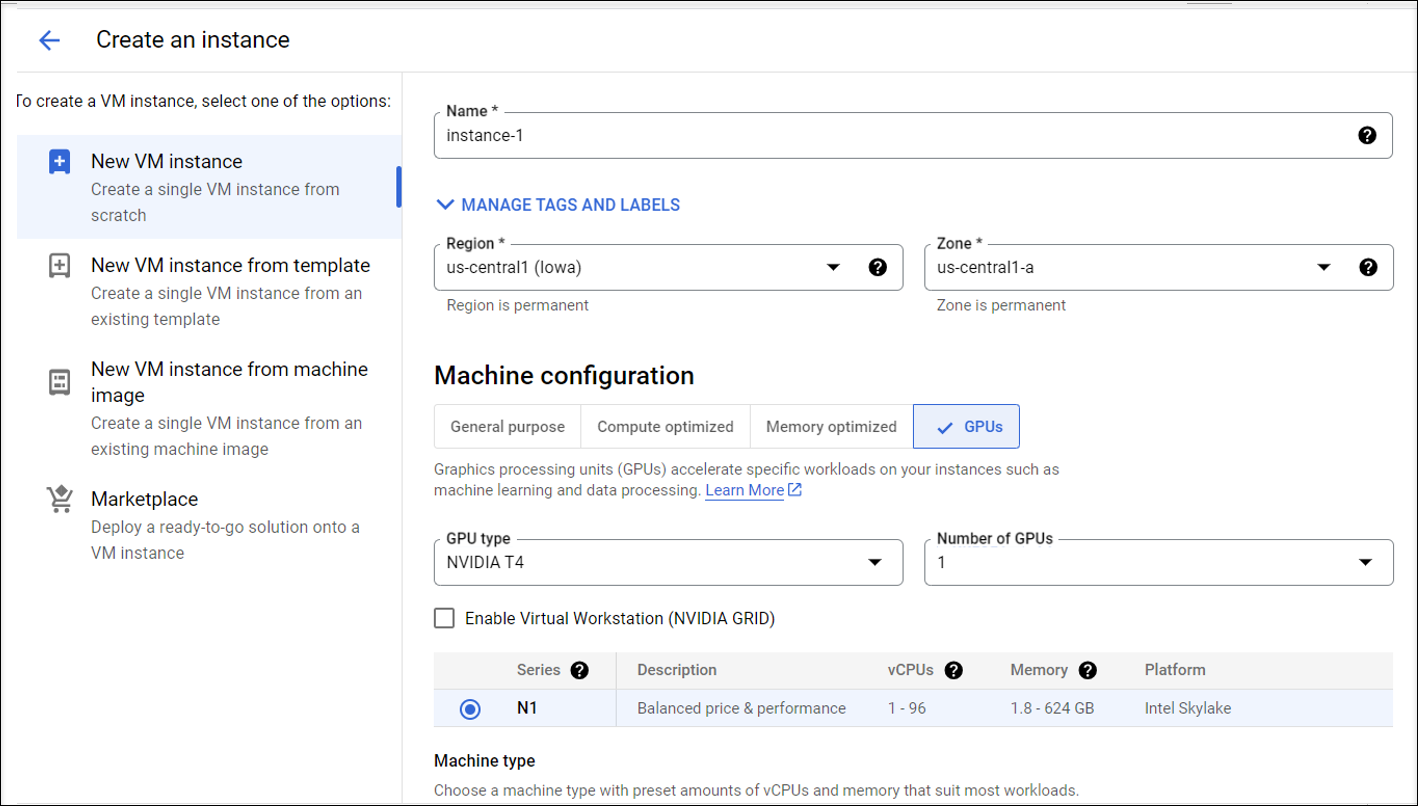
Step 1a: In the Google Cloud console, navigate to Compute Engine > VM instances.
Step 1b: On the VM instances page, click CREATE INSTANCE to create a VM instance.
Step 1c: Make the following configurations and keep other configurations as default:
- Enter a name for your VM instance.
- Select a region and zone to host your VM.
- (Optional) Add a GPU to your VM. For more information, see Step 4c later in this article.
-
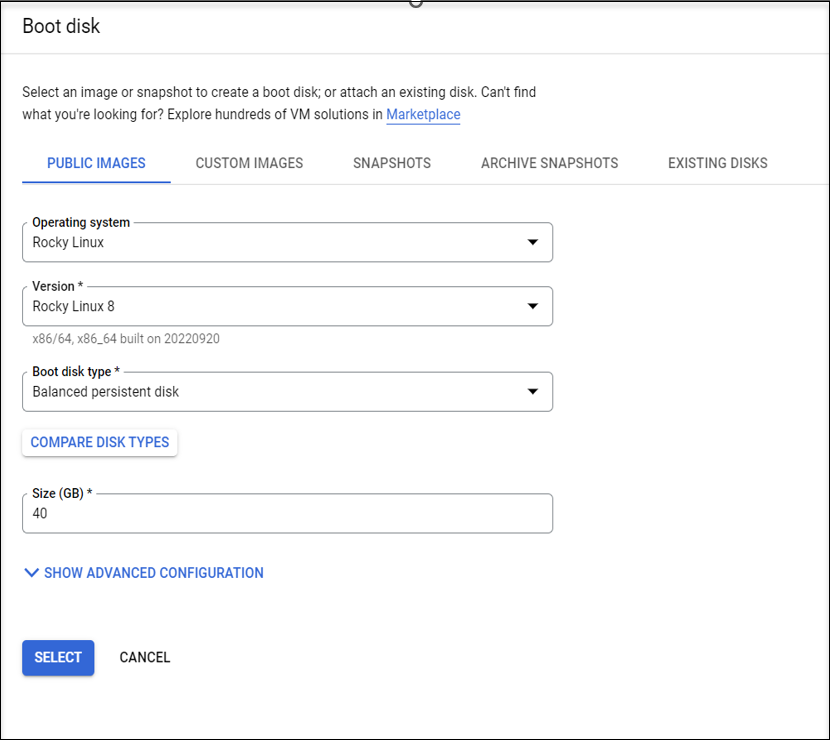
In the Boot disk section, select the operating system and disk size for your VM. For example:
-
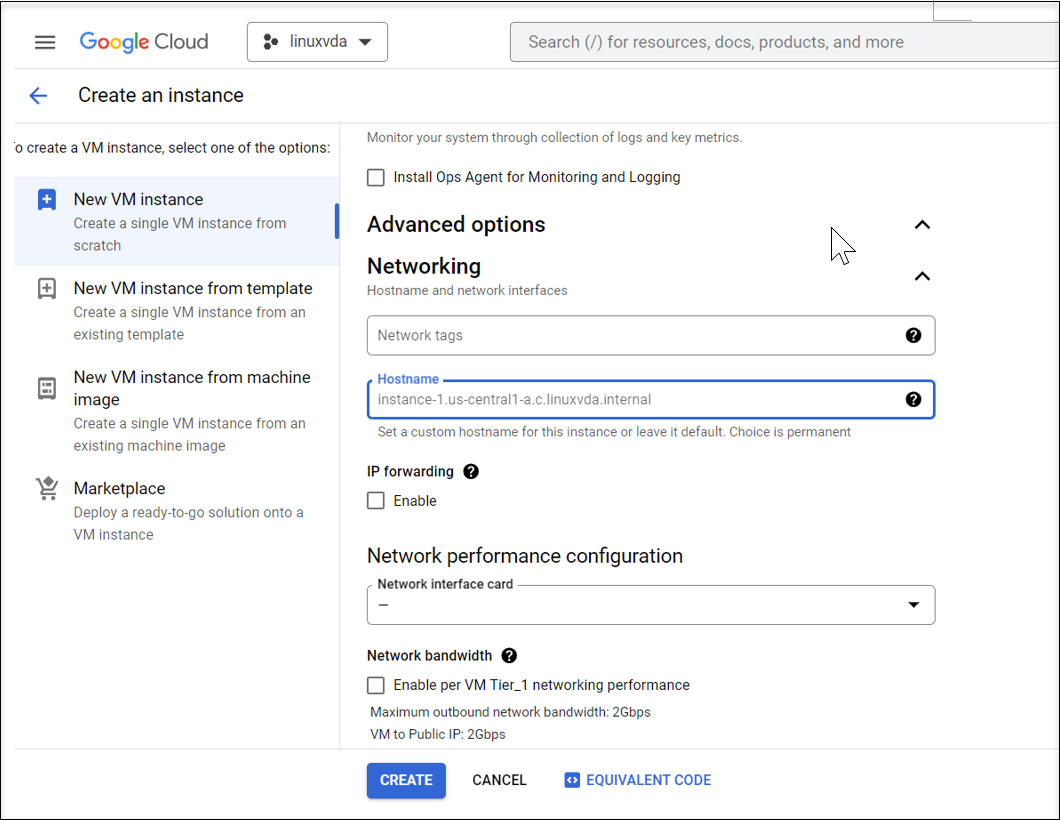
Navigate to Advanced options > Networking and set the Hostname field to an FQDN.
Step 1d: Click Create to create the VM instance.
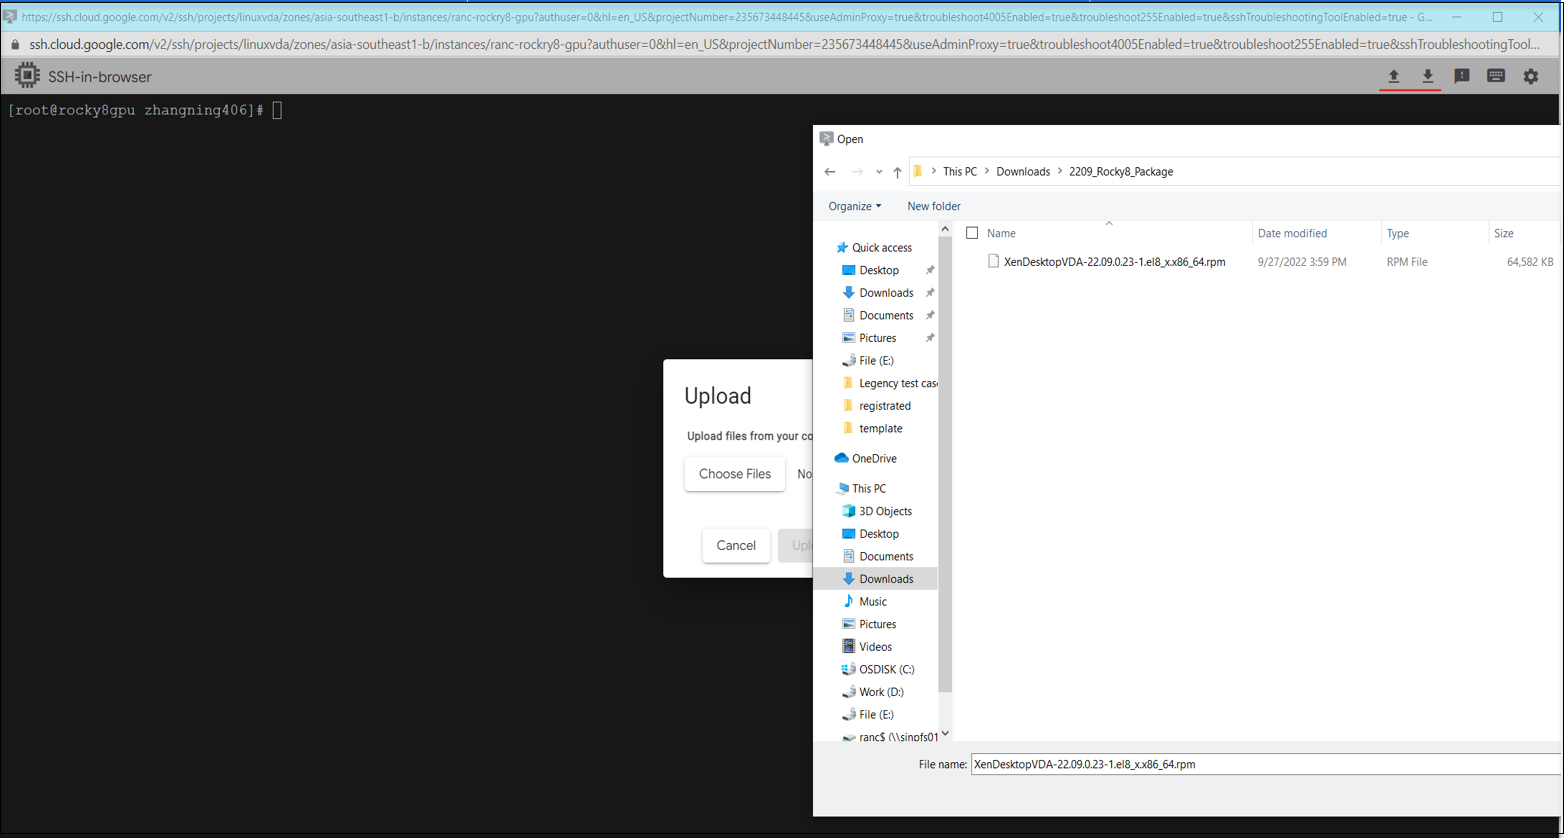
Step 1e: After the VM is created, return to the Compute Engine dashboard, find your VM instance in the list, and click the SSH button to connect to your VM.
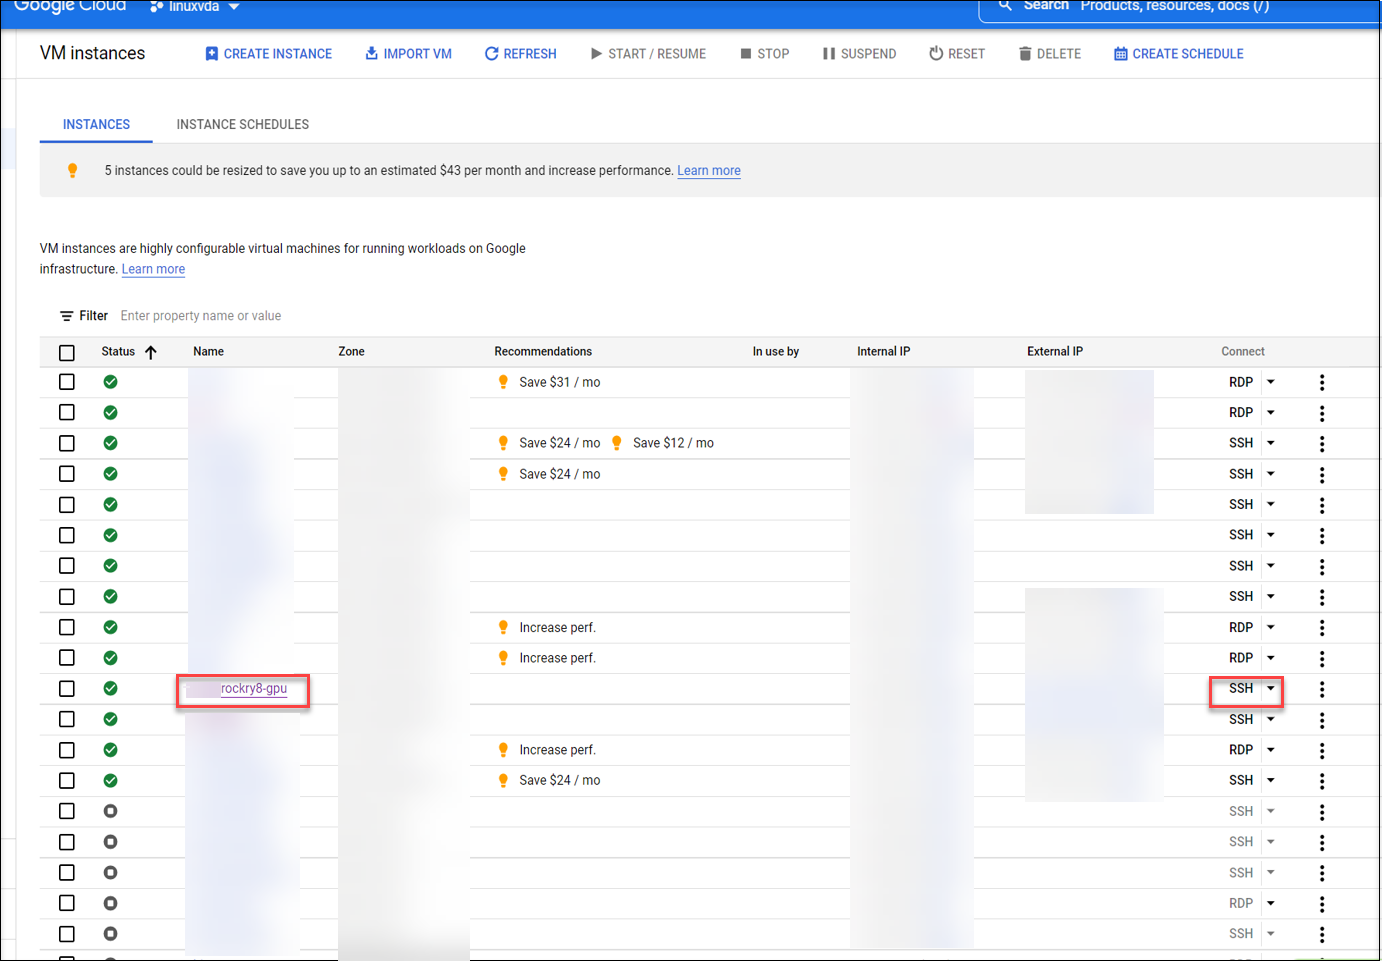
Step 1f: Upload the Linux VDA package to your VM through the web-based SSH client.
Step 1g: Prevent failures to access the VM using SSH.
The VM might be unreachable after a restart. To work around the issue, set a root password when logging on to the VM for the first time and make sure that you can log on to the VM as root. Then, run the following commands in the console after restarting the VM:
nmcli dev connect eth0
systemctl restart NetworkManager
<!--NeedCopy-->
Step 2: Create a GCP service account
This section guides you through creating a GCP service account, including creating a service account key and granting the required roles to the service account.
Note:
To create a GCP service account, ensure that you are granted the Service Account Admin (roles/iam.serviceAccountAdmin) IAM role.
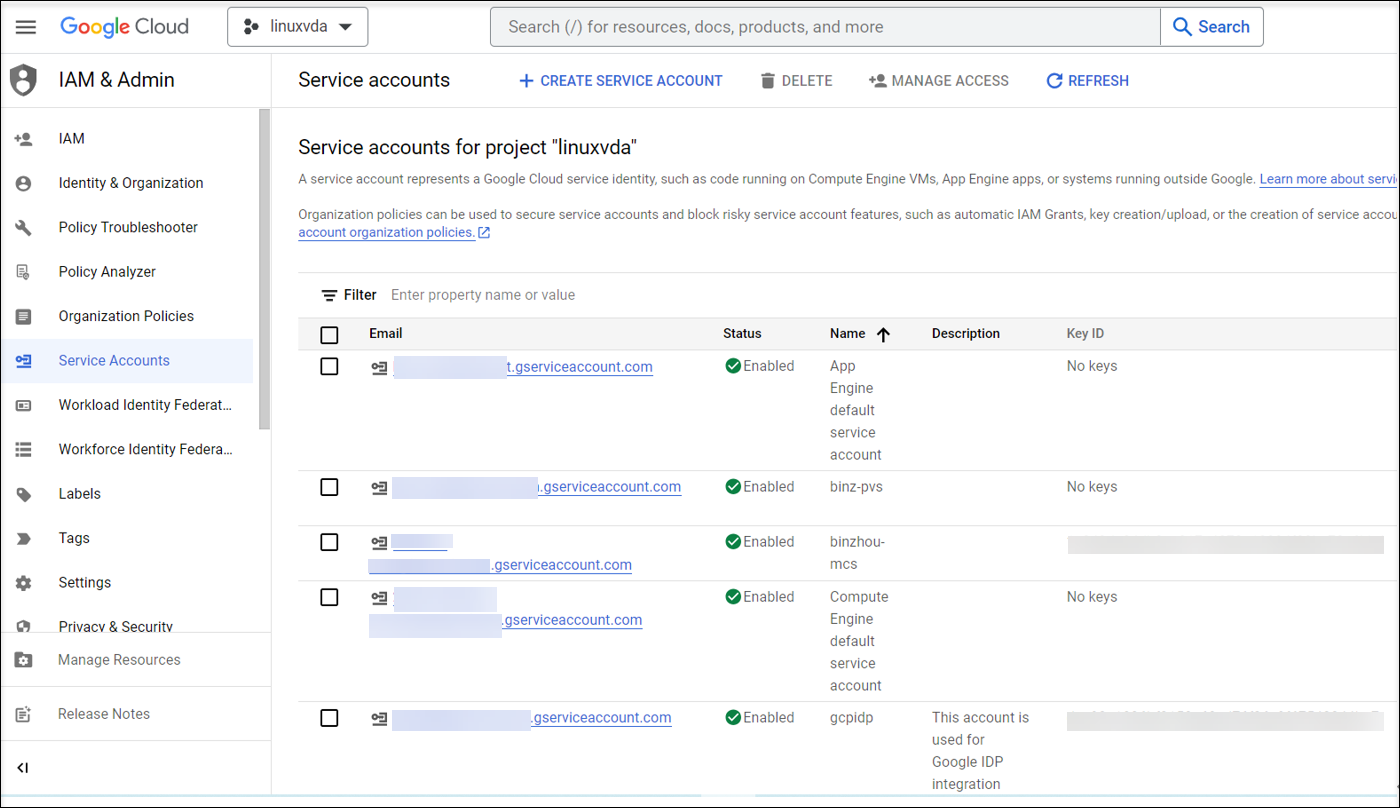
Step 2a: In the Google Cloud console, navigate to IAM & Admin > Service Accounts and then Click the Create Service Account tab.
Step 2b: In the Service account details step, enter the values in the fields and then click Create and continue.
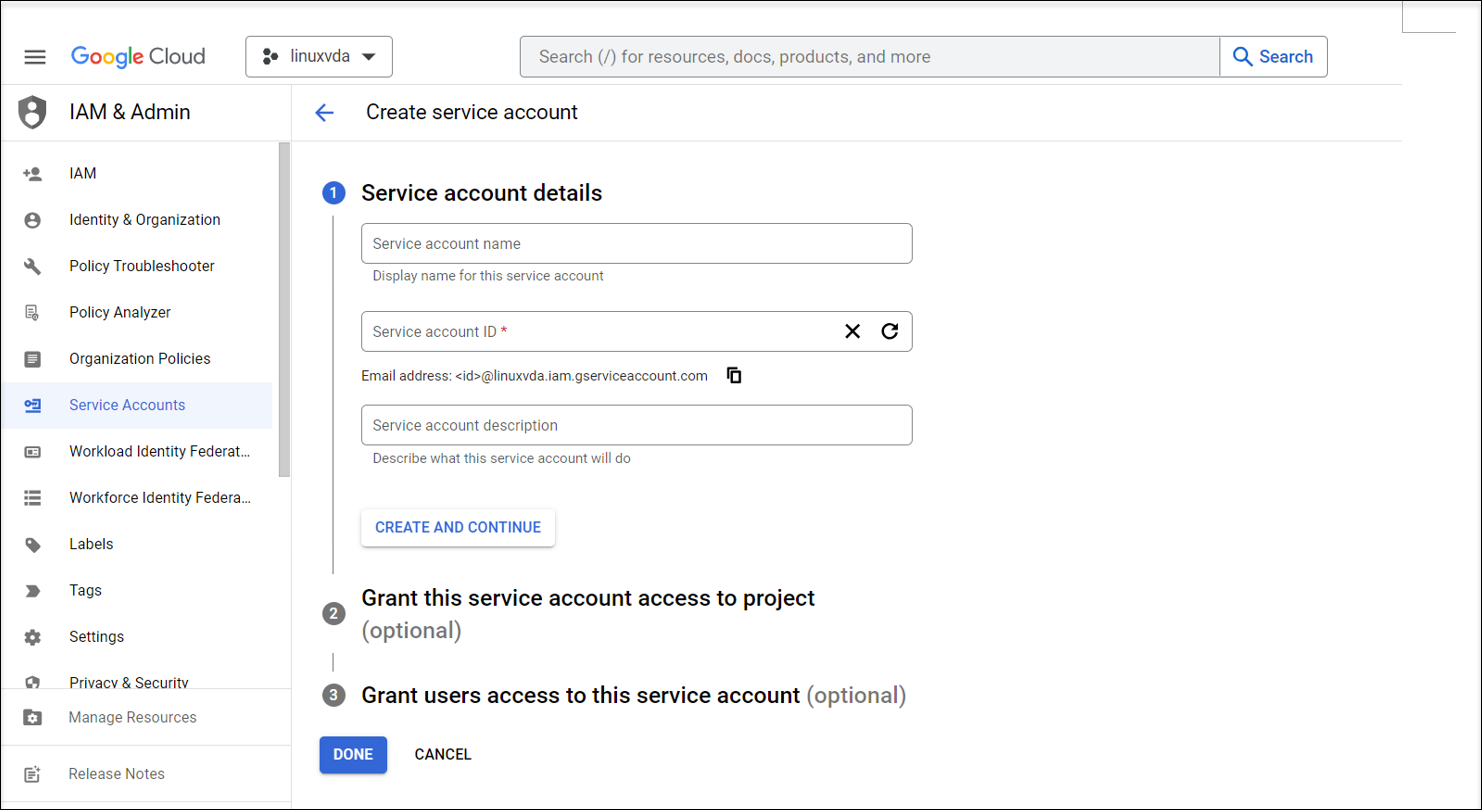
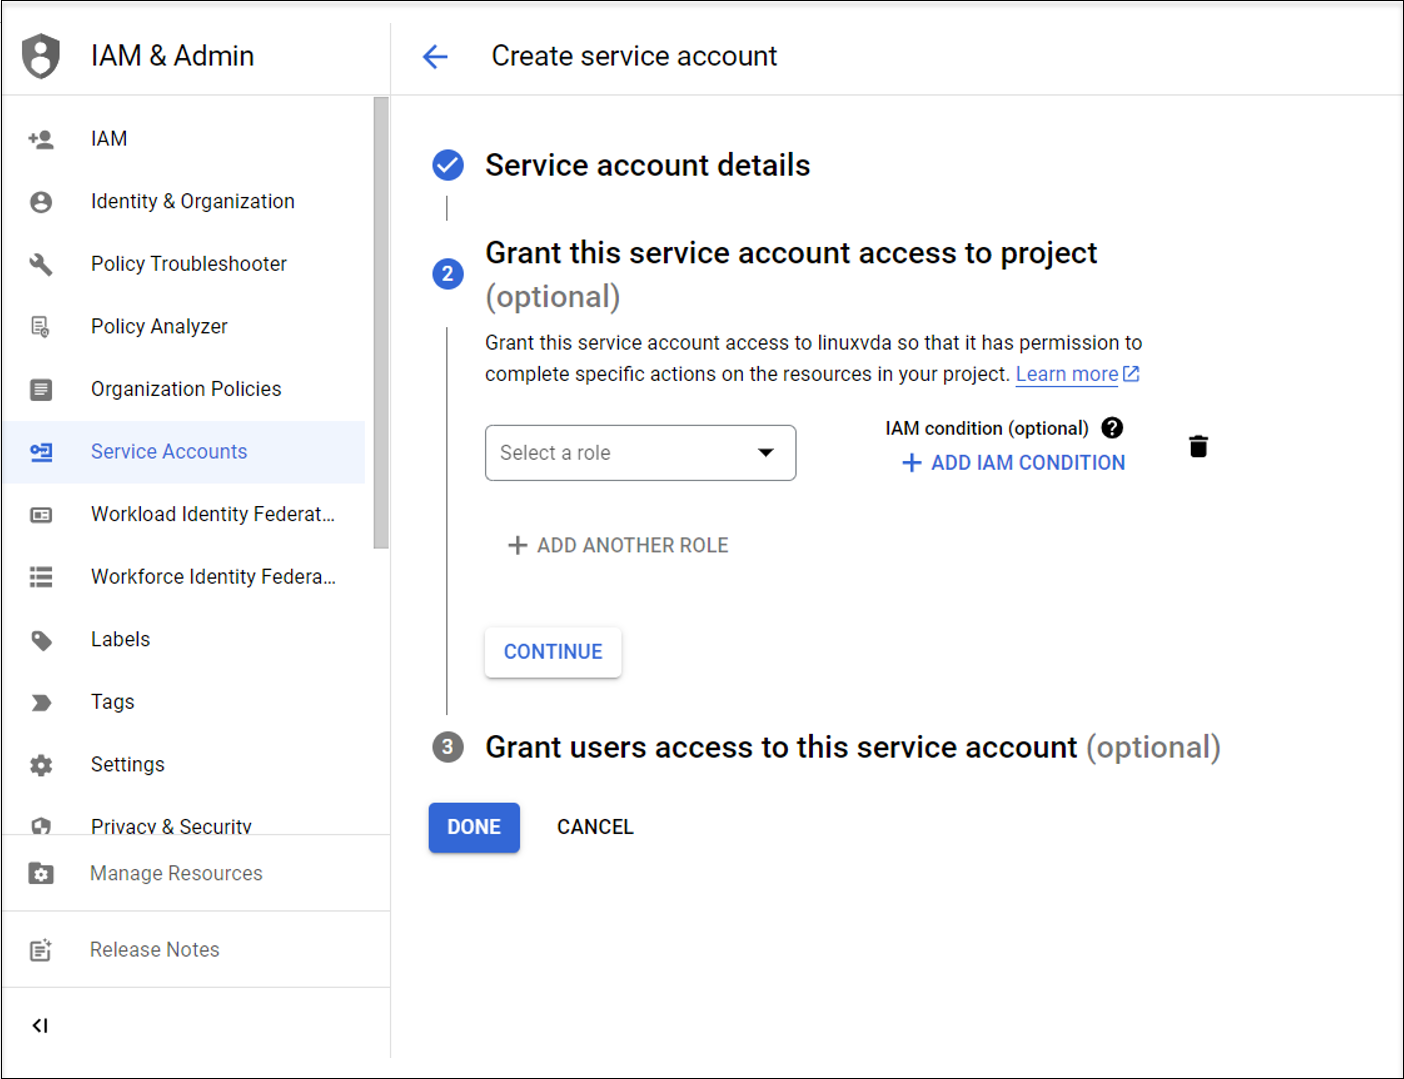
Step 2c: Skip the optional steps and click Done at the bottom.
Step 2d: Navigate to IAM & Admin > Service Accounts again and then click the Service accounts tab. Find the newly created service account, navigate to the Keys tab, and then click Add key > Create new key > JSON > Create.

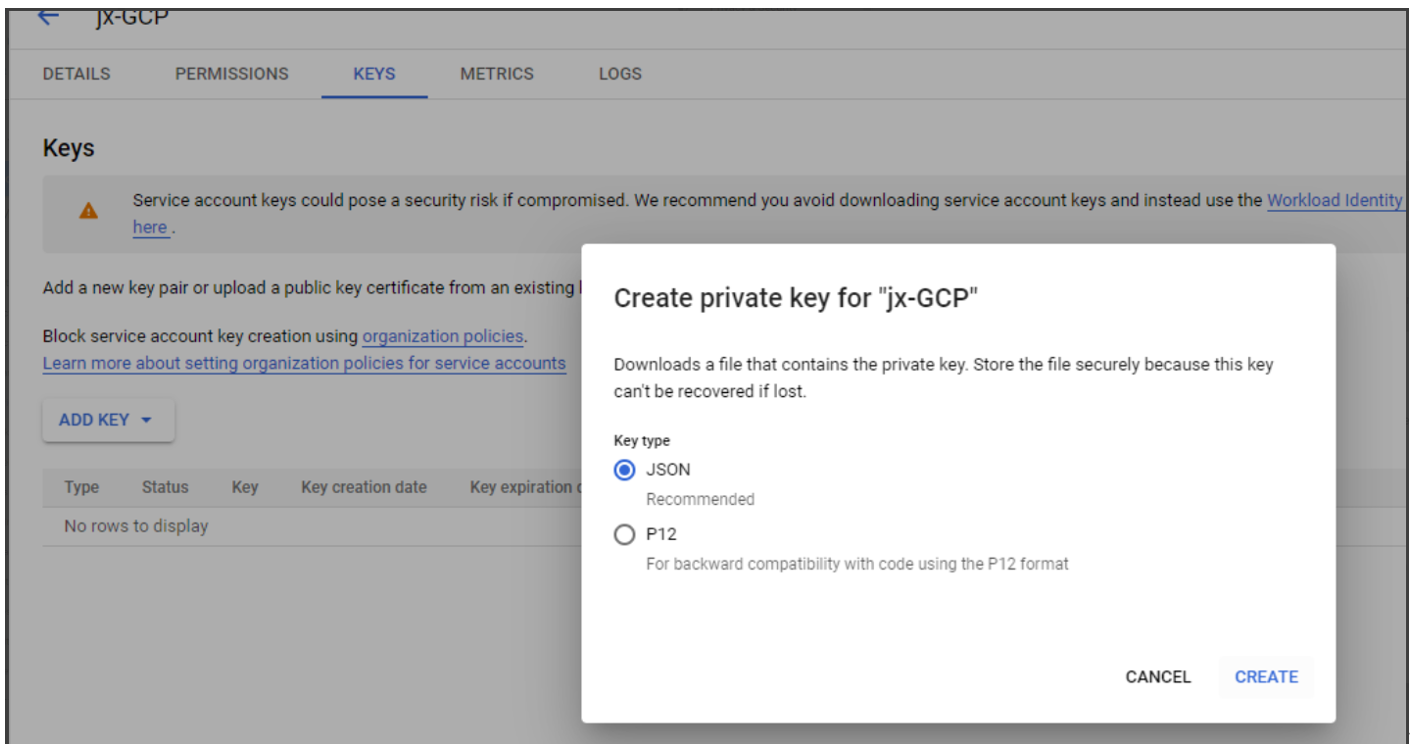
Note:
After you download the key file, you can’t download it again.
Step 2e: In the Google Cloud console, navigate to IAM & Admin > IAM and then click Add. Search for and select the newly created service account in the New members field and then select a role for the service account to grant it access to your resources. Keep granting roles by clicking Add another role to ensure that you grant all the following roles to the newly created service account.
- Compute Admin
- Storage Admin
- Cloud Build Editor
- Service Account User
- Cloud Datastore User
- Compute Instance Admin (beta)
- Owner
For example:

Step 3: Create a host connection to GCP in Citrix Studio
Set up your GCP environment according to Google Cloud Platform virtualization environments and then complete the following steps to create a host connection to GCP.
-
For on-premises Delivery Controllers, choose Configuration > Hosting > Add Connection and Resources in the on-premises Citrix Studio to create a host connection. For cloud Delivery Controllers, choose Manage > Hosting > Add Connection and Resources in the web-based Studio console on Citrix Cloud™ to create a host connection.
-
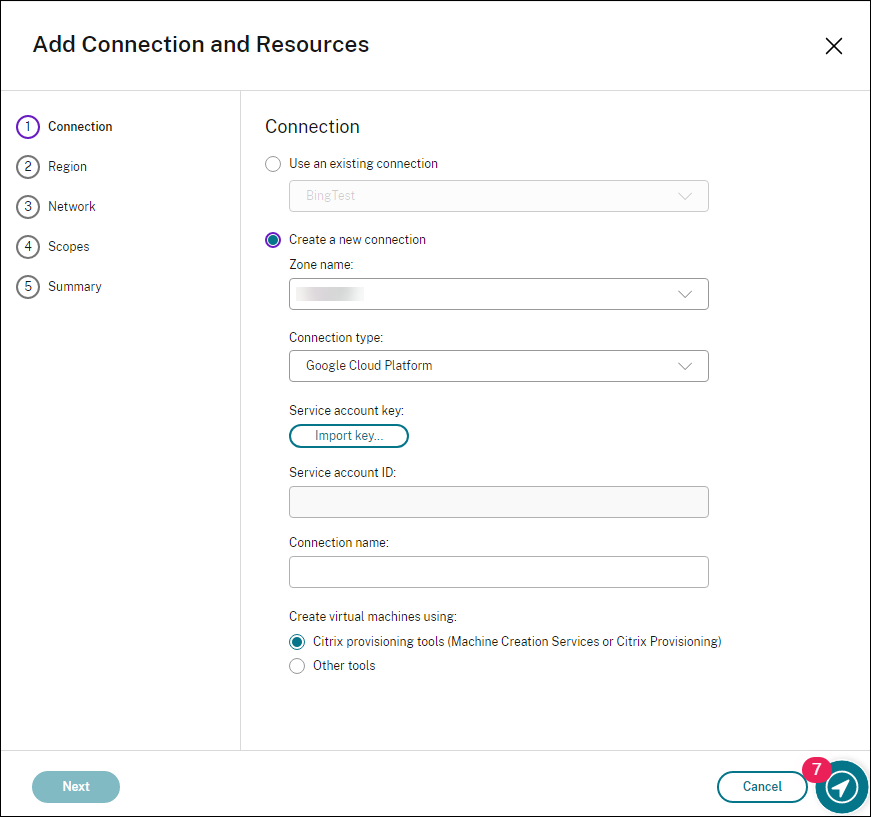
In the Add Connection and Resources wizard, select Google Cloud Platform as the connection type.
For example, in the web-based Studio console on Citrix Cloud:
-
Import the service account key of your GCP account and type your connection name.
-
The wizard guides you through the pages. Specific page content depends on the selected connection type. After completing each page, select Next until you reach the Summary page. For more information, see Step 2: Create a host connection in the Create non-domain-joined Linux VDAs using MCS article.
Step 4: Prepare a Linux VDA master image
Step 4a: (For RHEL 8.x/9.x and Rocky Linux 8.x/9.x) Configure Ethernet connection.
After you install the Linux VDA on RHEL 8.x/9.x and Rocky Linux 8.x/9.x hosted on GCP, the Ethernet connection might be lost and the Linux VDA might be unreachable after a VM restart. To work around the issue, set a root password when logging on to the VM for the first time and make sure that you can log on to the VM as root. Then, run the following commands in the console after restarting the VM:
nmcli dev connect eth0
systemctl restart NetworkManager
<!--NeedCopy-->
Step 4b: Install the Linux VDA package on the template VM.
On the template VM, do the following to install the Linux VDA package:
-
Install .NET.
In addition to the .NET Runtime, you must install .ASP.NET Core Runtime Version 8 on all supported Linux distributions before you install or upgrade the Linux VDA.
If your Linux distribution contains the .NET version that you require, install it from the built-in feed. Otherwise, install .NET from the Microsoft package feed. For more information, see https://docs.microsoft.com/en-us/dotnet/core/install/linux-package-managers.
-
Install the Linux VDA package:
sudo yum –y localinstall <PATH>/<Linux VDA RPM> <!--NeedCopy--> -
Enable the EPEL repository:
sudo rpm -ivh  https://dl.fedoraproject.org/pub/epel/epel-release-latest-8.noarch.rpm
<!--NeedCopy-->
Step 4c: Add a Graphics Processing Unit (GPU) to the template VM on GCP (optional).
-
In the Google Cloud console, add one or more GPUs to the template VM. For information about adding and removing GPUs on GCP, see https://cloud.google.com/compute/docs/gpus/add-remove-gpus.
-
Install the appropriate GPU driver on the template VM. For more information, see https://cloud.google.com/compute/docs/gpus/install-drivers-gpu.
Required NVIDIA driver versions:
NVIDIA GPUs running on Compute Engine must use the following NVIDIA driver versions:
- For L4 GPUs:
- Linux : 525.60.13 or later
- For A100 GPUs:
- Linux : 450.80.02 or later
- For T4, P4, P100, and V100 GPUs:
- Linux : 410.79 or later
- For K80 GPUs (End-of-life):
- Linux : 410.79 - latest R470 version
For K80 GPUs, NVIDIA has announced that the R470 driver branch is the final driver version to receive debug support. To review this update, see NVIDIA Software Support Matrix.
Installation script:
You can use the following script to automate the installation process:
https://raw.githubusercontent.com/GoogleCloudPlatform/compute-gpu-installation/main/linux/install_gpu_driver.py --output install_gpu_driver.py
<!--NeedCopy-->
Supported operating systems:
The installation script was tested on the following Linux distributions:
- Debian 11
- Red Hat Enterprise Linux (RHEL) 8
- Rocky Linux 8
- Ubuntu 20/22
If you use this script on other Linux distributions, the installation fails. For Linux VMs, this script installs only the NVIDIA driver.
-
Download the installation script.
curl https://raw.githubusercontent.com/GoogleCloudPlatform/compute-gpu-installation/main/linux/install_gpu_driver.py --output install_gpu_driver.py <!--NeedCopy--> -
Grant complete access to the script.
chmod 777 install_gpu_driver.py <!--NeedCopy--> -
Run the installation script.
python3 install_gpu_driver.py <!--NeedCopy--> -
Disable Wayland in gdm3.
- Locate your distribution’s Wayland configuration file in one of the following locations:
- /etc/gdm3/custom.conf (Ubuntu)
- /etc/gdm/custom.conf (CentOS, RHEL, Rocky Linux)
- Open the file with sudo/root privileges.
- Uncomment WaylandEnable=false by deleting the # at the beginning of the line.
- Restart the VM.
- Locate your distribution’s Wayland configuration file in one of the following locations:
-
If you installed an NVIDIA 510 or later driver, disable the GSP firmware.
If GSP firmware is enabled, disable it by setting the NVIDIA module parameter NVreg_EnableGpuFirmware to 0.
Set this parameter by adding the following entry to the /etc/modprobe.d/nvidia.conf file:
-
options nvidia NVreg_EnableGpuFirmware=0
-
If the /etc/modprobe.d/nvidia.conf file does not exist, create it.
When completing this step, keep the following in mind:
-
Use sudo to run the commands to create and update the configuration file.
-
To restart the VM, you can use sudo reboot in the Linux terminal or stop and start the VM.
-
- For L4 GPUs:
Step 4d: Configure MCS variables.
Configure MCS variables by editing the /etc/xdl/mcs/mcs.conf file. The following are MCS variables that you can configure for non-domain-joined and domain-joined scenarios:
-
For non-domain-joined scenarios
You can use the default variable values or customize the variables as required (optional):
DOTNET_RUNTIME_PATH=path-to-install-dotnet-runtime \
DESKTOP_ENVIRONMENT= **gnome | mate \**
REGISTER_SERVICE=**Y | N**
ADD_FIREWALL_RULES=**Y | N**
VDI_MODE=**Y | N**
START_SERVICE=**Y | N**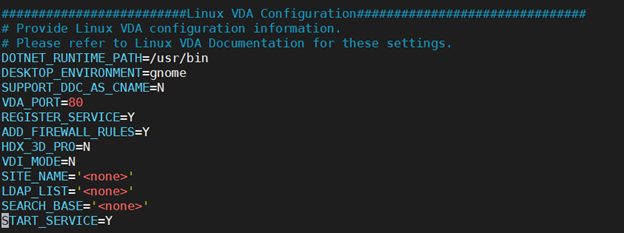
-
For domain-joined scenarios
-
Use_AD_Configuration_Files_Of_Current_VDA: Determines whether to use the existing AD-related configuration files (/etc/krb5.conf, /etc/sssd.conf, and /etc/samba/smb.conf) of the currently running VDA. If set to Y, the configuration files on MCS-created machines are the same as the equivalents on the currently running VDA. However, you still must configure thednsandAD_INTEGRATIONvariables. The default value is N, which means the configuration templates on the master image determine the configuration files on MCS-created machines. To use a currently running VDA as the template VM, set the value to Y. Otherwise, set it to N. -
dns: Sets the IP address for each DNS server. You can set up to four DNS servers. -
NTP_SERVER: Sets the IP address for your NTP server. Unless otherwise specified, it’s the IP address of your domain controller. -
WORKGROUP: Sets the workgroup name to the NetBIOS name (case-sensitive) that you configured in AD. Otherwise, MCS uses the part of the domain name that immediately follows the machine hostname as the workgroup name. For example, if the machine account is user1.lvda.citrix.com, MCS uses lvda as the workgroup name while citrix is the correct choice. Ensure that you set the workgroup name correctly. -
AD_INTEGRATION: Sets Winbind, SSSD, PBIS, or Centrify. For a matrix of the Linux distributions and domain joining methods that MSC supports, see Supported distributions. -
CENTRIFY_DOWNLOAD_PATH: Sets the path for downloading the Server Suite Free (formerly Centrify Express) package. The value takes effect only when you set theAD_INTEGRATIONvariable to Centrify. -
CENTRIFY_SAMBA_DOWNLOAD_PATH: Sets the path for downloading the Centrify Samba package. The value takes effect only when you set theAD_INTEGRATIONvariable to Centrify. -
PBIS_DOWNLOAD_PATH: Sets the path for downloading the PBIS package. The value takes effect only when you set theAD_INTEGRATIONvariable to PBIS. -
UPDATE_MACHINE_PW: Enables or disables automating machine account password updates. For more information, see Automate machine account password updates. -
Linux VDA configuration variables:
DOTNET_RUNTIME_PATH=path-to-install-dotnet-runtime \
DESKTOP_ENVIRONMENT= **gnome | mate \**
SUPPORT_DDC_AS_CNAME=**Y | N**
VDA_PORT=port-number
REGISTER_SERVICE=**Y | N**
ADD_FIREWALL_RULES=**Y | N**
HDX_3D_PRO=**Y | N**
VDI_MODE=**Y | N**
SITE_NAME=**dns-site-name | ‘<none>’**
LDAP_LIST=**‘list-ldap-servers’ | ‘<none>’**
SEARCH_BASE=**search-base-set | ‘<none>’**
FAS_LIST=**‘list-fas-servers’ | ‘<none>’**
START_SERVICE=**Y | N**
TELEMETRY_SOCKET_PORT=port-number
TELEMETRY_PORT=port-number
-
Step 4e: Create a master image
-
(For SSSD + RHEL 8.x/9.x or Rocky Linux 8.x/9.x only) Run the
update-crypto-policies --set DEFAULT:AD-SUPPORTcommand and then restart the template VM. -
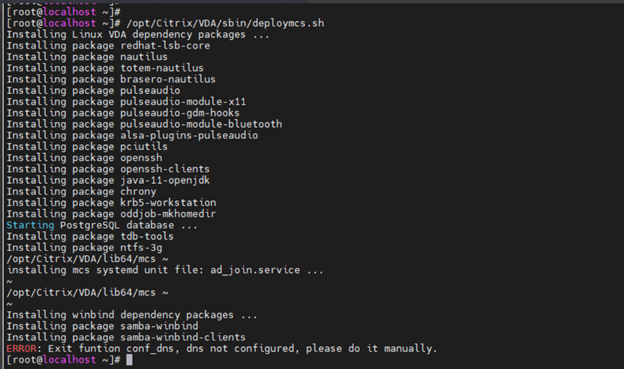
Run
/opt/Citrix/VDA/sbin/deploymcs.sh.For non-domain-joined scenarios, the following error is normal and does not block you from proceeding.
-
Install applications on the template VM and shut down the template VM. Create and name a snapshot of your master image.
Step 5: Create a machine catalog
- Sign in to Citrix Cloud. In the upper left menu, select My Services > DaaS.
- From Manage > Full Configuration, select Machine Catalogs in the left pane.
- Select Create Machine Catalog in the action bar.
-
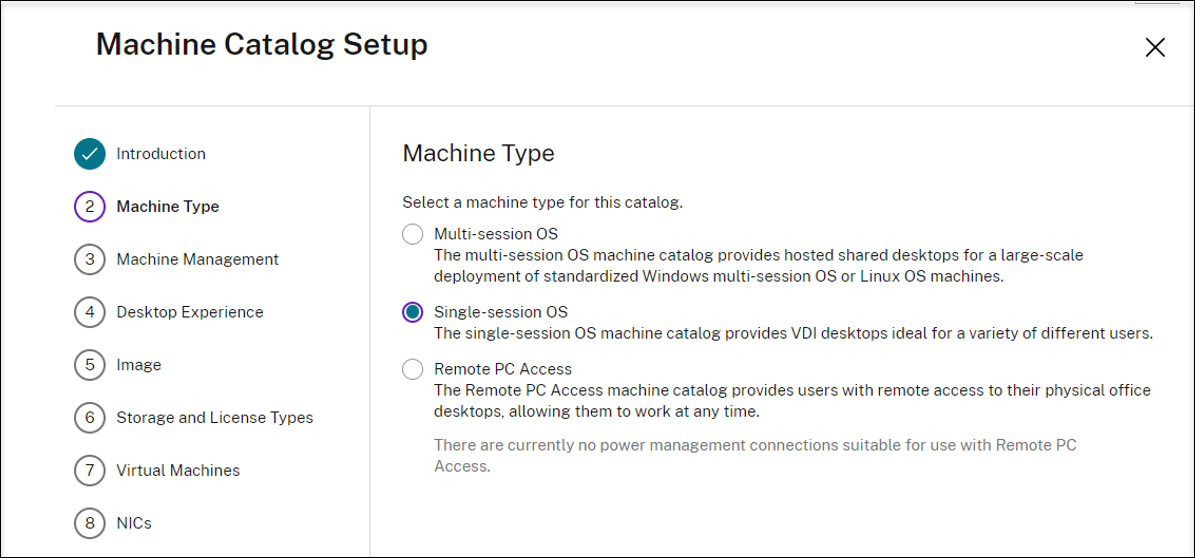
On the Machine Type page, select Multi-session OS or Single-session OS and then select Next.
-
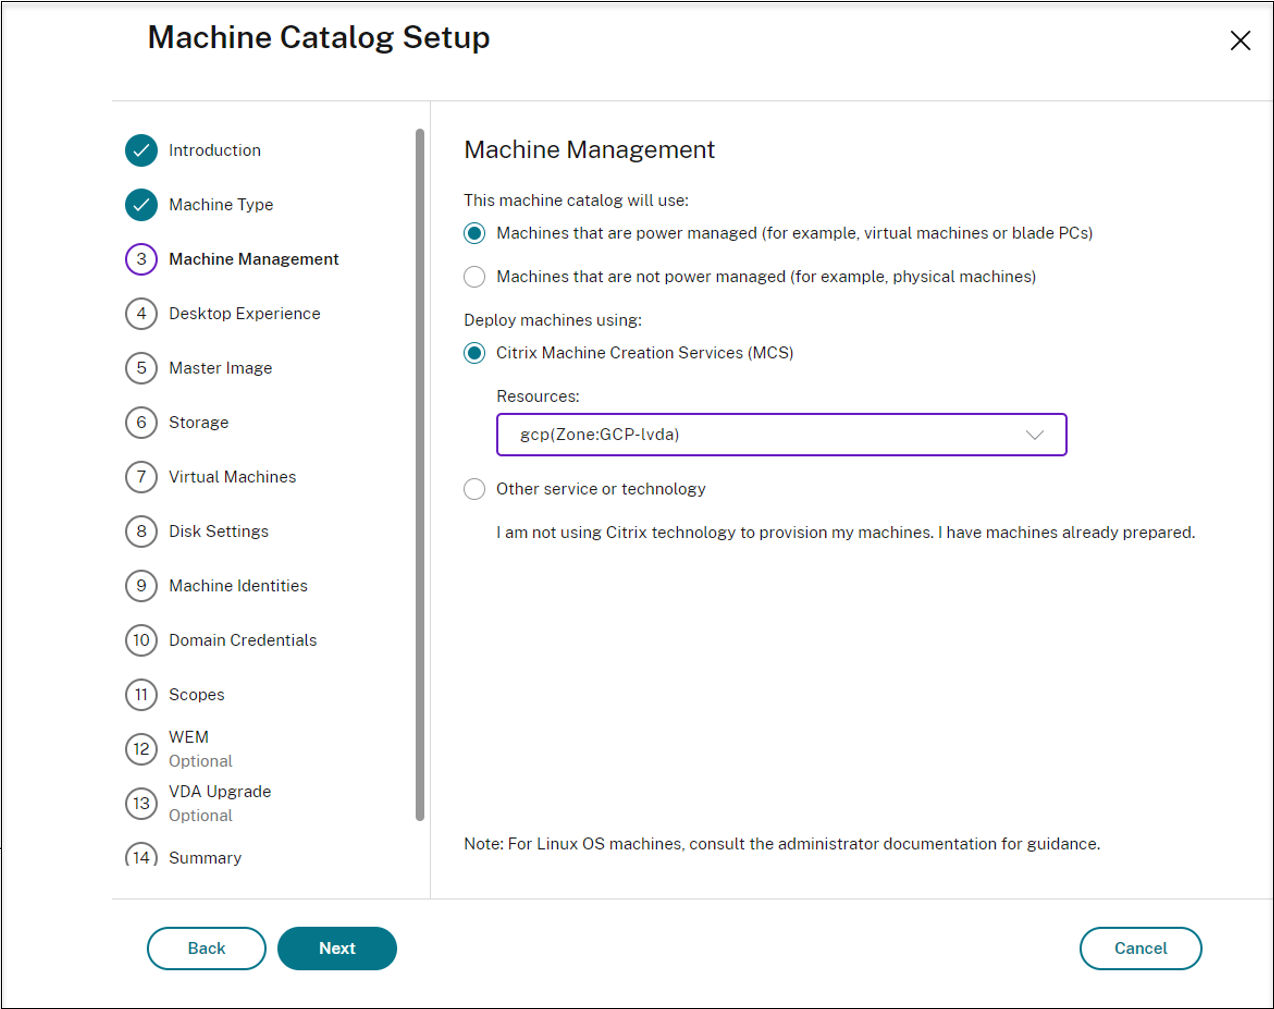
On the Machine Management page, select the Machines that are power managed and the Citrix Machine Creation Services options and then select Next. If there are multiple resources, select one from the menu.
-
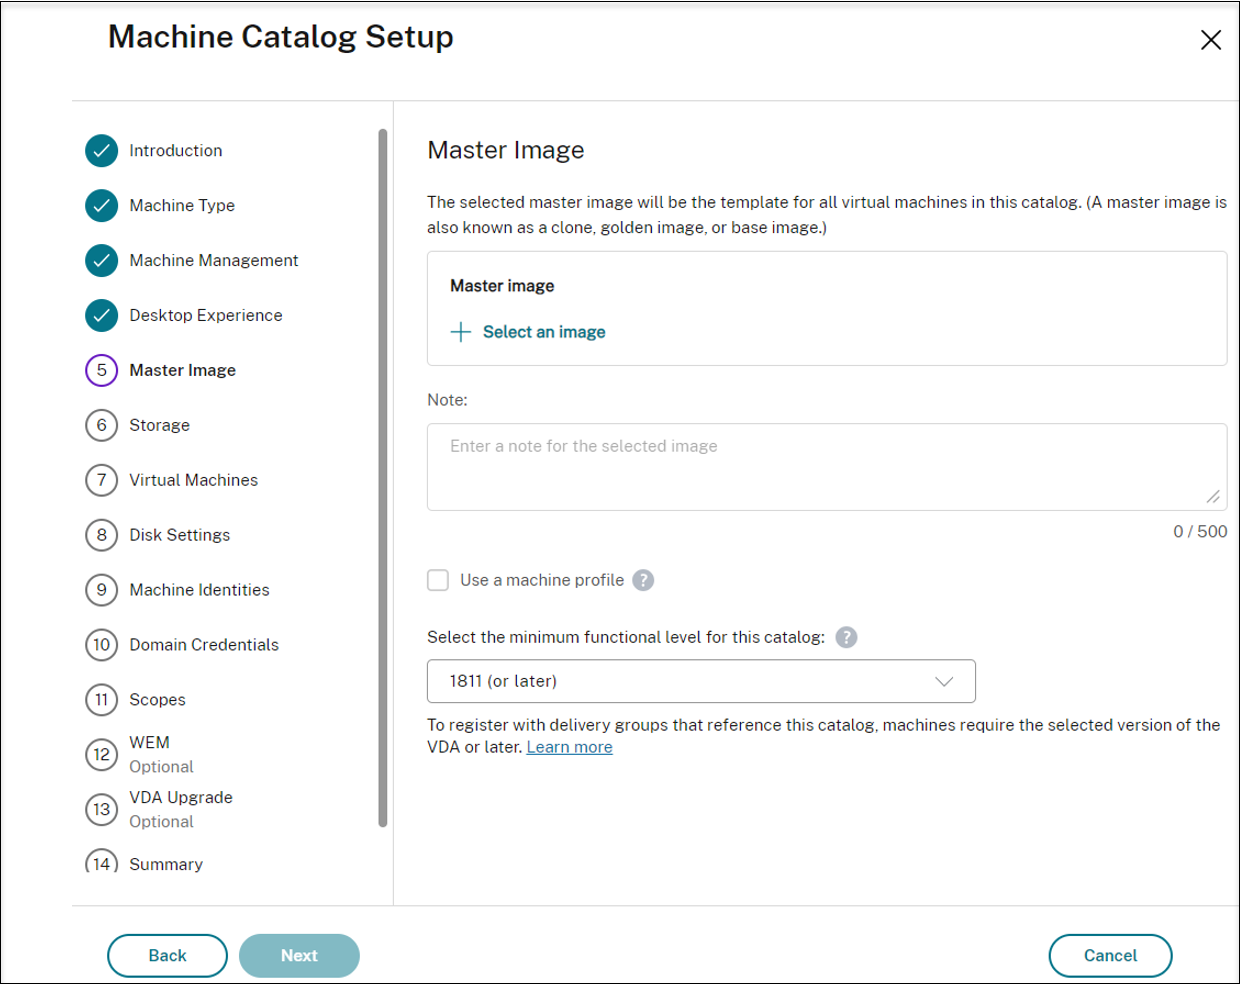
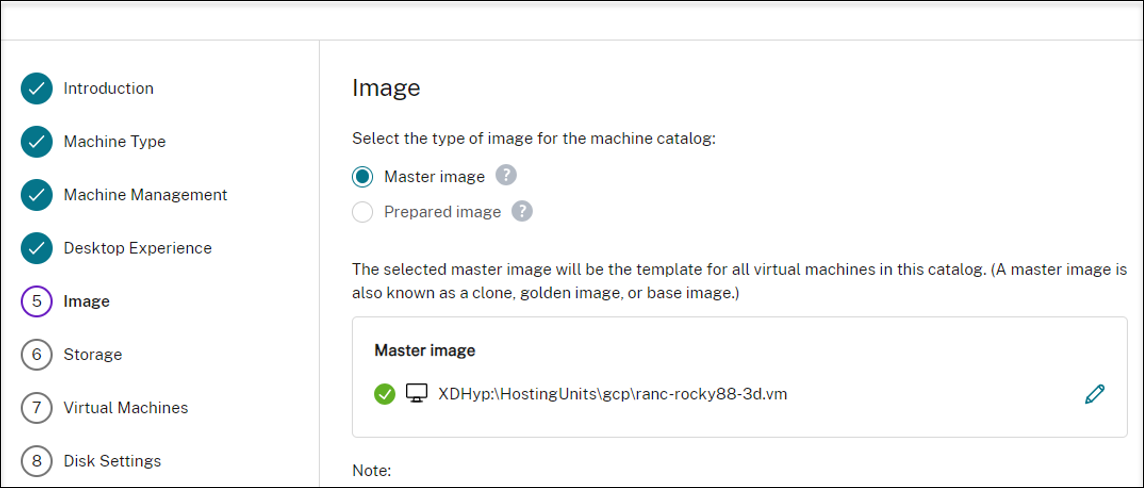
On the Master Image page, select the master image created earlier.
-
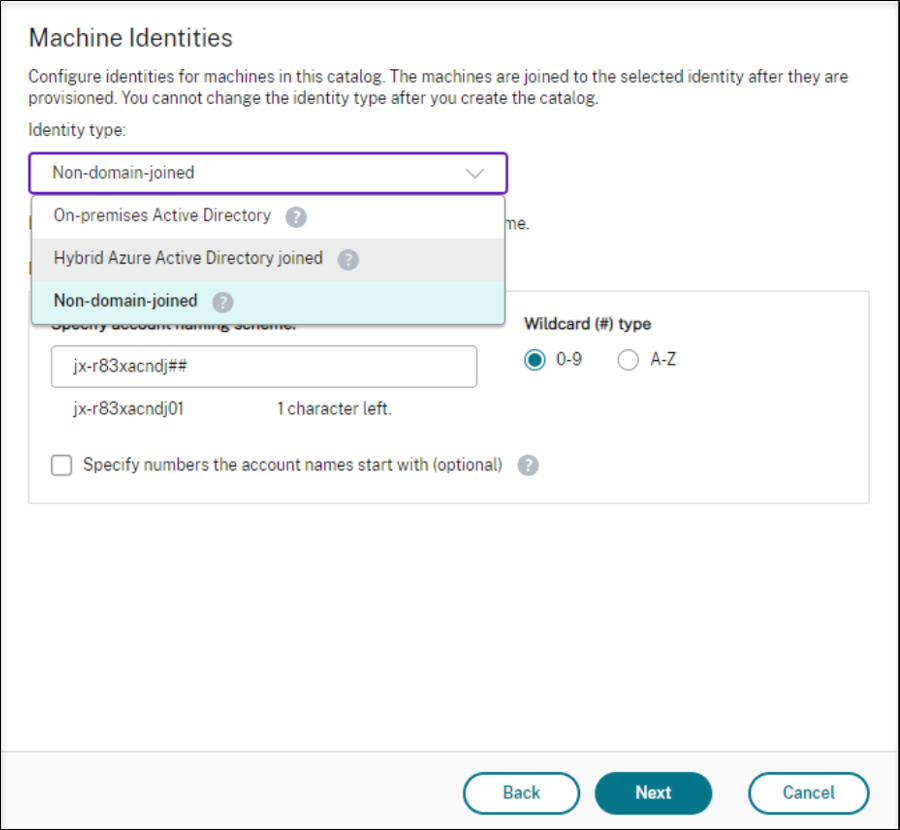
On the Machine Identities page, select Non-domain-joined if the master image wasn’t joined to any domain or select an Active Directory account if you joined the master image to a domain.
For non-domain-joined scenarios:
For domain-joined scenarios:
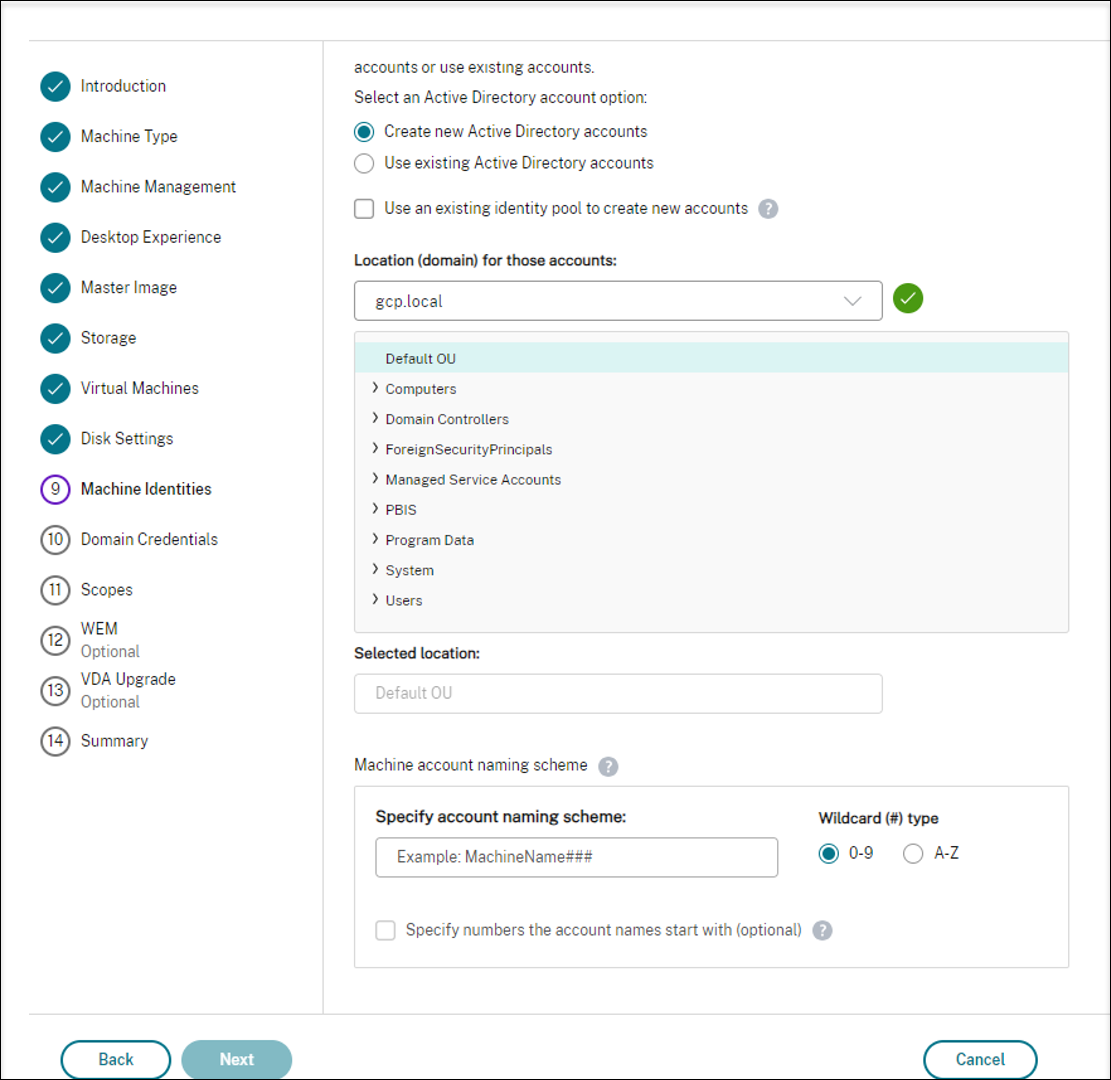
- If you select Create new Active Directory accounts, select a domain and then enter the sequence of characters representing the naming scheme for the provisioned VM computer accounts created in the Active Directory. The account naming scheme can contain 1–64 characters, and cannot contain blank spaces, or non-ASCII or special characters.
- If you select Use existing Active Directory accounts, select Browse to navigate to the existing Active Directory computer accounts for the selected machines.
- On the Domain Credentials page, select Enter credentials, type the user name and password, select Save, and then select Next. The credential you type must have permission to perform Active Directory account operations.
- Configure additional settings on the other pages. For more information, see Create a Google Cloud Platform catalog.
-
On the Summary page, confirm the information, specify a name for the catalog, and then select Finish.
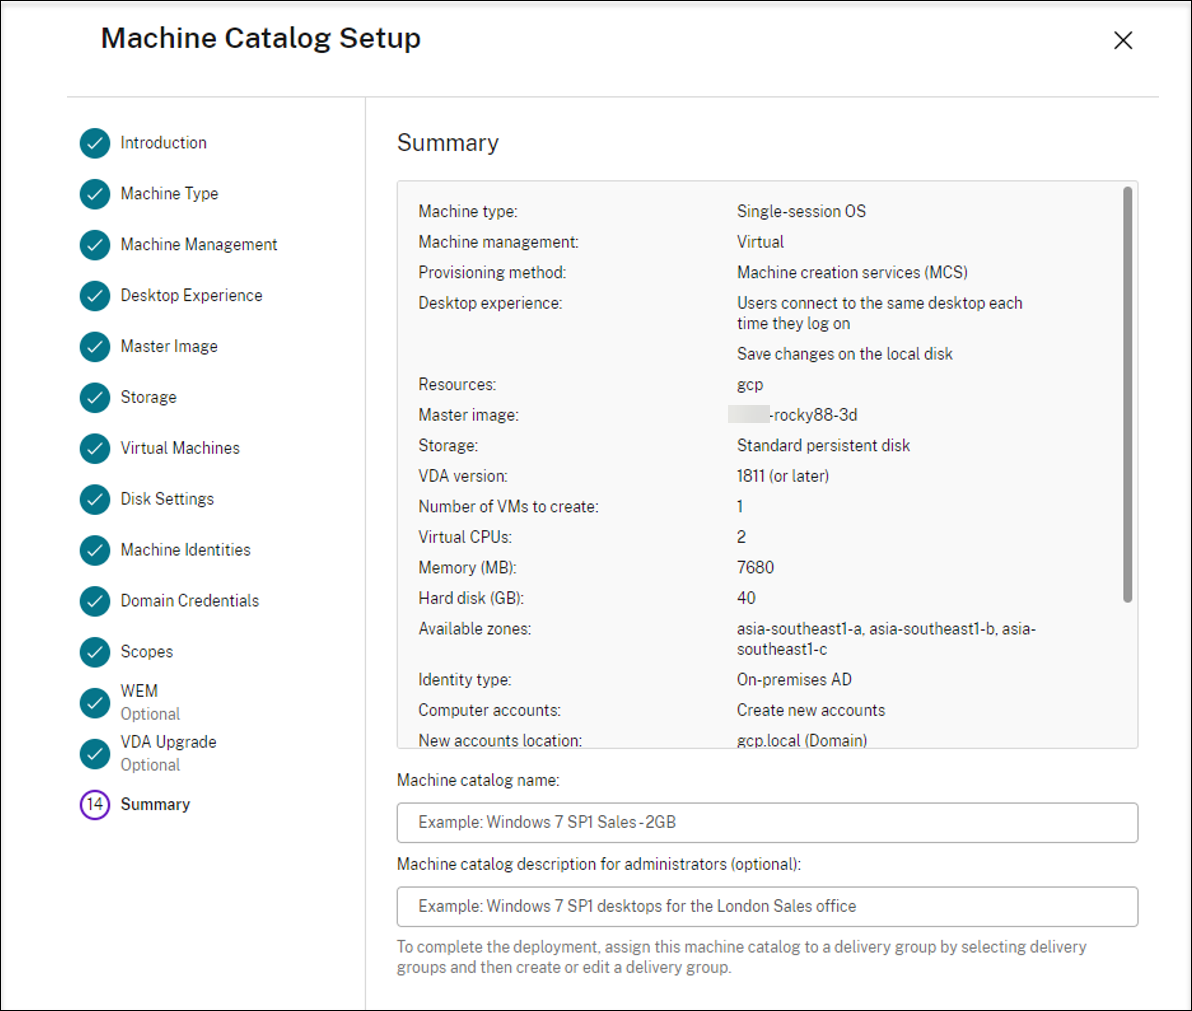
Machine catalog creation might take a long time to complete. When it completes, the catalog is listed. You can verify that the machines are created on the target node groups in the Google Cloud console.
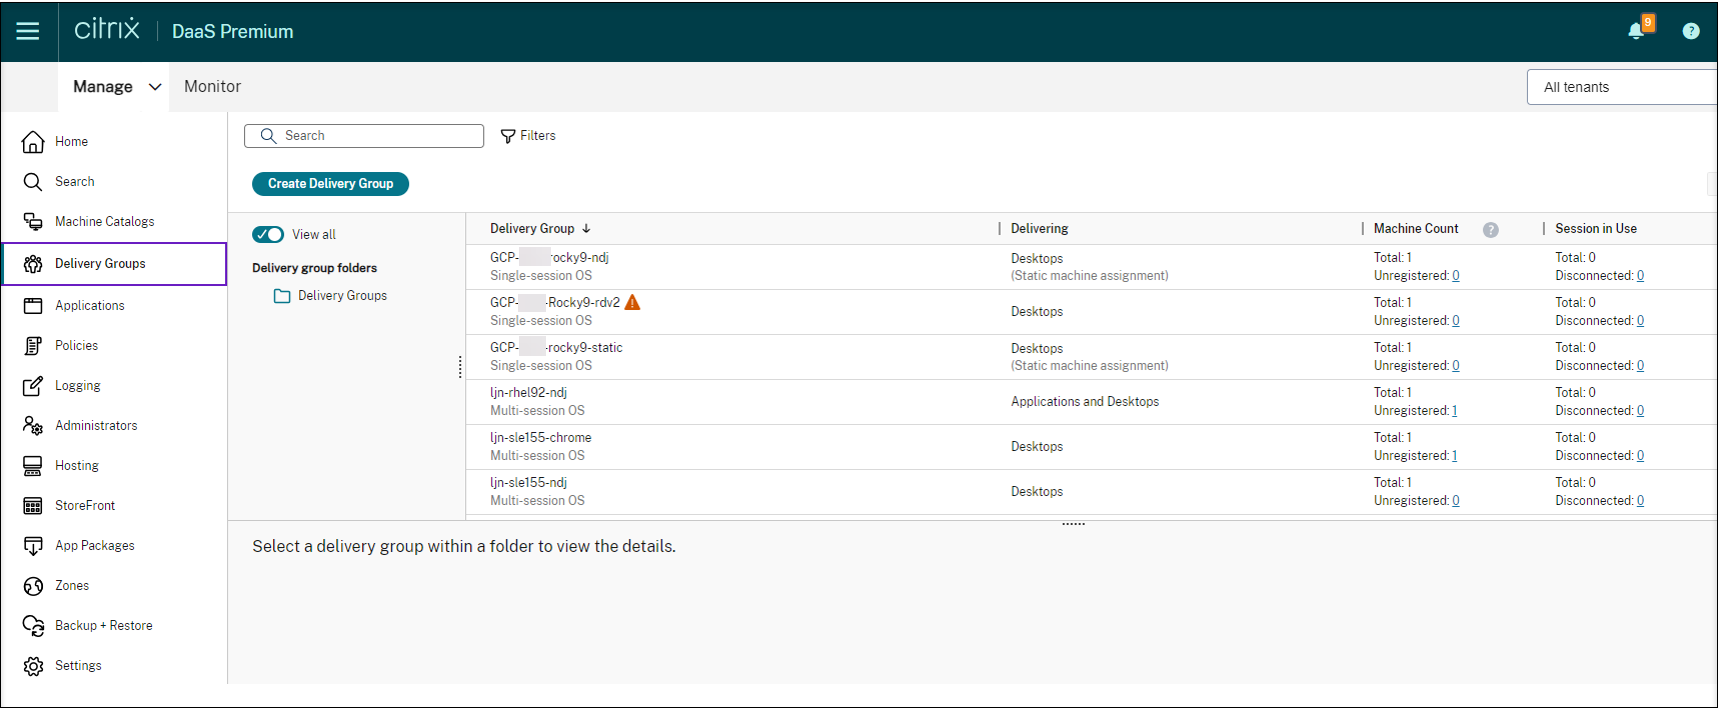
Step 6: Create a delivery group
A delivery group is a collection of machines selected from one or more machine catalogs. It specifies which users can use those machines, and the applications and desktops available to those users.
For more information, see delivery group creation in the Citrix DaaS documentation.
- Sign in to Citrix Cloud. In the upper left menu, select My Services > DaaS.
- From Manage > Full Configuration, select Delivery Groups in the left pane.
-
Select Create Delivery Group in the action bar. The delivery group creation wizard opens.
The wizard pages that you see might be different, depending on the selections you make.
-
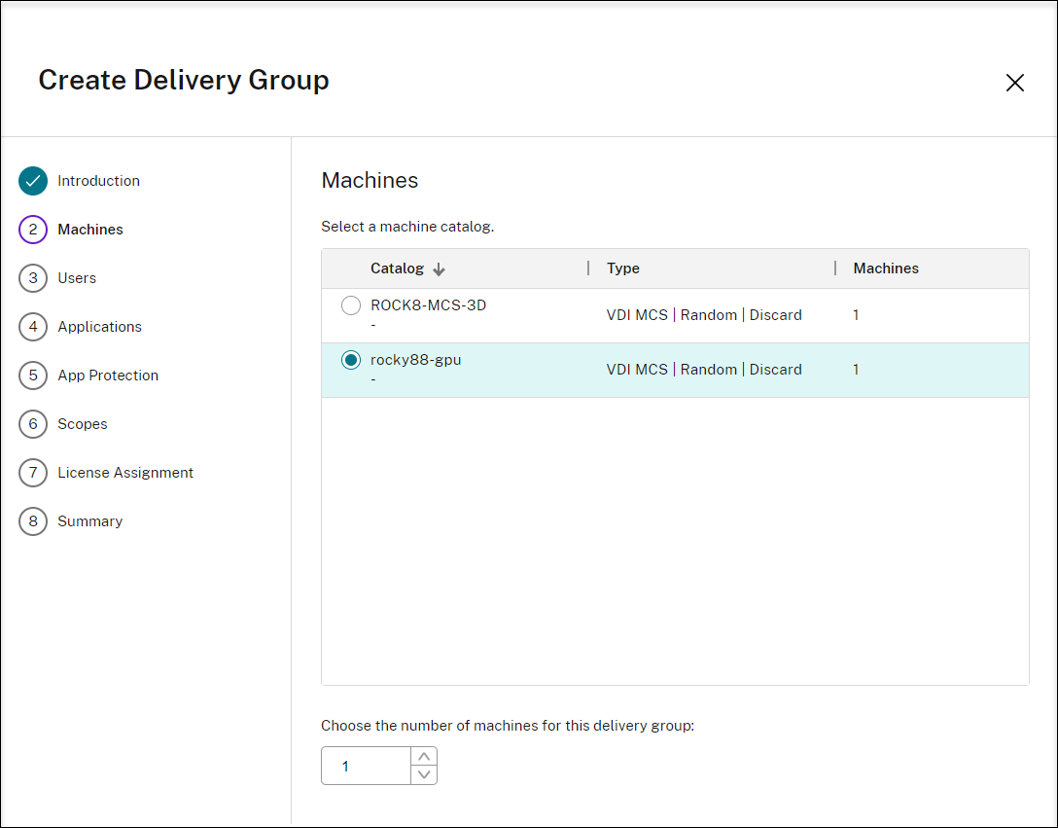
On the Machines page, select a machine catalog and select the number of machines you want to use from that catalog.
-
Configure additional settings on the other pages. For more information, see Create delivery groups.
-
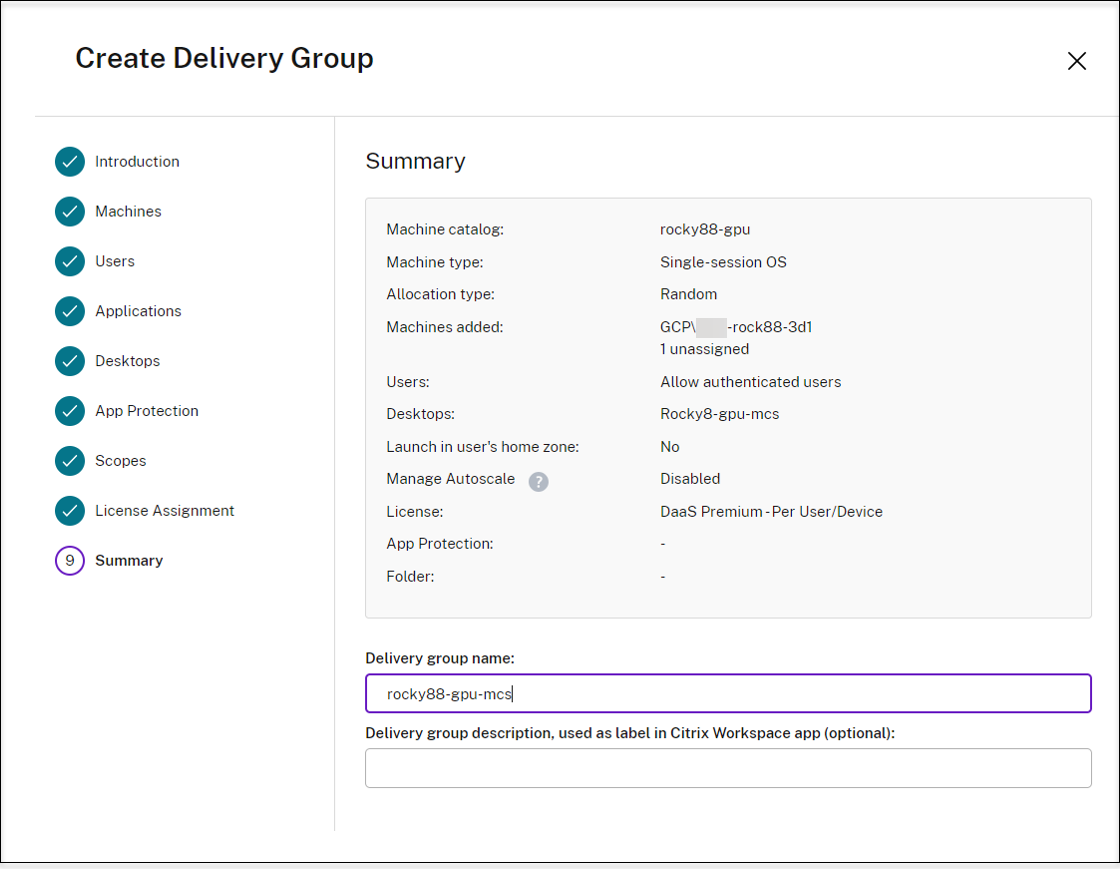
On the Summary page, enter a name for the delivery group. You can also (optionally) enter a description, which appears in Citrix Workspace™ app and in the Full Configuration management interface. For example:
Enter a name for the delivery group:
List of delivery groups in the Full Configuration management interface:
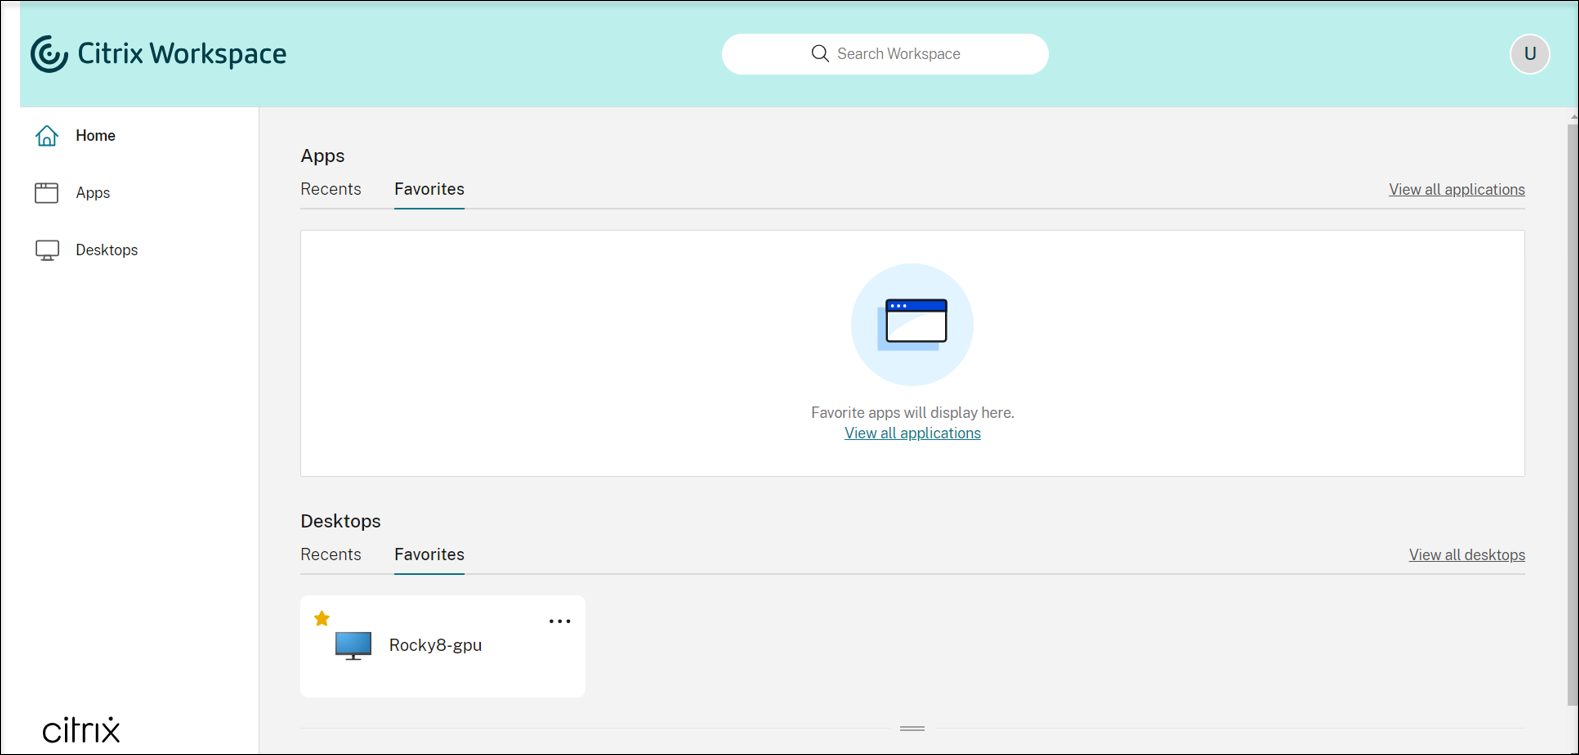
Delivered machine in Citrix Workspace app