Create Hybrid Azure AD joined catalogs
You can create a Hybrid Azure AD joined catalog using one of the following:
- The Citrix Virtual Desktops™ Setup Wizard in Citrix Provisioning Console.
- Studio UI or PowerShell commands.
This article describes how to create a Hybrid Azure AD joined catalog using the two different ways.
Note:
This article is applicable to both DaaS and Citrix Virtual Apps and Desktops™ customers.
Key Steps
- Set up a Hybrid Azure AD environment.
- Set up Citrix Provisioning™ server.
- Join your farm with Citrix Cloud or Citrix Virtual Apps™ and Desktops site: when using the Studio UI or PowerShell.
- Create a master target device.
- Run the Imaging Wizard to create a vDisk.
- Create a Hybrid Azure AD joined catalog.
Set up Hybrid Azure AD environment
Set up Hybrid Azure AD and enable Microsoft Entra Connect Sync on the Domain Controller. For information, see Configure Microsoft Entra hybrid join.
Set up Citrix Provisioning
To set up Citrix Provisioning, begin by configuring your provisioning server and other infrastructure. See Install Citrix Provisioning software components.
Join your farm with Citrix Cloud™ or Citrix Virtual Apps and Desktops site
If you want to create a Hybrid Azure AD joined catalog using the Studio UI or PowerShell, then run the Configuration Wizard to join the Citrix Provisioning servers in a farm to Citrix Cloud or Citrix Virtual Apps and Desktops site.
See Join Citrix Cloud or Citrix Virtual Apps and Desktops site.
Create a master target device
- Create a master target device.
- Run the command
dsregcmd /leaveto leave the master target device from Hybrid Azure AD joined.
Note:
For windows 11 master devices, add the following registry values to the registry key
HKLM\Software\AzureAD\VirtualDesktop:
- Value: Type [DWORD]: 1 for non-persistent VM and 2 for persistent VM
- Value: User [DWORD]: 1 for single session and 2 for multi-session
Run Imaging Wizard to create a vDisk
Use the Imaging Wizard to create the vDisk from the master target device. For more information, see Using the Imaging Wizard to create a virtual disk.
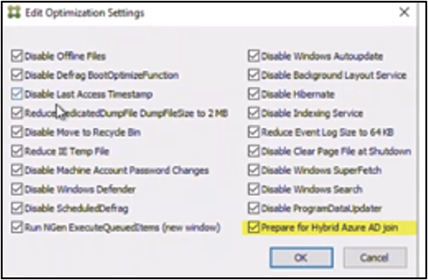
While running the Image Wizard to create a vDisk, select Prepare for Hybrid Azure AD join in the Edit Optimization Settings dialog if you want to create a Hybrid Azure AD joined catalog.
Create a Hybrid Azure AD joined catalog
You can create a Citrix Provisioning Hybrid Azure AD joined catalog using one of the following:
- The Citrix Virtual Desktops Setup Wizard in Citrix Provisioning Console.
- MCS provisioning (Studio UI or PowerShell commands).
Using Citrix Virtual Desktops Setup Wizard
- For information on how to create target devices using Citrix Virtual Desktops Setup Wizard, see Deploying virtual desktops to VMs using the Citrix Virtual Apps and Desktops Setup Wizard.
- After the target devices are created, see the Citrix Provisioning catalog on the Full configuration interface.
- Complete creating delivery groups.
- After approximately 90 minutes, locate the delivery group in the Delivery Group list, and check the Details tab. When the target devices complete Hybrid Azure AD join, the value of the Unregistered Machines must be zero.
Note:
The joining time can vary. However, the target devices must join within 90 minutes.
Using MCS provisioning
You can use the Studio UI or PowerShell commands to create a Citrix Provisioning Hybrid Azure AD joined catalog. If you use Studio provisioning, then target devices join Hybrid Azure AD immediately.
Currently, Azure, Vmware, and XenServer® hypervisors are supported.
For Citrix Virtual Apps and Desktops on-premises users, following are the upported versions:.
| Hypervisor | CVAD release required for Studio UI | CVAD release required for PowerShell | Supported Citrix Provisioning version |
|---|---|---|---|
| Azure | 2503 and later | 2311 and later | 2311 and later |
| VMware | 2503 and later | 2402 LTSR and later | 2402 LTSR and later |
| XenServer | NA | 2407 and later | 2407 and later |
Note:
Currently, in XenServer environments, you can create a Citrix Provisioning Hybrid Azure AD joined catalog using only PowerShell.
Using the Studio UI
For information on creating a machine catalog using the Studio UI interface, see Create a Citrix Provisioning catalog using the Citrix Studio interface.
On the Machine Identities page, select Hybrid Azure Active Directory joined.
Using PowerShell
Do the following steps to create the catalog using PowerShell commands:
- Create Hybrid Azure AD Identity Pool using
New-AcctIdentityPoolcommand.
Note:
When creating the identity pool, make sure the specified Domain and Organizational Unit (OU) are the same as the ones you created when setting up the Hybrid Azure AD environment.
- Create AD Accounts using the
New-AcctADAccountcommand. - Set
userCertificatefor AD Accounts usingSet-AcctAdAccountUserCertcommand. - Create a provisioning scheme using the
New-ProvSchemecommand. - Create a broker catalog using the
New-BrokerCatalogcommand. - You can add VMs to the catalog using Full Configuration interface > Machine Catalogs. Alternatively, you can use the PowerShell command
New-ProvVmNew-BrokerMachine.
Example: This is a sample script for the same enhancement used for Citrix Provisioning on Azure. For VMware and XenServer PowerShell commands, see Create a Citrix Provisioning catalog using PowerShell commands.
asnp citrix*
# General variable settings
$ipName = "ip-ex"
$domainPrefix = "abcdef"
$domainExtension = "com"
$ou = "mixxxx-haad"
$username = "username"
$password = "password"
# ProvScheme configurations
$provSchemeName = "haad-ex"
$hostingUnit = "hosting unit"
$resourceGroup= "mixxxx"
$machineProfile = "XDHyp:\HostingUnits\$hostingUnit\machineprofile.folder\$resourceGroup.resourcegroup\mixxxx -standard.templatespec\v1.templatespecversion"
$serviceOffering = "XDHyp:\HostingUnits\$hostingUnit\serviceoffering.folder\Standard_D2s_v3.serviceoffering"
$networkMapping = @{"0"=“XDHyp:\HostingUnits\$hostingUnit\virtualprivatecloud.folder\$resourceGroup.resourcegroup\mixxxx-vnet.virtualprivatecloud\default.network"}
# PVS settings
$pvsFarmName = "mixxxx-farm"
$pvsSiteName = "mixxxx-site"
$pvsDiskName = "pvs-vda-haad"
# Basic PVS objects
$pvsSite = Get-HypPvsSite -SiteName $pvsSiteName -FarmName $pvsFarmName
$vDisk = Get-HypPvsDiskInfo -SiteId $pvsSite.SiteId | ? { $_.DiskLocatorName -eq "$pvsDiskName" }
$customProperties = @"
<CustomProperties xmlns="http://schemas.citrix.com/2014/xd/machinecreation" xmlns:xsi="http://www.w3.org/2001/XMLSchema-instance">
<Property xsi:type="StringProperty" Name="PersistWBC" Value="True" />
<Property xsi:type="StringProperty" Name="ResourceGroups" Value="$resourceGroup" />
</CustomProperties>
"@
# 1. Create a IdentityPool
New-AcctIdentityPool `
  -IdentityPoolName $ipName `
  -IdentityType HybridAzureAD `
  -NamingScheme "$($provSchemeName)##" `
  -NamingSchemeType Numeric `
  -Domain "$domainPrefix.$domainExtension" `
  -OU "OU=$ou,DC=$domainPrefix,DC=$domainExtension"
# 2. Create ADAccounts
$password = ConvertTo-SecureString $password -AsPlainText -Force
New-AcctADAccount `
  -IdentityPoolName $ipName `
  -Count 1 `
  -StartCount 1 `
  -ADUserName $username `
  -ADPassword $password `
  -OutVariable result
# 3. Set ADAccount userCertificate
Set-AcctAdAccountUserCert `
  -IdentityPoolName $ipName `
  -ADUserName "$domainPrefix\$username" `
  -ADPassword $password `
  -All
# 4. Create a ProvScheme
$ps = New-ProvScheme -CleanOnBoot `
  -ProvisioningSchemeName $provSchemeName `
  -HostingUnitName $hostingUnit `
  -IdentityPoolName $ipName `
  -MachineProfile $machineProfile `
  -ServiceOffering $serviceOffering `
  -NetworkMapping $networkMapping `
  -PVSSite $pvsSite.SiteId `
  -PVSvDisk $vDisk.DiskLocatorId `
  -ProvisioningSchemeType PVS `
  -UseWriteBackCache -WriteBackCacheDiskSize 127 -WriteBackCacheMemorySize 256 `
  -CustomProperties $customProperties
# 5. Create a Broker Catalog
New-BrokerCatalog `
  -AllocationType Random `
  -Name $provSchemeName `
  -PersistUserChanges Discard `
  -ProvisioningType "MCS" `
  -SessionSupport SingleSession `
  -ProvisioningSchemeId $ps.ProvisioningSchemeUid
  <!--NeedCopy-->