Create machine catalogs
Collections of physical or virtual machines are managed as a single entity called a machine catalog. All the machines in a catalog have the same type of operating system: server or desktop. A catalog containing Server OS machines can contain either Windows or Linux machines, not both.
Studio guides you to create the first machine catalog after you create the Site. After you create the first catalog, Studio guides you to create the first Delivery Group. Later, you can change the catalog you created, and create more catalogs.
Overview
When you create a catalog of VMs, you specify how to provision those VMs. You can use Citrix® tools such as Machine Creation Services™ (MCS) or Provisioning Services (PVS). Or, you can use your own tools to provide machines.
- If you use PVS to create machines, see the Provisioning Services documentation for instructions.
- If you use MCS to provision VMs, you provide a master image (or snapshot) to create identical VMs in the catalog. Before you create the catalog, you first use hypervisor or cloud service tools to create and configure the master image. This process includes installing a Virtual Delivery Agent (VDA) on the image. Then you create the machine catalog in Studio. You select that image (or a snapshot of an image), specify the number of VMs to create in the catalog, and configure additional information.
- If your machines are already available (so you do not need master images), you must still create one or more machine catalogs for those machines.
When using MCS or PVS to create the first catalog, you use the host connection that you configured when you created the Site. Later (after you create your first catalog and Delivery Group), you can change information about that connection or create more connections.
After you complete the catalog creation wizard, tests run automatically to ensure that it is configured correctly. When the tests complete, you can view a test report. You can run the tests at any time from Studio.
For on-premises deployments only: When using MCS or PVS to create the first catalog, you use the host connection that you configured when you created the Site. Later (after you create your first catalog and Delivery Group), you can change information about that connection or create more connections.
If you are creating a catalog using the PowerShell SDK directly, you can specify a hypervisor template (VMTemplates), rather than an image or a snapshot.
VDA registration
A VDA must be registered with a Delivery Controller™ (for on-premises deployments) or Cloud Connector (for Citrix Cloud deployments) to be considered when launching brokered sessions. Unregistered VDAs can result in underutilization of otherwise available resources. There are a variety of reasons a VDA might not be registered, many of which an administrator can troubleshoot. Studio provides troubleshooting information in the catalog creation wizard, and after you add machines from a catalog to a Delivery Group.
In the catalog creation wizard, after you add existing machines, the list of computer account names indicates whether each machine is suitable for adding to the catalog. Hover over the icon next to each machine to display an informative message about that machine.
If the message identifies a problematic machine, you can either remove that machine (using the Remove button), or add the machine. For example, if a message indicates that information could not be obtained about a machine (perhaps because it had never registered), you might choose to add the machine anyway.
For messages about functional level, see VDA versions and functional levels.
For more information about VDA registration troubleshooting, see CTX136668.
MCS catalog creation summary
Here’s a brief overview of default MCS actions after you provide information in the catalog creation wizard.
- If you selected a master image (rather than a snapshot), MCS creates a snapshot.
- MCS creates a full copy of the snapshot and places the copy on each storage location defined in the host connection.
- MCS adds the machines to Active Directory, which creates unique identities.
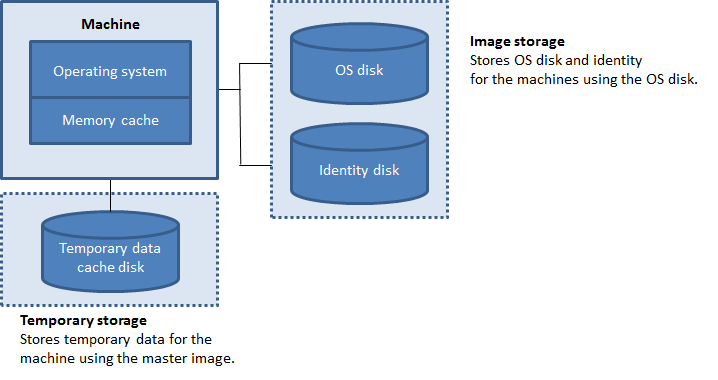
- MCS creates the number of VMs specified in the wizard, with two disks defined for each VM. In addition to the two disks per VM, a master is also stored in the same storage location. If you have multiple storage locations defined, each gets the following disk types:
- The full copy of the snapshot (noted above), which is read-only and shared across the just-created VMs.
- A unique 16 MB identity disk that gives each VM a unique identity. Each VM gets an identity disk.
- A unique difference disk to store writes made to the VM. This disk is thin provisioned (if supported by the host storage) and increases to the maximum size of the master image, if necessary. Each VM gets a difference disk. The difference disk holds changes made during sessions. It is permanent for dedicated desktops. For pooled desktops, it is deleted and a new one created after each restart.
Alternatively, when creating VMs to deliver static desktops, you can specify (on the Machines page of the catalog creation wizard) thick (full copy) VM clones. Full clones do not require retention of the master image on every data store. Each VM has its own file.
Prepare a master image on the hypervisor or cloud service
For information about creating connections to hypervisors and cloud providers, see Connections and resources.
The master image contains the operating system, non-virtualized applications, VDA, and other software.
Good to know:
- A master image might also be known as a clone image, golden image, base VM, or base image. Host vendors and cloud service providers may use different terms.
- When using PVS, you can use a master image or a physical computer as the master target device. PVS uses different terminology than MCS to refer to images; see the Provisioning Services documentation for details.
- Ensure that the hypervisor or cloud service has enough processors, memory, and storage to accommodate the number of machines created.
- Configure the correct amount of hard disk space needed for desktops and applications. That value cannot be changed later or in the machine catalog.
- Remote PC Access machine catalogs do not use master images.
- Microsoft KMS activation considerations when using MCS: If your deployment includes 7.x VDAs with a XenServer 6.1 or 6.2, vSphere, or Microsoft System Center Virtual Machine Manager host, you do not need to manually re-arm Microsoft Windows or Microsoft Office. If your deployment includes a 5.x VDA with a XenServer 6.0.2 host, see CTX128580.
- Install and configure the following software on the master image:
- Integration tools for your hypervisor (such as XenServer® Tools, Hyper-V Integration Services, or VMware tools). If you omit this step, applications and desktops might not function correctly.
- A VDA. Citrix recommends installing the latest version to allow access to the newest features. Failure to install a VDA on the master image causes the catalog creation to fail.
- Third-party tools as needed, such as anti-virus software or electronic software distribution agents. Configure services with settings that are appropriate for users and the machine type (such as updating features).
- Third-party applications that you are not virtualizing. Citrix recommends virtualizing applications. Virtualizing reduces costs by eliminating having to update the master image after adding or reconfiguring an application. Also, fewer installed applications reduce the size of the master image hard disks, which saves storage costs.
- App-V clients with the recommended settings, if you plan to publish App-V applications. The App-V client is available from Microsoft.
- When using MCS, if you localize Microsoft Windows, install the locales and language packs. During provisioning, when a snapshot is created, the provisioned VMs use the installed locales and language packs.
Important:
If you are using PVS or MCS, do not run Sysprep on master images.
To prepare a master image
- Using your hypervisor’s management tool, create a master image and then install the operating system, plus all service packs and updates. Specify the number of vCPUs. You can also specify the vCPU value if you create the machine catalog using PowerShell. You cannot specify the number of vCPUs when creating a catalog using Studio. Configure the amount of hard disk space needed for desktops and applications. That value cannot be changed later or in the catalog.
- Ensure that the hard disk is attached at device location 0. Most standard master image templates configure this location by default, but some custom templates might not.
- Install and configure the software listed above on the master image.
- When using PVS, create a VHD file for the vDisk from your master target device before you join the master target device to a domain. See the Provisioning Services documentation for details.
- If you are not using MCS, join the master image to the domain where applications and desktops are members. Ensure that the master image is available on the host where the machines are created. If you are using MCS, joining the master image to a domain is not required. The provisioned machines are joined to the domain specified in the catalog creation wizard.
- Citrix recommends that you create and name a snapshot of your master image so that it can be identified later. If you specify a master image rather than a snapshot when creating a catalog, Studio creates a snapshot, but you cannot name it.
Prepare a master image for GPU-capable machines on XenServer
When using XenServer for your hosting infrastructure, GPU-capable machines require a dedicated master image. Those VMs require video card drivers that support GPUs. Configure GPU-capable machines to allow the VM to operate with software that uses the GPU for operations.
- In XenCenter®, create a VM with standard VGA, networks, and vCPU.
- Update the VM configuration to enable GPU use (either Passthrough or vGPU).
- Install a supported operating system and enable RDP.
- Install XenServer Tools and NVIDIA drivers.
- Turn off the Virtual Network Computing (VNC) Admin Console to optimize performance, and then restart the VM.
- You are prompted to use RDP. Using RDP, install the VDA and then restart the VM.
- Optionally, create a snapshot for the VM as a baseline template for other GPU master images.
- Using RDP, install customer-specific applications that are configured in XenCenter and use GPU capabilities.
Create a machine catalog using Studio
Before starting the catalog creation wizard, review this section to learn about the choices you make and information you supply.
If you are using a master image, ensure that you have installed a VDA on the image before creating the catalog.
From Studio:
- If you already created a Site but haven’t yet created a machine catalog, Studio guides you to the correct starting place to create a catalog.
- If you already created a catalog and want to create another, select Machine Catalogs in the Studio navigation pane. Then select Create Machine Catalog in the Actions pane.
The wizard walks you through the items described below. The wizard pages you see may differ, depending on the selections you make.
Operating system
Each catalog contains machines of only one type:
- Server OS: A Server OS catalog provides hosted shared desktops and applications. The machines can be running supported versions of the Windows or Linux operating systems, but the catalog cannot contain both. (See the Linux VDA documentation for details about that OS.)
- Desktop OS: A Desktop OS catalog provides VDI desktops and applications that can be assigned to various different users.
- Remote PC Access: A Remote PC Access catalog provides users with remote access to their physical office desktop machines. Remote PC Access does not require a VPN to provide security.
Machine management
This page does not appear when you are creating Remote PC Access catalogs.
The Machine Management page indicates how machines are managed and which tool you use to deploy machines.
Choose whether or not machines in the catalog will be power managed through Studio.
- Machines are power managed through Studio or provisioned through a cloud environment, for example, VMs or blade PCs. This option is available only if you already configured a connection to a hypervisor or cloud service.
- Machines are not power managed through Studio, for example, physical machines.
If you indicated that machines are power managed through Studio or provisioned through a cloud environment, choose which tool to use to create VMs.
- Citrix Machine Creation Services (MCS): Uses a master image to create and manage virtual machines. Machine catalogs in cloud environments use MCS. MCS is not available for physical machines.
- Citrix Provisioning™ Services (PVS): Manages target devices as a device collection. A PVS vDisk imaged from a master target device delivers desktops and applications. This option is not available for cloud deployments.
- Other: A tool that manages machines already in the data center. Citrix recommends that you use Microsoft System Center Configuration Manager or another third-party application to ensure that the machines in the catalog are consistent.
Desktop types (desktop experience)
This page appears only when you are creating a catalog containing Desktop OS machines.
The Desktop Experience page determines what occurs each time a user logs on. Select one of:
- Users connect to a new (random) desktop each time they log on.
- Users connect to the same (static) desktop each time they log on.
If you choose to connect to a static desktop when logging in, the Device collection screen appears. When you establish this connection type, the catalog displays the Personal vDisk in the user data field under the machine type.
Master image
This page appears only when you are using MCS to create VMs.
Select the connection to the host hypervisor or cloud service, and then select the snapshot or VM created earlier. If you are creating the first catalog, the only available connection will be the one you configured when you created the Site.
Remember:
- When you are using MCS or PVS, do not run Sysprep on master images.
- If you specify a master image rather than a snapshot, Studio creates a snapshot, but you cannot name it.
To enable use of the latest product features, ensure the master image has the latest VDA version installed. Do not change the default minimum VDA selection. However, if you must use an earlier VDA version, see VDA versions and functional levels.
An error message appears if you select a snapshot or VM that is not compatible with the machine management technology you selected earlier in the wizard.
Cloud platform and service environments
When you are using a cloud service or platform to host VMs (such as Azure Resource Manager, Nutanix, or Amazon Web Services), the catalog creation wizard may contain additional pages specific to that host.
For details, see Where to find information about connection types.
Device Collection
This page appears only when using PVS to create VMs. It displays the device collections and the devices that have not already been added to catalogs.
Select the device collections to use. See the Provisioning Services documentation for details.
Machines
This page does not appear when you are creating Remote PC Access catalogs.
The title of this page depends on what you selected on the Machine Management page: Machines, Virtual Machines, or VMs and users.
When using MCS to create machines:
- Specify how many virtual machines to create.
- Choose the amount of memory (in MB) each VM will have.
- Important: Each created VM will have a hard disk. Its size is set in the master image; you cannot change the hard disk size in the catalog.
- If you indicated on the Desktop Experience page that user changes to static desktops should be saved on a separate Personal vDisk, specify the vDisk size in gigabytes and the drive letter.
- If your deployment contains more than one zone, you can select a zone for the catalog.
- If you are creating static desktop VMs, select a virtual machine copy mode. See Virtual machine copy mode.
- If you are creating random desktop VMs that do not use personal vDisks, you can configure a cache to be used for temporary data on each machine. See Configure cache for temporary data.
When using PVS to create machines:
The Devices page lists the machines in the device collection that you selected on the previous wizard page. You cannot add or remove machines on this page.
When using other tools to provide machines:
Add (or import a list of) Active Directory machine account names. You can change the Active Directory account name for a VM after you add/import it. If you specified static machines on the Desktop Experience wizard page, you can optionally specify the Active Directory user name for each VM you add.
After you add or import names, you can use the Remove button to delete names from the list, while you are still on this wizard page.
When using PVS or other tools (but not MCS):
An icon and tooltip for each machine added (or imported, or from a PVS device collection) help identify machines that might not be eligible to add to the catalog, or be unable to register with a Delivery Controller. For details, see VDA versions and functional levels.
Virtual machine copy mode
The copy mode you specify on the Machines page determines whether MCS creates thin (fast copy) or thick (full copy) clones from the master image. (Default = thin clones)
- Use fast copy clones for more efficient storage use and faster machine creation.
- Use full copy clones for better data recovery and migration support, with potentially reduced IOPS after the machines are created.
VDA versions and functional levels
A catalog’s functional level controls which product features are available to machines in the catalog. Using features introduced in new product versions may require a new VDA. Setting a functional level makes all features introduced in that version (and later, if the functional level does not change) available to machines in the catalog. However, machines in that catalog with an earlier VDA version will not be able to register.
A drop-down near the bottom of the Machines (or Devices) page allows you to select the minimum VDA level that will successfully register; this sets the catalog’s minimum functional level. By default, the most current functional level is selected for on-premises deployments. If you follow the Citrix recommendation to always install and upgrade VDAs and core components to the latest version, you don’t need to change this selection. However, if you must continue using older VDA versions, select the correct value.
A XenApp and XenDesktop release might not include a new VDA version, or the new VDA does not impact the functional level. In such cases, the functional level might indicate a VDA version that is earlier than the installed or upgraded components. For example, although XenApp and XenDesktop 7.15 LTSR contains a 7.15 VDA, the default functional level (“7.9 .or later”) remains the most current. Therefore, after installing or upgrading components from 7.9-7.14 to 7.15 LTSR, you do not need to change the default functional level.
In Citrix Cloud™ deployments, Studio uses a default functional level that can be earlier than the most current.
The selected functional level affects the list of machines above it. In the list, a tooltip next to each entry indicates whether the machine’s VDA is compatible with the catalog at that functional level.
Messages are posted on the page if the VDA on each machine does not meet or exceed the minimum functional level selected. You can continue with the wizard, but be aware that those machines will likely not be able to register with a Controller later. Alternatively, you can:
- Remove the machines containing older VDAs from the list, upgrade their VDAs and then add them back to the catalog.
- Choose a lower functional level; however, that will prevent access to the latest product features.
A message is also posted if a machine was not be added to the catalog because it is the wrong machine type. Examples include attempting to add a server to a Desktop OS catalog, or adding a Desktop OS machine originally created for random allocation to a catalog of static machines.
Configure cache for temporary data
Caching temporary data locally on the VM is optional. You can enable use of the temporary data cache on the machine when you use MCS to manage pooled (not dedicated) machines in a catalog. If the catalog uses a connection that specifies storage for temporary data, you can enable and configure the temporary data cache information when you create the catalog.
To enable the caching of temporary data, the VDA on each machine in the catalog must be minimum version 7.9.
You specify whether temporary data uses shared or local storage when you create the connection that the catalog uses; for details, see Connections and resources. Enabling and configuring the temporary cache in the catalog includes two check boxes and values: Memory allocated to cache (MB) and Disk cache size (GB). The default values differ according to the connection type. Generally, the default values are sufficient for most cases; however, take into account the space needed for:
- Temporary data files created by Windows itself, including the Windows page file.
- User profile data.
- ShareFile data that is synced to users’ sessions.
- Data that may be created or copied by a session user or any applications users may install inside the session.
Windows will not allow a session to use an amount of cache disk that is significantly larger than the amount of free space on the original master image from which machines in the machine catalog are provisioned. For example, there is no benefit specifying a 20 GB cache disk if there is only 10 GB of free space on the master image.
If you enable the Disk cache size check box, temporary data is initially written to the memory cache. When the memory cache reaches its configured limit (the Memory allocated to cache value), the oldest data is moved to the temporary data cache disk.
The memory cache is part of the total amount of memory on each machine; therefore, if you enable the Memory allocated to cache check box, consider increasing the total amount of memory on each machine.
If you clear the Memory allocated to cache check box and leave the Disk cache size check box enabled, temporary data is written directly to the cache disk, using a minimal amount of memory cache.
Changing the Disk cache size from its default value can affect performance. The size must match user requirements and the load placed on the machine.
Important:
If the disk cache runs out of space, the user’s session becomes unusable.
If you clear the Disk cache size check box, no cache disk will be created. In this case, specify a Memory allocated to cache value that is large enough to hold all of the temporary data; this is feasible only if large amounts of RAM are available for allocation to each VM.
If you clear both check boxes, temporary data is not cached; it is written to the difference disk (located in the OS storage) for each VM. (This is the provisioning action in releases earlier than 7.9.)
Do not enable caching if you intend to use this catalog to create AppDisks.
This feature is not available when using a Nutanix host connection.
You cannot change the cache values in a machine catalog after it is created.
Network Interface Cards (NICs)
This page does not appear when you are creating Remote PC Access catalogs.
If you plan to use multiple NICs, associate a virtual network with each card. For example, you can assign one card to access a specific secure network, and another card to access a more commonly-used network. You can also add or remove NICs from this page.
Machine accounts
This page appears only when creating Remote PC Access catalogs.
Specify the Active Directory machine accounts or Organizational Units (OUs) to add that correspond to users or user groups. Do not use a forward slash (/) in an OU name.
You can choose a previously-configured power management connection or elect not to use power management. If you want to use power management but a suitable connection hasn’t been configured yet, you can create that connection later and then edit the machine catalog to update the power management settings.
Computer accounts
This page appears only when using MCS to create VMs.
Each machine in the catalog must have a corresponding Active Directory computer account. Indicate whether to create new accounts or use existing accounts, and the location for those accounts.
- If you create new accounts, you must have access to a domain administrator account for the domain where the machines will reside.
Specify the account naming scheme for the machines that will be created, using hash marks to indicate where sequential numbers or letters will appear. Do not use a forward slash (/) in an OU name. A name cannot begin with a number. For example, a naming scheme of PC-Sales-## (with 0–9 selected) results in computer accounts named PC-Sales-01, PC-Sales-02 , PC-Sales-03, and so on.
- If you use existing accounts, either browse to the accounts or click Import and specify a .csv file containing account names. The imported file content must use the format:
[ADComputerAccount]
ADcomputeraccountname.domain
…
<!--NeedCopy-->
Ensure that there are enough accounts for all the machines you’re adding. Studio manages these accounts, so either allow Studio to reset the passwords for all the accounts or specify the account password, which must be the same for all accounts.
For catalogs containing physical machines or existing machines, select or import existing accounts and assign each machine to both an Active Directory computer account and to a user account.
For machines created with PVS, computer accounts for target devices are managed differently; see the Provisioning Services documentation.
Summary, name, and description
On the Summary page of the wizard, review the settings you specified. Enter a name and description for the catalog; this information appears in Studio.
After reviewing the information you specified, click Finish to start the catalog creation.
Troubleshoot
Citrix recommends collecting logs to help the Support team provide solutions. Use the following procedure to generate log files when using PVS:
-
On the master image, create the following registry key with the value of 1 (as a DWORD (32-bit) value):
HKLM\Software\Citrix\MachineIdentityServiceAgent\LOGGING -
Shut down the master image and create a new snapshot.
-
On the Delivery Controller, run the following command:
Set-ProvServiceConfigurationData -Name ImageManagementPrep_NoAutoShutdown -Value $True -
Create a new catalog based on that snapshot.
-
When the preparation VM is created on the hypervisor, log in and extract the following files from the root of C:\ drive:
- Image-prep.log
- PvsVmAgentLog.txt
-
Shut the machine down, at which point it reports the failure.
-
Run the following PowerShell command to re-enable auto shutdown of the Image Preparation machines:
Remove-ProvServiceConfigurationData -Name ImageManagementPrep_NoAutoShutdown